How to create a Windows Azure Storage Account
Overview
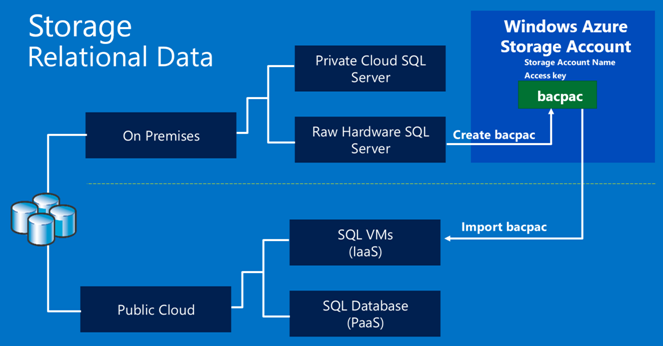
You will need a storage account to help you migrate an on-premises database to Windows Azure SQL Virtual Machine. It is needed to store the bacpac file. In another post of mine you will create the bacpac file, which represents a compressed format for your on-premises SQL Server database.
It is a logical backup (bacpac) file containing the schema definition and table data. Windows Azure storage is needed to store this file. This bacpac will then be imported into our Windows Azure SQL virtual machine (IaaS) in a future lab.
You will need to remember the Storage Account Name as well as the Access key so you can import the bacpac file.
High Level Options
Windows Azure Storage and the bacpac file
Objectives
In this hands-on lab, you will learn how to:
- Create a Storage Account so that you can store the bacpac file once it is exported
Prerequisites
The following is required to complete this hands-on lab:
- A Windows Azure subscription
Note: This lab is required for a future labs where the export and import of the bacpac file takes place. You will import the bacpac file into Windows Azure SQL Virtual Machine.
Setup
In order to execute the exercises in this hands-on lab you need to set up your environment.
- Start by logging into the Windows Azure Portal (https://manage.windowsazure.com).
A set of database-oriented posts
This post is part of a set of posts that go together:
- How to create a Windows Azure Storage Account
- How to Export an On-Premises SQL Server Database to Windows Azure Storage
- How to Migrate an On-Premises SQL Server 2012 Database to Windows Azure SQL Virtual Machine
- How to Migrate an On-Premises SQL Server 2012 Database to Windows Azure SQL Database
- Setting up an Azure Virtual Machine For Developers with Visual Studio 2013 Ultimate and SQL Server 2012 Express
Exercises
This hands-on lab includes the following exercises:
Getting Started: Creating an Windows Azure Storage Account
In this section, you will log into the Windows Azure Portal and create an Windows Azure Storage Account.
Task 1 – Getting Started: Creating an Windows Azure Storage Account
This lab plays an important role for 2 other labs. This lab is all about establishing a Storage Account. This Storage Account will be used to store a bacpac file. The bacpac file will be a compressed database file. We will create this file using an on premises SQL Server database.
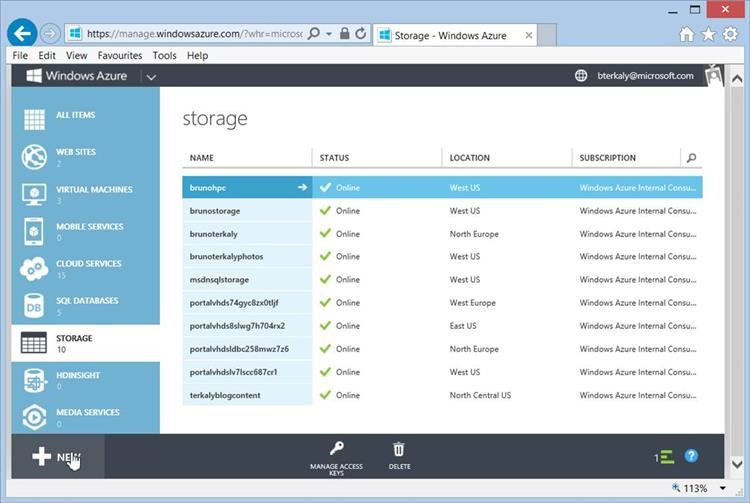
Login into the Windows Azure Portal. On the left menu pane, select Storage. In the lower left corner select +New to create a new Storage Account.
Creating a Storage Account
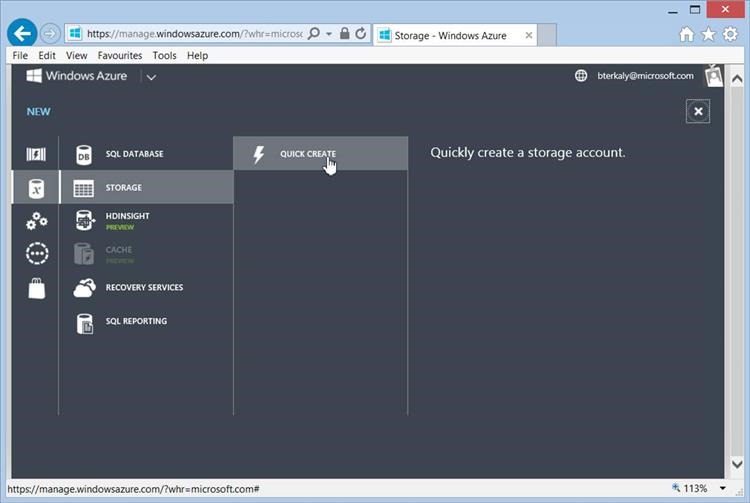
From the screen below, select Storage | Quick Create.
Using Quick Create
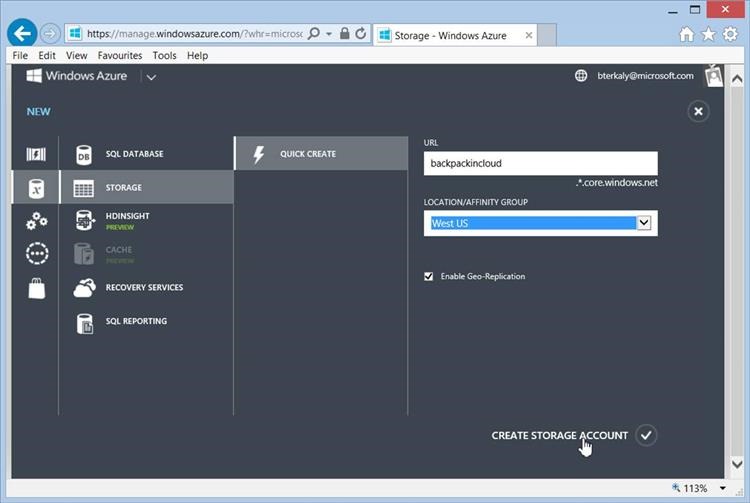
Storage accounts are publicly exposed REST endpoints. This means that content can be accessed with ordinary http access. Note that in the screen below we need to provide the first segment of the URL. Notice that we choose bacpackincloud. You will need to choose your own URL. Naturally, files can also be made private, accessible with only a security key. Each Storage Account can contain one or more containers. Inside of each container is where files can be placed. These files are also known as Blobs. In the next exercise we will export the on-premises database as a bacpac file as a blob, inside a container, inside a storage account. In summary, you will provide 2 things here: (1) URL; (2) Data Center Location. Finally, hit the Create Storage Account button on the lower right.
Providing Storage Account Details
It may take a few moments for the Storage Account to finish completion.
Waiting for the Storage Account to complete
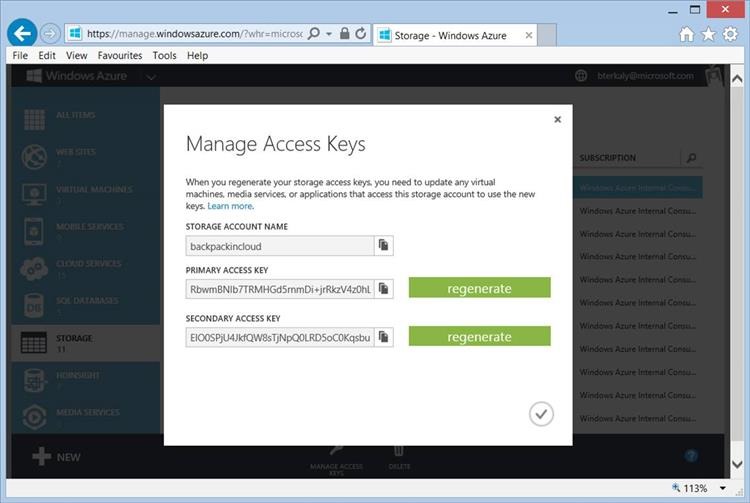
At the bottom of the screen you will see a button called, Manage Access Keys. You will then be provided a popup dialog box where you can choose to copy the management key to the clipboard. You will need the management key for a future step, so you may want to copy it to a text file somewhere for future reference. After you've copied it, click the checkmark to dismiss the dialog box.
Getting the Management Access Keys (Primary Access Keys)
Now that we've create a Storage Account, we have 2 vital pieces of information - the Account Storage Name and the Primary Access Key. You will need these pieces of data for future labs.
Summary
This lab laid the groundwork for you to upload a bacpac file, which will be used as a temporary or permanent storage location. The bacpac file will be used "re-hydrate" the on-premises database in Windows Azure SQL Virtual Machine .
