Setting up an Azure Virtual Machine For Developers with Visual Studio 2013 Ultimate and SQL Server 2012 Express
Overview
This next section is about getting set up with Azure Virtual Machine that includes Visual Studio 2013 Ultimate RC and SQL Server 2012 Express. This will be the starting point for other labs.
In this hands-on lab, you will explore the basic elements of setting up an Windows Azure Virtual Machine using the Windows Azure Gallery for Virtual Machines. Once a basic virtual machine has been setup, we will add SQL Server 2012 Express.
The goal is that you will have an equivalent infrastructure that a developer would need. You will have Visual Studio 2013 Ultimate RC and SQL Server 2012 Express that you can use to work with an existing MVC4 Sample application.
You can use this virtual machine instead of your own, in the event you don't have Visual Studio 2013 Ultimate RC.
Objectives
In this hands-on lab, you will learn how to:
- Create a Virtual Machine with Visual Studio 2013 Ultimate RC from the Windows Azure Management Portal
- Download and install SQL Server 2012 Express
Prerequisites
The following is required to complete this hands-on lab:
- A Windows Azure subscription
Setup
In order to execute the exercises in this hands-on lab you need to set up your environment.
- Start by logging into the Windows Azure Portal (https://manage.windowsazure.com).
A set of database-oriented posts
This post is part of a set of posts that go together:
- How to create a Windows Azure Storage Account
- How to Export an On-Premises SQL Server Database to Windows Azure Storage
- How to Migrate an On-Premises SQL Server 2012 Database to Windows Azure SQL Virtual Machine
- How to Migrate an On-Premises SQL Server 2012 Database to Windows Azure SQL Database
- Setting up an Azure Virtual Machine For Developers with Visual Studio 2013 Ultimate and SQL Server 2012 Express
Exercises
This hands-on lab includes the following exercises:
- Getting Started: Creating an Azure Virtual Machine using the Windows Azure Virtual Image Gallery
- Exercise 1: Downloading and installing SQL Server 2012 Express
Getting Started: Creating an Azure Virtual Machine using the Windows Azure Virtual Image Gallery
In this section, will connect to the virtual machine using Remote Desktop. You will configure SQL Server 2012 Express so that the Virtual Machine will have both Visual Studio 2013 Ultimate RC and SQL Server 2012 Express.
Task 1 – Creating an Azure Virtual Machine using the Windows Azure Virtual Image Gallery
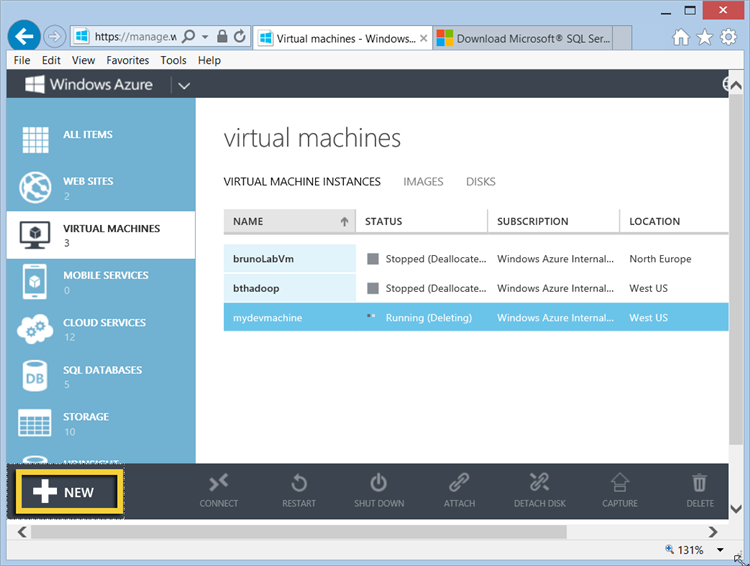
Go to the Windows Azure Management Portal and sign in using the Microsoft credentials associated with your subscription. On the left menu, select Virtual Machines.
Log on to the Windows Azure Management Portal
Click New on the command bar. It is in the lower left corner.
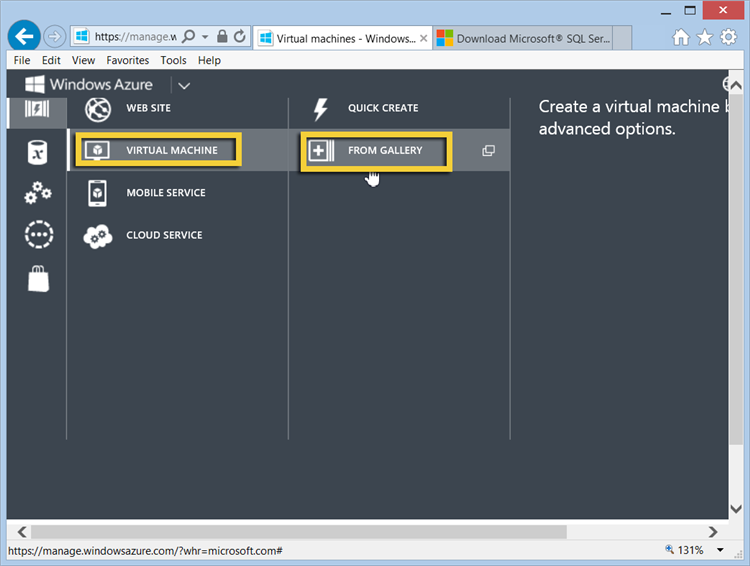
In the menu located at the bottom, select New | Compute | Virtual Machine | From Gallery to start creating a new virtual machine.
Creating a new Virtual Machine
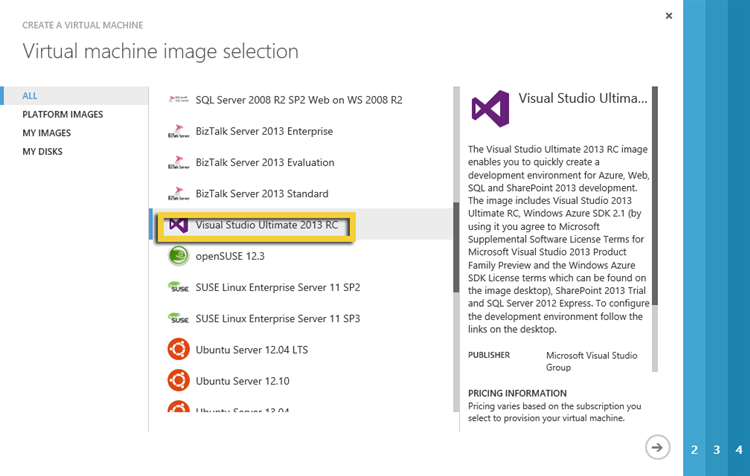
In the Virtual Machine image Selection page, click Platform Images on the left menu and select the Visual Studio Ultimate 2013 RC from the list. Click the arrow to continue.
Selecting Visual Studio 2013 Ultimate RC
The next arrow is located in the lower right corner of the portal screen.
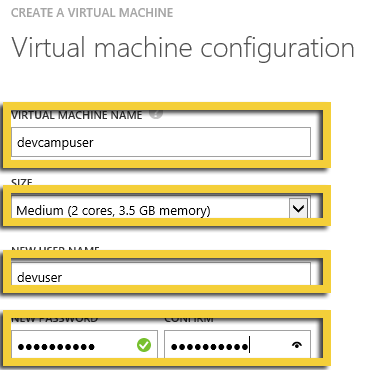
The wizard will start by having you specify a virtual machine name. You will also choose the machine size. Finally, you will need to know your user name and password for later, when you log into the machine with Remote Desktop.
Configuring the VM
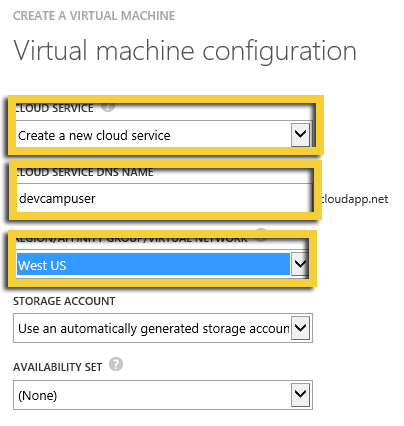
You will Create a new cloud service. You will also specify:
- Cloud Service DNS name (see note)
- Azure subscription to use for the VM (only appears if you have more than one subscription)
- Region (the data center to host your virtual machine)
Configuring the VM
Note: The URL used for the virtual machine corresponds to a DNS name and is subject to standard DNS naming rules. Moreover, the name is publicly visible and must therefore be unique. The portal ensures that the name is valid by verifying that the name complies with the naming rules and is currently available. A validation error will be shown if you enter a name that does not satisfy the rules.
Note: If you have more than one Windows Azure Subscription associated with your Microsoft Account, you will also need to choose which subscription you want the Virtual Machine to be created on.
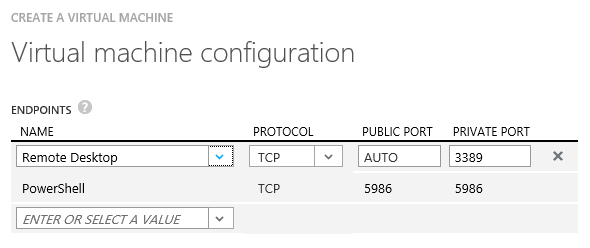
Once the virtual machines have been configured you will configure the public endpoints to allow connections from outside the Windows Azure data center. You will not need to change these values.
Endpoint Configuration
Validating that the virtual machine is running.
The virtual machine running
Exercise 1: Using Remote Desktop to connect to the Virtual Machine
In this section, you will log into the Windows Azure Portal and create an Azure Virtual Machine using the Windows Azure Gallery.
Task 1 – Configuring Visual Studio Ultimate 2013 RC and SQL Server 2012 Express
You will now connect to the Virtual Machine and configure it to run both Visual Studio 2013 Ultimate RC and SQL Server 2012 Express.
You will also download and install software, such as SQL Server 2012 Express Management Studio.
You will select the Virtual Machine you just created by clicking on the text, Running at the Windows Azure Portal's Virtual Machine section. It will be the VM just created in Task 1.
Click the Connect button in the bottom left menu bar.
The connect button
You will be asked to download the remote desktop settings file. Click Open and log on using the credentials you defined when creating the Virtual Machine.
Remoting into the virtual machine
Once the login is complete and the desktop appears, on the left side click on the shortcut Configure Development.
Configuring Development
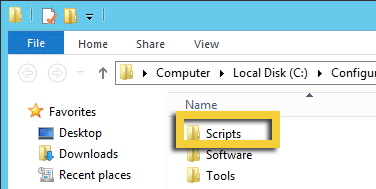
The ConfigureDeveloperDesktop folder will open up. Click and navigate into the Scripts folder.
Getting to the scripts folder
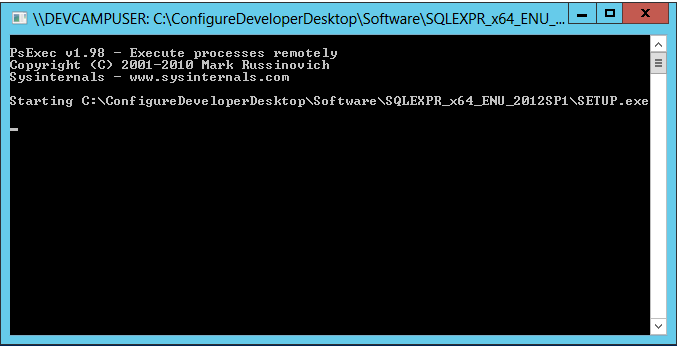
Right mouse click on ConfigureSQLExpress and choose Run with Powershell.
Configuring SQL Express
This process can take 5 to 15 minutes to complete. At the end, Visual Studio 2013 Ultimate RC will appear.
Waiting for the configuration to complete
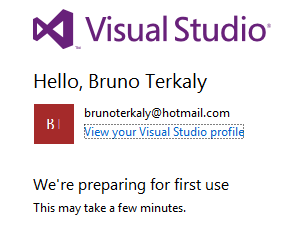
You will be asked to login with your Live ID once Visual Studio appears.
Logging into Visual Studio
Select the View | Server Explorer menu from Visual Studio.
Viewing Server Explorer
Note: The purpose of this section is to verify SQL Express is properly configured.
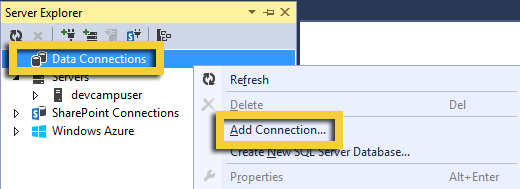
Right mouse click on Data Connections and choose Add Connection.
Connecting to SQL Express
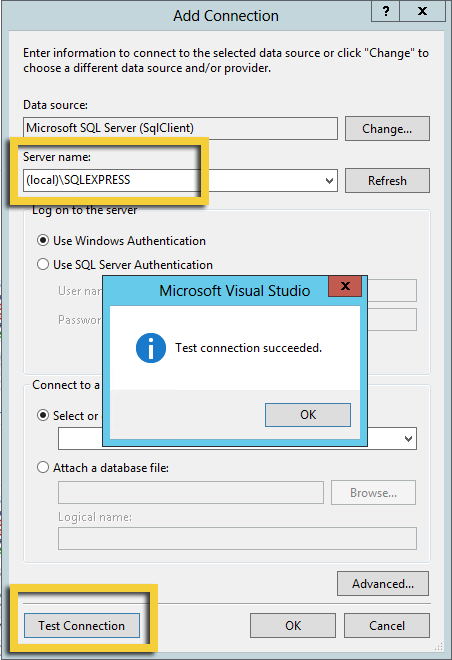
In the Server Name name text box, type in (local)\SQLEXPRESS. The purpose is to
Verifying connectivity to SQLEXPRESS
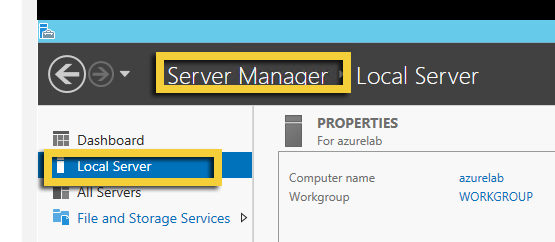
In order to enable downloads from Internet Explorer you will need to update Internet Explorer Enhanced Security Configuration. In the Azure Virtual Machine, open Server Manager from Start | Administrative Tools | Server Manager.
Configuring IE ESC
In the Server Manager, click Configure IE ESC within Security Information section.
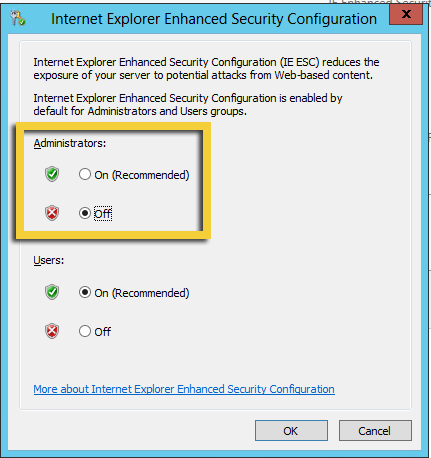
In the Internet explorer Enhanced Security configuration, turn off the enhanced security for Administrators and click OK.
Internet Explorer Enhanced Security
Note: Modifying Internet Explorer Enhanced Security configurations is not good practice and is only for the purpose of this particular lab. The correct approach should be to download the files locally and then copy them to a shared folder or directly to the Virtual Machine.
For Administrators, turn the configuration to Off.
Shutting configuration off
Task 2 – Configuring the browser to allow downloads and installation
The next section if for downloading and installing SQL Setup 2012 Express Management Studio. To be able to download and install this software, you will to change the security settings in Internet Explorer.
Start Internet Explorer. Right mouse click in the title bar area and choose Menu bar. This enable the menus within the browser.
Enabling the menu in Internet Explorer
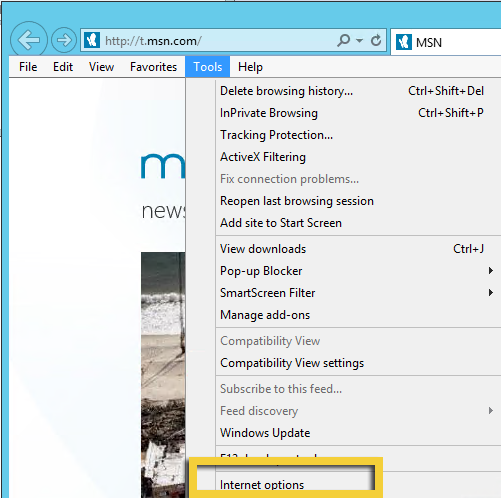
From the menu, choose Tools | Internet Options.
Bringing up the Internet Explorer Dialog Box
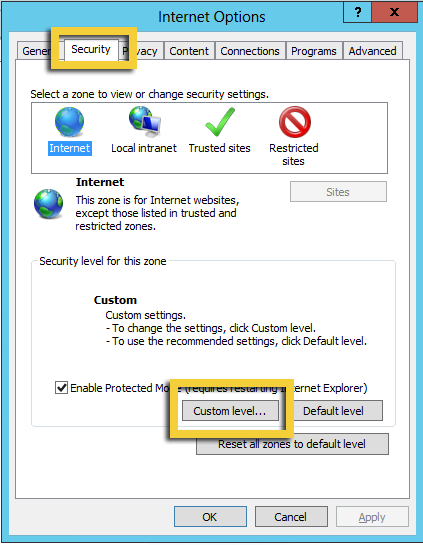
Select the Security tab.
Modifying Internet Explorer security settings
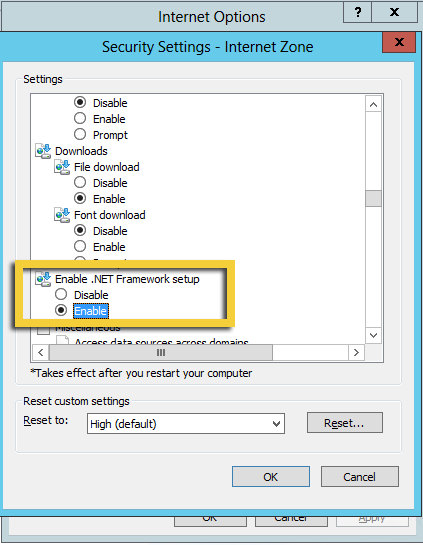
Scroll down to the Downloads section and Enable .NET Framework setup.
Enabling .NET Framework setup
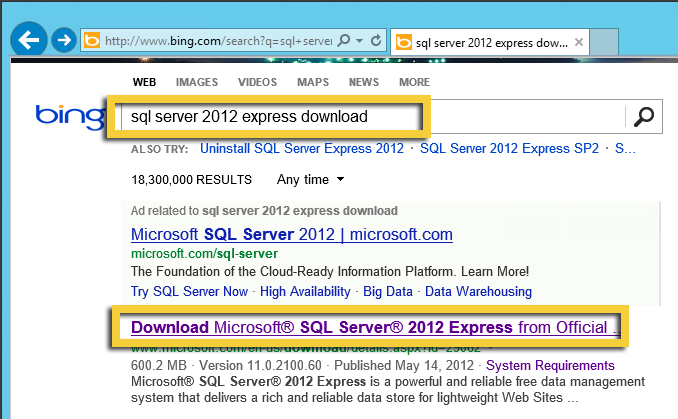
You will now prepare to download SQL Server 2012 Express tooling. Use Internet Explorer to navigate to bing.com. Type in SQL Server 2012 Express download. Click the official download link.
Finding SQL Server 2012 Express download
Click Download from the web page. There will be several options.
Downloading SQL Server 2012 Express
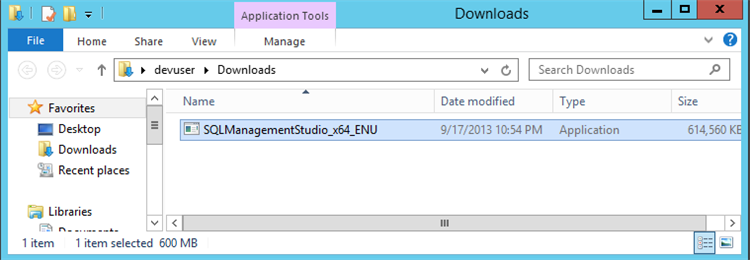
A download windown will appear at the bottom of Internet Explorer. Select Save As. The file SQLManagementStudio_x64_ENU.exe will be downloaded to the Downloads folder.
Downloading SQL Management Studio_x64_ENU.exe
Navigate to the Downloads folder. Double-click on SQLManagementStudio_x64_ENU.exe to begin the installation process.
Navigating to the Downloads folder. Installing SQL Server 2012 Express Management Studio
You select New SQL Server stand-alone installation or add features to an existing installation
Adding features to an existing installation
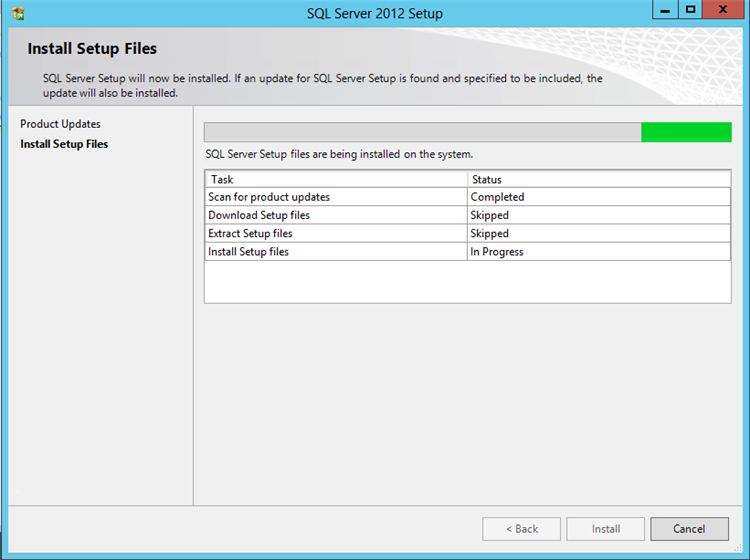
Wait as setup files are installed.
Setting up dialog box
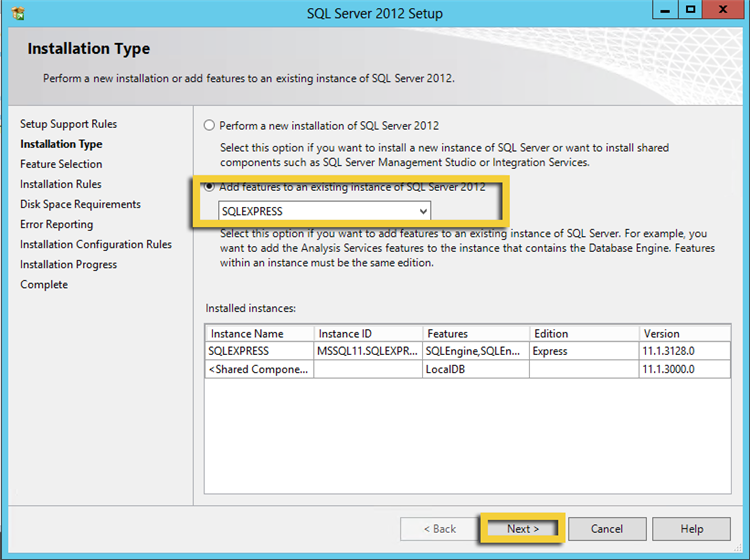
Select Add features to an existing instance of SQL Server 2012. Then click Next.
Adding features to an existing installation
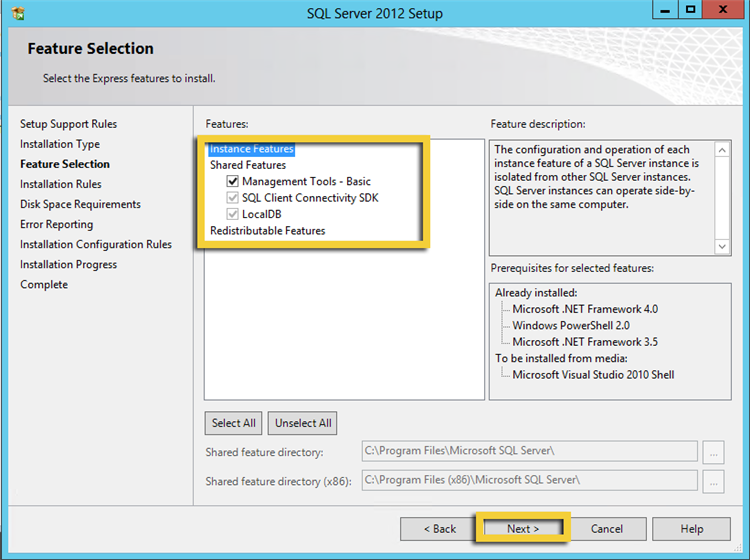
In the checkboxes below, select Management Tools - Basic
Installing the Management Tools
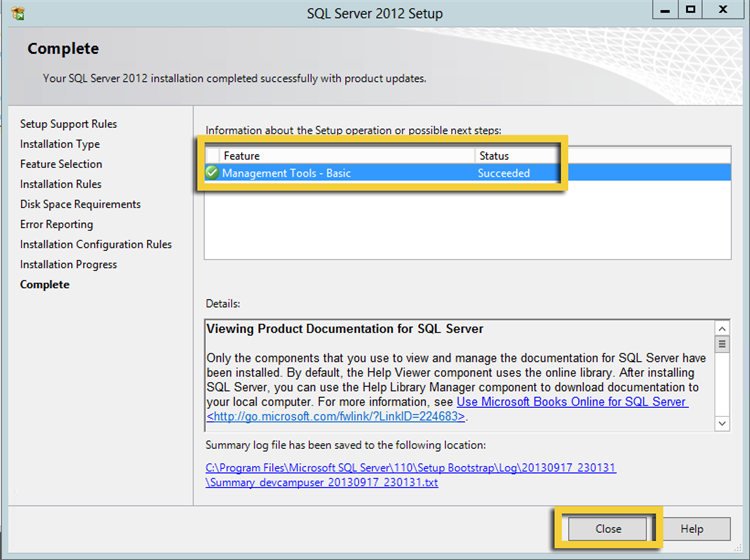
Wait a few minutes. The Complete dialog box should appear.
A successful installation
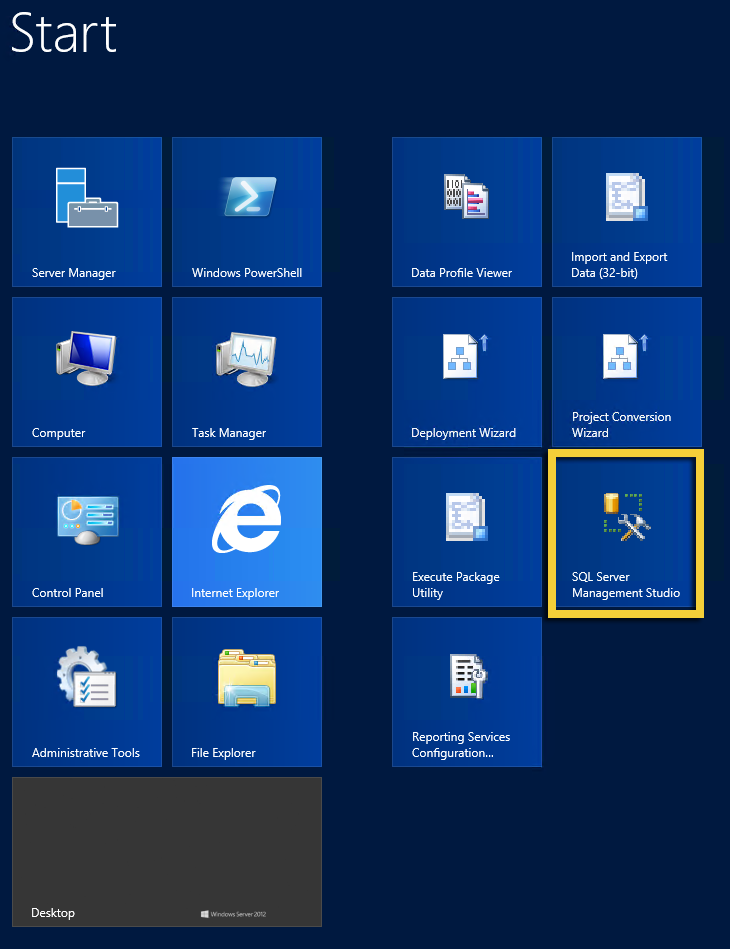
Now that you have successfully installed SQL Server 2012 Express Management Studio, you should be able to select it from the Start screen.
Navigating to the start screen
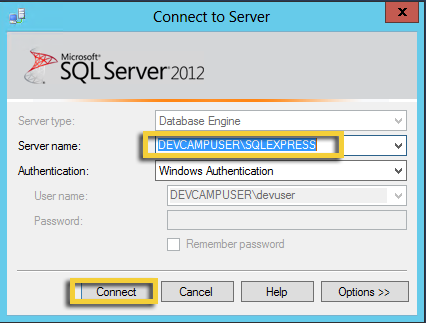
The final step is to verify that we can connect to (local)\SQLEXPRESS. This final step concludes this lab and verifies that we now have a development machine with Visual Studio 2013 Ultimate RC and SQL Server 2012 Express.
Final verification of success
Summary
In this hands-on lab, you will learned how to provision a virtual machine that can be used for development purposes. The virtual machine contains SQL Server 2012 Express and Visual Studio 2013 Ultimate RC.
