How to Install Hadoop on a Linux-based Windows Azure Virtual Machine
Introduction
The purpose of this blog is to create a very cost effective single-node, Hadoop cluster for testing and development purposes. This allows you to test and develop without needing to provision a large, expensive cluster. Once some testing and development is complete, it then makes sense to move to a product like HDInsight, which is a high-end service offered by Microsoft to greatly simplify the provisioning of a Hadoop cluster and the execution Hadoop jobs.
The developer who is creating algorithms for the first time typically works with test data just to experiment with logic and code. Once most of the issues have been resolved, then it makes sense to go to a full-blown cluster scenario.
Special Thanks to Lance for much of the guidance here: https://lancegatlin.org/tech/centos-6-install-hadoop-from-cloudera-cdh
I've added some extra steps for Java 1.6 to clarify Java setup issues.
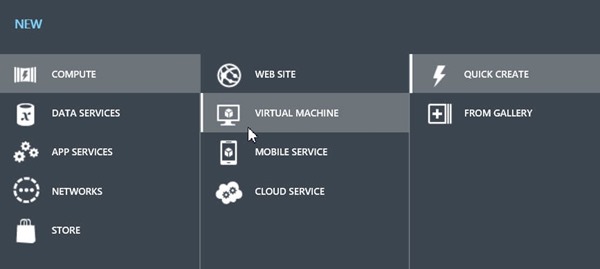
Creating a new virtual machine The assumption is that you have a valid Azure account. You can create a single node Hadoop cluster using a virtual machine.
Choose quick create Next, you will choose a specific flavor of Linux, called CentOS.
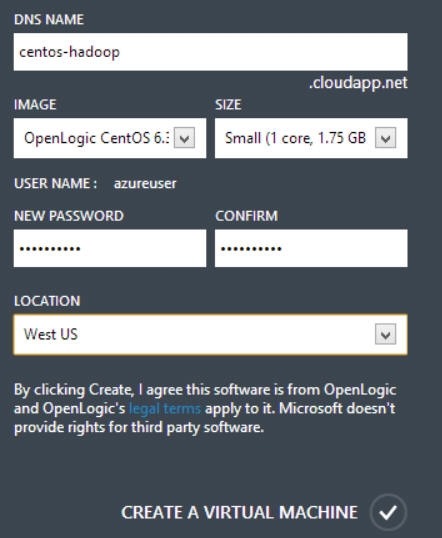
Specify details Notice that we need to provide a DNS name. This will need to be globally unique. we will also specify the image type to be OpenLogic CentOS. A small core will work just fine. Finally provide a password and a location closest to you.
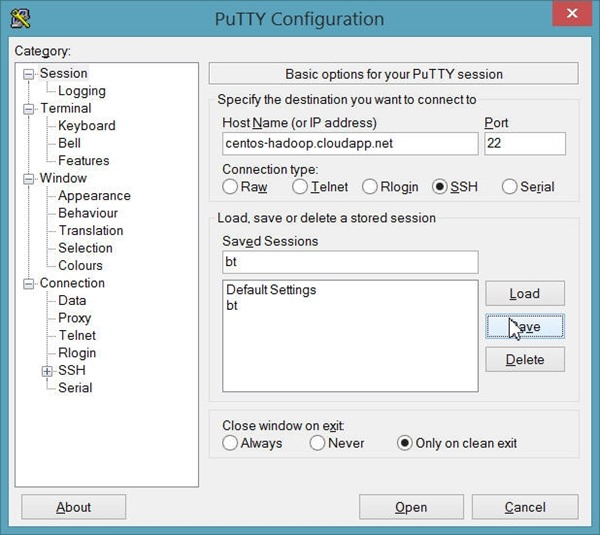
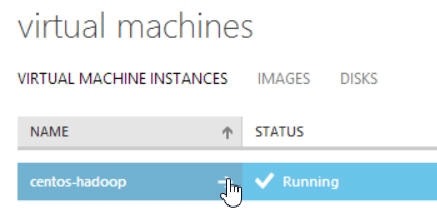
Click on the virtual machine so we can get it's url, which will be needed to connect to it. Then select DASHBOARD. You can see, that in my case, the DNS for my server is centos-hadoop.cloudapp.net. You can remote in from Putty.
Now we are read to log into the VM to setup it up.
Start by downloading Putty.
 |
Click open and now you are allowed to login into the remote linux machine.
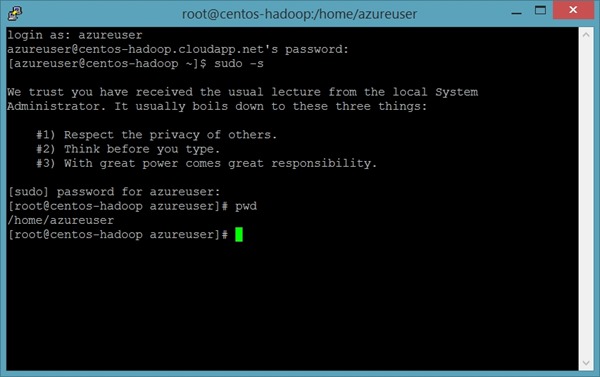
Login with the command to be the mighty and powerful "root" user.
| 1 | sudo -s |
You will need to get version 6u26. It used to be easy but Oracle has made it difficult. wget allows you to download a binary file to the local Virtual Machine (VM).
| 1 | wget http://[some location from oracle]/jdk-6u26-linux-x64-rpm.bin |
chmod makes the binary executable. Line 3 actually executes the binary file to install java.
| 123 | #Once downloaded, you can install Java:chmod +x jdk-6u26-linux-x64-rpm.bin./jdk-6u26-linux-x64-rpm.bin |
We will need to create a file that will set the proper Java environment variables.
| 1 | vim /etc/profile.d/java.sh |
This should be the contents of java.sh
| 12345 | export JRE_HOME=/usr/java/jdk1.6.0_26/jreexport PATH=$PATH:$JRE_HOME/binexport JAVA_HOME=/usr/java/jdk1.6.0_26export JAVA_PATH=$JAVA_HOMEexport PATH=$PATH:$JAVA_HOME/bin |
You will probably need to go back to the Windows Azure Portal to do a proper reboot.
| 1 | reboot |
Now that Java is configured, let's turn our attention to Hadoop.
Cloudera offer some binaries that we can work with. the following commands download Hadoop and then install it.
The following code gets the hadoop code from cloudera.
| 12 | #Download binaries to install hadoopsudo wget -O /etc/yum.repos.d/cloudera-cdh4.repo http://archive.cloudera.com/cdh4/redhat/6/x86_64/cdh/cloudera-cdh4.repo |
yum install is how the installation works best on CentOS.
| 12 | #Perform the installsudo yum install hadoop-0.20-conf-pseudo |
The NameNode is the centerpiece of an HDFS file system. It keeps the directory tree of all files in the file system, and tracks where across the cluster the file data is kept. It does not store the data of these files itself.
Client applications talk to the NameNode whenever they wish to locate a file, or when they want to add/copy/move/delete a file. The NameNode responds the successful requests by returning a list of relevant DataNode servers where the data lives.
| 12 | #Format the name nodesudo -u hdfs hdfs namenode -format |
A DataNode stores data in the [HadoopFileSystem]. A functional filesystem has more than one DataNode, with data replicated across them.
On startup, a DataNode connects to the NameNode; spinning until that service comes up. It then responds to requests from the NameNode for filesystem operations.
| 1234 | # Start the namenode and data node servicessudo service hadoop-hdfs-namenode startsudo service hadoop-hdfs-secondarynamenode startsudo service hadoop-hdfs-datanode start |
This ensures that hadoop starts up with the OS.
| 1234 | #Make sure that they will start on bootsudo chkconfig hadoop-hdfs-namenode onsudo chkconfig hadoop-hdfs-secondarynamenode onsudo chkconfig hadoop-hdfs-datanode on |
Create some directories with the proper permissions.xxx
| 1234 | #Create some directoriessudo -u hdfs hadoop fs -mkdir /tmpsudo -u hdfs hadoop fs -chmod -R 1777 /tmpsudo -u hdfs hadoop fs -mkdir /user |
Map Reduce needs some local directories for processing data.
| 1234 | #Create directories for map reducesudo -u hdfs hadoop fs -mkdir -p /var/lib/hadoop-hdfs/cache/mapred/mapred/stagingsudo -u hdfs hadoop fs -chmod 1777 /var/lib/hadoop-hdfs/cache/mapred/mapred/stagingsudo -u hdfs hadoop fs -chown -R mapred /var/lib/hadoop-hdfs/cache/mapred |
Jobs and Tasks are fundamental services to hadoop and need starting.
| 123 | #Start map reduce servicessudo service hadoop-0.20-mapreduce-jobtracker startsudo service hadoop-0.20-mapreduce-tasktracker start |
Make sure jobs and tasks are available on boot up with the OS.
| 123 | #Start map reduce on bootsudo chkconfig hadoop-0.20-mapreduce-jobtracker onsudo chkconfig hadoop-0.20-mapreduce-tasktracker on |
Some directories for the hadoop user running jobs.
| 123 | #Create some home folderssudo -u hdfs hadoop fs -mkdir /user/$USERsudo -u hdfs hadoop fs -chown $USER /user/$USER |
Create a shell script that executes on boot. It will setup the propery environment variables needed by Hadoop.
| 12 | #Export hadoop home folders. Or use "nano" as your editor.vi /etc/profile.d/hadoop.sh |
Make sure hadoop.sh looks like this..
| 12 | #Create hadoop.sh and add this line to hadoop.shexport HADOOP_HOME=/usr/lib/hadoop |
Source runs hadoop.sh with requiring a reboot. The variables are now available for use.
| 12 | #Load into sessionsource /etc/profile.d/hadoop.sh |
Some hadoop commands to test things out. Line 4 actually runs a PI estimation algorithm. The JAR file got installed with Hadoop previously.
| 1234 | #First test to make sure hadoop is loadedsudo -u hdfs hadoop fs -ls -R /#Lets run a hadoop job to validate everything, we will estimate PIsudo -u hdfs hadoop jar /usr/lib/hadoop-0.20-mapreduce/hadoop-examples.jar pi 10 1000 |
Conclusion
You can now start and shutdown your Azure Virtual Machine as needed. There is no need to accrue expensive charges for keeping your single-node hadoop cluster up and running.
The portal offers a shutdown and start command so you only pay for what you use. I’ve even figured out how to install HIVE and a few other Hadoop tools. Happy big data coding!

