How To Take Photographs From Windows 8 Applications And Automatically Upload Them To The Cloud–Part 5 of 6
Deploying to a Microsoft Data Center
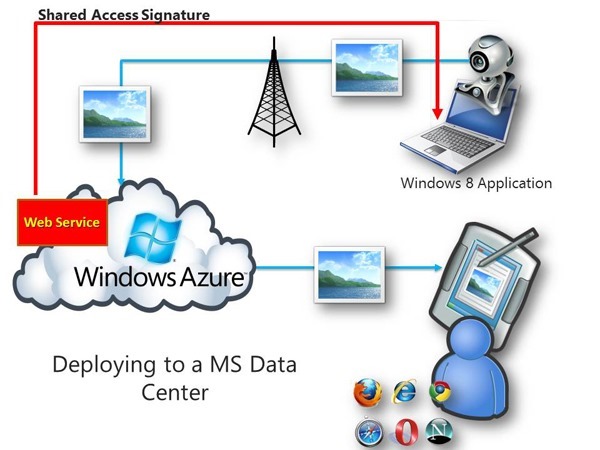
- This is an exciting section.
- I'm going to guide you step by step in getting our web service up into a fully redundant cluster of IIS and hosted web roles.
- I will show you how to deploy three instances of our service, All of them automatically load balanced and updateable without down time.
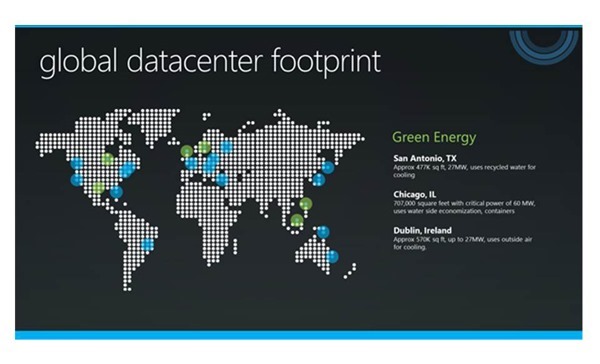
- We will tap into a giant globally dispersed mega Data Centers.
- We will use the portal to set this all up.
- We will create a hosted service.
- We will create a storage account.
- We will deploy through the portal.
- Windows Azure is the Microsoft public cloud platform, offering the biggest global reach and the most comprehensive service backend.
- It supports the use of multiple OS, language, database and tool, providing automatic OS and service patching.
- The network infrastructure behind it offers automatic load balancing and resiliency to hardware failure.
- Last, but not least, it supports a deployment model that enables developers to upgrade applications without downtime.
Two things to accomplish at the Portal
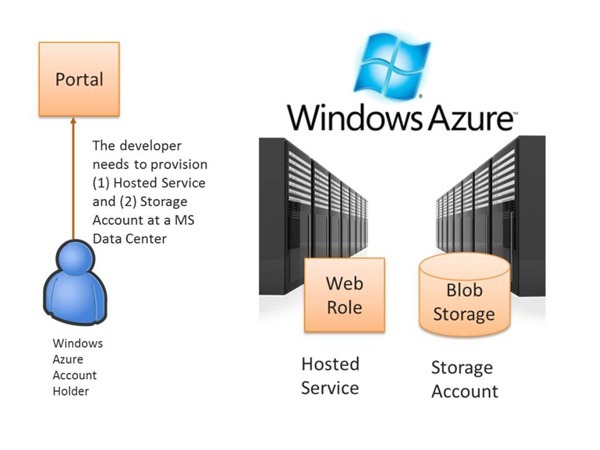
- We will need to create both a hosted account and a storage account at the portal.
- If we want to store our photos in a Microsoft Data Center to make them available to the world, we will need a storage account.
- Once again, this can be done at the portal.
- If you don't have an account, here is how to get a trial account. It is FREE for 90 days.
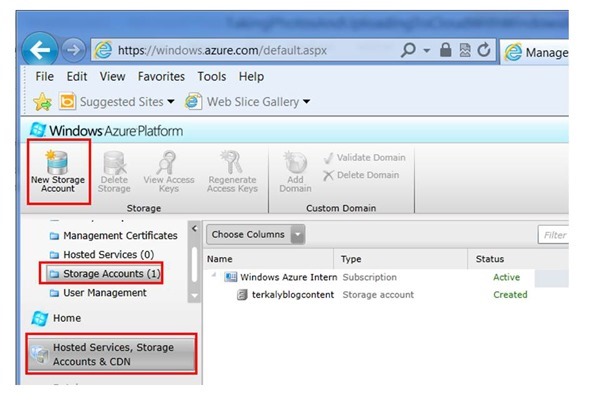
- Once you have signed up to the Azure Portal, Login into the Azure Portal.
- Follow the red boxes to navigate to Storage Accounts
- Click New Storage Account. Specify a globally unique URL.
Defining the URL and choosing the region for our Storage Account
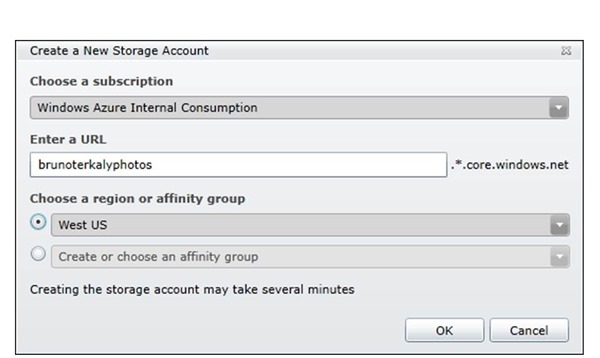
- We will need to paste this URL into our Windows 8 Application.
- You also need to choose from among several global data centers.
- Notice I chose West US.
- You could also replicate and route requests between data centers
- Click OK
Successful creation of storage account
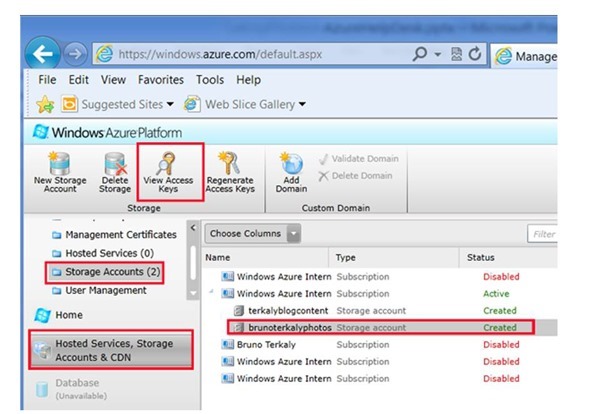
- At this point the storage account has been created successfully.
- The next step is to view the access keys.
- We will need to paste in the Access Keys into our ASP.NET MVC Web API application.
- Think of Access Keys being the password for the web service to be able to generate a Shared Access Signature.
- After all, it wouldn't make sense for just any Web Service to be able to grant Shared Access Signatures on a the Azure Storage Service.
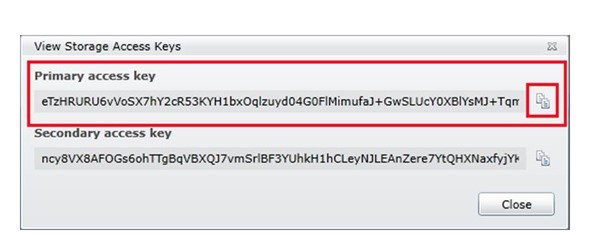
- Take special note of the Access keys
- At this point the storage account has been created successfully.
- The next step is to view the access keys.
- We will need to paste in the Access Keys into our ASP.NET MVC Web API application.
- You will need to copy the access key to the clipboard so that you can paste it into our Web Service project.
- Essentially, we have the two things we need for our web service
- , the name of the storage account
- brunoterkalyphotos
- the access key
- eTzHRURU3552j345kl3j4hY2cR53KYH1bxOqlzuyd04G0FlMimufaJ+Gw23fdgjasdgg==
- , the name of the storage account
- Return back to Visual Studio and the Web Service project.
- In Solution Explorer, double-click on Web.config.
- Just under the <AppSetttings> section, add the following DataConnectionString (lines 31 to 33)
| Web.config | |
| 1 2 3 4 5 6 7 8 9 10 11 12 13 14 15 16 17 18 19 20 21 22 23 24 25 26 27 28 29 30 31 32 33 34 35 36 37 38 39 40 41 42 43 44 45 46 47 48 49 50 51 52 53 54 55 56 57 58 59 60 61 62 63 64 65 66 67 68 69 70 71 72 73 74 75 76 77 78 79 80 81 82 83 84 85 86 87 88 89 90 91 92 93 94 95 96 97 98 99 100 101 102 103 104 105 106 107 108 109 110 111 112 113 114 115 116 117 118 119 120 121 122 123 124 125 126 127 128 129 130 131 132 133 134 135 136 137 138 139 140 141 142 143 144 145 146 147 148 149 150 151 152 | <?xml version="1.0" encoding="utf-8"?> <!--For more information on how to configure your ASP.NET application, please visit https://go.microsoft.com/fwlink/?LinkId=169433 --> <configuration> <configSections> <!--For more information on Entity Framework configuration, visit https://go.microsoft.com/fwlink/?LinkID=237468 --> <section name="entityFramework" type="System.Data.Entity.Internal.ConfigFile.EntityFrameworkSection, EntityFramework, Version=4.4.0.0, Culture=neutral, PublicKeyToken=b77a5c561934e089" requirePermission="false"/> </configSections> <system.diagnostics> <trace> <listeners> <add type="Microsoft.WindowsAzure.Diagnostics.DiagnosticMonitorTraceListener, Microsoft.WindowsAzure.Diagnostics, Version=1.7.0.0, Culture=neutral, PublicKeyToken=31bf3856ad364e35" name="AzureDiagnostics"> <filter type=""/> </add> </listeners> </trace> </system.diagnostics> <connectionStrings> <add name="DefaultConnection" providerName="System.Data.SqlClient" connectionString="Data Source=(LocalDb)\v11.0;Initial Catalog=aspnet-WebService_WebRole-20120820201239;Integrated Security=SSPI;AttachDBFilename=|DataDirectory|\aspnet-WebService_WebRole-20120820201239.mdf"/> </connectionStrings> <appSettings> <add key="DataConnectionString" value="DefaultEndpointsProtocol=https;AccountName=brunoterkalyphotos;AccountKey=eTzHRURU6vVoSX7hY2cR53KYH1bxOqlzuyd04G0FlMimufaJ+GwSLUcY0XBlYsMJ+TqmMLbBVLaPdJknB6qN8g=="/> <add key="aspnet:UseTaskFriendlySynchronizationContext" value="true"/> <add key="webpages:Version" value="2.0.0.0"/> <add key="webpages:Enabled" value="false"/> <add key="PreserveLoginUrl" value="true"/> <add key="ClientValidationEnabled" value="true"/> <add key="UnobtrusiveJavaScriptEnabled" value="true"/> </appSettings> <system.web> <compilation debug="true" targetFramework="4.0"/> <authentication mode="None"/> <pages> <namespaces> <add namespace="System.Web.Helpers"/> <add namespace="System.Web.Mvc"/> <add namespace="System.Web.Mvc.Ajax"/> <add namespace="System.Web.Mvc.Html"/> <add namespace="System.Web.Optimization"/> <add namespace="System.Web.Routing"/> <add namespace="System.Web.WebPages"/> </namespaces> </pages> <profile defaultProvider="DefaultProfileProvider"> <providers> <add name="DefaultProfileProvider" type="System.Web.Providers.DefaultProfileProvider, System.Web.Providers, Version=1.0.0.0, Culture=neutral, PublicKeyToken=31bf3856ad364e35" connectionStringName="DefaultConnection" applicationName="/"/> </providers> </profile> <membership defaultProvider="DefaultMembershipProvider"> <providers> <add name="DefaultMembershipProvider" type="System.Web.Providers.DefaultMembershipProvider, System.Web.Providers, Version=1.0.0.0, Culture=neutral, PublicKeyToken=31bf3856ad364e35" connectionStringName="DefaultConnection" enablePasswordRetrieval="false" enablePasswordReset="true" requiresQuestionAndAnswer="false" requiresUniqueEmail="false" maxInvalidPasswordAttempts="5" minRequiredPasswordLength="6" minRequiredNonalphanumericCharacters="0" passwordAttemptWindow="10" applicationName="/"/> </providers> </membership> <roleManager defaultProvider="DefaultRoleProvider"> <providers> <add name="DefaultRoleProvider" type="System.Web.Providers.DefaultRoleProvider, System.Web.Providers, Version=1.0.0.0, Culture=neutral, PublicKeyToken=31bf3856ad364e35" connectionStringName="DefaultConnection" applicationName="/"/> </providers> </roleManager> <sessionState mode="InProc" customProvider="DefaultSessionProvider"> <providers> <add name="DefaultSessionProvider" type="System.Web.Providers.DefaultSessionStateProvider, System.Web.Providers, Version=1.0.0.0, Culture=neutral, PublicKeyToken=31bf3856ad364e35" connectionStringName="DefaultConnection"/> </providers> </sessionState> </system.web> <system.webServer> <validation validateIntegratedModeConfiguration="false"/> <modules runAllManagedModulesForAllRequests="true"/> </system.webServer> <runtime> <assemblyBinding xmlns="urn:schemas-microsoft-com:asm.v1"> <dependentAssembly> <assemblyIdentity name="System.Web.Helpers" publicKeyToken="31bf3856ad364e35"/> <bindingRedirect oldVersion="1.0.0.0-2.0.0.0" newVersion="2.0.0.0"/> </dependentAssembly> <dependentAssembly> <assemblyIdentity name="System.Web.Mvc" publicKeyToken="31bf3856ad364e35"/> <bindingRedirect oldVersion="1.0.0.0-4.0.0.0" newVersion="4.0.0.0"/> </dependentAssembly> <dependentAssembly> <assemblyIdentity name="System.Web.WebPages" publicKeyToken="31bf3856ad364e35"/> <bindingRedirect oldVersion="1.0.0.0-2.0.0.0" newVersion="2.0.0.0"/> </dependentAssembly> </assemblyBinding> </runtime> <entityFramework> <defaultConnectionFactory type="System.Data.Entity.Infrastructure.SqlConnectionFactory, EntityFramework"/> </entityFramework> </configuration> |
Creating a new hosted service-Part 1
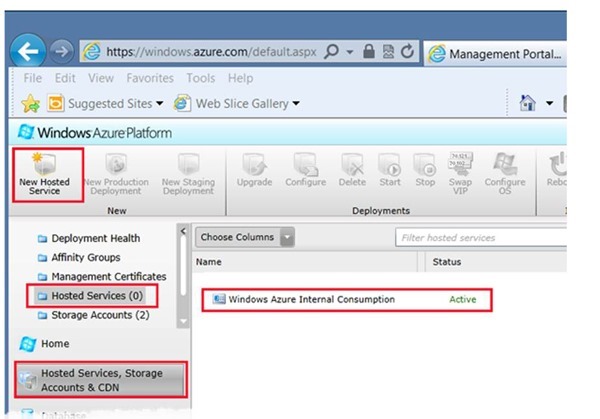
- Now that we have the storage account created, we now need to create a hosted service.
- A hosted service is simply a running instance of a web service inside IIS, inside Windows Server, inside a VM in a Microsoft Data Center.
- We will deploy our web service to the hosted service we create at the portal.
- We will choose our hosted service to be located in the same data center as our storage account.
- This makes sense for both performance and economic reasons.
- Login into the Azure Portal.
- Follow the red boxes above to navigate to the Hosted Service section.
Creating a new hosted service-Part 2-Specifying the details of about your hosted service
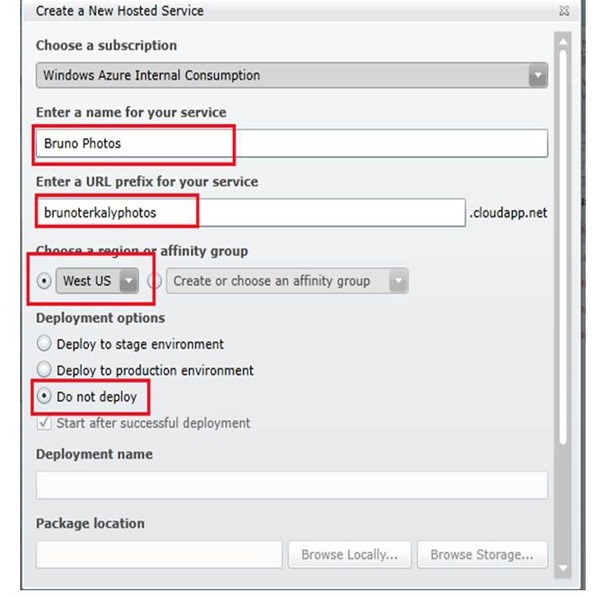
- As we did with the storage account, we will now and two are some of the basic information necessary to creating a host that account.
- You will need to indicate a URL for your service as well as the region.
- Be sure to select the do not deploy radio button.
- We will deploy momentarily.
- It is important to remember that the URL that we entered above will need to be incorporated into the Windows 8 application we created previously.
Final changes required before deployment
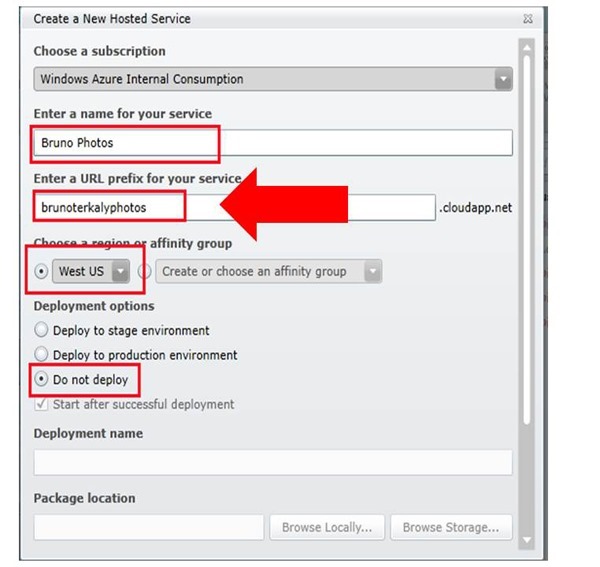
- There are three basic steps before we're ready to test everything. They include:
- Updating the web service code to use the freshly entered storage account information.
- Creating a deployment package of our web service and deploying it in a web role as a web service through the portal.
- Updating the Windows 8 application to make use of the URL specified at the big red arrow above.
Modifying the web service to use the DataConnectionString
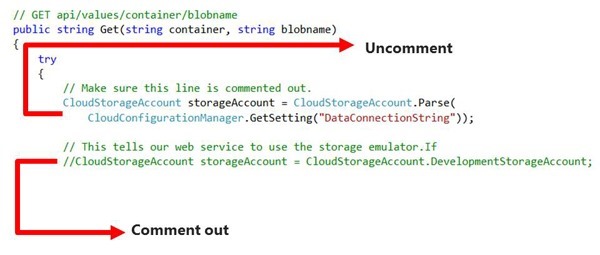
- I am intentionally repeating myself below.
- We have already updated the web.config file with the storage account information.
- We will need to modify some code in the action method Get(), to make use of the DataConnectionString.
- Currently it uses the development storage account information, which is essentially the local storage emulator.
- You will now modify the web service to use the DataConnectionString setting in web.config.
- We will now make use of the storage account that we created at the portal.
- In a nutshell, we are modifying the ValuesController.cs file to support new DataConnectionString
- We have already updated the web.config file with the storage account information from the portal
- We will need to modify some code in the action method Get(), to make use of the DataConnectionString. Currently it uses the development storage account information, which is essentially the local storage emulator. This is good for testing purposes, but will not work in a production environment.
- Double-click on the ValuesController.cs file
- Modify the code to look like the diagram above. (Modifying the web service to use the DataConnectionString)
Deploying our web service to a Microsoft data center
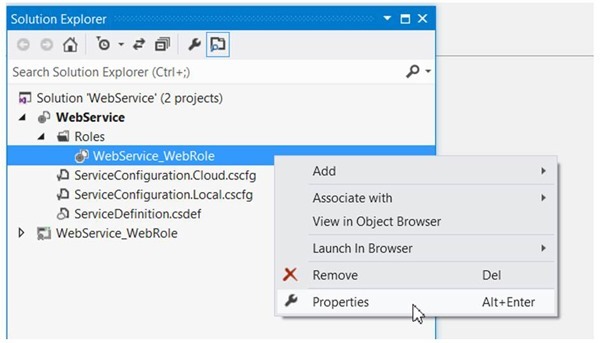
- The modifications to our web service are complete. To deploy this application there are only two steps involved:
- Before creating the package file, you might decide that you want more than one instance of our deployed application.
- In other words, if we specify any instance count of 3, Windows Azure will automatically create 3 copies of our application, running on 3 CPU cores, on separate racks and fault domains.
Modifying the project properties for the web service
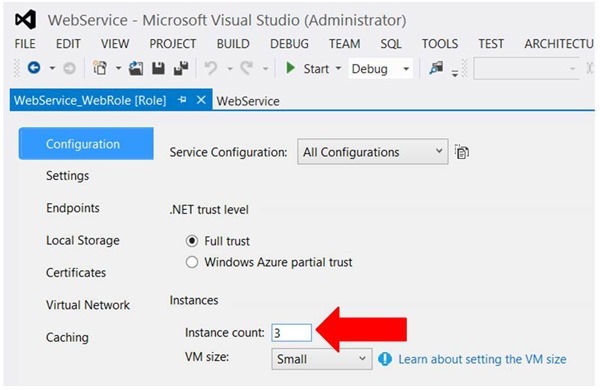
- It is a simple step of modifying the project properties and changing the instance count as follows:
- Changing the Instance Count to 3
Creating our deployment package for the web service
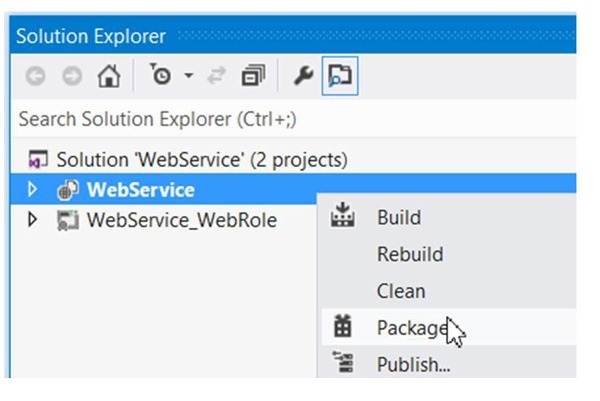
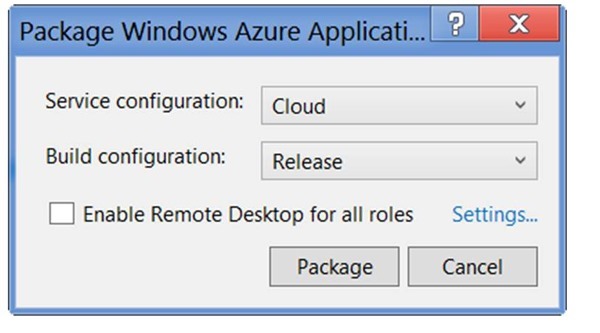
- Right mouse click on the web service configuration project and select Package
- We wish to use our cloud configuration project and this is a release version.
- Click package.
Viewing the resulting package files that we will upload of the portal
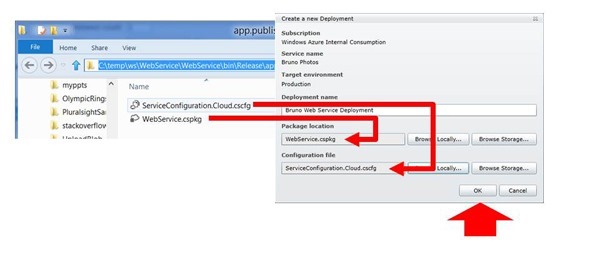
- This is where we use the portal to actually upload the files generated by the package process just described.
- As soon as we click the OK button after having selected our configuration and package file, the deployment process begins now.
Using the portal to deploy our package
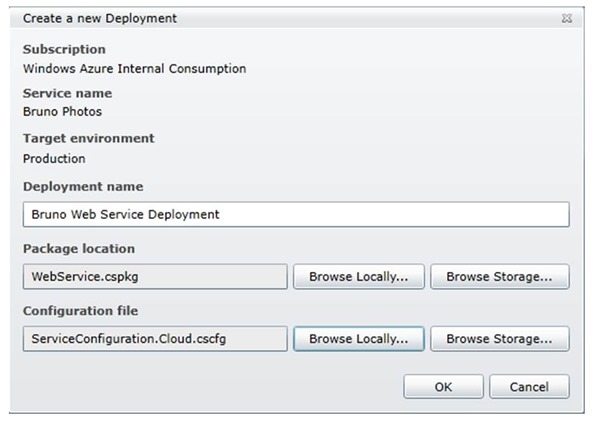
- Click to browse locally buttons and select the package files just to generated.
- Once again, when you click OK the deployment process begins.
The final step of the deployment process
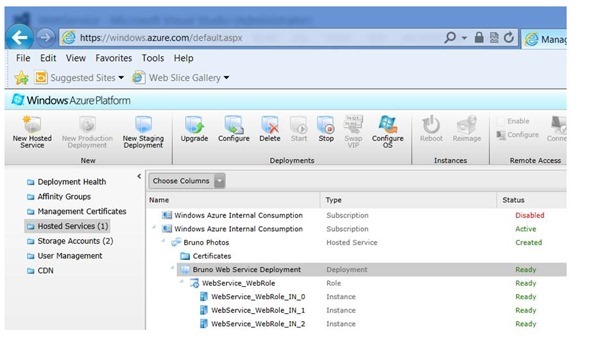
- You can see that after a few minutes my deployment did succeed .
- Notice the three instances are running.
- This is a beautiful thing.
- I just change one member in a property of my Visual Studio project, And the result is a nice clean triply load-balanced web service .
- I can do upgrades without bringing my users down.
- I can grow and shrink this number very easily.
- I can change my instance counter the portal or to some code.
- I can even automate the process based on performance counters .
- I may wish to use CPU utilization disk I owe or memory consumption as my guidelines for growing or shrinking scale .
- I can even automate the process based on performance counters .
- Just one more post.
- Adjusting the Windows 8 Client app to talk to our hosted service
- Final testing and wrap up
- Download the free trial
- You will need a trial account for Windows Azure
- Please sign up for it here:
- You will need a trial account for Windows Azure
Thanks..
I appreciate that you took the time to read this post. I look forward to your comments.
