How To Take Photographs From Windows 8 Applications And Automatically Upload Them To The Cloud–Part 2 of 6
Introduction - Building the Windows 8 Application
- Time to Code
- There will be two projects: (1) Cloud Project and (2) Windows 8 Project.
| 30 Page Hands on Guide with Full Source Code | https://bit.ly/BrunoCoolCode |
- Start by creating a new Windows Metro style application.
- Visual Studio 2012 as Administrator.
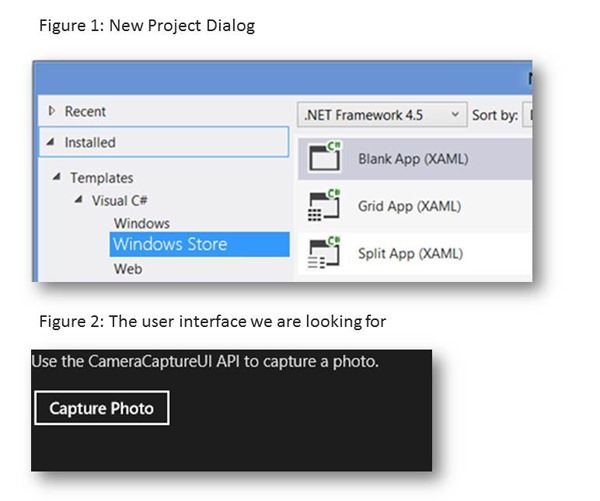
- On the File menu and choose New/Project. See Figure 1.
- The Templates pane, choose Windows Store.
- The framework version, choose .NET Framework 4.5.
- The Project Type choose Blank App.
- Enter the Application Name and Location.
- Application Name = Windows8CameraApp
- Click OK
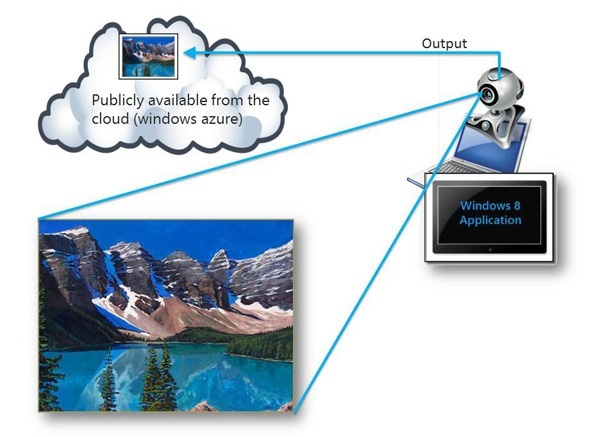
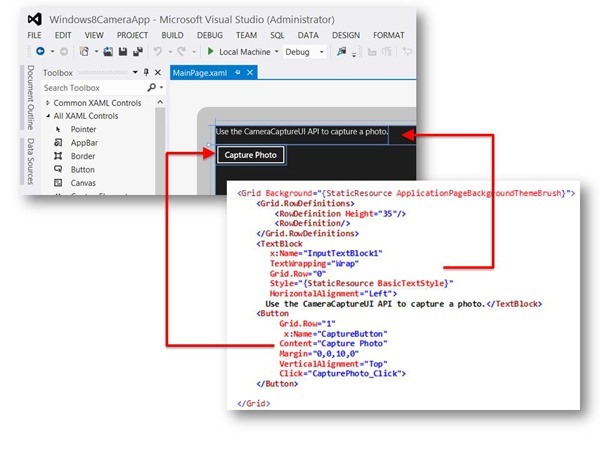
- We will add one TextBlock and one Button
- Note that Windows 8 apps are full screen and I only showed a subset in Figure 2.
- Before building this application, let's discuss what it does.
- Naturally, it requires a camera to work so if you don't have one built in, you can go purchase one for $20 or $30 US.
- The logic of the code works like this:
- Smile and click Capture Photo.
- A photo will get saved to disk.
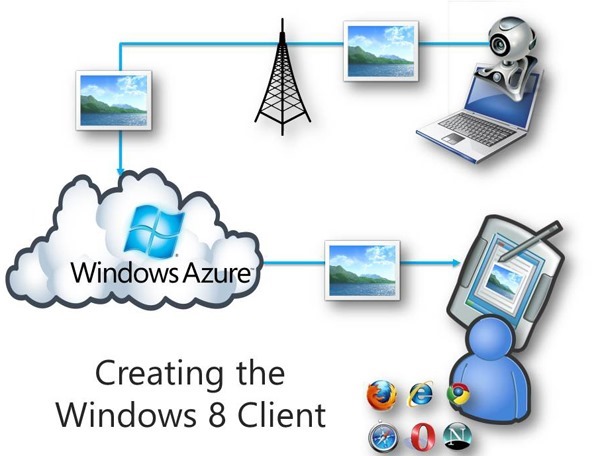
- The Windows 8 Application will call into our web service (yet to be created) to get the Shared Access Signature.
- Once the Windows 8 Application has the Shared Access Signature, it is ready to start uploading the photo as a blob into Windows Azure storage.
- At this point, because the photo is made to be public, anyone can connect to it and view it.
- Smile and click Capture Photo.
Adding the TextBlock and Button
- From the View Menu, choose Solution Explorer.
- Right mouse click on MainPage.xaml and choose View Designer.
- Paste in the code in Figure 7.
- You should be replacing the existing Grid Declaration
- Notice that the code appears inside the <Grid> declaration.
Figure 7 : MainWindow.xaml
| MainWindow.xaml | |
| 1 2 3 4 5 6 7 8 9 10 11 12 13 14 15 16 17 18 19 20 21 22 23 24 25 26 27 28 29 30 31 32 | <Page x:Class="Windows8CameraApp.MainPage" IsTabStop="false" xmlns="https://schemas.microsoft.com/winfx/2006/xaml/presentation" xmlns:x="https://schemas.microsoft.com/winfx/2006/xaml" xmlns:local="using:Windows8CameraApp" xmlns:d="https://schemas.microsoft.com/expression/blend/2008" xmlns:mc="https://schemas.openxmlformats.org/markup-compatibility/2006" mc:Ignorable="d"> <Grid Background="{StaticResource ApplicationPageBackgroundThemeBrush}"> <Grid.RowDefinitions> <RowDefinition Height="35"/> <RowDefinition/> </Grid.RowDefinitions> <TextBlock x:Name="InputTextBlock1" TextWrapping="Wrap" Grid.Row="0" Style="{StaticResource BasicTextStyle}" HorizontalAlignment="Left"> Use the CameraCaptureUI API to capture a photo.</TextBlock> <Button Grid.Row="1" x:Name="CaptureButton" Content="Capture Photo" Margin="0,0,10,0" VerticalAlignment="Top" Click="CapturePhoto_Click"> </Button> </Grid> </Page> |
Adding the code behind - Figure 8a and 8b
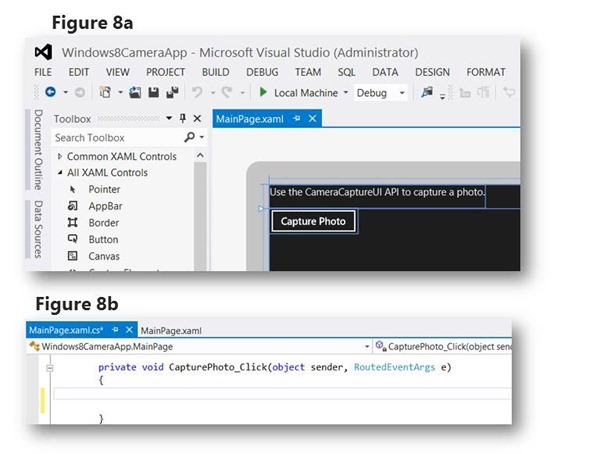
- Note that button in Figure 6 has defined a click event (CapturePhoto_Click).
- But we haven't yet defined that event in our code behind.
- There is more than one way to do this.
- The easiest way is to double click on the Capture Photo button in design mode, as seen in Figure 8a.
- Once you do so, you should see the method definition in Figure 8b.
Figure 9: The code behind - adding code to take a photo
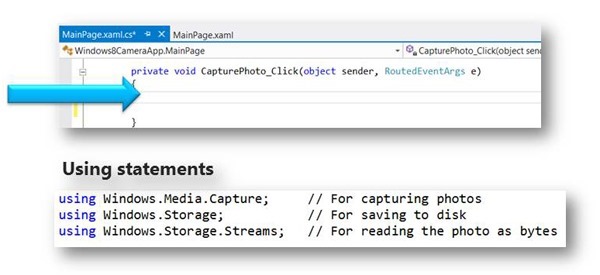
- Add the code as seen in Figure 10.
- The code is highly commented and is somewhat self explanatory.
- In short, the Windows 8 application requests a shared access signature and then uses it to save the freshly taken photo to Azure Blob Storage.
- Notice the async decoration.
- private async void CapturePhoto_Click(object sender, RoutedEventArgs e)
- Add the using statements in Figure 9.
- Note that the line string _photoSAS will be updated later.
- It will need to reflect that actual storage account that we create.
- This will be done at the Azure Portal.
Figure 10 : MainWindow.xaml.cs
| MainWindow.xaml.cs | |
| 1 2 3 4 5 6 7 8 9 10 11 12 13 14 15 16 17 18 19 20 21 22 23 24 25 26 27 28 29 30 31 32 33 34 35 36 37 38 39 40 41 42 43 44 45 46 47 48 49 50 51 52 53 54 55 56 57 58 59 60 61 62 63 64 65 | private async void CapturePhoto_Click(object sender, RoutedEventArgs e) { // This url represents the template for the shared access signature. // If the web service were deployed to a Microsoft data center, this url // would need to be changed to reflect the location of the deployed instance // of the web service. This will get done in future post. string _photoSAS = "https://[**YOU WILL GET THIS FROM THE STORAGE ACCOUNT AT THE PORTAL**].cloudapp.net/api/values?container={0}&blobName={1}"; try { // Using Windows.Media.Capture.CameraCaptureUI API to capture a photo CameraCaptureUI dialog = new CameraCaptureUI(); // Define the aspect ratio for the photo Size aspectRatio = new Size(16, 9); dialog.PhotoSettings.CroppedAspectRatio = aspectRatio; // Perform a photo capture and return the file object StorageFile file = await dialog.CaptureFileAsync(CameraCaptureUIMode.Photo); if (file != null) { // Physically save the image to local storage BitmapImage bitmapImage = new BitmapImage(); using (IRandomAccessStream fileStream = await file.OpenAsync(FileAccessMode.Read)) { bitmapImage.SetSource(fileStream); } // Connect to the web service and request the shared access signature. // Shared access signature needed to write blob. using(HttpClient client = new HttpClient()) using (var response = await client.GetAsync(string.Format(_photoSAS, "photocontainer", file.Name))) { if (response.IsSuccessStatusCode) { // Retrieve Shared Access Signature from Web Service var sasUrl = await response.Content.ReadAsStringAsync(); // Trim any miscellaneous quotes sasUrl = sasUrl.Trim('"'); // Read the bytes from the picture so that they can be written to // Azure storage. using (var fileStream = await file.OpenStreamForReadAsync()) { // Load bytes of image into content object var content = new StreamContent(fileStream); // Content-Type will be image/jpeg content.Headers.Add("Content-Type", file.ContentType); // Write the bytes of the photo to blob storage using (var uploadResponse = await client.PutAsync(new Uri(sasUrl), content)) { if (uploadResponse.IsSuccessStatusCode) { // If successful, show on screen this.InputTextBlock1.Text = "Uploaded " + sasUrl; } } } } } } } catch (Exception ex) { this.InputTextBlock1.Text = "Error message = " + ex.Message; } } |
Figures 11a and 11b : Solution Explorer : Package.appmanifest
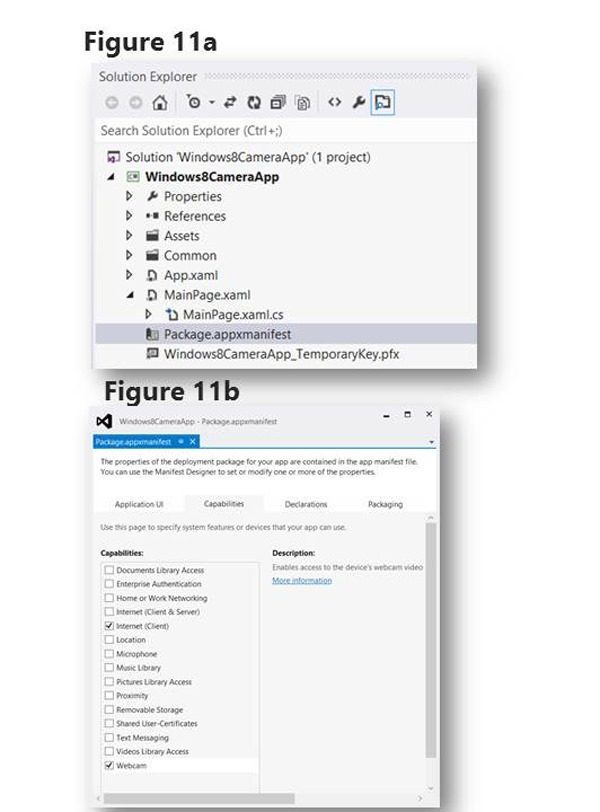
- This allows your Windows 8 Application talk to webcam hardware.
- In order to use a web cam to take photos, you need to edit the application manifest file.
- The application manifest file can be edited by double clicking on Package.appmanifest.
- We will need to modify Capabilities and tell the Windows 8 application that we can use the camera or web cam.
- Click on the Capabilities tab and select Webcam as seen in Figure 11b.
Figure 12 : Running the application
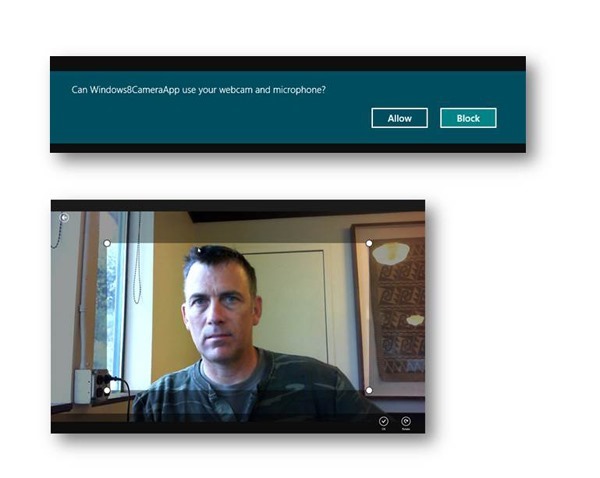
- You are ready to run the application.
- Hit the F5 key or choose Start Debugging from the Debug menu.
- You will be presented with the interface as seen in Figure 12.
- Click Allow to permit the photo to be taken.
- I am actually happier than that photo indicates. :-)
- Once the application takes the photo and saves it, it ends up in a users AppData folder.
- On my machine, it was saved here.
- C:\\Users\\bterkaly\\AppData\\Local\\Packages\\8d4a3388-1c5f-42da-a299-de915896d7c6_d9fbpvqm16pa0\\TempState\\picture004.jpg
- In a future post, we will upload this photo to the cloud so the world could see it.
Figure lucky 13 - You will need a trial account for Windows Azure

- Please sign up for it here:
Thanks..
I appreciate that you took the time to read this post. I look forward to your comments.
