How to create a custom blob manager using Windows 8, Visual Studio 2012 RC, and the Azure SDK 1.7
Programmatically managing blobs
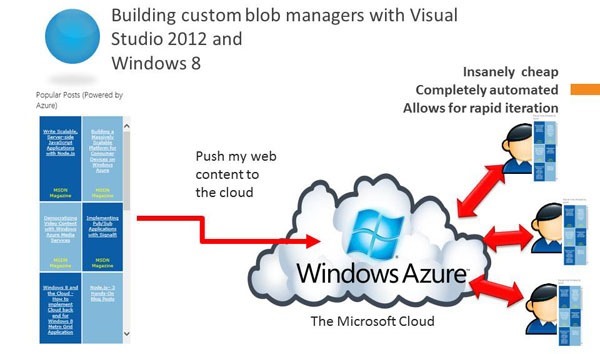
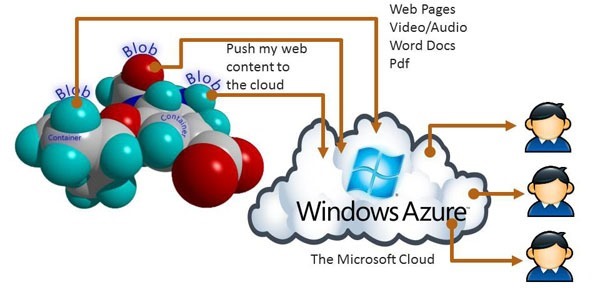
- This post has two main objectives: (1) Educate you that you can host web content very economically; (2) Show you how you can create your own blob management system in the cloud.
- You can also learn about some threading techniques and how to update WPF user interfaces in a multi-threaded environments.
- Download the source to my VS 2012 RC project:
| Download The Source | https://skydrive.live.com/embed?cid=98B7747CD2E738FB&resid=98B7747CD2E738FB%212850&authkey=AAWxTD4cCiYKJ60 |
| Free Azure Trial Account | https://www.windowsazure.com/en-us/pricing/free-trial/?WT.mc_id=A733F5829 |
- Hosting web content as a blob on Windows Azure is powerful. To start with, it is extremely economical; it doesn't require you to host a web server yourself. As a result blobs are very cost-effective. Secondly, the other powerful aspect of hosting html content as blobs on Windows Azure is that you get that blobs get replicated 3 times. It will always be available, with SLA support.
- I use Windows Azure-hosted blobs for my blog. I store html, javascript, and style sheets. I manage video content as well. You can see my article in MSDN Magazine for further details.
- I could store anything I want. When you visit my blog, you are pulling content from Windows Azure storage services.
| See my article in MSDN Magazine, Democratizing Video Content with Windows Azure Media Services | https://msdn.microsoft.com/en-us/magazine/jj133821.aspx |
- You can dynamically create content and then upload to Azure. I'll show you how to upload the web page as a blob.
- But that web page can be dynamically created based on a database. The code I am about to show is infinitely flexible. You could adapt it to manage all your content programmatically.
- I will illustrate with the latest tools and technologies, as of July 2012. This means we will use:
- Windows 8
- Visual Studio 2012 RC
- Azure SDK and Tooling 1.7
- I assume you have an Azure Account (free trials are available)
- The storage service offers two types of blobs, block blobs and page blobs.
- You specify the blob type when you create the blob.
- You can store text and binary data in either of "two types of blobs":
- Block blobs, which are optimized for streaming.
- Page blobs, which are optimized for random read/write operations and which provide the ability to write to a range of bytes in a blob.
- Windows Azure Blob storage is a service for storing large amounts of unstructured data that can be accessed from anywhere in the world via HTTP or HTTPS.
- A single blob can be hundreds of gigabytes in size, and a single storage account can contain up to 100TB of blobs.
- Common uses of Blob storage include:
- Serving images or documents directly to a browser
- Storing files for distributed access
- Streaming video and audio
- Performing secure backup and disaster recovery
- Storing data for analysis by an on-premise or Windows Azure-hosted service
- Once the blob has been created, its type cannot be changed, and" it can be updated only by using operations appropriate for that blob type", i.e., writing a block or list of blocks to a block blob, and writing pages to a page blob.
- All blobs reflect committed changes immediately.
- Each version of the blob has a unique tag, called an ETag, that you can use with access conditions to assure you only change a specific instance of the blob.
- Any blob can be leased for exclusive write access.
- When a blob is leased, only calls that include the current lease ID can modify the blob or (for block blobs) its blocks.
- You can assign attributes to blobs and then query those attributes within their corresponding container using LINQ.
- Blobs allow you to write bytes to specific offsets. You can enjoy typical read/write block-oriented operations.
- Note following attributes of blob storage:
- Storage Account
- All access to Windows Azure Storage is done through a storage account. This is the highest level of the namespace for accessing blobs. An account can contain an unlimited number of containers, as long as their total size is under 100TB.
- Container
- A container provides a grouping of a set of blobs. All blobs must be in a container. An account can contain an unlimited number of containers. A container can store an unlimited number of blobs.
- Blob
- A file of any type and size.
- Storage Account
- "A single block blob can be up to 200GB in size". "Page blobs, another blob type, can be up to 1TB in size", and are more efficient when ranges of bytes in a file are modified frequently. For more information about blobs, see Understanding Block Blobs and Page Blobs.
- URL format
- Blobs are addressable using the following URL format:
- https://.blob.core.windows.net/
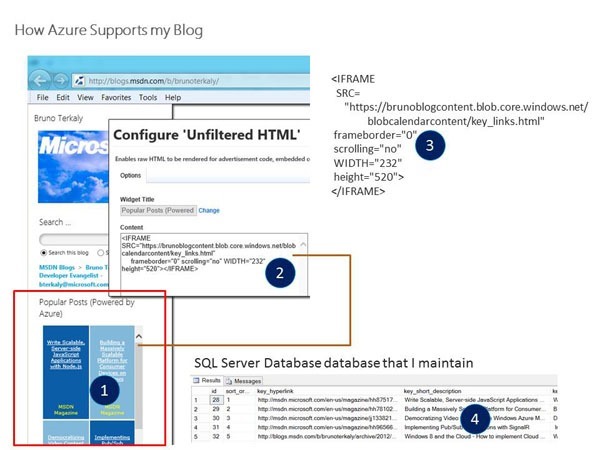
- As I explained, what I am showing is how I power my blog with Windows Azure [1]. My main blog page starts with an <iframe>[2][3]. This tag lets you embed an html page within an html page. My post is basically a bunch of iframe's glued together. One of those iframe's is a menu I have for articles I have created. It really is a bunch of metro-styled hyperlinks.
- As I said before, this post is about how I power my blog[1]. This post is about generating web content and storing it as a web page blob up in a MS data center. The left frame on my blog is nothing more than an iframe with a web page.[2][3]
- The name of the web page is key_links.html. Key_links.html is generated locally, then uploaded to blog storage.
- The pane on the left here that says Popular Posts. It is just an embedded web page, that is stored as a blob on Windows Azure. I upload the blob through a Windows 8 Application that I am about to build for you.
- The actual one that I use his slightly more complicated. It leverages a SQL Server database that has the source for the content you see in Popular Posts.
- For my blog, all I do is keep a database of up to date. The custom app we are writing generates a custom web page, based on the SQL server data that I previously entered.
- My app then simply loops through the rows in the SQL server database table and generates that colorful grid you see labeled Popular Posts.
- You can see my blob stored here:
Dynamically created based on SQL Server Data
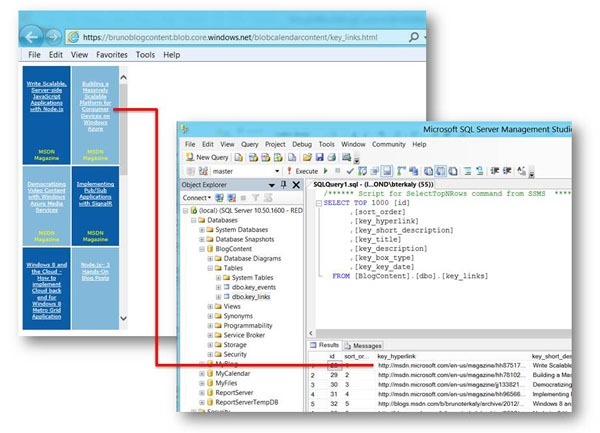
- You can navigate directly to my blob content.
- The point here is that Key_links.html is generated based on entries in a database table
- You could potentially store the entries in the cloud as well using SQL Database (formerly SQL Azure)
- This post will focus on how you would send key_links.html and host it in the Windows Azure Storage Service
- Here you can see the relationship between the table data and the corresponding HTML content.
- The metro-like web interface you see up there is generated dynamically by a Windows 8 application. We will not do dynamic creation here.
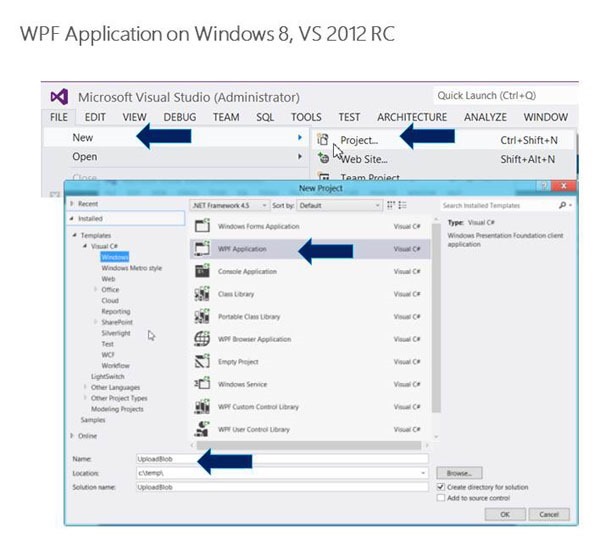
- I used Visual Studio 2012 RC to write the Windows 8 application. To upload the blob of all I needed the Windows Azure SDK and Tooling.
- On the File menu, select New and then click Project.
- In the New Project dialog box, select one of the Project types from the left pane.
- Select Windows of the project Templates from the right pane.
- In the middle pane, select WPF Application.
- Enter a Name for the new project.
- I chose UploadBlob
Creating a WPF ApplicationWe can start dragging controls over. We will drag buttons, textboxes, and labels. Actually, I will provide you the XAML code. With WPF applications, the user interface is built in XAML.
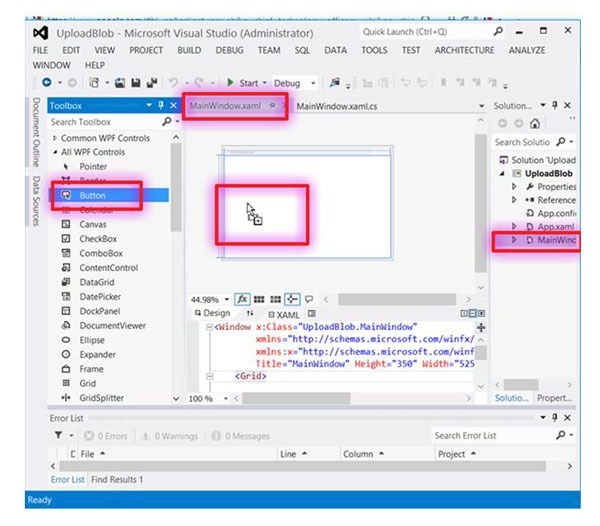
- This is just for illustration purposes. I will provide you all the XAML code in a moment so you don't have to drag and drop anything.
Dragging a control generates XAML
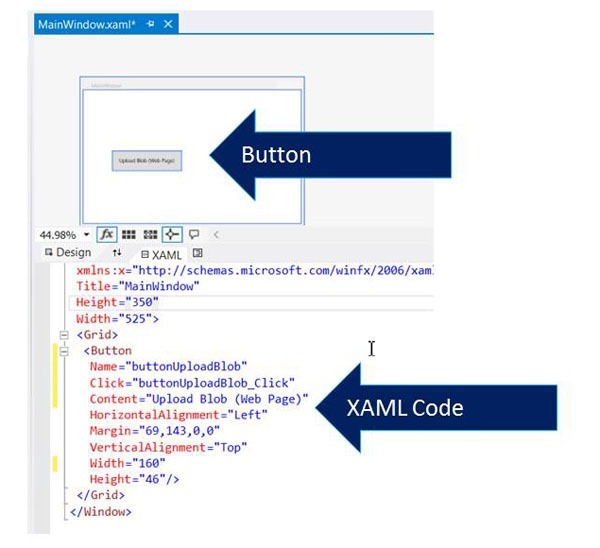
- I am being very detailed here. Most developers hopefully can see that when I drag a control, XAML code is generated. Note that we dragged in a button.
- Also note that XAML code below.
- You can see the <Button> tag.
- This is just for illustration purposes. I will provide you all the XAML code in a moment.
The finished application that we are building Here is the interface we'd like to build.
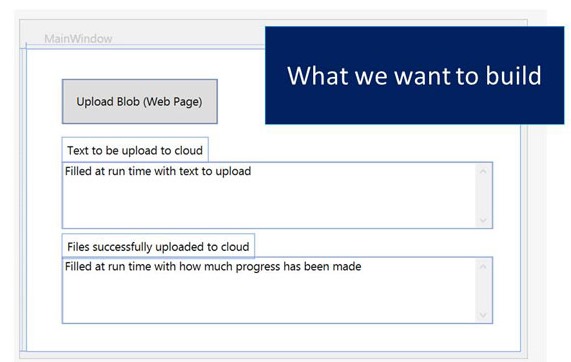
- It has one button, 2 labels, and 2 textboxes. I'll give you the XAML code in a little while
Our app is finished and running
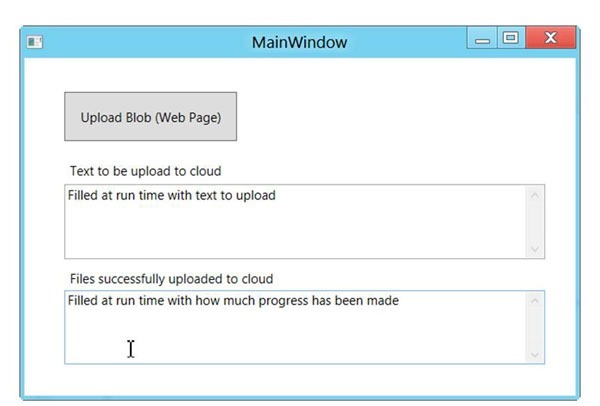
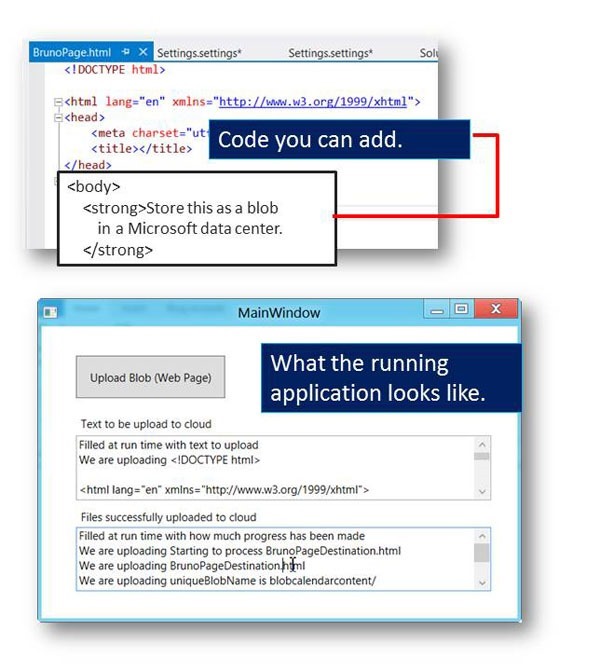
- Here is what it looks like when running.
- The top text box will show the html web page that we will upload to the cloud.
- The second text box will show the user the progress as it executes the upload.
- Let's start to build up the application. The first task is to set some references.
- We need a reference to the Windows Azure SDK.
- We will add a reference to support the Assert() statements in the code.
- For the user interface we will add some XAML code (I will provide)
- The programming logic will be handled by the code behind.
- Get the Windows Azure 90-day trial.
- Download the link below:
Connecting to the Azure tooling
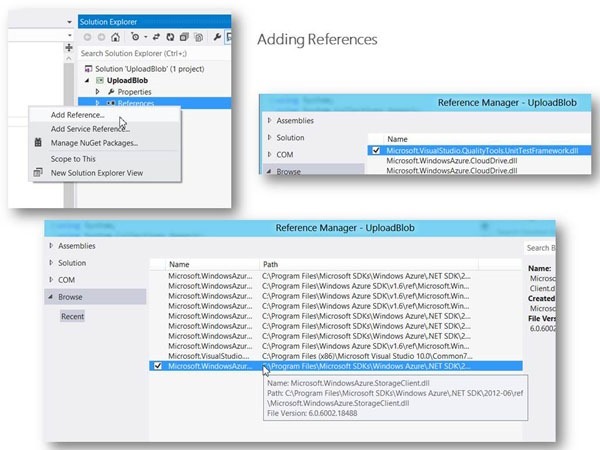
- Note the two references added.
- One for the Quality Tools
- So we can do Asserts in code
- One for the Storage Client
- So we can upload blobs
- One for the Quality Tools
- You will need to select the browse button.
| MainWindow.xaml | |
| 1 2 3 4 5 6 7 8 9 10 11 12 13 14 15 16 17 18 19 20 21 22 23 24 25 26 27 28 29 30 31 32 33 34 35 36 37 38 39 40 41 42 43 44 45 46 | <Window x:Class="UploadBlob.MainWindow" xmlns="https://schemas.microsoft.com/winfx/2006/xaml/presentation" xmlns:x="https://schemas.microsoft.com/winfx/2006/xaml" Title="MainWindow" Height="350" Width="525"> <Grid> <Button Name="buttonUploadBlob" Click="buttonUploadBlob_Click" Content="Upload Blob (Web Page)" HorizontalAlignment="Left" Margin="37,31,0,0" VerticalAlignment="Top" Width="160" Height="46"/> <TextBox Name="txtCodeToUpload" TextWrapping="Wrap" AcceptsReturn="True" VerticalScrollBarVisibility="Visible" Margin="37,117,28.4,0" VerticalAlignment="Top" Height="69">Filled at run time with text to upload</TextBox> <TextBox Name="txtWorkDone" TextWrapping="Wrap" AcceptsReturn="True" VerticalScrollBarVisibility="Visible" Margin="37,215,28.4,0" VerticalAlignment="Top" Height="69" Text="Filled at run time with how much progress has been made"/> <Label Content="Text to be upload to cloud" HorizontalAlignment="Left" Margin="37,91,0,0" VerticalAlignment="Top"/> <Label Content="Files successfully uploaded to cloud" HorizontalAlignment="Left" Margin="37,191,0,0" VerticalAlignment="Top"/> </Grid> </Window> |
| MainWindow.xaml.cs | |
| 1 2 3 4 5 6 7 8 9 10 11 12 13 14 15 16 17 18 19 20 21 22 23 24 25 26 27 28 29 30 31 32 33 34 35 36 37 38 39 40 41 42 43 44 45 46 47 48 49 50 51 52 53 54 55 56 57 58 59 60 61 62 63 64 65 66 67 68 69 70 71 72 73 74 75 76 77 78 79 80 | using System; using System.Collections.Generic; using System.Linq; using System.Text; using System.Threading; using System.Threading.Tasks; using System.Windows; using System.Windows.Controls; using System.Windows.Data; using System.Windows.Documents; using System.Windows.Input; using System.Windows.Media; using System.Windows.Media.Imaging; using System.Windows.Navigation; using System.Windows.Shapes; using System.Windows.Threading; namespace UploadBlob { /// <summary> /// Interaction logic for MainWindow.xaml /// </summary> public partial class MainWindow : Window { public MainWindow() { InitializeComponent(); } public void UpdateGui(string msg, string content) { Dispatcher.BeginInvoke(DispatcherPriority.Input, (ThreadStart)( () => { this.txtWorkDone.Text += Environment.NewLine + string.Format( "We are uploading {0}", msg); this.txtCodeToUpload.Text += Environment.NewLine + string.Format( "We are uploading {0}", content); })); } private string GetStringFromFileName(string path) { FileIOReader file_io = new FileIOReader(path); string s = file_io.ReadFile(); file_io.Close(); return s; } private void buttonUploadBlob_Click(object sender, RoutedEventArgs e) { // Get file path to BrunoPage.html. It is in the "content" folder. string curr_file = System.IO.Path.Combine(Environment.CurrentDirectory, \@"..\..\Content\" + "BrunoPage.html"); // Open file and load content for uploading to Azure string html_content_to_upload = GetStringFromFileName(curr_file); // Kick off thread to do the uploading. Use Task-based threading. // Get help from BlobManager code. Task<string> taskOpenEndpoint = Task<string>.Factory.StartNew(() => { // Use blob manager for encapsulation BlobManager bu = new BlobManager(); // Upload the web page. (1) Pass in the callback method to update the gui. // In other words, BlobManager can update the gui. // (2) Pass in the string containing the web content I want to host in the cloud. // (3) Pass in the destination web page bu.UploadWebPage(this.UpdateGui, html_content_to_upload, "BrunoPageDestination.html"); return ""; }); UpdateGui(curr_file, "We are done"); } } } |
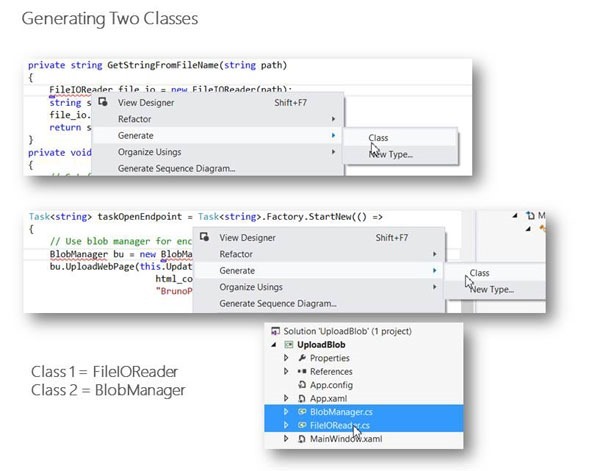
- After you paste the main code, you will need to generate some classes.
- Once generated, we will paste even more code into these freshly generated classes.
- You can see that we are going to two classes to generate empty classes.
- FileIOReader
- BlobManager
- Just place your cursor on the class name, right mouse click, and choose Generate Class
| BlobManager.cs | |
| 1 2 3 4 5 6 7 8 9 10 11 12 13 14 15 16 17 18 19 20 21 22 23 24 25 26 27 28 29 30 31 32 33 34 35 36 37 38 39 40 41 42 43 44 45 46 47 48 49 50 51 52 53 54 55 56 57 58 59 60 61 62 63 64 65 66 67 68 69 | using System; using System.Collections.Generic; using System.Linq; using System.Text; using System.Threading.Tasks; using Microsoft.VisualStudio.TestTools.UnitTesting; using Microsoft.WindowsAzure; using Microsoft.WindowsAzure.StorageClient; namespace UploadBlob { class BlobManager { public void UploadWebPage(Action<string, string> UpdateGui, string codeToUpload, string output_filename) { UpdateGui("Starting to process " + output_filename, codeToUpload); // Stores our pictures CloudBlobClient blobStorage = null; Microsoft.WindowsAzure.CloudStorageAccount.SetConfigurationSettingPublisher((configName, configSetter) => { configSetter(configName); }); // read account configuration settings string connectionString = null; string formatter_for_connection = Properties.Settings.Default.DataConnectionstringProduction; string accountName = Properties.Settings.Default.accountname; string accountKey = Properties.Settings.Default.accountkey; connectionString = string.Format(formatter_for_connection, accountName, accountKey); UpdateGui (output_filename, "Connection string is " + connectionString); var storageAccount = CloudStorageAccount.FromConfigurationSetting(connectionString); // create blob container for images string blobContainerName = "blobcalendarcontent"; blobStorage = storageAccount.CreateCloudBlobClient(); CloudBlobContainer container = blobStorage.GetContainerReference(blobContainerName); container.CreateIfNotExist(); Assert.AreEqual<string>( string.Format(\@"https://brunoblogcontent.blob.core.windows.net/{0}", blobContainerName), container.Uri.ToString()); Assert.AreEqual<string>(blobContainerName, container.Name.ToString()); // configure container for public access var permissions = container.GetPermissions(); permissions.PublicAccess = BlobContainerPublicAccessType.Container; Assert.AreNotEqual(permissions.PublicAccess, null); container.SetPermissions(permissions); // upload the image to blob storage string uniqueBlobName = string.Format("{0}/{1}", blobContainerName, output_filename); CloudBlockBlob blob = blobStorage.GetBlockBlobReference(uniqueBlobName); //blob.Properties.ContentType = "application/json"; blob.Properties.ContentType = "text/html"; UpdateGui("uniqueBlobName is " + uniqueBlobName, codeToUpload); UpdateGui("uri is " + blob.Uri.AbsoluteUri.ToString(), codeToUpload); blob.UploadText(codeToUpload); System.Diagnostics.Trace.TraceInformation("Uploaded image '{0}'", uniqueBlobName); } } } |
| FileIOReader.cs | |
| 1 2 3 4 5 6 7 8 9 10 11 12 13 14 15 16 17 18 19 20 21 22 23 24 25 26 27 28 29 30 31 32 33 34 35 36 37 38 39 40 41 42 43 44 45 46 47 48 49 50 51 52 53 54 55 56 57 58 59 60 61 62 63 64 65 66 | using System; using System.Collections.Generic; using System.IO; using System.Linq; using System.Text; using System.Threading.Tasks; namespace UploadBlob { public class FileIOReader { FileStream fs_reader = null; StreamReader stream_reader = null; public FileIOReader(string path) { fs_reader = File.Open(path, FileMode.Open); stream_reader = new StreamReader(fs_reader); } public bool HasData() { return (stream_reader.EndOfStream == false); } public string ReadFile() { return stream_reader.ReadToEnd().ToString(); } public void ReadLine(ref string s) { s = stream_reader.ReadLine(); } public void Close() { stream_reader.Close(); fs_reader.Close(); } } public class FileIOWriter { FileStream fs_writer = null; StreamWriter stream_writer = null; public FileIOWriter(string path) { if (File.Exists(path)) { File.Delete(path); } fs_writer = File.Create(path); stream_writer = new StreamWriter(fs_writer); } public void WriteLine(string s) { stream_writer.WriteLine(s); } public void Close() { stream_writer.Close(); fs_writer.Close(); } } } |
| Content\BrunoPage.html | |
| 1 2 3 4 5 6 7 8 9 10 11 12 13 | <!DOCTYPE html> <html lang="en" xmlns="https://www.w3.org/1999/xhtml"> <head> <meta charset="utf-8" /> <title></title> </head> <body> <strong>Store this as a blob in a Microsoft data center. </strong> </body> </html> |
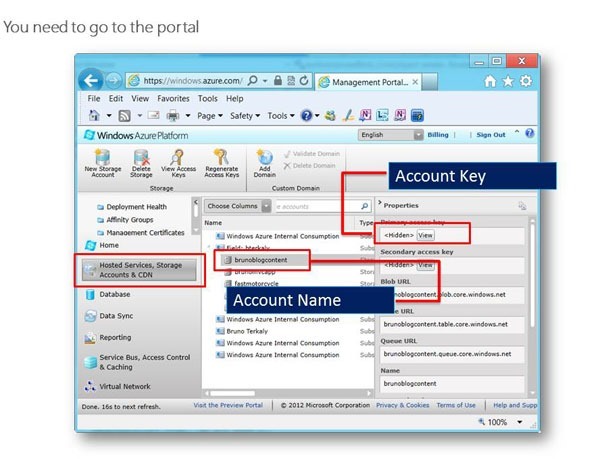
You need to have a Windows Azure Portal Account
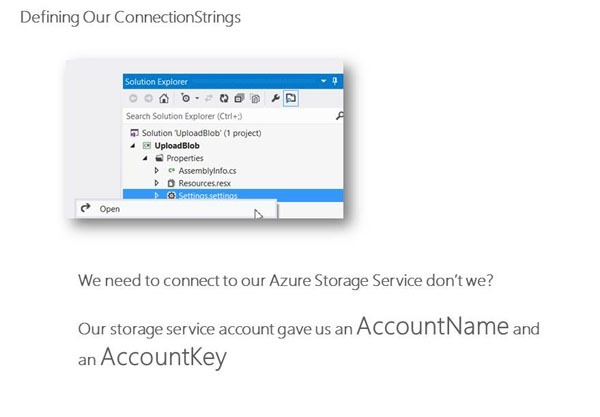
- You get this information from the Windows Azure portal
- The portal is where you get the Account Name and the Account Key
- You will need to click on the View button.
- Keep this information so you can paste into the application.
- You can think of this information as a user name and password.
- The portal is where you get the Account Name and the Account Key
- You will need to click on the View button.
- Keep this information so you can paste into the application.
- You can think of this information as a user name and password.
| Settings.settings | |
| 1 2 3 4 5 6 7 8 9 10 11 12 13 14 15 16 17 18 19 | <?xml version='1.0' encoding='utf-8' > <SettingsFile xmlns="uri:settings" CurrentProfile="(Default)"> <Profiles> <Profile Name="(Default)" /> </Profiles> <Settings > <Setting Name="accountname" Type="System.String" Scope="User"> <Value Profile="(Default)">brunoblogcontent</Value> </Setting> <Setting Name="accountkey" Type="System.String" Scope="User"> <Value Profile="(Default)">oOTLSWgSvFFIECZU21VdUc/FtSv4oksXv5J4F/VEuWfhiWFvSb0u0xMDSvhblkxci+VZduxzZBXZMolAb9gUkw==</Value> </Setting> <Setting Name="DataConnectionstringProduction" Type="System.String" Scope="User"> <Value Profile="(Default)">DefaultEndpointsProtocol=https;AccountName={0};AccountKey={1}</Value> </Setting> </Settings> </SettingsFile> |
Defining the blob that you will upload
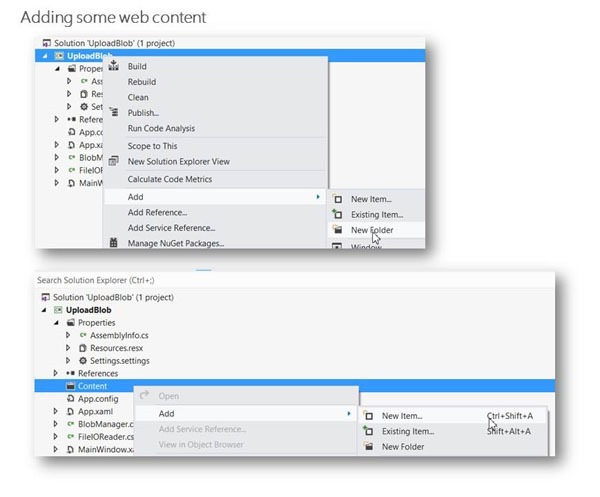
- We now need to define the content that we wish to upload has a blob to the Windows Azure storage Service. In our case, we will simply upload a web page. It is also possible to upload almost anything, such as zipfiles, MP3 files, videos, just about anything you can think of.
- You can right mouse click on the project, allowing you to add a new folder. From there you can add a new item, which in our case will be a web page, basically an HTML file.
- Right mouse click on the project and select Add, New Folder
- Call the folder Content
- Right mouse click on the new folder (Content) and choose Add New Item
- The web page will be called BrunoPage.html
- You can call it whatever you want, but you'll need to remember this for the code behind. It obviously needs to match.
| BrunoPage.html | |
| 1 2 3 4 5 6 7 8 9 10 11 12 13 14 | <!DOCTYPE html> <html lang="en" xmlns="https://www.w3.org/1999/xhtml"> <head> <meta charset="utf-8" /> <title></title> </head> <body> <strong>Store this as a blob in a Microsoft data center. </strong> </body> </html> |
- Running the application and uploading the web page (blob)
- BrunoPage.html can be seen above. Notice the <body> tag that we've added.
- Right mouse click on BrunoPage.html and choose open
- Type in the code you see above. I called the new file BrunoPageDestination.html
- https://brunoblogcontent.blob.core.windows.net/blobcalendarcontent/BrunoPageDestination.html
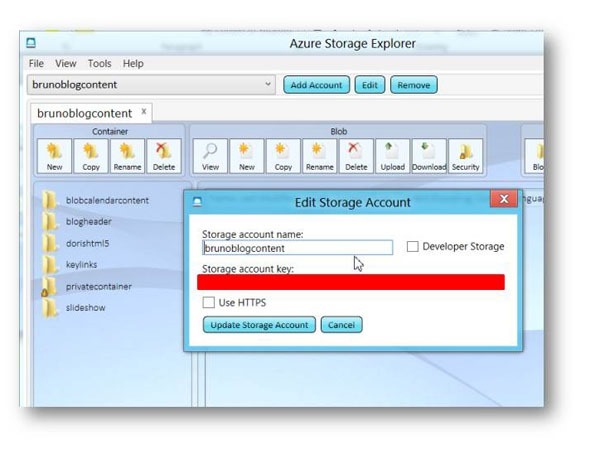
- You can download Azure Storage Explorer here:
- Azure Storage Explorer will help you view your uploaded blob.
- It also works with tables and queues (2 other Azure-related storage types)
- Once you've entered in your account info, you can simply click on blobs.
- Once installed, you will need to configure your account.
- It is the same process as before.
- You will need to go to the portal and retrieve the account name and account key
- It is the same process as before.
Interacting with Azure Storage Explorer
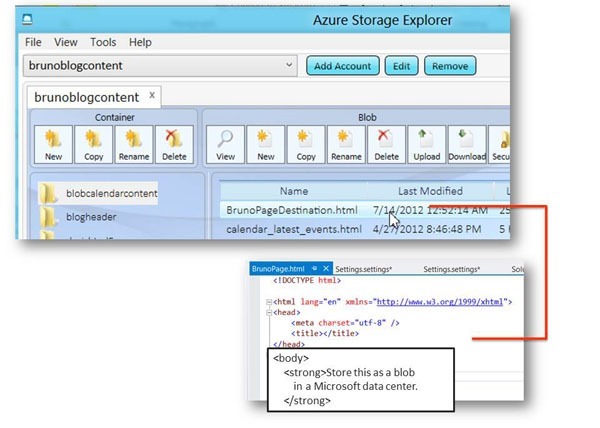
- Note the container has been called blobcalendarcontent
- This was defined by our code (MainWindow.xaml.cs)
Drilling into our blob (web page)
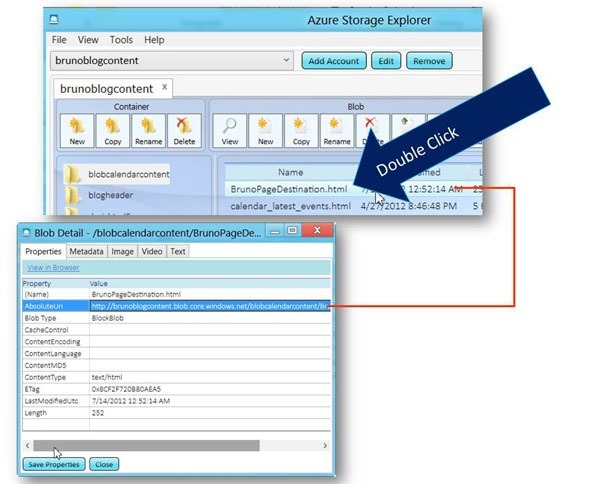
- Azure Storage Explorer can help you obtain the absolute uri of your blob content.
- You can also notice the ContentType is text/html
Viewing the web page that we uploaded
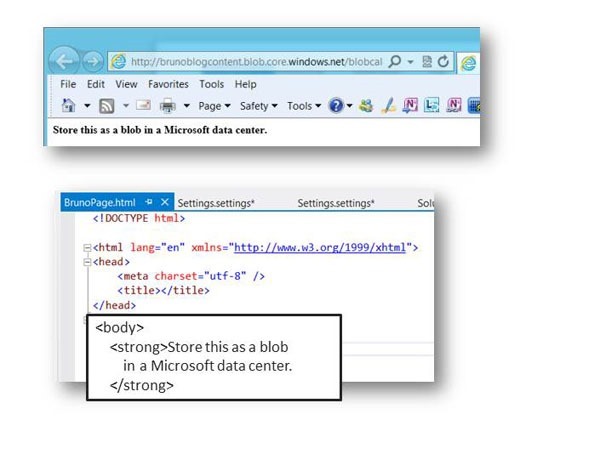
- You could probably go there right now.
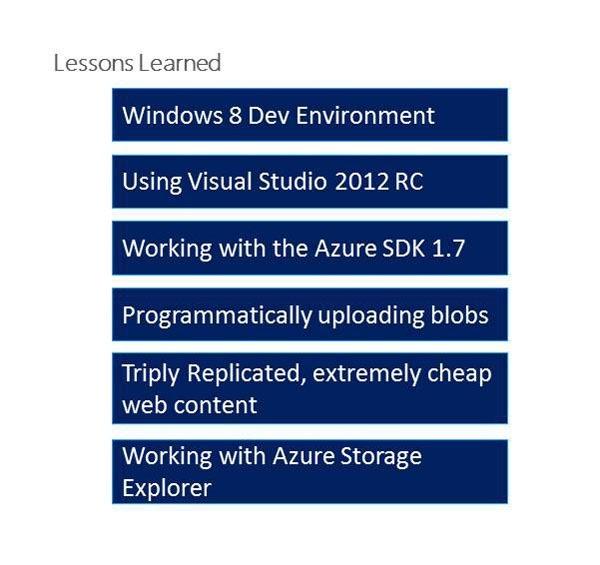
- This was an ambitious post. It covered a lot of interesting ground.
- I will make it possible for you to create dynamically generated content.
- Follow up
- Understanding Block Blobs and Page Blobs
- Visual Studio 2012 RC downloads
- Download: Windows Azure SDK for .NET

![lahxjo2d[3] lahxjo2d[3]](https://msdntnarchive.blob.core.windows.net/media/MSDNBlogsFS/prod.evol.blogs.msdn.com/CommunityServer.Blogs.Components.WeblogFiles/00/00/01/13/13/metablogapi/0434.lahxjo2d%5B3%5D_b4e3a41a-e052-490c-b753-7898621c3272.jpg)