How To Build Cloud-Based, Asynchronous, Scalable Web Applications With Near Real-Time Persistent Long-Running Connections With SignalR
Introducing SignalR
First of all, thank you to David Fowler and Damian Edwards for creating SignalR and providing a demo here: https://channel9.msdn.com/Shows/Web+Camps+TV/Damian-Edwards-and-David-Fowler-Demonstrate-SignalR. SignalR is a new technology from Microsoft that makes long-running interactions between web client and web server practical and scalable. SignalR is a framework available on GitHub (https://github.com/SignalR/SignalR) that makes it easy to build asynchronous scalable web applications with real-time persistent long-running connections. A number of technical innovations in recent years has paved the way to create SignalR. If you talk to its creators, David Fowler and Damian Edwards, they will tell you that SignalR would have been too challenging a few years ago.
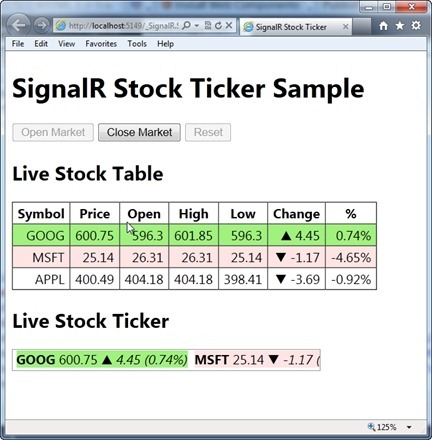
- Click on the link twice
- This will open up two instances
- You can even use different browsers
- Move the grey rectangle with the mouse
- You should see both rectangles move
| Try it out (click twice) | https://signalrincloud.cloudapp.net/Moveshape.htm |
Writing multi-threaded programs was just too difficult until the Task Parallel Library in the Microsoft .NET Framework 4 was introduced. Also, the development of jQuery makes it possible to write JavaScript once and deploy it on Firefox, Internet Explorer, Safari, Opera, and Chrome. The convergence of various technologies has opened the door for the technical feasibility of creating and using SignalR.
Building and Deploying to the cloud
Even if SignalR can support 100,000’s of connections on a single server, there may come a time where additional scale is needed. Windows Azure is a cloud offering from Microsoft that makes hosting a SignalR application easy to deploy and scale. I will demonstrate how easy it is to build a SignalR application and deploy it to the cloud. I am assuming you’ve installed all the necessary Azure-related tooling and SDKs. I discuss this here:
| Configuring your environment | https://blogs.msdn.com/b/brunoterkaly/archive/2012/03/27/microsoft-azure-cloud-devcamps-if-you-can-t-make-it-in-person.aspx. |
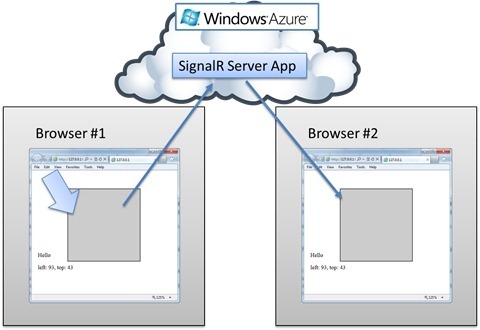
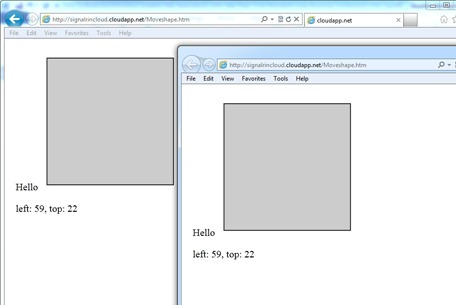
Let’s discuss how we’d implement the application in Figure 1, which allows one browser to broadcast a drag operation to other browsers. This means that if a user drags a shape in one browser, all other browsers will see the shape move on their own browser. If Browser #1 moves the grey shape, the shape will automatically move in Browser #2.
Download for Azure SDK |
Exercise 1: The high level steps to create a SignalR application and hosting it in the cloud include:
| 1. | Use Visual Studio 2010 to create a new Cloud project. |
| 2. | Add an Asp.Net Web Role to the project. This will be the container for our web application. |
| 3. | Use NuGet to add the needed SignalR assemblies and references. You will also add some jQuery JavaScript modules with NuGet. |
| 4. | Create a server-side class the inherits from the SignalR intrinsic Hub. This is the server-side code that listens to Browser #1 and transmits the event to Browser #2. |
| 5. | Create the client-side code, which is effectively some JavaScript and a web page. |
| 6. | Go to the Windows Azure Management Portal and create a hosted service and a storage account. |
| 7. | Package up our project (Steps 1 – 4) and deploy to Windows Azure. |
| 8. | Tell Windows Azure how many running instances you need (this is the elastic scale part). It is also adjustable after deployment. |
| 9. | Done! |
Here is what the Visual Studio 2010 solution looks like when it is complete.
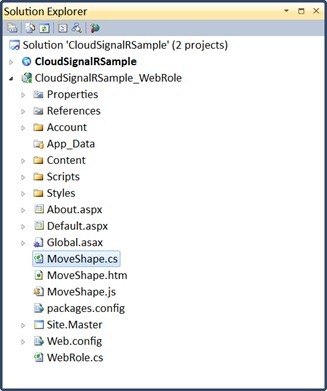
I will demonstrate how easy it is to build a SignalR application and deploy it to the cloud. I am assuming you’ve installed all the necessary Azure-related tooling and SDKs. I discuss this here: How to Install the Needed Tooling.
The 3 Key files that you will add to the Visual Studio Solution are:
| Module | Description |
|---|---|
| MoveShape.cs | The server side SignalR file that acts as a hub or central gateway to broadcast jQuery calls. This code is what listens to one browser and forwards user actions to other browsers. |
| MoveShape.js | The JavaScript in the browser that gets called through the SignalR back-end server |
| MoveShape.htm | The web page where all the action happens. This is where the user drags a shape and the other users see the shape move on their own browsers. |
Exercise 1: Task 1 - Create a new cloud project.
- Create a new cloud project.
- Start Visual Studio as administrator and select File, New Project.
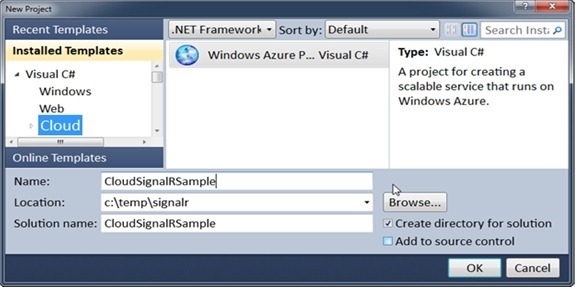
- In the left template pane in the New Project dialog, select Cloud, then provide a Name and Location.
- Start Visual Studio as administrator and select File, New Project.
- Double-click ASP.NET Web Role.
- You can also hit the “>” button between the two panes.
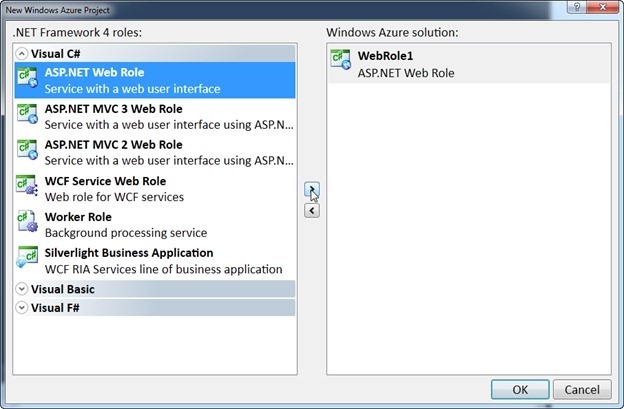
- You can also hit the “>” button between the two panes.
- Rename web role to CloudSignalRSample_WebRole.
- This is not required but keeps the code better organized.
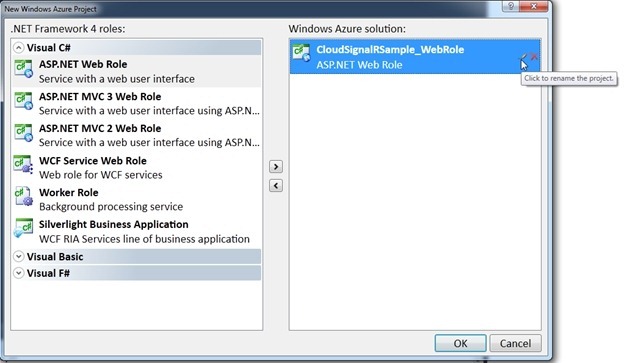
- This is not required but keeps the code better organized.
Exercise 1: Task 2 - Use NuGet to Install SignalR
NuGet is probably the easiest way to work with SignalR. It allows you to easily download the SignalR assemblies, and add some SignalR sample source code to your project. It also adds the needed references.
- If you haven’t done this previously, enabling NuGet is the first step and can be done from the Tools menu.
- Select Extension Manager. NuGet is useful for a variety of technologies, not just SignalR.
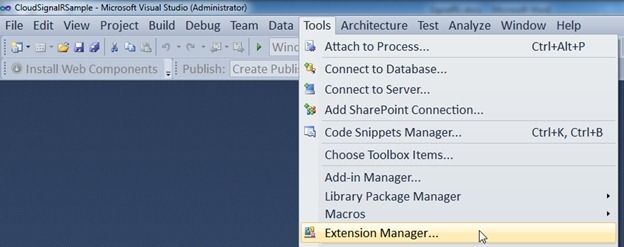
- Select Extension Manager. NuGet is useful for a variety of technologies, not just SignalR.
- Selet NuGetPackage Manager and choose Download.
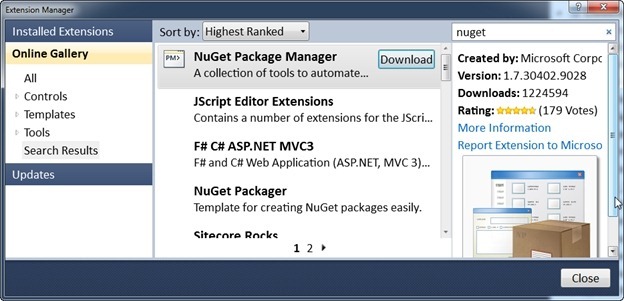
- Once NuGet is installed, we can begin to install SignalR.
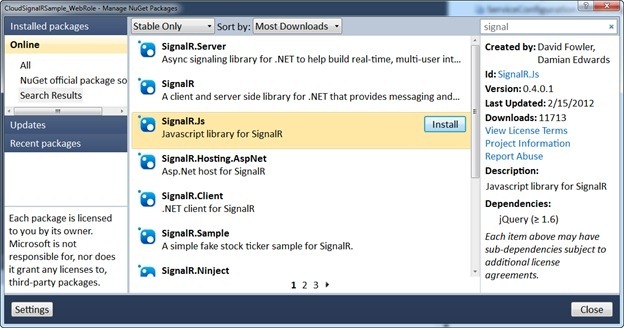
- Selecting the first of two SignalR packages. Be sure to install these two:
- SignalR.Js
- SignalR.Hosting.AspNet
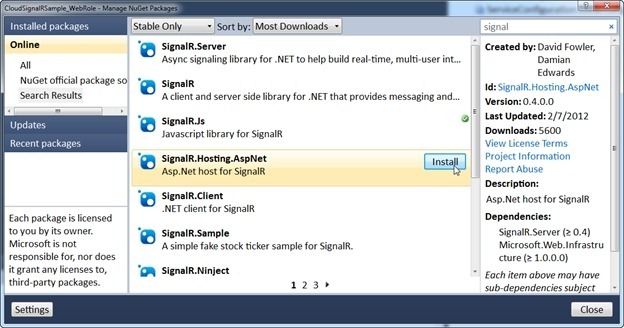
- Install the package SignalR.Hosting.AspNet
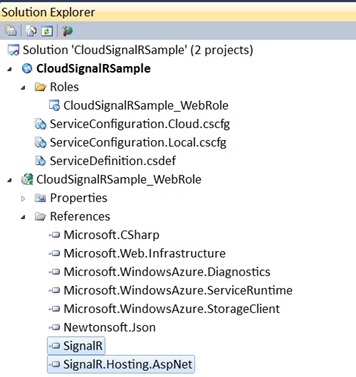
- Note that various references have been added to reflect the SignalR packages just installed.
Exercise 1: Task 3 – Adding the server and client side code
It is now time to add the 3 files discussed previously: (1) MoveShape.cs; (2) MoveShape.js; (3) MoveShape.htm. The first of these three files is the server side. It will broadcast drag events sent by the client browser and forward to other browser clients.
The last 2 of the 3 files are the client implementations. The JavaScript is written to send drag events to the server. The JavaScript will also move shape objects in the htm page for drag events sent by the server.
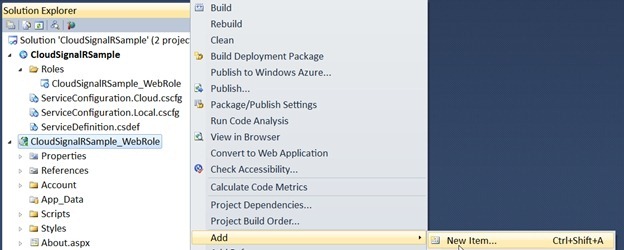
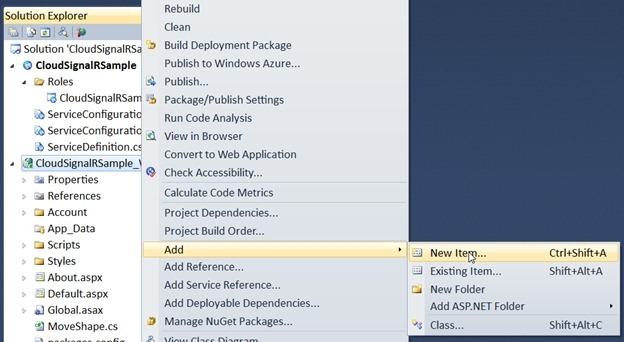
Right click on the web role and select Add, New Item.
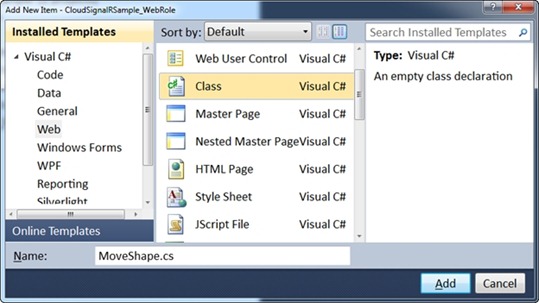
Select Class and name the file MoveShape.cs.
MoveShape.cs
 using System;
using System.Collections.Generic;
using System.Linq;
using System.Web;

// Add reference
using SignalR.Hubs;
namespace CloudSignalRSample_WebRole
{
    // Derive from Hub, which is a server-side class
    // and a client side proxy.
    [HubName("moveShape")]  // moveShape is the name used in the Javascript
    public class MoveShapeHub : Hub
    {
        public void MoveShape(int x, int y)
        {
// Broadcast drag event to other browsersClients.shapeMoved(Context.ConnectionId, x, y); // Simple diagnostics for debugging System.Diagnostics.Debug.WriteLine("x = " + x + ", y = " + y); } } }Use NuGet to add some jQuery code to the project.
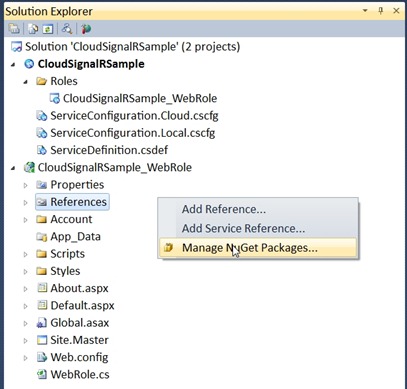
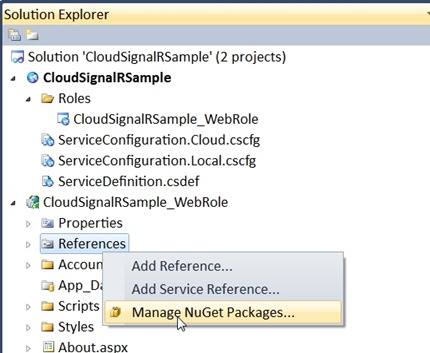
- Right click on References and choose Manage NuGet Packages.
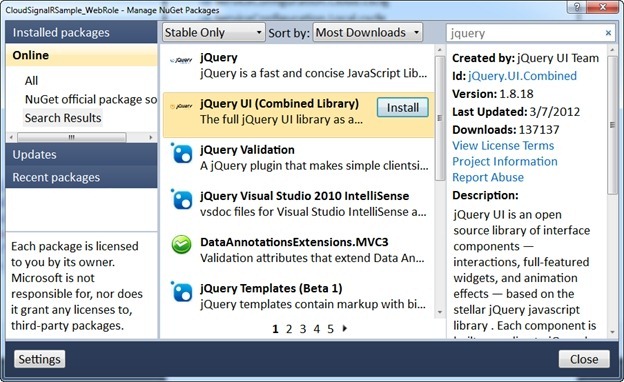
Select the NuGet Package called jQuery UI (Combined Library).
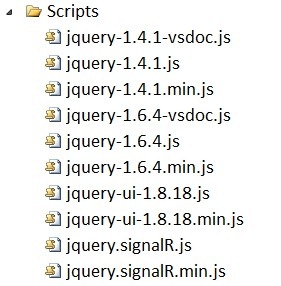
Note that the following scripts that have been added.
Right click on the web role and select Add, New Item.
- We will add MoveShape.js.
- This represents the jQuery written to send drag events to the server.
- MoveShape.js will also move shape objects in the web page for drag events sent by the SignalR server.
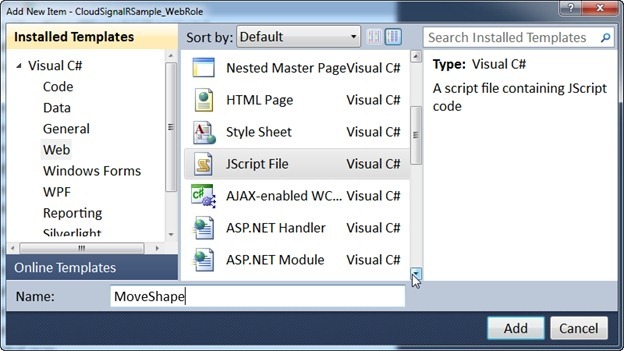
Select Web in the Templates pane and the Jscript File for the file type.
- Provide the name MoveShape.js
Paste in the following code into MoveShape.js.
MoveShape.js
 /// <reference path="Scripts/jquery-1.6.4.js" />
/// <reference path="Scripts/jquery.signalR.js" />
/// <reference path="Scripts/jquery-ui-1.8.18.js" />

$(function () {
    // Get a refeerence to the server-side moveShape() class.
    var hub = $.connection.moveShape,
    // Get a reference to the shape div in the html
    $shape = $("#shape");
    // Use extend to move the shape object (if we are not the sender)
    $.extend(hub, {

        // Use css to move the shape object

        shapeMoved: function (cid, x, y) {
            if ($.connection.hub.id !== cid) {
                $shape.css({ left: x, top: y });
                $("p:last").text("left: " + x + ", top: " + y);
            }
        }
    });
    // Wire up the draggable behavior (when hub is done starting)
    // "done" is a jquery deferred method
    $.connection.hub.start().done(function () {
        $shape.draggable({
            // Implement draggable effect for jquery
            drag: function () {
                // Tell the server that the shape was just dragged
                hub.moveShape(this.offsetLeft, this.offsetTop);
            }
        });
    })
});
Right click on the web role and select Add, New Item.
- We will add MoveShape.htm.
- This represents the primary web page the user will interact with.
- It contains the shape that the user will drag.
- It leverages MoveShape.js, which we just wrote.
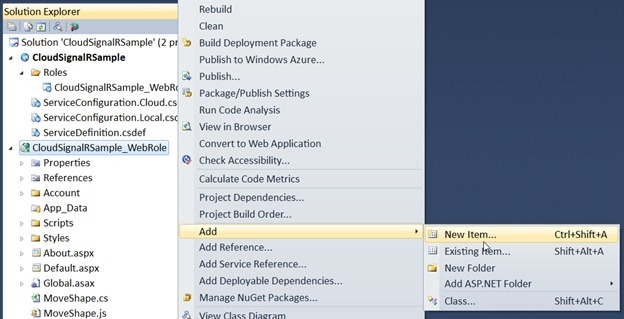
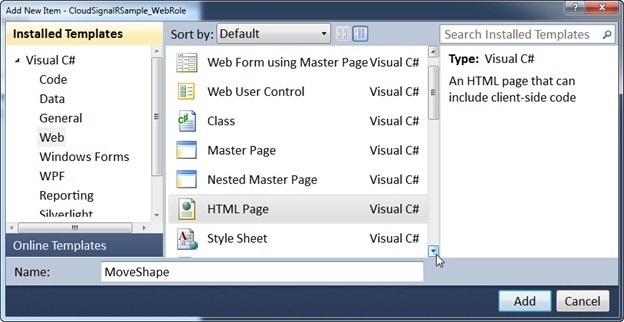
Select Web in the Templates pane and the HTML Page for the file type.
- Provide the name MoveShape.htm
MoveShape.htm
 <!DOCTYPE html >
<html xmlns="https://www.w3.org/1999/xhtml">
<head>
    <title></title>
    <style type="text/css">
        #shape
        {
            width: 200px;
            height: 200px;
            background: #ccc;
            border: 2px solid #333;

        }
        p { margin-left:10px; }
    </style>
</head>
<body>
    <div id="shape"></div>
    <script src="../Scripts/jquery-1.6.4.js" type="text/javascript"></script>
    <script src="../Scripts/jquery-ui-1.8.18.js" type="text/javascript"></script>
    <script src="../Scripts/jquery.signalR.js" type="text/javascript"></script>
    <script src="/signalr/hubs" type="text/javascript"></script>
    <script src="MoveShape.js" type="text/javascript"></script>
    <div>  <p>Hello</p></div><p></p>
</body>
</html>
Exercise 1: Task 4 – Testing the application
This project will run in the Compute emulator (because this is a cloud project). Before we run this project,let’s set the startup page to be MoveShape.htm.
- Select the Debug, Start Debugging menu.
- This will start the Compute and Storage Emulators (the come when you install the Azure SDK and related tooling).

- This will start the Compute and Storage Emulators (the come when you install the Azure SDK and related tooling).
- Start another browser instance. Start IE (or any browser) and paste in the url: https://127.0.0.1:81/MoveShape.htm.
- Move the shape in either of the two browsers.
- Note the two instances communicating.
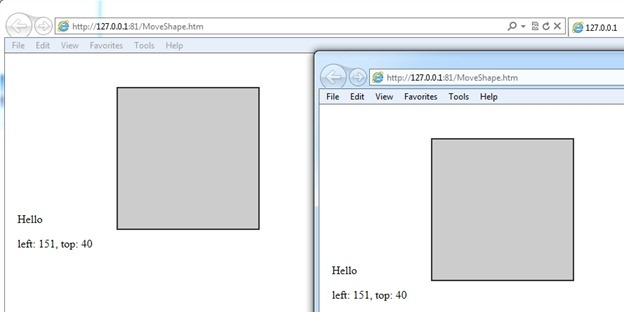
- We are done. Prepare for the next step.
- At a high level we will go to the Windows Azure Management Portal and provision a hosted service and a storage account.
- The hosted service will act as our container for our server and client code code.
- Although we are not using storage, we will need a storage account for diagnostics.
Exercise 2: Provisioning an Windows Azure Account and Deploying to the Cloud
The next step will involve taking our project and deploying it to the cloud. There will be a few things we need to get done before we can actually move the bits of our SignalR application to a MS data center.
There is an assumption that you are already have an account. More information is available here:
 |
Sign up for an Azure account |
Exercise 2: Task 1 - Configuring a hosted service and storage account
After you’ve signed up for a Windows Azure account, you are ready to start setting up your hosted service and storage account. This is the preliminary step to deploying your application to the cloud.
Sign in to the Windows Azure Portal.
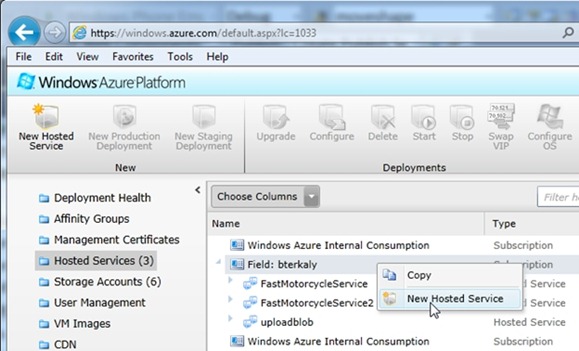
- Click in the left pane on Hosted Services.
- Go to the middle pane to the relevant account, right-mouse click and select New Hosted Service.
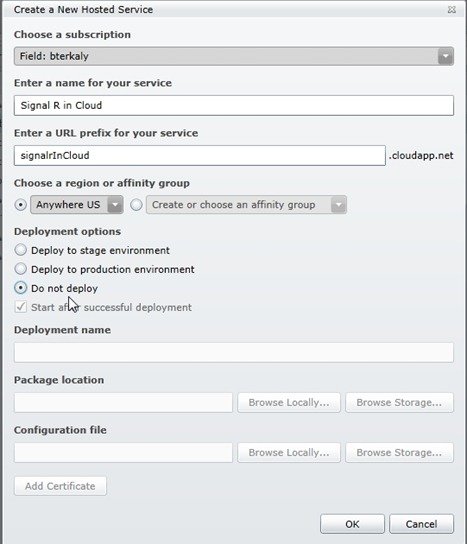
Specify the details of your Hosted Service.
- Enter a name for your service.
- Enter a URL (this has to be globally unique)
- Choose a region (this is the location of the data center)
- Select Do Not Deploy (we will deploy later)
Notice that the portal indicates the hosted service is being provisioned.
- It takes about 10 minutes for this process to complete.
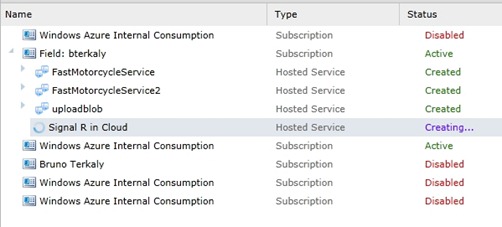
- It takes about 10 minutes for this process to complete.
Provision a storage account.
- A storage account is needed for the built-in diagnostics.
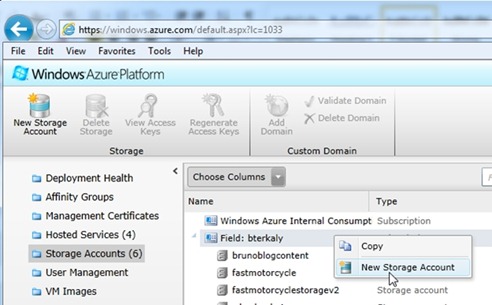
- A storage account is needed for the built-in diagnostics.
Provide a Name for your Storage Account.
- Provide a URL that is globally unique.
- Specify a Region or Data Center (should be in the same data center as your hosted service for performance reasons).
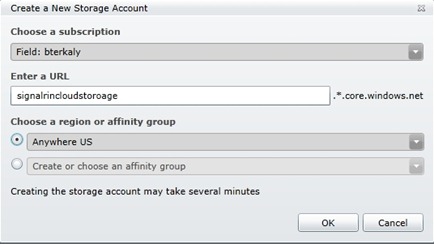
Wait for the storage account to complete.
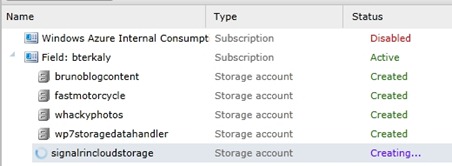
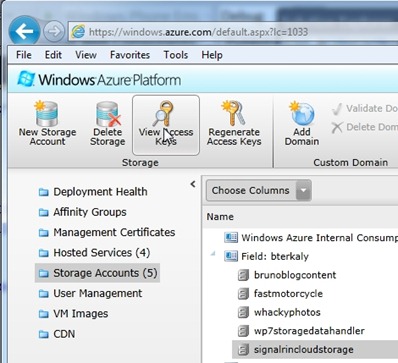
Once your storage account is complete, you will need the Access Keys.
- The Access Key is needed for diagnostics.
- You will enter the Access Key into your Visual Studio Project.
- Click on the View Access Key toolbar button
Copy the Primary Access Key to the clipboard.
- Click on the icon to the right as seen below.
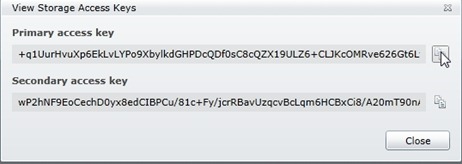
- Click on the icon to the right as seen below.
You will now enter your Access Key into Visual Studio.
- Right mouse click and choose Properties.
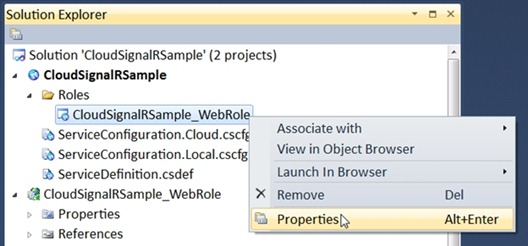
- Right mouse click and choose Properties.
In the left pane click on Settings.
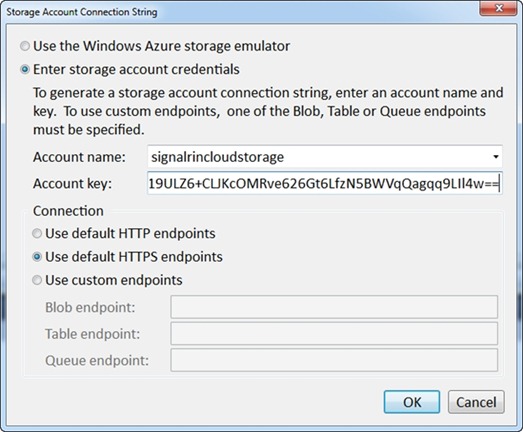
- The Storage Account Connection String Dialog box will appear.
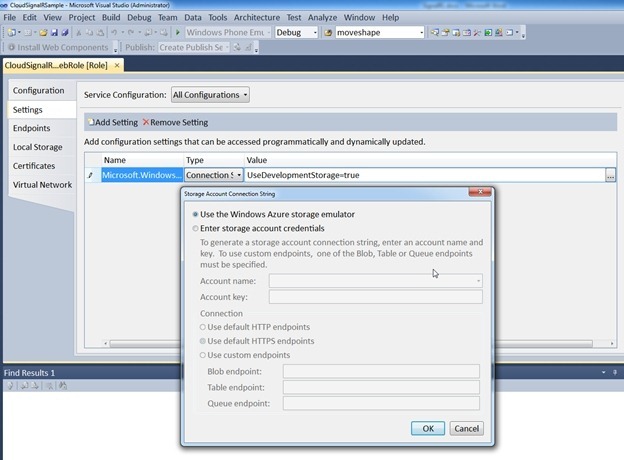
- The Storage Account Connection String Dialog box will appear.
Click on Enter storage account credentials.
- Enter the Account name that you specified at the portal.
- Paste in the Account Key that you copied from the portal.
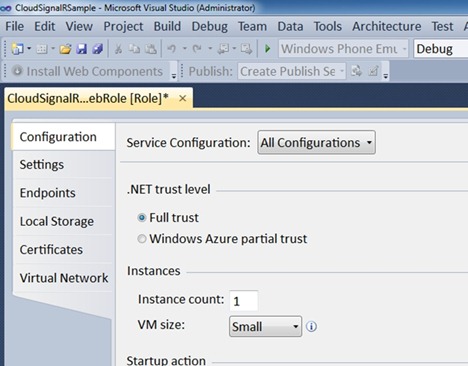
Click on Configuration.
- Note that the Instance count is 1 (this means there is one running instance of your SignalR server application)
- You can increase the instance count number to increase scale.
We are now ready to package up our SignalR Cloud Application.
- Right mouse click on CloudSignalRSample.
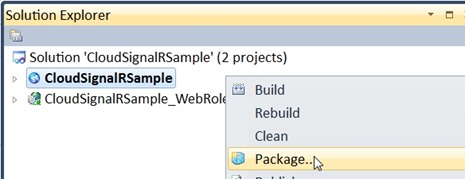
- Right mouse click on CloudSignalRSample.
Click the Package Button.
- We will leave everything else to the default values.
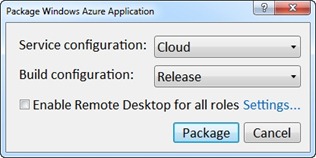
- We will leave everything else to the default values.
When the packaging process is complete, Visual Studio will launch an explorer window so you can see your two package files.
- The first file is the web application itself, complete with all the needed assemblies (Including SignalR).
- The second file is the configuration file (stores the instance count, the access keys,etc).

Return back to the Windows Azure Portal.
- Click on Hosted Services.
- Right mouse click on your previously created Hosted Service.
- Select New Production Deployment.
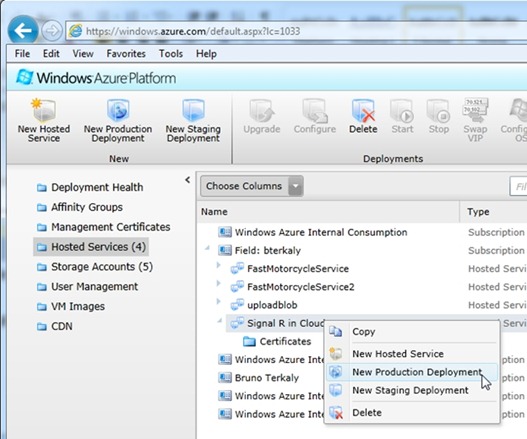
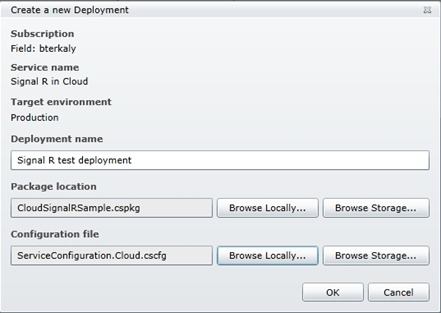
You will now upload your packaged files from the previous step.
- The path used by Visual Studio is C:\temp\signalr\CloudSignalRSample\CloudSignalRSample\bin\Release\app.publish.
- You will upload both the cspkg file as well as the cscfg file.
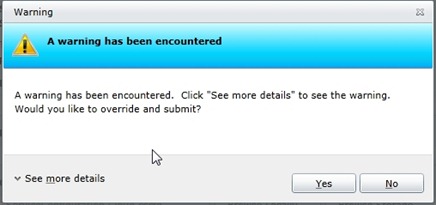
You are getting this warning because your instance count was only 1.
- If you want to utilize the SLA of Windows Azure, you need an instance count of at least 2.
- You can ignore and click Yes.
10 minutes later, the web application is ready to use.
- Note the DNS Name ( https://signalrInCloud.cloudapp.net ).
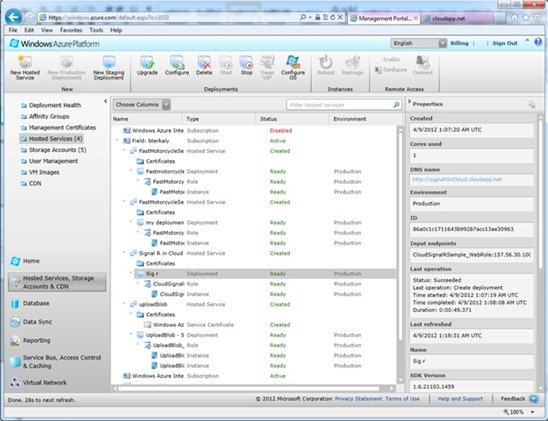
- Note the DNS Name ( https://signalrInCloud.cloudapp.net ).
10 minutes later, the web application is ready to use.
- Note the DNS Name (https://signalrInCloud.cloudapp.net).
- You will have your own DNS name based on the URL you provided in an earlier step.
- In my case, I am navigating to https://signalrincloud.cloudapp.net/Moveshape.htm
Try it out (click twice) https://signalrincloud.cloudapp.net/Moveshape.htm 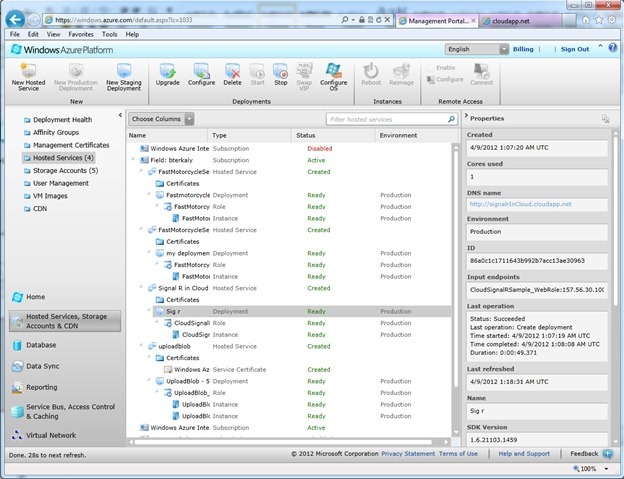
Navigate to https://signalrincloud.cloudapp.net/Moveshape.htm
- Start another browser instance. Start IE and paste in the url: https://signalrincloud.cloudapp.net/Moveshape.htm
- Move the shape in either of the two browsers.
- Note the two instances communicating.
| Download Project | https://skydrive.live.com/redir.aspx?cid=98b7747cd2e738fb&resid=98B7747CD2E738FB!2291&parid=98B7747CD2E738FB!172 |
Conclusion
SignalR is a major leap forward in lowering the technical barriers to creating asynchronous and scalable web applications across all of today’s popular browsers. Combined with Windows Azure, SignalR opens the door to many more types of applications. Let me also mention that SignalR works with non-browser clients, such as traditional desktop applications. Finally, SignalR is designed to leverage other high-level transports that are not based on long-polling, such as Web Sockets, Server Sent Events, and the Forever Frame on Internet Explorer. You can expect its creators, Damian Edwards and David Fowler, to continue to develop and improve SignalR with the help of the community on CodePlex and Github.
Download for Azure SDK |