Supporting Billions of entities/rows for Mobile – Mobile to Cloud Series - Part 9– Writing an iOS (iPhone/iPad/MacOS) Client to consume RESTful data from Azure (Microsoft Cloud)
Article
This is a post about connecting iOS applications to a RESTful service hosted in the Microsoft cloud, aka Windows Azure. Before moving on into this particular post, I’m making a few assumptions about what you’ve already done.
First, I expect that you have already created a RESTful service, which was explained in detail in previous posts. Complete source code was provided as well as guidance about building the service itself.
Second, I’m also assuming that you are part of the apple developer program. Being part of this program gives you access to Xcode, which is the integrated development environment you use to create applications on Apple’s platform, which include iPhone, iPad, and MacOS.
Below you will find pointers to the previous posts – they really aren’t that difficult to find. The assumption is also that you have a Windows Azure account. Although you have to provide your credit card, you can leverage the trial offer and do these block posts for free.
This is part of an ongoing series of posts about writing a RESTful service hosted in the Microsoft cloud (Windows Azure). There are 8 posts on this topic that discuss, in detail, how to build out a RESTful service. They address Azure Table Services which allow you to host billions of rows of data in a secure and scalable manner.
Blog Post
Link
Part 8 (This Post) –Writing an Android Client to consume RESTful data from Azure (Microsoft Cloud)
The first step is to create a project. Start Xcode and choose the following menu selections, "File / New / New Project." The next screen will allow you to select the type of project you would like for your iPhone. We will select a "Navigation-based Application."
Navigation-based Application
We are choosing a "Navigation-based Application" because it makes it easy to use the TableView control. The TableView control is what will display our fast motorcycle data, as shown in previous posts. The TableView control is used by iOS developers because it has a lot of powerful, built-in capbilities (graphics, sorting, master/detail, etc).
Providing a Project Name
The "Product Name" represents the "Project Name." CloudClient will be used because it reflects what we are building - a client application that connects to the cloud.
A location for your code
A location is needed for our project and the corresponding code. For purposes of this demo it really doesn't matter that much where you store your code. Note your can select the "New Folder" button as well. Finally, you can add your project to a "git repository."
The project has been generated by Xcode
You can now see the project has been created. The files that we will modify include: -MainWindow.xib -RootViewController.h -RootViewController.m We will also add a couple of files: -JSONKit.h -JSONKit.m
Code to Parse JSON data from the RESTful Service
I have included the code to be available from my utility, "ClipboardLoader." This utility makes it easy to build the project during a live demo. If you would like the actual source code, you can download it here:
This code allows us to easily parse the JSON data coming back from our Azure RESTful service. The data coming back from the RESTful service will need to an "NSArray" from JSON so that the TableView control can display it easily. The TableView control cannot display JSON data directly. When you go to the site for downloading JSONKit you will notice that it offers dramatically better performance than similar frameworks or libraries.
I have provided a utility that makes getting this code much easier.
We will add two files, as previously stated. There files are important because they will save us all the trouble of writing the code that downloads from the RESTful service. -JSONkit.h and JSONKit.m Right mouse click on "CloudClient" and select "New / File."
Adding an Objective-C Class
Typically, when adding code to an iOS application, you choose "Objective-C class" as the file template. Classes are reusable pieces of code that perform a specific function. In Objective-C a class is split into two files. A header file which has a file extension of .h and an implementation file with a file extension of .m. The reason for the split is to simplify how you use an existing class. If you are an iOS newbie, you can see this post: https://timroadley.com/2011/06/28/ios-newbie-part-1-getting-started/.
Specifying a base class to your Objective-C class
Whenever you choose an "Objective-C class," you specify the class you need to inherit from. In this case, it doesn't really matter because we will overwrite all the code that is generated. You can simply click "Next" on this screen.
Naming your new class
A name for our "Objective-C class" is needed. We will use "JSONKit." Two files will be added once you do this: -JSONkit.h and JSONKit.m We will replace the contents of both these files in the next couple of steps.
Noting that your “empty” class has been added
Notice the two files have been added. There is code inside of them but we will completely replace that code with our own code from my "ClipboardLoader" tool. Once again, you can download the code yourself if you wish here:
Before continuing you will need to download the "ClipboardLoader" application from here: https://brunoblogfiles.com/clipboard/ClipboardLoader.zip Once you download and uncompress the file, you will start the application. Next, you will click on the button "Clip - JSONKit.h." Doing so will fill the clipboard with *all* the code you will need for JSONKit.h. Remember, to complete this series of posts, you will need:
After downloading and running ClipboardLoader, click on “Clip – JSONKit.h”
Pasting code into JSONKit.h
On the left pane, select JSONKit.h then select Command-A, which will highlight all the text. Next, right-mouse click and "Paste" the code from the clipboard into JSONKit.h. Essentially, we are replacing all the code in JSONKit.h with code from the clipboard. After that, we will do the same with JSONkit.m.
Getting JSONKit.m from ClipboardLoader
Go back to ClipboardLoader. This time we are going to select "Clip - JSONKit.m." This is a lot of code, over 1mb. The original source can be found here: https://github.com/johnezang/JSONKit. After doing so you will have a lot of code in the clipboard. Now back to Xcode and select JSONKit.m.
Pasting code into JSONKit.m
On the left pane, select JSONKit.m then select Command-A, which will highlight all the text. Next, right-mouse click and "Paste" the code from the clipboard into JSONKit.m. Essentially, we are replacing all the code in JSONKit.m with code from the clipboard. At this point we have loaded our JSONKit code. I leave it as an excercise to the developer to dive into the details of JSONKit. It is beyond the scope of this post. In a moment you will be **using** this library to actually make RESTful calls.
Sanity Check – Compiling / Building our project
At this point I recommend doing a sanity check by compiling. After adding JSONKit to our project we can make sure everything compiles correctly. Select the following from the menu: "Project / Build." There should be no errors.
Getting the code for RootViewController.h
Return back to ClipboardLoader. There are two more files we want to paste code into. The first file (seen below) is RootViewController.h. Select "RootViewController.h" from ClipboardLoader. Your clipboard now has the needed code.
Pasting code into RootViewController.h
On the left pane, select RootViewController.h then select Command-A, which will highlight all the text. Next, right-mouse click and "Paste" the code from the clipboard into RootViewController.h. Essentially, we are replacing all the code in RootViewController.h with code from the clipboard. We are almost finished with the coding.
Getting the code for RootViewController.m
Go back to ClipboardLoader. This time we are going to select "RootViewController.m" This is where the important work is being done. This is where we make RESTful calls to our service and where we populate the TableView control with data.
Pasting code into RootViewController.m
On the left pane, select RootViewController.m then select Command-A, which will highlight all the text. Next, right-mouse click and "Paste" the code from the clipboard into RootViewController.m. Essentially, we are replacing all the code in RootViewController.m with code from the clipboard. We are almost finished with the coding.
Connecting to our RESTful Endpoint
At the top of RootViewController.m take note of "serviceUri." This is represents our Azure RESTful endpoint that we are calling into to get data. You can get the exact URI from the Azure Portal at https://windows.azure.com. You will log in, find your "hosted service" and then in the right pane take note of "DNS Name." Here is what the code looks like: NSString *serviceUri = @"https://[* YOU GET THIS FROM THE PORTAL*].cloudapp.net/FastMotorcycleListService.svc/list/"; See Appendix A for more explanations on the actual RESTful calls. I’ve added some liberal commenting so you can see what the JSONKit is doing to make the JSON data “attachable” to the TableView control.
Building the final project
It is time to build the final project before running it. Simply go to the menu and select "Product / Build." If you copied everything well, you should see no errors.
Running the finished solution
It is time to build the final project before running it. Simply go to the menu and select "Product / Build." If you copied everything well, you should see no errors. This is the best part - running the application. It is as easy as hitting the menu "Product / Run."
Viewing the finished application as it runs
Assuming you have network connectivity, this is the actual emulator up and running. Clearly it is working and data is coming back. Congratulations! You consumed RESTful data from an iOS client. By the way, this will require hardly any modifications to run on an iPad.
Appendix A - Understanding how TableView gets populated by the RESTful calls
------------------------------------------------Understanding the method cellForRowAtIndexPath------------------------------------------------// This method is about customizing the appearance of table view cells.// This method fills the TableView with some contents.// Cells contain the actual contents of data.// Each cell is part of a larger hierarchy.// "Index Path" is how we access individual cells and populate them with data.// Returns a a pointer to a UITableViewCell object.- (UITableViewCell *)tableView:(UITableView *)tableView cellForRowAtIndexPath:(NSIndexPath *)indexPath{ // Standard code for cell identification static NSString *CellIdentifier = @"Cell"; // Standard to code to get a cell so we can put data into it UITableViewCell *cell = [tableView dequeueReusableCellWithIdentifier:CellIdentifier]; if (cell == nil) { cell = [[[UITableViewCell alloc] initWithStyle:UITableViewCellStyleDefault reuseIdentifier:CellIdentifier] autorelease]; } // These two lines make the fastmotorcycle visible in the TableView control NSString *fastbikeString = [self.fastbikes objectAtIndex: [indexPath row]]; cell.textLabel.text = fastbikeString; // Configure the cell. return cell;}
// RootViewController.m
//
#import "RootViewController.h"
#import "JSONKit.h"
@implementation RootViewController
@synthesize fastbikes;
////////////////////////////////////////////////////////////////////////////////////
// username - (1) Used in the restful service as part of the "where" clause
// (2) This allows you to support multiple users and becomes part of the
// partitionkey/rowkey. It also allows for scaling your data across
// multiple servers or partition nodes.
//
NSString *username = @"Bruno"; // Gets passed to the RESTful service
////////////////////////////////////////////////////////////////////////////////////
// Your get "YOUR SERVICE" from the portal
NSString *serviceUri = @"https://[**YOUR SERVICE GOES HERE**].cloudapp.net/FastMotorcycleListService.svc/list/";
////////////////////////////////////////////////////////////////////////////////////
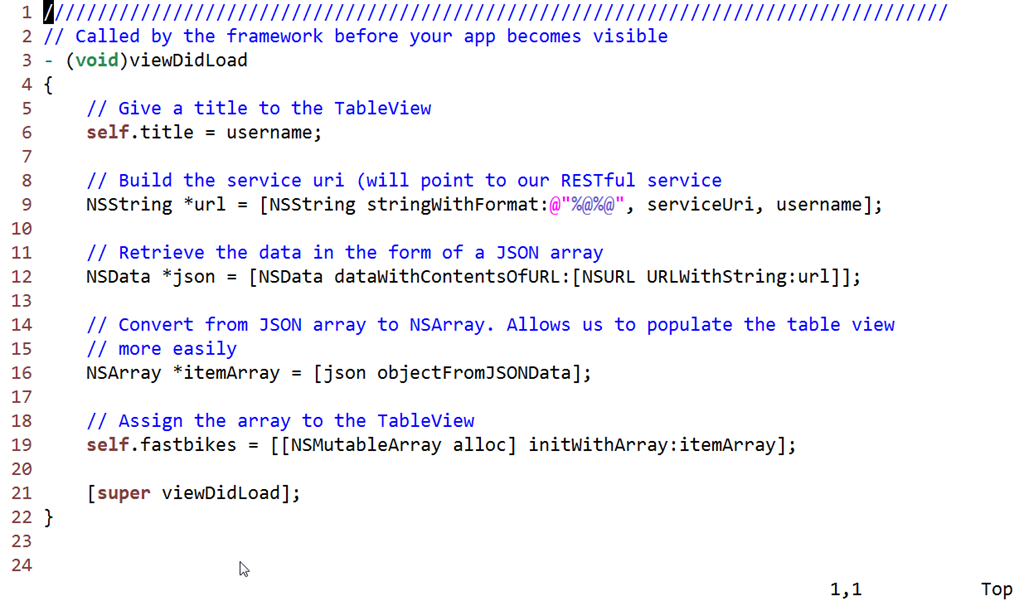
// Called at the right time for us to populate the control
- (void)viewDidLoad
{
// Give a title to the TableView
self.title = username;
// Build the service uri (will point to our RESTful service
NSString *url = [NSString stringWithFormat:@"%@%@", serviceUri, username];
// Retrieve the data in the form of a JSON array
NSData *json = [NSData dataWithContentsOfURL:[NSURL URLWithString:url]];
// Convert from JSON array to NSArray. Allows us to populate the table view
// more easily
NSArray *itemArray = [json objectFromJSONData];
// Assign the array to the TableView
self.fastbikes = [[NSMutableArray alloc] initWithArray:itemArray];
[super viewDidLoad];
}
// Boilerplate - added by Xcode
- (void)viewWillAppear:(BOOL)animated
{
[super viewWillAppear:animated];
}
// Boilerplate - added by Xcode
- (void)viewDidAppear:(BOOL)animated
{
[super viewDidAppear:animated];
}
// Boilerplate - added by Xcode
- (void)viewWillDisappear:(BOOL)animated
{
[super viewWillDisappear:animated];
}
// Boilerplate - added by Xcode
- (void)viewDidDisappear:(BOOL)animated
{
[super viewDidDisappear:animated];
}
/*
// Override to allow orientations other than the default portrait orientation.
- (BOOL)shouldAutorotateToInterfaceOrientation:(UIInterfaceOrientation)interfaceOrientation {
// Return YES for supported orientations.
return (interfaceOrientation == UIInterfaceOrientationPortrait);
}
*/
// Customize the number of sections in the table view.
- (NSInteger)numberOfSectionsInTableView:(UITableView *)tableView
{
return 1;
}
- (NSInteger)tableView:(UITableView *)tableView numberOfRowsInSection:(NSInteger)section
{
// fastbikes is the TableView so return its count
return [fastbikes count];
}
// Customize the appearance of table view cells.
// This fills the TableView with some contents.
// Cells contain the actual contents of data.
// Each cell is part of a larger hierarchy.
// "Index Path" is how we access individual cells.
// Returns a a pointer to a UITableViewCell object.
- (UITableViewCell *)tableView:(UITableView *)tableView cellForRowAtIndexPath:(NSIndexPath *)indexPath
{
// Standard code for cell identification
static NSString *CellIdentifier = @"Cell";
// Standard to code to get a cell so we can put data into it
UITableViewCell *cell = [tableView dequeueReusableCellWithIdentifier:CellIdentifier];
if (cell == nil) {
cell = [[[UITableViewCell alloc] initWithStyle:UITableViewCellStyleDefault reuseIdentifier:CellIdentifier] autorelease];
}
// These two lines make the fastmotorcycle visible in the TableView control
NSString *fastbikeString = [self.fastbikes objectAtIndex: [indexPath row]];
cell.textLabel.text = fastbikeString;
// Configure the cell.
return cell;
}
- (void)dealloc
{
[fastbikes release]; // cleanup and deallocate
[super dealloc];
}
///////////////////////////////////////////////////////////////////////////////////////
//******************** This is all boilerplate installed by Xcode ********************
/*
// Override to support conditional editing of the table view.
- (BOOL)tableView:(UITableView *)tableView canEditRowAtIndexPath:(NSIndexPath *)indexPath
{
// Return NO if you do not want the specified item to be editable.
return YES;
}
*/
/*
// Override to support editing the table view.
- (void)tableView:(UITableView *)tableView commitEditingStyle:(UITableViewCellEditingStyle)editingStyle forRowAtIndexPath:(NSIndexPath *)indexPath
{
if (editingStyle == UITableViewCellEditingStyleDelete)
{
// Delete the row from the data source.
[tableView deleteRowsAtIndexPaths:[NSArray arrayWithObject:indexPath] withRowAnimation:UITableViewRowAnimationFade];
}
else if (editingStyle == UITableViewCellEditingStyleInsert)
{
// Create a new instance of the appropriate class, insert it into the array, and add a new row to the table view.
}
}
*/
/*
// Override to support rearranging the table view.
- (void)tableView:(UITableView *)tableView moveRowAtIndexPath:(NSIndexPath *)fromIndexPath toIndexPath:(NSIndexPath *)toIndexPath
{
}
*/
/*
// Override to support conditional rearranging of the table view.
- (BOOL)tableView:(UITableView *)tableView canMoveRowAtIndexPath:(NSIndexPath *)indexPath
{
// Return NO if you do not want the item to be re-orderable.
return YES;
}
*/
- (void)tableView:(UITableView *)tableView didSelectRowAtIndexPath:(NSIndexPath *)indexPath
{
/*
<#DetailViewController#> *detailViewController = [[<#DetailViewController#> alloc] initWithNibName:@"<#Nib name#>" bundle:nil];
// ...
// Pass the selected object to the new view controller.
[self.navigationController pushViewController:detailViewController animated:YES];
[detailViewController release];
*/
}
- (void)didReceiveMemoryWarning
{
// Releases the view if it doesn't have a superview.
[super didReceiveMemoryWarning];
// Relinquish ownership any cached data, images, etc that aren't in use.
}
- (void)viewDidUnload
{
[super viewDidUnload];
// Relinquish ownership of anything that can be recreated in viewDidLoad or on demand.
// For example: self.myOutlet = nil;
}
@end


 I’ve added some liberal commenting so you can see what the JSONKit is doing to make the JSON data “attachable” to the TableView control.


