Supporting Billions of entities/rows for Mobile – Android Series - Part 8–Writing an Android Client to consume RESTful data from Azure (Microsoft Cloud)

  Past Posts in this Series
 
Blog Post Link
Part 1 - Why Scale Matters https://blogs.msdn.com/b/brunoterkaly/archive/2011/09/27/supporting-billions-of-entities-rows-for-mobile-android-series-part-1-why-scale-matters.aspx
Part 2 - What are some high level cloud offerings? https://blogs.msdn.com/b/brunoterkaly/archive/2011/09/27/supporting-billions-of-entities-rows-for-mobile-android-series-part-2-what-are-some-high-level-cloud-offerings.aspx
Part 3–Architecture and Data Options https://blogs.msdn.com/b/brunoterkaly/archive/2011/09/28/supporting-billions-of-entities-rows-for-mobile-android-series-part-3-architecture-and-data-options.aspx
Part 4–Building a Cloud-based RESTful service for our Android, iOS, and Windows Phone 7 Clients https://blogs.msdn.com/b/brunoterkaly/archive/2011/09/28/supporting-billions-of-entities-rows-for-mobile-android-series-part-4-building-a-cloud-based-restful-service-for-our-android-ios-and-windows-phone-7-clients.aspx
Part 5–Using the Portal and Setting up your Azure Account (Microsoft Cloud) https://blogs.msdn.com/b/brunoterkaly/archive/2011/10/05/supporting-billions-of-entities-rows-for-mobile-android-series-part-5-using-the-portal-and-setting-up-your-azure-account-microsoft-cloud.aspx
Part 6–Reading and Writing to Windows Azure (Cloud-based) Tables using standard HTTP and Fiddler https://blogs.msdn.com/b/brunoterkaly/archive/2011/10/05/supporting-billions-of-entities-rows-for-mobile-android-series-part-6-reading-and-writing-to-windows-azure-cloud-based-tables-using-standard-http-and-fiddler.aspx
Part 7–Migrating your Azure (Cloud RESTful Service) to be Hosted in a Microsoft Data Center https://blogs.msdn.com/b/brunoterkaly/archive/2011/10/07/supporting-billions-of-entities-rows-for-mobile-android-series-part-7-migrating-your-azure-cloud-restful-service-to-be-hosted-in-a-microsoft-data-center.aspx
Part 8 (This Post) –Writing an Android Client to consume RESTful data from Azure (Microsoft Cloud) https://blogs.msdn.com/b/brunoterkaly/archive/2011/10/10/supporting-billions-of-entities-rows-for-mobile-android-series-part-8-writing-an-android-client-to-consume-restful-data-from-azure-microsoft-cloud.aspx
You will need to download the Azure 90-day free trial. Click the image to the right.  


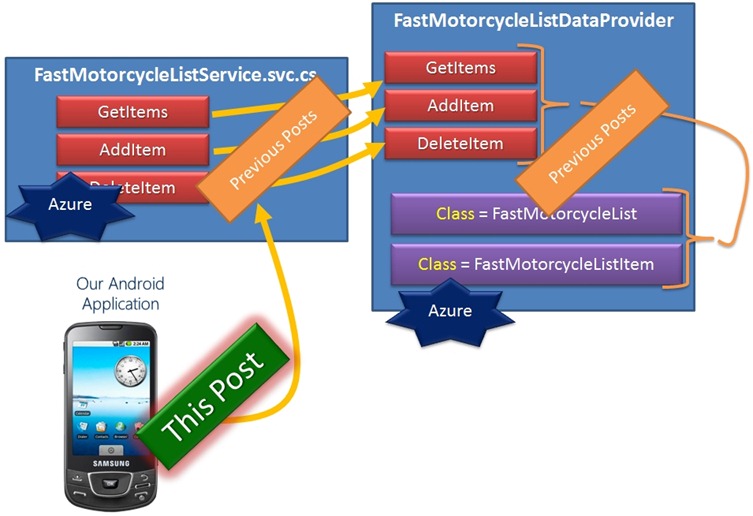
  This Post is About Android Client
  Finally, we are ready to talk about Android development. Yes, that means we are going to take out the Eclipse IDE and code in Java. Our Android client will make JSON calls against cloud data. q31r4cui

  Setting up Eclipse and Android for Development
  You obviously need to setup your Android development environment. These links will get your started. You will need to learn about downloading and installing Eclipse, the Android SDK, the Java runtime, etc.   Everything that follows here assumes you have a properly configured Eclipse environment and associated Android tooling.
Download Link
Download the Android SDK https://developer.android.com/sdk/index.html
Setting up Eclipse and Android https://insanitydesign.com/wp/projects/nehe-android-ports/setting-up-eclipse-and-android/
Installing the SDK https://developer.android.com/sdk/installing.html
Setting up your Android Environment https://fyi.oreilly.com/2009/02/setting-up-your-android-develo.html
   

  Creating the Android Project in Eclipse
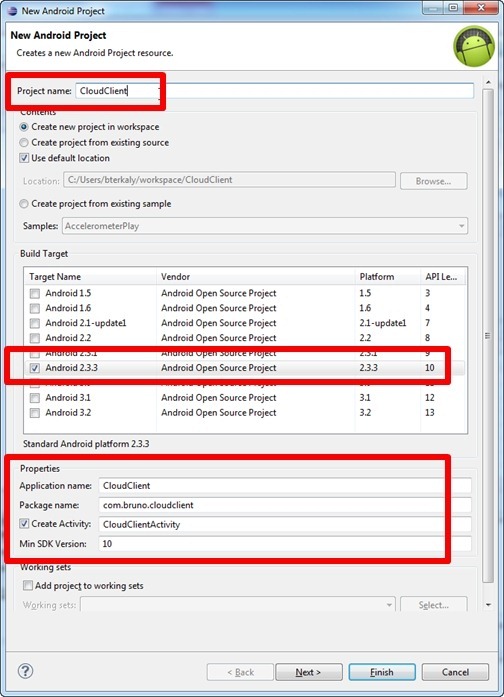
  Select File / New / Android Project. 3zwf155z Fill in the following information:
1. Project Name
2. Build Target
3. Application Name
4. Package name
5. The rest will auto-fill
rj3sugli

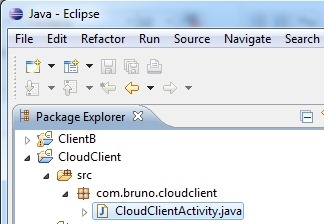
  CloudClientActivity.java
  We are now ready to start adding our java code. Notice we have already been provided CloudClientActivty.java. vwj21gkn Replace the existing code in CloudClientActivity.java with the following:             
 package com.bruno.cloudclient;import java.io.IOException;import com.bruno.cloudclient.R;import android.app.Activity;import android.app.Dialog;import android.content.Context;import android.content.SharedPreferences;import android.graphics.LightingColorFilter;import android.os.Bundle;import android.view.Gravity;import android.view.KeyEvent;import android.view.LayoutInflater;import android.view.View;import android.view.ViewGroup;import android.widget.AdapterView;import android.widget.ArrayAdapter;import android.widget.Button;import android.widget.EditText;import android.widget.ImageView;import android.widget.ListView;import android.widget.TextView;import android.widget.Toast;import android.widget.AdapterView.OnItemClickListener;public class CloudClientActivity extends Activity {        /** Called when the activity is first created. */    ArrayAdapter<String> adapter = null;  //     String listName;    SharedPreferences settings;    /***************************************************************    *  Purpose      - Startup routine. Configures view and accesses    *                 xml file that is your view. Set the file system    *                 sharing mode.    ****************************************************************/    @Override    public void onCreate(Bundle savedInstanceState)     {        try         {            super.onCreate(savedInstanceState);            setContentView(R.layout.main);            // Set file sharing mode to private            settings = getPreferences(Context.MODE_PRIVATE);            listName = settings.getString("listName", "Bruno");            // Get some data. Create an adapter and attach to our listview             // control.            final Data data = new Data();            // This is a key call. It retrieves the dat from the web service.            // The data is in JSON originally, then converted to simple strings.            adapter = new ArrayAdapter<String>(this, R.layout.list_item,                    R.id.listItem, data.getItems(listName));            // Attach the data to the ListView            final ListView myList = (ListView) findViewById(R.id.list);            myList.setAdapter(adapter);            // Create an "Add" button. This button will allow users to            // add data stored in web service.            Button btnAdd = (Button) findViewById(R.id.btnAdd);            // Manage button color for a black screen            btnAdd.getBackground().setColorFilter(                    new LightingColorFilter(0xFFFFFFFF, 0xFFAA0000));            // Add a textbox the user can use to enter new data to be added            // to the web service.            final EditText txtItem = (EditText) findViewById(R.id.txtItem);            // Setup the button listener            btnAdd.setOnClickListener(new Button.OnClickListener() {                public void onClick(View v) {                    settings = getPreferences(Context.MODE_PRIVATE);                    listName = settings.getString("listName", "Bruno");                    // Passing true to modifyData, which will add a new record                    // in the cloud                    data.modifyItem(listName, txtItem.getText().toString(), true);                    // Clear the textbox                    txtItem.setText("");                    try {                        refresh();                    } catch (IOException e) {                        // TODO Auto-generated catch block                        e.printStackTrace();                    }                }            });            // If you click on a ListItem in the ListBox you will            // pass "false" to modifyItem() which will delete            // a record in the cloud            myList.setOnItemClickListener(new OnItemClickListener()             {                public void onItemClick(AdapterView<?> a, View v, int position,                        long id)                 {                    String s = myList.getItemAtPosition(position).toString();                    settings = getPreferences(Context.MODE_PRIVATE);                    listName = settings.getString("listName", "Bruno");                    data.modifyItem(listName, s, false);                    try                     {                        refresh();  // Refresh the listbox to reflect the deleted entry                    }                     catch (IOException e)                     {                        // TODO Auto-generated catch block                        e.printStackTrace();                    }                    // Notify user that record was just deleted                    makeToast(s);                }            });        }         catch (Exception e)         {            e.printStackTrace();        }    }     /***************************************************************    *  Purpose      - Notify user that we just deleted a record    *                 Pops a little message    ****************************************************************/    public void makeToast(String item)     {        LayoutInflater inflater = getLayoutInflater();        View layout = inflater.inflate(R.layout.toast_layout,                (ViewGroup) findViewById(R.id.toast_layout_root));        ImageView image = (ImageView) layout.findViewById(R.id.image);        image.setImageResource(R.drawable.icon);        TextView text = (TextView) layout.findViewById(R.id.text);        text.setText(item + " deleted.");        Toast toast = new Toast(getApplicationContext());        toast.setGravity(Gravity.CENTER_VERTICAL, 0, 0);        toast.setDuration(Toast.LENGTH_SHORT);        toast.setView(layout);        toast.show();    }    /***************************************************************    *  Purpose      - Get latest data. Fill the view, attach view and    *                 adapter, tell adapter to refresh view.     ****************************************************************/    public void refresh() throws IOException     {        Data d = new Data();        settings = getPreferences(Context.MODE_PRIVATE);        listName = settings.getString("listName", "Bruno");        adapter = new ArrayAdapter<String>(this, R.layout.list_item,                R.id.listItem, d.getItems(listName));        // Attach adapter and view, then refresh with the        // notifyDataSetChanged event        ListView myList = (ListView) findViewById(R.id.list);        myList.setAdapter(adapter);        adapter.notifyDataSetChanged();    }}                
             

  Data.java
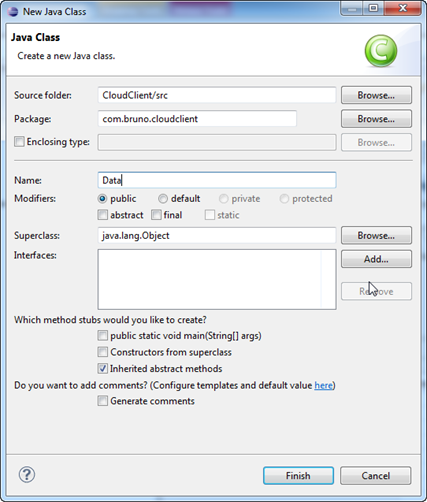
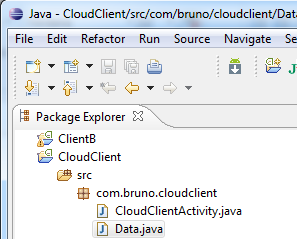
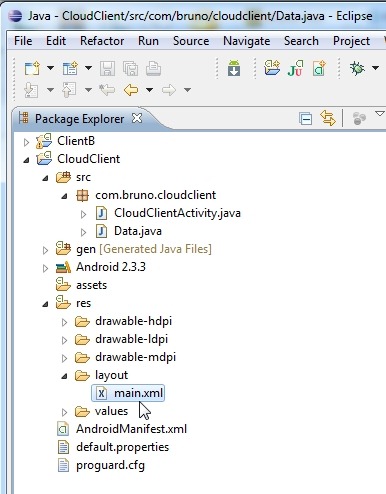
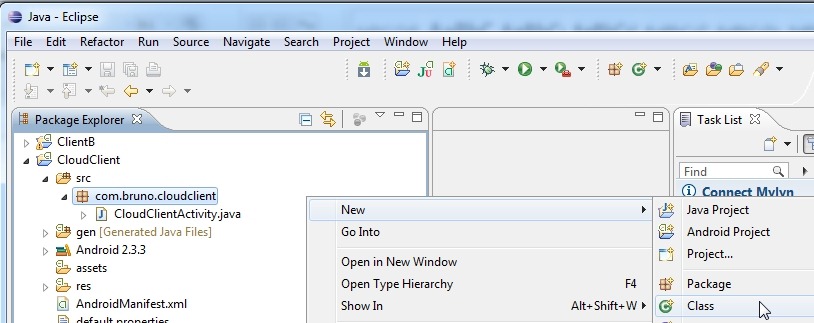
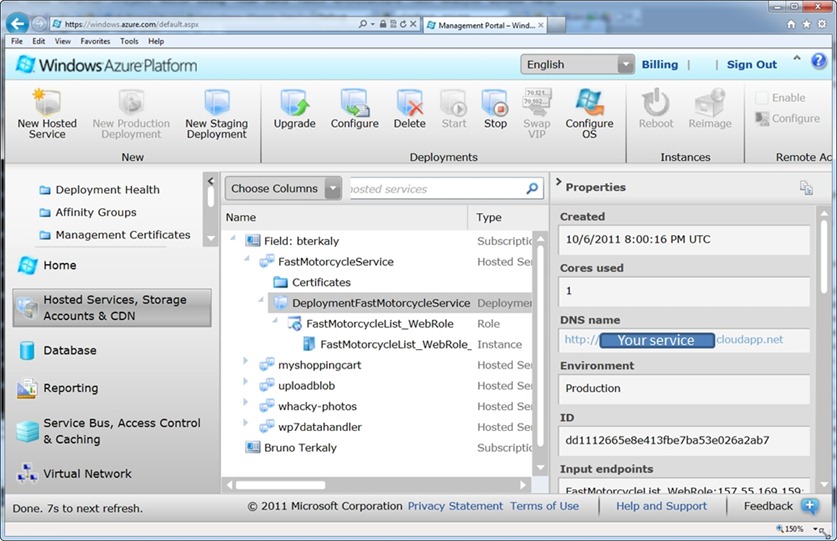
  Add a java module and insert code. le3ul5l4 Call it Data.java. image You should see this: image You will need to take note of the URL for your Azure service. See “YOUR_AZURE_SERVICE” below. It should correspond to: bl5n2vwz Open Data.java and insert this code:        
 package com.bruno.cloudclient;import java.io.BufferedInputStream;import java.io.IOException;import java.io.InputStream;import java.net.HttpURLConnection;import java.net.MalformedURLException;import java.net.URL;import java.net.URLConnection;import java.util.ArrayList;import org.apache.http.HttpEntity;import org.apache.http.HttpResponse;import org.apache.http.client.ClientProtocolException;import org.apache.http.client.HttpClient;import org.apache.http.client.methods.HttpDelete;import org.apache.http.client.methods.HttpGet;import org.apache.http.client.methods.HttpPost;import org.apache.http.entity.ByteArrayEntity;import org.apache.http.impl.client.DefaultHttpClient;import org.json.JSONArray;import android.os.AsyncTask;public class Data {    private ArrayList<String> items;    /***************************************************************    *  Purpose      - Populate or list view control. Makes a call    *                 the web service using a hard-coded address.    *                     *     ****************************************************************     *  Assumptions  - RESTful service available with data    *     ****************************************************************     *  Effects      - none, simply reads data    *     ****************************************************************     *  Inputs       - A list (represents an android user) to     *                 that is looked up from the RESTful service    ****************************************************************     *  Returns      - A populated array (will fill the adapter    *                 which is mapped to our listbox    *     ****************************************************************/    public ArrayList<String> getItems(String listName) throws IOException     {        // ArrayList will be populated from the JSON data coming from        // the web server        items = new ArrayList<String>();                JSONArray ja = new GetShoppingListData()           .doInBackground("https://fastmotorcycleservice.cloudapp.net/FastMotorcycleListService.svc/list/"+listName);                // Loop through json array and return results to be used in         // the listbox via the adapter object        for (int i = 0; i < ja.length(); i++)         {            try             {               items.add(ja.getString(i));            }             catch (Exception e)             {                e.printStackTrace();            }        }        return items;    }    /***************************************************************    *  Purpose      - Does a delete or add asynchronously. If pass    *                 true, then an add is done. Else do delete.    ****************************************************************/    public void modifyItem(String listName, String item, boolean operation)     {        if (operation == true)         {            HttpResponse response = new AddShoppingListData()                .doInBackground(                        "https://YOUR_AZURE_SERVICE.cloudapp.net/FastMotorcycleListService.svc/list/"+listName,                    item);        }         else         {            HttpResponse response = new DeleteShoppingListData()                    .doInBackground(                            "https://YOUR_AZURE_SERVICE.cloudapp.net/FastMotorcycleListService.svc/list/"+listName,                    item);        }    }        /***************************************************************    *  Purpose      - A private class to allow:    *                 Asynchronously retrieve data from the RESTful    *                 service hosted in the cloud    ****************************************************************     *  Assumptions  - RESTful service up and and running    *     ****************************************************************     *  Inputs       - A url to look up data    *     ****************************************************************     *  Returns      - A JSON array full of data    *     ****************************************************************/    private class GetShoppingListData extends            AsyncTask<String, Void, JSONArray> {        @Override        protected JSONArray doInBackground(String... urls)         {            // HttpClient used to talk to web service.            HttpClient httpclient = new DefaultHttpClient();                        // This will be the array we need to convert. We            // get the data from the web service.            JSONArray listItems = null;            String jason = null;                        // Setup the RESTful call to 'GET' the data            HttpGet request_http_get = new HttpGet(urls[0]);                        // Read the JSON data and return            try             {                // Fill a response object using a request                HttpResponse response_http_get = httpclient.execute(request_http_get);                            // Length represents the number of data items returned                // by RESTful service                long length = response_http_get.getEntity().getContentLength();                // "entity" ends up being the data coming back from web server.                HttpEntity entity = response_http_get.getEntity();                // Read the bytes, one byte at a time.                InputStream stream = entity.getContent();                                // Allocate a series of bytes                byte[] buffer = new byte[(int) length];                                // Read bytes from RESTful service.                // After this loop, we end up with -> ["busa","gxr1000","ninja250"]                for (int i = 0; i < length; i++)                 {                    buffer[i] = (byte) stream.read();                }                // The string "buffer" looks something                 // like this -> ["busa","gxr1000","ninja250"]                jason = new String(buffer);                // Convert to Json array for Android ListBox.                // This ends up being a 3 element json array (see "busa" above)                listItems = new JSONArray(jason);            }             catch (Exception e)             {                System.out.println(e);            }            return listItems;        }    }     /***************************************************************    *  Purpose      - A class used to Post data to the RESTful service (Microsoft    *                 cloud, Azure) using Http 'POST'    ****************************************************************     *  Inputs       - (1) The service address    *                 (2) The data to be posted (what the user types in)    ****************************************************************     *  Comments     - (1) Using HttpPost for "Add" operations    *                 (2) Using UTF8 because default Android is UTF-16    ****************************************************************/    private class AddShoppingListData extends            AsyncTask<String, Void, HttpResponse> {        HttpResponse response_http;        @Override        protected HttpResponse doInBackground(String... params)         {            HttpClient httpclient = new DefaultHttpClient();            HttpPost request_add = new HttpPost(params[0]);            try {                request_add.addHeader("Content-Type", "application/json");                String postData = "\"" + params[1] + "\"";                request_add.setEntity(new ByteArrayEntity(postData.getBytes("UTF8")));                response_http = httpclient.execute(request_add);            } catch (ClientProtocolException e) {                // TODO            } catch (IOException e) {                // TODO            }            return response_http;        }    }    /***************************************************************    *  Purpose      - A class used to Post data to the RESTful service (Microsoft    *                 cloud, Azure) using Http 'POST'    ****************************************************************     *  Inputs       - (1) The service address    *                 (2) The data to be posted (what the user types in)    ****************************************************************     *  Comments     - (1) Using HttpPost for "Delete" operations    *                 (2) Fixing up spaces with s.replace()    ****************************************************************/    private class DeleteShoppingListData extends            AsyncTask<String, Void, HttpResponse> {        @Override        protected HttpResponse doInBackground(String... params)         {            HttpClient httpclient = new DefaultHttpClient();            String s = params[1];            // Fix up spaces            String charEscaped = s.replace(" ", "%20");            HttpDelete request_delete = new HttpDelete(params[0] + "/" + charEscaped);            HttpResponse response_delete = null;            try             {                // Do the RESTful delete command                response_delete = httpclient.execute(request_delete);            }             catch (ClientProtocolException e)             {                e.printStackTrace();            } catch (IOException e)             {                e.printStackTrace();            }            return response_delete;        }    }}                
          

  Main.xml
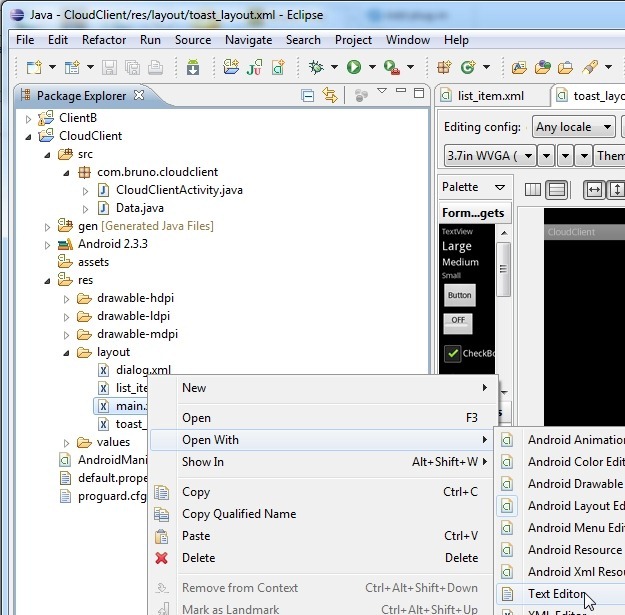
  The next 4 files represent the user interface. Lets start with Main.xml. It is already provided. dd5pzpb2 Open the text editor. Right-mouse click and choose Open With / Text Editor. 04qfffvi Insert the following xml code:        
 <?xml version="1.0" encoding="utf-8"?><RelativeLayout  xmlns:android="https://schemas.android.com/apk/res/android"  android:layout_width="fill_parent"  android:layout_height="fill_parent">  <ListView    android:layout_alignParentTop="true" android:id="@+id/list" android:layout_width="fill_parent" android:layout_height="fill_parent">  </ListView>  <LinearLayout    android:layout_below="@+id/ListView01" android:id="@+id/LinearLayout01" android:layout_height="wrap_content" android:layout_width="fill_parent" android:layout_alignParentBottom="true">    <EditText      android:id="@+id/txtItem"      android:layout_width="fill_parent"      android:layout_height="wrap_content"      android:layout_weight="1"      android:layout_alignParentBottom="true">    </EditText>    <Button      android:id="@+id/btnAdd"      android:layout_alignRight="@id/txtItem"      android:layout_width="fill_parent"      android:layout_height="wrap_content"      android:layout_weight="1"      android:text="Add"      android:layout_alignParentBottom="true">    </Button>  </LinearLayout></RelativeLayout>                

  Dialog.xml
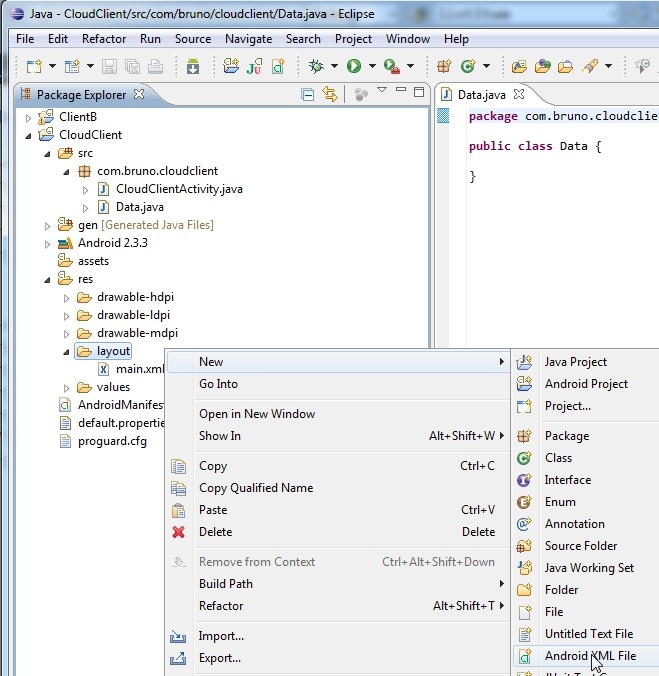
  Add a new xml file by right-mouse clicking on layout. Choose New / Android XML File. ntroj41s Insert the following xml code:   
 <?xml version="1.0" encoding="utf-8"?><LinearLayout  xmlns:android="https://schemas.android.com/apk/res/android"  android:id="@+id/layout_root"  android:orientation="horizontal"  android:layout_width="fill_parent"  android:layout_height="fill_parent"  android:padding="10dp">  <EditText    android:id="@+id/listName"    android:layout_width="100dp"    android:layout_height="fill_parent"    android:layout_marginRight="10dp"/>  <Button    android:id="@+id/btnCreateList"    android:layout_width="100dp"    android:layout_height="fill_parent"    android:textColor="#FFF"/></LinearLayout>                

  list_item.xml
  Add a new xml file by right-mouse clicking on layout. Choose New / Android XML File. Insert the following xml code:        
 <?xml version="1.0" encoding="utf-8"?><LinearLayout  xmlns:android="https://schemas.android.com/apk/res/android"  android:id="@+id/layout_root"  android:orientation="horizontal"  android:layout_width="fill_parent"  android:layout_height="fill_parent"  android:padding="10dp">  <EditText    android:id="@+id/listName"    android:layout_width="100dp"    android:layout_height="fill_parent"    android:layout_marginRight="10dp"/>  <Button    android:id="@+id/btnCreateList"    android:layout_width="100dp"    android:layout_height="fill_parent"    android:textColor="#FFF"/></LinearLayout>                

  toast_layout.xml
  Add a new xml file by right-mouse clicking on layout. Choose New / Android XML File. Insert the following xml code:        
 <?xml version="1.0" encoding="utf-8"?><LinearLayout  xmlns:android="https://schemas.android.com/apk/res/android"  android:layout_width="wrap_content"  android:layout_height="wrap_content">  <TextView    xmlns:android="https://schemas.android.com/apk/res/android"    android:layout_width="fill_parent"    android:layout_height="fill_parent"    android:padding="10dp"    android:textSize="16sp"    android:id="@+id/listItem">  </TextView></LinearLayout>                


  Modify AndroidManifest.xml
  We need to tell the application that an connecting to the internet is possible from within the application. This is done by modifying the XML inside of AndroidManifest.xml. We need to add the following line:

<uses-permission android:name="android.permission.INTERNET" />

This is what AndroidManifest.xml should look like:        
 <?xml version="1.0" encoding="utf-8"?><manifest xmlns:android="https://schemas.android.com/apk/res/android"      package="com.bruno.cloudclient"      android:versionCode="1"      android:versionName="1.0">    <uses-sdk android:minSdkVersion="10" /> <uses-permission android:name="android.permission.INTERNET" />    <application android:icon="@drawable/icon" android:label="@string/app_name">        <activity android:name=".CloudClientActivity"                  android:label="@string/app_name">            <intent-filter>                <action android:name="android.intent.action.MAIN" />                <category android:name="android.intent.category.LAUNCHER" />            </intent-filter>        </activity>    </application></manifest>                

  Ready to compile and run !
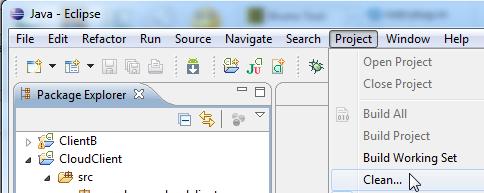
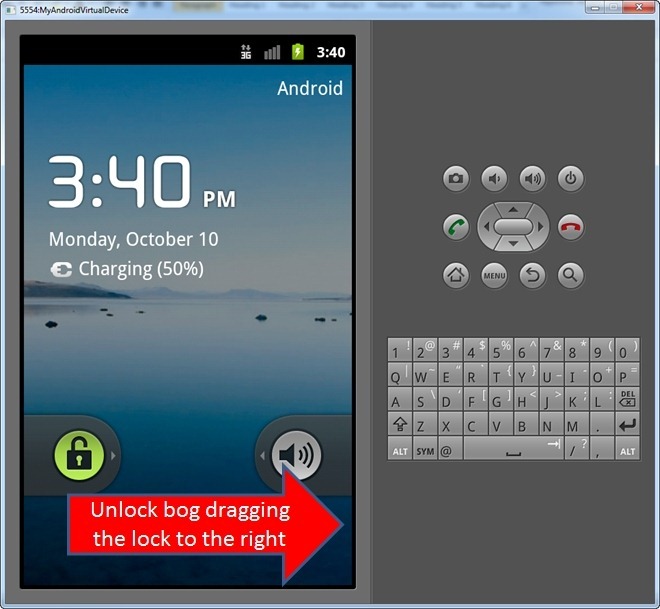
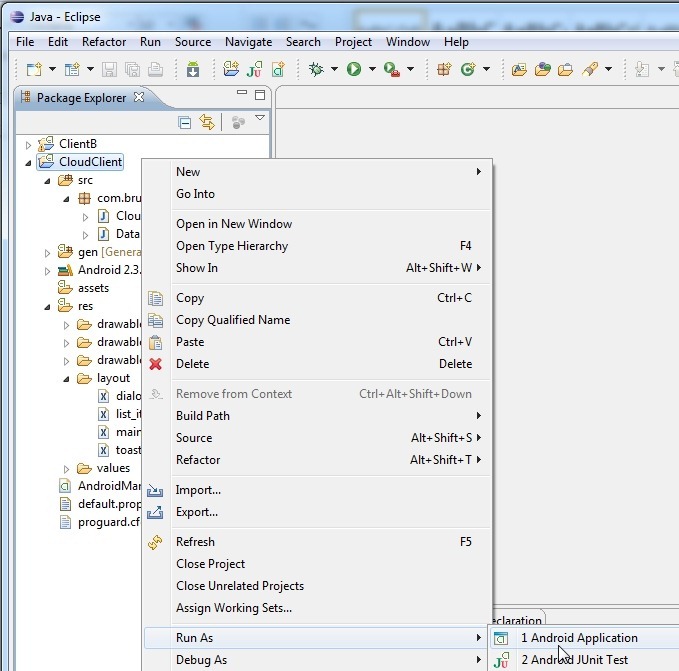
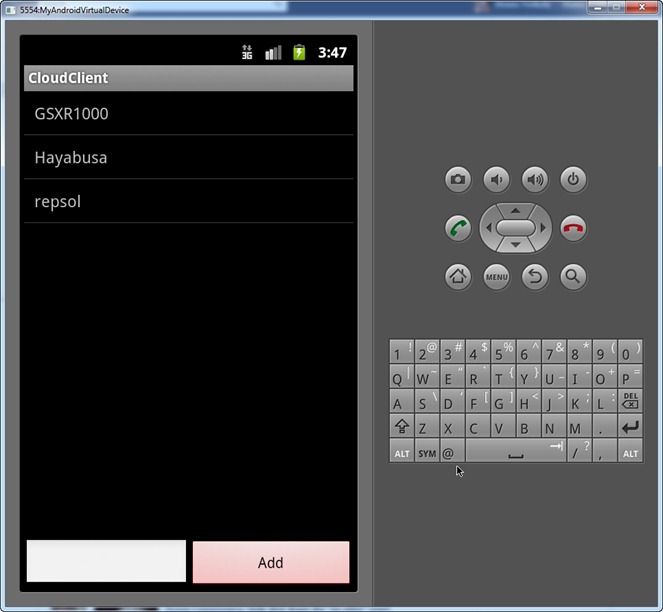
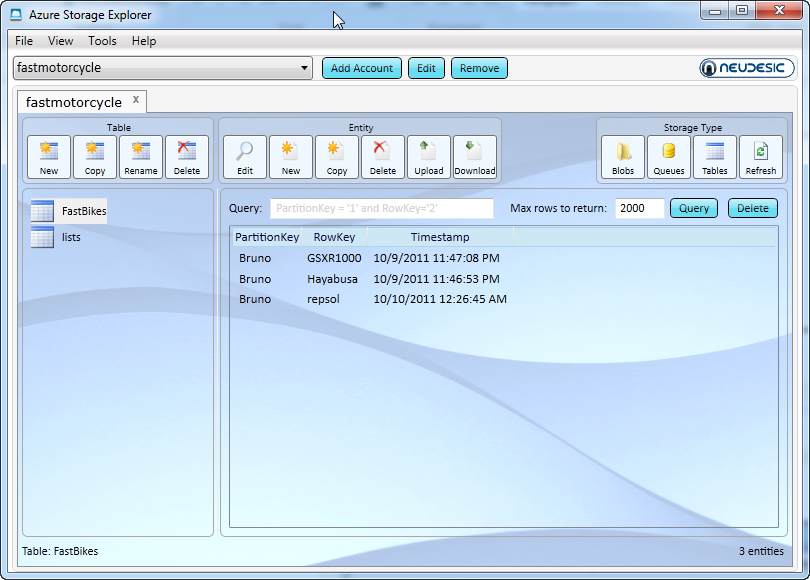
  Close your Android emulators, if they are open. Save and close all the java and xml files. Select the following command: Project / Clean. image There should be no errors. We are ready to run our Android application. Right-mouse click on the CloudClient project and choose Run As / Android Application. ku04rj1c Unlock the client. pmo2xuuf If everything was coded correctly (and assuming you used Azure Storage Explorer to add data), you should see the following: astrm2oi This corresponds to our Azure Storage Explorer version of the data: image
    Conclusion
  This concludes this 8-part series on constructing a RESTful Azure (Microsoft Cloud) and performing CRUD operations from an Android client application. This has demonstrated the whole process from start to end, complete with source code. Hope you found value in it! -Bruno