Supporting Billions of entities/rows for Mobile – Android Series - Part 6–Reading and Writing to Windows Azure (Cloud-based) Tables using standard HTTP and Fiddler

 
Past Posts in this series
 
Post Topic Link
Part 1 - Why Scale Matters https://blogs.msdn.com/b/brunoterkaly/archive/2011/09/27/supporting-billions-of-entities-rows-for-mobile-android-series-part-1-why-scale-matters.aspx
Part 2 - What are some high level cloud offerings? https://blogs.msdn.com/b/brunoterkaly/archive/2011/09/27/supporting-billions-of-entities-rows-for-mobile-android-series-part-2-what-are-some-high-level-cloud-offerings.aspx
Part 3–Architecture and Data Options https://blogs.msdn.com/b/brunoterkaly/archive/2011/09/28/supporting-billions-of-entities-rows-for-mobile-android-series-part-3-architecture-and-data-options.aspx
Part 4–Building a Cloud-based RESTful service for our Android, iOS, and Windows Phone 7 Clients https://blogs.msdn.com/b/brunoterkaly/archive/2011/09/28/supporting-billions-of-entities-rows-for-mobile-android-series-part-4-building-a-cloud-based-restful-service-for-our-android-ios-and-windows-phone-7-clients.aspx
Part 5–Using the Portal and Setting up your Azure Account (Microsoft Cloud) https://blogs.msdn.com/b/brunoterkaly/archive/2011/10/05/supporting-billions-of-entities-rows-for-mobile-android-series-part-5-using-the-portal-and-setting-up-your-azure-account-microsoft-cloud.aspx
You will need to download the free Azure trial.                     
   
 
The last post was about …
  In the last post I illustrated how to create a RESTful service using .NET technologies. Here is the diagram from the last post: 5tw420z0
 
This post is to illustrate that you can go directly to the Storage Service with HTTP bypassing .NET
  Although it is not recommended for this particular application, it is possible communicate directly with the Storage Service. Direct communication with Azure tables requires some advanced techniques, working with request headers and request bodies. Later in this post you will learn what makes this technique somewhat challenging. gl3nhvsu We need to able to: 1. Create a table 2. Insert into a table 3. Query a table We need do this using all standard http without any .NET whatsoever. We will use Fiddler to get this done. We can also use the Azure Storage Explorer.
 
Azure Storage Explorer ase4_blobs.png
 

Azure Storage Explorer is a useful GUI tool for inspecting and altering the data in your Windows Azure Storage storage projects including the logs of your cloud-hosted applications.

All 3 types of cloud storage can be viewed and edited: blobs, queues, and tables.

Description Link
Home page on CodePlex for Azure Storage Explorer https://azurestorageexplorer.codeplex.com/
   
Login to https://windows.azure.portal and choose Hosted Services, Storage Accounts & CDN. 0vf2k02l Now you need your storage access keys. 4f5px5yl Copy the storage access keys to the clipboard. zmpvyhy3 Now are are ready to configure the Azure Storage Explorer. bp0vkom1 As expected, there are no tables and no data. That is the next step. image
 
Adding a Table Object with Storage Explorer
  Follow these steps to add a table object: 1. Click Tables 2. Click New 3. Enter a table name usk0gj0q
 
Adding Entities
  Each table can have many Entities. You can think of an entity as a row in a table. But in reality an entity is a collection of name- value pairs.  Notice under the Storage Type panel you can see the Tables button. Click tables before following the rest of the steps. ucqytfub Notice that a PartitionKey and RowKey are required columns.
 
Querying the table
  You can also hit the query button to see the entities in the table. Later, when we create the Android client, you will be able to use LINQ to query the entities. image
 
Using http to interact with Azure Tables
  Http is the most generic way to interact with Azure tables. I will be using Fiddler add new records and to query the data in Azure tables. 3szv5gtp You can download Fiddler here:
Description Link
Download Fiddler https://www.fiddler2.com/fiddler2/
   
Authentication The Table service requires that each request be authenticated. Both Shared Key and Shared Key Lite authentication are supported. More information can be found here
Description Link
Authentication Information at Microsoft https://msdn.microsoft.com/en-us/library/windowsazure/dd179428.aspx
   
 
Entering an HTTP Request in Fiddler
  Step 1 -  Click on Request Builder Step 2 -  Enter the URL and select GET Step 3 -  Enter the Request Header (you cannot do this without my tool explained below. See “Generating the Request Header” section below). Step 4 -  Hit Execute
gz5fsztr  
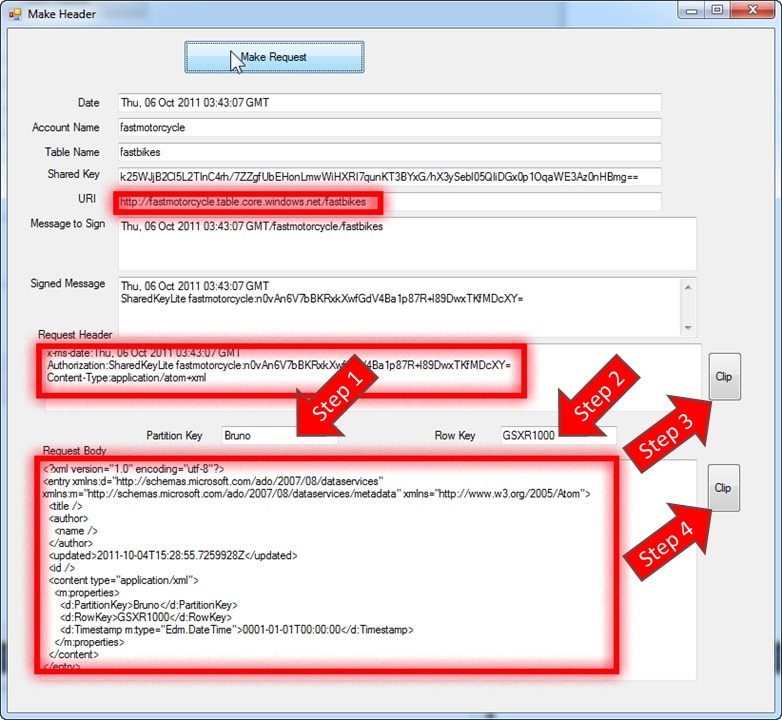
The Request Header is going to require you to generate a Shared Key Lite.
 
Viewing the Result in Fiddler
  After hitting Execute in Step 4 above, results will appear. sgaijwcz
 
Viewing the results (see above)
  Step 1 – Double click the result item in the upper left window. This brings up results window in the lower right pane of Fiddler Step 2 – Click on TextView to see the results in AtomPub format. Step 3 – View the data. Notice you can see Bruno and Haybusa that we added previously with the Azure Storage Explorer.
 
Generating the Request Header lbtlwmog
  If you look carefully, you will notice the SharedKeyLite authorization signature. This isn’t trivial to generate, since you need to compute a Hash-based Message Authentication Code (HMAC) using the SHA256 hash function. Luckily I’ve done that for you.
 
A Simple Windows Forms Application mhp4avet
  You are looking at a custom application that I wrote. I am providing the code below in case you want to do this yourself. You typically would use the ADO.NET Data Services library in C# or VB. But if you want to interact with Azure Tables from non-.NET clients, you will need to master the techniques I am illustrating here. You can learn more at the link below.
Description Link
Azure REST-API https://msdn.microsoft.com/en-us/library/windowsazure/dd179423.aspx
   
The trick is understanding the code behind the Make Request button, which fills in all the boxes you see above. The ones to paste into fiddler are: 1. URI 2. HttpHeader
 public partial class Form1 : Form{    const string uriTemplate = "https://{0}.table.core.windows.net/{1}";    const string uriTemplate2 = "https://{0}.table.core.windows.net/{1}/{2}";    string _sharedKey = "== your shared key from the portal goes here==";    string _accountName = "fastmotorcycle";    string _tableName = "fastbikes";    public Form1()    {        InitializeComponent();    }    private void cmdMakeHeader_Click(object sender, EventArgs e)    {        var account = _accountName;        var sharedKey = Convert.FromBase64String(_sharedKey);        this.txtAccountName.Text = account;        this.txtSharedKey.Text = _sharedKey;        this.txtTableName.Text = _tableName;        // Fill datetime field        string datetime = DateTime.UtcNow.ToString("R", CultureInfo.InvariantCulture);        this.txtDate.Text = datetime;                    // Fill uri field        string uri = string.Format(uriTemplate, _accountName, _tableName);        this.txtURI.Text = uri;                    // Create request object        WebRequest request = WebRequest.Create(uri);        // Add date header        request.ContentLength = 0;        request.Headers.Add("x-ms-date", datetime);                    // Get resource        var resource = request.RequestUri.PathAndQuery;            // Sign date, account and uri        string stringToSign = string.Format("{0}\n/{1}{2}",                request.Headers["x-ms-date"],                account,                resource            );        this.txtMessageToSign.Text = stringToSign;        // Sign the string using shared key        var hasher = new HMACSHA256(sharedKey);        string signedSignature = Convert.ToBase64String(hasher.ComputeHash(Encoding.UTF8.GetBytes(stringToSign)));        this.txtSignedMessage.Text = signedSignature;        // Add authorization header        string authorizationHeader = string.Format("{0} {1}:{2}", "SharedKeyLite", account, signedSignature);        request.Headers.Add("Authorization", authorizationHeader);        // Show the signed message        this.txtSignedMessage.Text = request.Headers.Get(0).ToString() + "\r\n";        this.txtSignedMessage.Text += request.Headers.Get(1).ToString() + "\r\n";        // Show the entire header        this.txtHttpHeader.Text = "x-ms-date:" + request.Headers.Get(0).ToString() + "\r\n";        this.txtHttpHeader.Text += "Authorization:" + request.Headers.Get(1).ToString() + "\r\n";        this.txtHttpHeader.Text += "Content-Type:" + "application/atom+xml" + "\r\n";        if (this.txtPartitionKey.Text == String.Empty ||            this.txtRowKey.Text == String.Empty)            return;        this.txtResponseBody.Text = string.Format(Strings.response_header,                                                    this.txtPartitionKey.Text,                                                    this.txtRowKey.Text);    }    private void cmdClip2_Click(object sender, EventArgs e)    {        Clipboard.SetData(DataFormats.Text, (Object)this.txtResponseBody.Text);    }    private void cmdClip1_Click(object sender, EventArgs e)    {        Clipboard.SetData(DataFormats.Text, (Object)this.txtHttpHeader.Text);    }}
 
You can even add data using this technique
  Notice that this time I added a PartitionKey and RowKey in Steps 1 and 2 below. cur33vw5 Now we need to copy the Response Body in addition to the previous fields. The XML below was generated by my tool. Notice the partitionkey and rowkey from the form above.
 

<?xml version="1.0" encoding="utf-8"?> <entry xmlns:d="https://schemas.microsoft.com/ado/2007/08/dataservices" xmlns:m="https://schemas.microsoft.com/ado/2007/08/dataservices/metadata" xmlns="https://www.w3.org/2005/Atom">   <title />   <author>     <name />   </author>   <updated>2011-10-04T15:28:55.7259928Z</updated>   <id />   <content type="application/xml">     <m:properties>       <d:PartitionKey>Bruno</d:PartitionKey>       <d:RowKey>GSXR1000</d:RowKey>       <d:Timestamp m:type="Edm.DateTime">0001-01-01T00:00:00</d:Timestamp>     </m:properties>   </content> </entry>

Notice the Make Header tool creates the 3 core pieces of information you will need to paste into Fiddler’s Request Builder: 1. URI 2. Request Header 3. Request Body When adding date, you will need to do a POST. Here is a table that explains the HTTP verbs and how they relate to operations:
HTTP Verb Operation
GET Query data
POST Insert data
DELETE Delete data
PUT Update data
MERGE Merge data
1s3xztlh
 
In Fiddler do the following:
  Step 1 – Change from GET to POST Step 2 – Paste in the new Request headers from the tool above Step 3 – Paste in the Request Body from the tool above Step 4 – Hit execute Step 5 – Realize that you just added data to your table using a PURE http protocol
waslub2k Notice that we have added the data. You can see the GSXR1000 data in Azure Storage Explorer. image
 
Conclusions
  This post was important for several reasons. First, it introduced the Windows Azure Portal and addressed the Hosted Service and Storage Account and how they related to your RESTful service and to your infinitely scaled Azure Table Service Storage.
Windows Azure Portal Section Description
Hosted Service Where your RESTful service will reside and be available to mobile clients. This is the next blog post. We will migrate our RESTful project in Visual Studio to the Microsoft Cloud. Remember, not only is our data scalable, but so is our RESTful service.
Building the RESTful Service The blog link
Part 4–Building a Cloud-based RESTful service for our Android, iOS, and Windows Phone 7 Clients https://blogs.msdn.com/b/brunoterkaly/archive/2011/09/28/supporting-billions-of-entities-rows-for-mobile-android-series-part-4-building-a-cloud-based-restful-service-for-our-android-ios-and-windows-phone-7-clients.aspx
   
Storage Account Where our data is stored. Explored deeply in this post, using the Azure Storage Explorer and Fiddler with standard HTTP requests. In the next post we will show how this data is consumed by the RESTful service. Mobile clients will not access Azure tables directly. They will go through the RESTful Hosted Service.
   

Typically, you will access Azure Table Storage through the ADO.NET Data Services API, found inside the Azure SDK Download. But there may be situations where you want to access Azure table storage outside of a Windows environment, such as from Java or PHP or any other non-MS platform. Remember, Azure tables are incredibly scalable, cost-effective, and performant. And Azure tables are also available from a purely http world.

What Where
Free download link for the 90-day Azure trial. Click the photo to the right. lahxjo2d