Multiple Authentication Methods in SharePoint 2010
In SharePoint 2007, you were limited to a single authentication mechanism per AAM zone. With SharePoint 2010, this is still the case when dealing with "Classic" mode authentication, but in Claims-based authentication scenarios, the limitation of a signle authentication mechanism per zone is removed. In SharePoint 2010, you are able to configure multiple authentication providers, and the default experience prompts the end user to select the authentication provider to use. In this article, we're going to take a look at this functionality, what this implies for SharePoint 2010, and explore a few ways to leverage this functionality to bend SharePoint in ways not previously possible.
Reviewing the Rules
In SharePoint 2007, SharePoint didn't do authentication; IIS did. SharePoint only authorized requests. This line was blurred a bit when it came to Forms-based authentication secured web applications, but frequently the argument was made that, since SharePoint simply leveraged the underlying ASP.NET pluggable authentication framework, SharePoint really wasn't authenticating the user even in that case - ASP.NET was. SharePoint 2007 was always positioned as a system that did its own authorization, but that relied on an external system to perform authentication.
In SharePoint 2010, for all intents and purposes SharePoint really does now authenticate the user - or, depending on your definition of authentication, has a very active role in the coordination of authentication activities and web application security. This is only true when a web application is configured for Claims-based authentication. If the web application is not configured for claims-based authentication, then it is configured for Classic mode authentication and you'll have the same authentication behavior and request/response patterns in SharePoint 2010 as you had in SharePoint 2007.
Claims-Based Authentication and Anonymous Access in IIS
When a web application is configured for Claims-based authentication, SharePoint will alter the IIS bindings associated with the web application and enable anonymous access. Once an application is configured for claims-based authentication, ensuring that users are authenticated is handled by SharePoint. Specifically, SPRequestModule intercepts all inbound requests and ensures that, if required, the remote user has authenticated themselves. SPRequestModule is an HTTP module and is wired into the IIS 7.X "Integrated Mode" request pipeline, registered as the first module in the request pipeline.

Figure 1: IIS Authentication Settings for a Claims-Based SharePoint Web Application
You can see this for yourself by attaching WinDbg to a SharePoint web application worker process, loading the SOS debugger extensions, and setting a breakpoint on Microsoft.SharePoint.Utilities.SPUtility.SendAccessDeniedHeader. Making a new request to the site will result in your breakpoint being hit - something that would not have happened had IIS been handling authentication all by its lonesome. To prove this, just configure a web application for Classic mode authentication, attach WinDbg and set a breakpoint for that SPUtility.SendAccessDeniedHeader and make an unauthenticated request - your breakpoint won't be hit.
The fact that a Claims-based SharePoint web application has complete control over the steps taken during authentication is important. This is a key enabler of advanced federation scenarios, and allows for such things as SharePoint 2010's ability to have multiple authentication types within a single URL zone. That fact, when combined with the extensibility point that allows for the specification of a custom sign-in page, can be a real game changer when it comes to a very specific extranet scenario...
Exposing the Same Internal and External URL
You have external partners that access your SharePoint from the extranet, and have their authentication credentials stored in a SQL Server database. You have internal employees that access your SharePoint from the intranet, who have Active Directory accounts. You'd like both your internal and external visitors to access the same URL. You're running SharePoint 2007. What to do?
In SharePoint 2007, this type of setup required split DNS and a bit of manual AAM configuration to get working. There were lots of potential problems, and when you began introducing reverse proxies, off-box SSL termination, etc. into the mix, you could quickly find yourself staring at a deal breaker. The fundamental problem was the authentication type switch; if everyone just had an AD account, overall the solution topology would be considerably simpler.
For SharePoint 2010, a single web application can expose multiple authentication types. By default, when this is configured, the end user will be presented with the page shown in Figure 2, prompting them to select an authentication method. When a single authentication method is configured, you won't see this.

Figure 2: The default SharePoint 2010 sign-in page
As a result, publishing the same URL internally and externally can be greatly simplified - simply publish the same Web Application, no AAM extensions required! The next obvious question, though - how do I automatically get my internal users to select Windows Authentication, and my external users to select Forms Authentication.
Enter todays sample.
The sign-in page shown in Figure 2 is the default - it can be replaced entirely on a per-web application AAM zone basis. The sample attached to todays article provides an implementation of a sign-in page that does not prompt the user to select an authentication method, but automatically chooses the authentication method based the IP address of the visitor. Now, this obviously has some limitations - for a real working system, you'd want to add wildcard support (among other things), but as a point of reference for how to leverage this extensibility point, I feel that this presents value.
The sample demonstrates how to write a replacement sign-in page, use hierarchal storage for storing configuration data tied to individual web applications, and a sample PowerShell cmdlet for configuring it all. Once you've built the solution package in Visual Studio, deploy the solution to your SharePoint environment (you can do this by right clicking the project in Visual Studio 2010). Once deployed, modify the sign in page by modifying the authentication provider associated with the zone you have configured for multiple authentication types. The setting your chasing is refered to as Sign In Page URL in the UI; Figure 3 shows what this should look like for you by default.

Figure 3: The sign-in page URL setting.
Choose to specify a custom sign in page, specifying _login/autosignin.aspx as the URL. Now, when an unauthenticated request comes in, instead of displaying the default sign in page, the end users browser will be directed to our custom sign in page.
Let's configure the custom sign-in page. First, open up the SharePoint 2010 Management Shell and run Get-PSSnapIn -registered. This should report that a snap-in named ClaimsSignInSampleAdmin is registered, as shown in Figure 4.
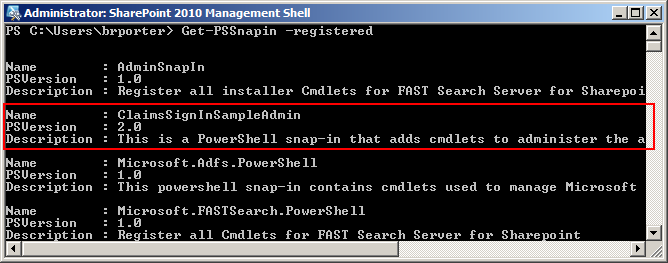
Figure 4: The output of Get-PSSnapIn if the sample PowerShell cmdlet has been registered properly
If the PowerShell snap-in with our sample cmdlet has not been registered properly, run the following and try Get-PSSnapIn again:
C:\WINDOWS\Microsoft.NET\Framework64\v2.0.50727\installutil /assemblyname "BryanPorter.Claims.SignIn, Culture=neutral, Version=1.0.0.0, PublicKeyToken=1ceafd08c849dc20"
That should properly install the snap-in.
Now, add the snap-in to your local PowerShell instance by running the following command:
Add-PSSnapIn ClaimsSignInSampleAdmin
Now, retrieve the SignInConfiguration object for the Web Application you'd like to configure for auto sign in by using the now available Get-SPSignInConfiguration cmdlet as shown in Figure 5.
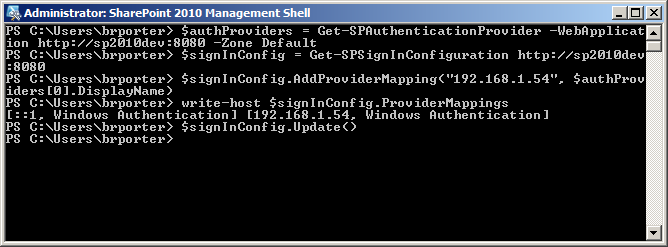
Figure 5: Configuring the sample for a web application
The commands themselves, one by one:
- Get the configured authentication providers for our web application in our target zone.
$authProviders = Get-SPAuthenticationProvider -WebApplication <WebAppURL> -Zone <Zone> - Get the custom sign-in configuration object associated with our web application.
$signInConfig = Get-SPSignInConfiguration <WebAppURL> - Map an IP address to the first authentication provider.
$signInConfig.AddProviderMapping("<IP Address>", $authProviders[0].DisplayName) - Call Update on our configuration object to save our configuration.
$signInConfig.Update()
Now, if everything has been configured right, when you navigate to your web application from a mapped IP address, you'll automatically be directed to a specific authentication provider; if no mapping can be found, the sample will simply print out a message saying as much. From here, the sample really needs to be improved with source IP address wild card support (send everyone from this IP range to this authentication provider, send everyone else to this authentication provider), and better PowerShell administrative support. In any case, I hope that, as a sample, this gives you some insight into how you might implement a similar solution.
Feel free to post ways you feel this sample should be expanded upon in the comments.