Using the Windows Azure Storage Explorer in Eclipse
Some time back I wrote a post that showed how to get started with creating Windows Azure PHP projects in Eclipse. What I didn’t talk about in that post was a nifty Eclipse feature (the Windows Azure Storage Explorer) that allows you easily manage your Windows Azure blobs, tables, and queues. That’s what I’ll look at in this post.
What is the Windows Azure Storage Explorer?
The Windows Azure Storage Explorer is a feature of the Windows Azure Tools for Eclipse that allows you to easily manage your Windows Azure blobs, queues, and tables. It simply gives you a convenient UI for inserting or deleting objects in your Windows Azure storage. I have found it very helpful for verifying scripts that interact with my Azure Storage account (Did that script actually upload the image? Was that table entry deleted?) and for cleaning things up after I’ve finished developing a script. Here’s a screenshot from my Eclipse installation (I’ve minimized the PHP Project Explorer):

Of course, to make use of the Storage Explorer, you need an Azure Storage account. Directions for creating one are in the “How do I create a storage account?” section of this post: How to Run PHP in Windows Azure.
Accessing the Windows Azure Storage Explorer
To access the Windows Azure Storage Explorer, you need to do two things:
- Install the Windows Azure Tools for Eclipse. Instructions for doing this are in this post: Using the Windows Azure Tools for Eclipse with PHP.
- Open the Windows Azure Perspective from the Windows menu:
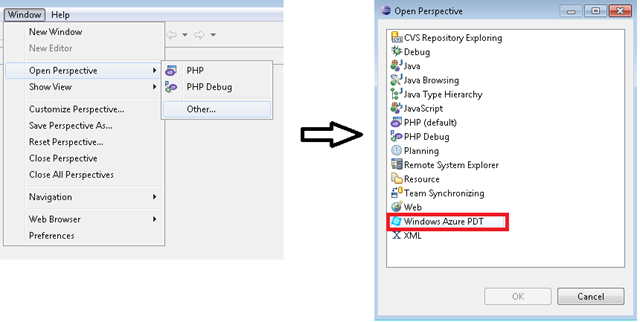
With a bit of moving windows around, you should now be able to see something like this:

Note that the storage account shown above is devstorageaccount1. This is the local storage account that simulates real Azure storage when you are running an application in the development fabric (an local environment that simulate the Azure environment, usually used for testing purposes).
To add an actual Azure storage account, click Manage. In the resulting dialog, click Add:

Now provide your your storage account name and key and click OK:

You can add as many accounts as you like and toggle back and forth between them in the Storage Explorer:

Once you have selected your account, click Open and you should be ready to manage your blobs, queues, and tables.
Managing Blobs
Start by clicking on Blob below the Open button…

…which will show you the blob containers that are in your storage account. By clicking on any one of the container names, you can see the blobs in that container and metadata about the container:

By right-clicking a blob name, you have a wide variety of options:

I leave exploration of those options as an “exercise for the reader.” :-)
Managing Queues
Now click Queue to get a list of your Azure queues, then click on one of the queues to see queue properties and message information:

If you click the Metadata tab, you can see queue metadata as key-value pairs:

Finally, right-click a message to get a list of message options (which, again, are left as an exercise for the reader):

Managing Tables
Lastly, managing tables is very similar to managing blobs and queues. Click Tables to get a list of tables, and click a table name to see table items in table properties:

Click a table item and you can get item properties (you can get the same property information in text format by clicking the Text tab):

And, as with blobs and queues, right-click an item and you will get a list of options:

And that’s it. I find the UI to be fairly intuitive…enough so that perhaps the screenshots above aren’t necessary to figure things out. But, I think the Storage Explorer is a little-known feature in the Windows Azure Tools for Eclipse, and I have found it useful in many ways…worth highlighting anyway.
Thanks.
-Brian