Using Windows Azure Automation Preview to manage Azure VMs
One of the great new features of Microsoft Azure that is currently in preview is the new Automation function. If you haven't heard about it, the short version of it is that it lets you run PowerShell based workflow runbooks from the Azure datacenters. This presents a bunch of really neat ideas for how we can manage our cloud assets as well as looking at things like scheduling scripts for maintenance or things like that. If you want to know more about the preview check out the info at https://azure.microsoft.com/en-us/documentation/services/automation/.
I took to the preview this afternoon with the idea of writing runbooks that will turn on and off my SharePoint dev environment. I've already blogged about how to manage Azure VMs with PowerShell so the same module will apply here - so all I had to do was port the connection to my Azure subscription to work using certificates instead of the interactive login window I was getting from running locally and then publish the code up as runbooks. Here is a rundown of how I got it to work.
Step 1: Set up a management certificate
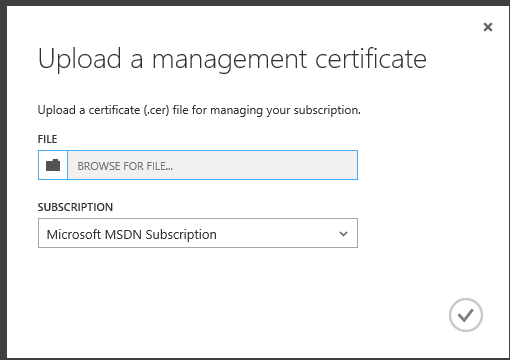
The first thing you need is a management certificate to be associated with your subscription. In my case I was happy with a self signed certificate for testing with but in reality you will want a proper certificate. There is a decent little write up at https://blog.porowski.pro/creating-self-signed-management-certificate-for-windows-azure on how to create a self signed certificate. Once you have it you will want to log in to the Azure management portal and go to the "Settings" tab on the left, select "Management Certificates" and then upload the .CER file for your certificate (note: Make sure you save the PFX as well as you will need this later on). Also take note of your subscription ID here as well as you will need this shortly.
Step 2: Create connection assets in Azure Automation
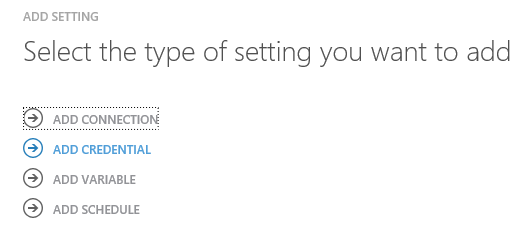
Once you have your certificate associated with your subscription you next go in to the "Automation" section on the left menu of the Azure portal, select your automation instance then select "Assets" on the left. Select "Add setting" from the bottom of the page and the first item we need to create is a "Credential".
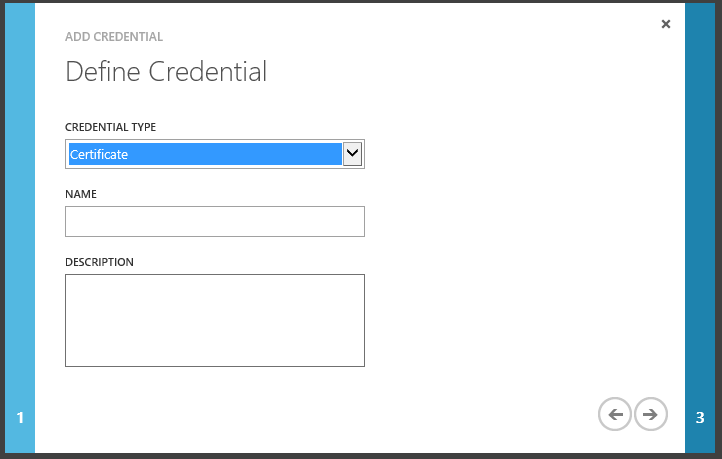
Here you want to select the credential type as "certificate" and then upload your PFX file from earlier, entering the password for it at the end.
Now we want to use the "Add Setting" button at the bottom of the screen again but this time we want to define a connection. Follow the wizard through here and then provide the name of the certificate asset you just created for the certificate field, and the ID of your subscription below that as well. Once this is done we are ready to start creating some runbooks.
Step 3: Create an Azure connection runbook
Using the "New" button in the bottom left of the Azure dashboard you can select to create a new runbook. Call this one "Connect-Azure". To save you the time of writing the code to connect to a subscription you can grab a sample from TechNet, so head over to https://gallery.technet.microsoft.com/scriptcenter/Connect-to-an-Azure-f27a81bb and copy the code from there to save in this runbook. Be sure to publish it when you are done
Step 4: Create you VM management runbooks
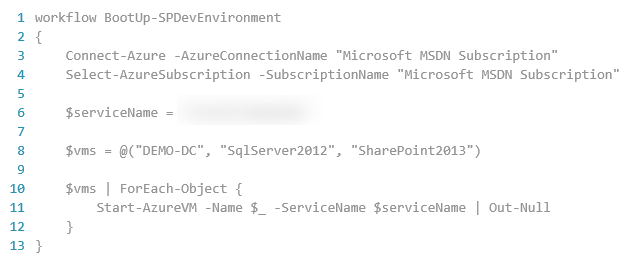
The last piece you want to do here is to create another runbook that will do whatever it is you want to do with your VMs. To take my previous sample here is a runbook I have for booting up my dev environment. Firstly I call my "Connect-Azure" runbook to establish the connection to my subscription, I select the subscription and from there everything is identical to the Azure PowerShell scripts you would already have been writing.
That's it! I can now trigger the runbook to turn on my VMs without have to run a script locally. I can also do the same in reverse to shut them down. There are a bunch of other cool examples on TechNet to connect to VMs through remote PowerShell sessions to manage them directly as well. This is just a basic example of how to use this great new service!