Implementing Pub/Sub Scenarios in Workflow Manager
WorkFlow Manager is a new server offering from Microsoft to develop and deploy workflows at high scale and density in a multi-tenant environment. For those already familiar with WFM, please feel to skip this introductory paragraph. As per MSDN –
Workflow Manager 1.0 is a new server which introduces new capabilities for authoring, hosting and managing workflows. These workflows will run at high scale and density, and will support execution in a multi-tenant environment. The service builds on the successful programming model, runtime and activity library that was introduced with Windows Workflow Foundation (WF) in .NET Framework 4. Ref - (https://msdn.microsoft.com/en-us/library/jj193471(v=azure.10).aspx)
So, if you are developing new Workflow applications/services, this is the way to go. Many of our internal products like SharePoint Server are now using WFM as the de-facto workflow hosting environment.
Workflow Manager (referred to as WFM from this point) provides a rich set of Activities on top of the activities that ship as part of the Windows Workflow Foundation. You can refer the following for an overview of the WFM activities - https://msdn.microsoft.com/en-us/library/jj193474(v=azure.10).aspx.
This post discusses a subset of the above activities, specifically the Pub/Sub activities that ship with WFM (https://msdn.microsoft.com/en-us/library/jj193461(v=azure.10).aspx). They are meant for scenarios when you want to deliver correlating messages to
already existing workflow instances.
Whenever you are looking to develop workflows that represent long-running business processes and are blocked on external input to make further progress, these would come in handy. For example, it could be an order fulfillment process or a loan approval process. All that you would need is a unique id (order_id or, loan_id) that can uniquely identify a business process (workflow instance). There are four Pub/Sub activities available –
- BuildMatchAllFilter – use this to create the filter condition that would match an incoming message to the workflow instance. For example, your filter could be (orderid = 123). Now, when an incoming message contains a property orderid with value 123, the filter would be
matched, and the message then delivered to the WF instance that defined the above filter. - ReceiveNotification – this blocks the WF execution until a matching notification message is received. While the WF instance is waiting/blocked on the matching notification message, it will be passivated (state serialized) to the Service Bus Topic that your WFM scope is
registered to. Once a matching message is received, the WF instance execution is resumed. - Subscribe – this is relevant for singleton WF scenarios, where you want to keep receiving all the messages that match the created Subscription Filter (generally in a loop). To stop receiving messages that match the filter, you have to explicitly use the Unsubscribe activity to unregister the filter condition with this workflow instance.
- Unsubscribe – this activity can be used to explicitly unsubscribe a subscription based on an input SubscriptionHandle. The SubscriptionHandle property is provided by a prior Subscribe activity in the same workflow. Basically, it is used in conjunction with the Subscribe activity,
when you are done receiving correlating messages that match your filter.
In the sample, we build a Task workflow. The task is identified by a unique id (taskid). To start a Task, you pass in the taskid with the initial message that creates the task workflow instance. To complete this workflow instance, you need to pass a subsequent WorkflowNotification message
that provides the same taskid. This message then gets routed to the correct WF instance. We will now build this scenario. For the sake of simplicity, our task workflow doesn’t really perform any real ‘task’ apart from waiting for the completion message, since all we want to demonstrate is how to route this correlating message to the correct WF instance.
This is how the task workflow looks like. Note that we pass in the taskid (the unique identifier for this WF instance) as an input argument to the workflow. Correlating messages would have to provide the same taskid for it to be delivered to the correct instance –
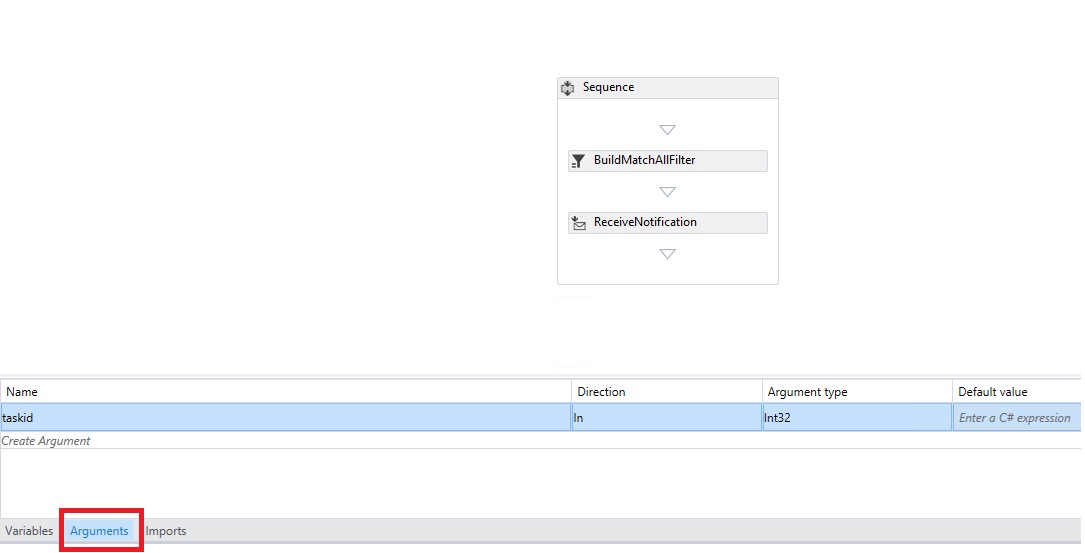
Next, we need to define the filter criteria that sets up the subscription for this WF instance. The BuildMatchAllFilter activity exposes a Matches property that lets you build your correlating filter. You can add a collection of properties to define the filter –

In this case, we define two properties that our correlating message should contain (EventName = "Complete Task") and (taskid = <originally passed in taskid during instance creation>}. Any WorkflowNotification message sent to the WFM Management service URI is published to the WFM scope and hence delivered to the Service Bus topic (the WFM backend service listens for new sessions on the SB topic). If that delivered message contains the properties and values that we just defined (using the filter), the message is then delivered to our already running WF instance.
To make the ReceiveNotification activity block the workflow instance until the correct notification message is received, we need to link it to the BuildMatchAllFilter activity. This is done through a SubscriptionFilter variable that we declare at the parent activity level (Sequence activity in this case). The BuildMatchAllFilter activity initializes this variable with the filter we created earlier and the same filter variable is passed on to the ReceiveNotification activity to resume the WF instance when the correct correlating message is delivered.

That’s all that you need to create this basic workflow. Now, we need to create an instance of this workflow and then send a subsequent correlating message to complete that instance. There are two ways to start a new WF instance –
- Directly specify which workflow instance to create –
WorkflowManagementClient.Workflows.Start (workflowName, startParameters);
Ref - https://msdn.microsoft.com/en-us/library/dn217860(v=azure.10).aspx - Via activation message - WorkflowManagementClient.PublishNotification method
- Pub/Sub messaging based activation
- Sends a WorkflowNotification message to the Topic
- Based on the settings of activation filters and subscriptions filters, a notification can activate an instance of 0 to N workflows and/or be delivered to 0 to N existing workflow instances.
Ref - https://msdn.microsoft.com/en-us/library/jj202197(v=azure.10).aspx
In this case, we opt for the latter, and our activating message (that starts a new WF instance looks as follows) –
WFClient.PublishNotification(new WorkflowNotification()
{
Properties =
{
{ "EventName", "New Task" }
},
Content = new Dictionary<string, object>()
{
{ "taskid", Int32.Parse(TaskId) }, //we read the val. for taskid from a console app in this case
}
});
You can specify additional properties to the Content of the WorkflowNotification message since it is just a Dictionary of objects, for example, you may want to send a message payload as an additional property. This creates a new workflow instance and associates the WF instance with the taskid we pass as part of the PublishNotification call. A good question to ask at this stage is where we define the structure of the activating message. That is done while publishing the workflow to WFM. Using a MatchAllSubscriptionFilter we specify the property/properties that an
activating message must contain. In addition, we also publish the xaml definition to WFM in this step–
client.PublishWorkflow(workflowName, @"..\..\Task.xaml",
new MatchAllSubscriptionFilter()
{
Matches =
{
{"EventName", "New Task"} //Activate Workflow when there is a ‘New Task’ event
}
});
The correlating message is sent using another PublishNotification call as follows. Note that the properties on this message match those specified in the Matches property in the BuildMatchAllFilter activity–
WFClient.PublishNotification(new WorkflowNotification()
{
Properties =
{
{ "EventName", "Complete Task" },
{ "taskid", Int32.Parse(taskid) } // pass an executing taskid from the console
},
Content = new Dictionary<string, object>()
{
{ "Message", "any payload" },
}
});
How to run the sample –
- First, you need a configured WFM Farm to test the sample. More on that here - https://msdn.microsoft.com/en-us/library/jj193514(v=azure.10).aspx
- To develop workflows that target WFM, you also need to install “Workflow Manager Tools for Visual Studio”. You can download that from Web Platform Installer (just search for Workflow Manager Tools, and download the appropriate version)- https://www.microsoft.com/web/downloads/platform.aspx
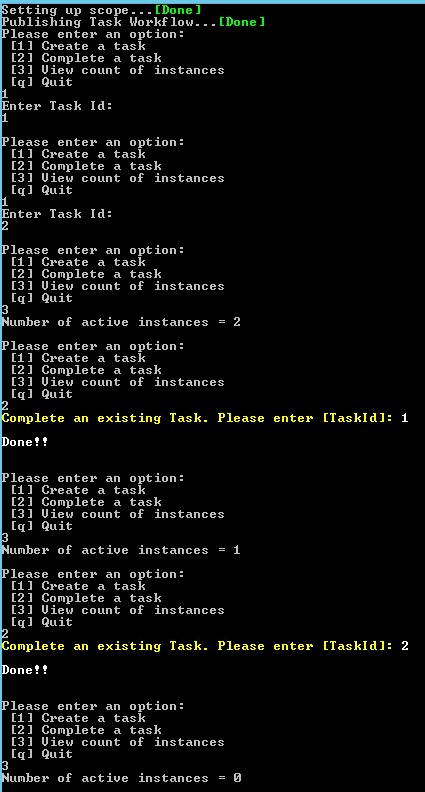
- Run the console app, and it lets you either create a new task, get count of existing tasks, or complete a task.
- If you start two tasks, say with id=1 and id=2, you should see that two instances are executing.
- Now you can complete the tasks one-by-one by passing in the correct task ids.
PS – The sample is for demonstrative purposes only. Ideally, while completing a task, if a supplied taskid is not present, we should report an error message. We have not enforced that check in the sample. In the sample, if we try to complete a task instance with an id that doesn’t exist, we don’t do anything with the executing instances. This check should be fairly simple to implement using a SetUserStatus activity that lets you attach runtime context properties to an executing WF instance. We could easily expose the tasked argument from our WF instance using the SetUserStatus activity. We could then query the properties thus exposed from the executing instances using the WF instance querying APIs available in the WorkflowManagementClient type.
Written By
Arindam Paul Roy
Microsoft India GTSC