Beginning LightSwitch in VS 2013 Part 2: Feel the Love - Defining Data Relationships
NOTE: This is the Visual Studio 2013 update of the popular Beginning LightSwitch article series. For previous versions see:
- Visual Studio 2012: Part 2: Feel the Love - Defining Data Relationships
- Visual Studio 2010: Part 2: Feel the Love - Defining Data Relationships
Welcome to Part 2 of the Beginning LightSwitch in Visual Studio 2013 series! In the last post we learned about tables, or entities, in LightSwitch and how to use the Data Designer to define them. If you missed it:
Beginning LightSwitch in VS 2013 Part 1: What’s in a Table? Describing Your Data
In this article I want to focus on data relationships as we build upon the data model we started in part 1. Relationships define how information in one table corresponds to information in another table in a database. Or more generically, relationships define how an entity corresponds to another entity in (or across) a data source. You can think of relationships between entities like relationships between things in everyday life. For instance, the relationship between a school and its students is one that exists in the real world. Similarly, a real-world relationship exists between students and the classes that those students attend. In a data model, you may have one entity that contains students and another that contains classes they are attending. When you tie the two entities together, you create a relationship.
Building a Better Address Book
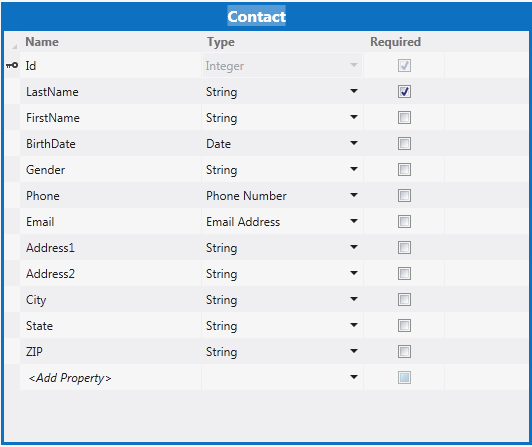
In the example we started in part 1, we’re building an address book application that manages contacts. In our current data model, we’re only storing one phone number, one email address and one address for our contact.
However, in real life contacts typically have more than one email, phone number, and address information. In order to model this in the database we are building through LightSwitch, we need to define additional tables and relate them to the contact table in a one-to-many relationship. A one-to-many relationship is probably the most common type of relationship you can define. In our case, this means that one contact can have many email addresses. One contact can have many phone numbers. One contact can also have many physical addresses.
Let’s start with email address. If we want to collect multiple email addresses for a contact we have a couple options. One option is to add a fixed number of email properties to our contact in the form of Email1, Email2, Email3. This means that we would never be able to collect more than 3 email addresses for any given contact. Depending on the type of application you are building this may be just fine. But if you start adding too many properties with the same meaning (in this case email) to your table, then it’s time to think of a different strategy. Instead we should create an EmailAddress table and define a one-to-many relationship.
From the Data Designer, click the “New Table” button and define an entity called EmailAddress with two required properties: Email (of type Email Address) and EmailType (of type String).

For EmailType we’ll create an Choice List, which you learned about in Part 1 of the series. This property will capture the type of email, whether that’s Personal or Work. I’ve also chosen to make the maximum length only 25 characters – we won’t ever need all 255.

Why don’t we make the maximum length 8 characters, which is the length of the longest value in the choice list? Because if we need to add a value to the choice list later that is a little longer than 8 characters, then we won’t have to change the data model. Disk space is cheap these days so it’s better to err on the side of longer max lengths so that all your data can fit into the underlying table. This avoids having to change the data model too often.
Defining Relationships in LightSwitch
Now that we have our EmailAddress entity it’s time to define the relationship. Click on the “Relationship…” button at the top of the Data Designer and this will open up the “Add New Relationship” dialog window. In the “To” column select Contact to set up the one-to-many relationship. The multiplicity is set to Many to One by default so we don’t need to change it. Multiplicity defines the type of relationship you want to create. In LightSwitch, you can also specify the multiplicity as One to Zero or One which means that only a maximum of one related entity would be allowed.
For more information on defining different types of relationships see: How to: Define Data Relationships
For information on how to model a many-to-many relationship in LightSwitch see: How to Create a Many-to-Many Relationship
You can also specify what happens to the email addresses when a contact is deleted. By default, this is set to “Restricted”. This means that a user would not be allowed to delete a Contact if they had any Email Addresses. Leaving the setting makes sense if we were working with Customers who had many Orders, for instance, but not in this case. We want LightSwitch to automatically delete any Email Addresses when we delete the Contact, so set the “On Delete Behavior” equal to “Cascade delete”.

The description at the bottom of the dialog is there to help you understand what you are doing when setting up the relationship. Once you click OK you will see the relationship in the Data Designer which will show all direct relationships to the entity you are working with. Notice that a Contact property is now added to the EmailAddress entity. This is called a navigation property and represents the Contact to which the EmailAddress belongs.

Double-click on the Contact entity to open it and you will notice a navigation property to all the EmailAddresses for that Contact. Navigation properties are used by LightSwitch on screens to navigate through your data, so it’s important to model them correctly.
Now that we’ve got the EmailAddress table defined and a relationship set up, we need to delete the Email property we had previously defined on the Contact itself. Select the Email property and hit the Delete key. Alternatively you can right-click and choose Delete on the menu. Do the same to delete the Address1, Address2, City, State, ZIP and Phone properties as well.

Next, let’s add a PhoneNumber table in the same way we added EmailAddress. You might wonder why we need to create a new table separate from the EmailAddress. This is because an EmailAddress and a PhoneNumber are different aspects of a Contact and have no relation to each other except through the Contact itself. Therefore, we need to create a new table.
Click the “Add Table” button and define the PhoneNumber entity with two required properties: Phone (of type Phone Number) and PhoneType (of type String). PhoneType will have a Choice List of “Cell”, “Fax”, “Home”, and Work”.

Next add the relationship to Contact exactly the same way as before. While the PhoneNumber entity is displayed, click the “Relationship…” button at the top of the Data Designer and specify the relationship to the Contact table.

Last but not least, we need to create an Address table to store multiple physical addresses for a Contact. Click the Add Table button and define the Address entity with the following properties AddressType, Address1, Address2, City, State, ZIP. Set the AddressType and Address1 properties as required. We will also specify a Choice List for the the AddressType property with values “Home”, “Work”, and “Other”.

Now set up the relationship for Address exactly as before. While the Address entity is displayed, click the “Relationship…” button and specify the relationship to the Contact table. Again we’ll choose “Cascade delete” so that any Addresses are deleted automatically if a Contact is deleted. This makes sense in the case of Contact because if the user deletes the contact from the system all their information should be automatically deleted. Keep in mind, however, that you may not want this behavior in other applications. For instance if you are building an order entry application you would want to restrict deletion of Customers if they had any Orders in the system in order to keep the Order history intact.

Now when we open the Contact entity in the Data Designer you can see all the direct relationships.

Testing the Address Book
Now that we have the data model designed, let’s quickly test it out by creating a new screen. We’ll talk more about screens in a future post but for now let’s do something simple by replacing the AddEditScreen we created in Part 1.
As a side note, if you open the current AddEditContact screen – notice that the fields that we deleted from the Contact entity are now removed from the screen. This is a really nice feature of LightSwitch. As you design your data model, it makes sure that you do not have data binding errors on your screens. So if you change the name of a entity property or remove the property completely (i.e. Phone, Email and Address info in our case) then all the screens that are using those fields will be updated. Note that if you add a property to your entity, LightSwitch will not automatically add it to all your screens. However, this comes in real handy when renaming and deleting entity properties during your initial schema design.
So let’s add a new AddEditContact screen -- first delete the one we created in Part 1 from the Solution Explorer. Then right-click on the screens node under the HTMLClient and select Add Screen…

In the Add New Screen dialog, select Add/Edit Details Screen template. Then drop down the Screen Data and select Contacts. Once you do this, you will see checkboxes for the additional related entities we created. Select all of them and click OK.

This will set up a screen that lets you edit the contact details and view the related children in lists on separate tabs. By default, this screen is shown as a dialog, but you can take up the full width of the browser by unchecking “Show As Dialog” in the appearance section of the properties window.

Finally, hook up this screen to the BrowseContacts screen we created in Part 1. Open BrowseContacts in the Screen Designer, select the Add Contact button and specify the Tap action addAndEditNew. LightSwitch will automatically suggest navigating to the correct screen. You can also change the icon of the Add Contact button in the properties window.

Do the same for editing a Contact. Select the Contacts list and set the Tap action to editSelected:

To build and launch the application hit F5. Click the Add button (now displaying a “+” icon) to add new contacts, or select a contact in the list to edit.

Notice that LightSwitch read all the one-to-many relationships we set up in our data model and created a tabs for each of the children; Email Addresses, Phone Numbers and Addresses. You can make the lists on these tabs editable by applying the same technique above like we did with the Contacts. Select the list, then choose editSelected as the Tap action and LightSwitch will hand hold you through creating the add/edit screen for each of the children.
Because we defined the relationships properly in our data model, LightSwitch is able to create very usable screens for entering our data into the database without much work. In the next post we’ll dive deeper into the Screen Templates and how to customize the layout of screens. Until next time!
Enjoy!
Read the next article –> Part 3: Screen Templates, Which One Do I Choose?