How to Allow Adding of Data to an Auto-Complete Drop-down Box in LightSwitch
In my last post I showed you how to create a multi-column auto-complete box in Visual Studio LightSwitch. I also showed you how to use multiple layouts and easily enable editing on the data inside the auto-complete box. In this post I want to address another very common use case in business applications – allowing the user to enter new rows of data directly into the auto-complete box. Our auto-complete box is displaying data from a lookup table and we want to allow users to add data to this table if they don’t see the selection they need. I’ll continue with the same data model I used in the previous post where Category has many Products.
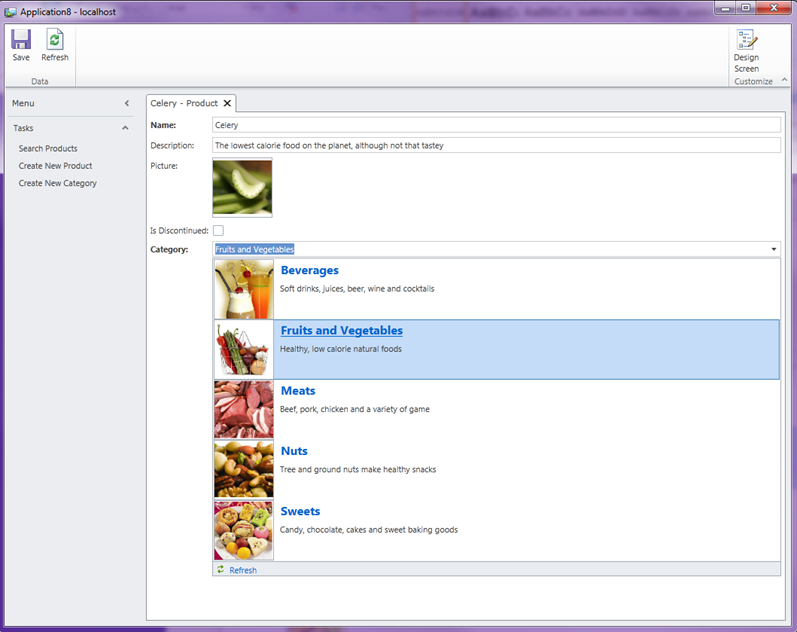
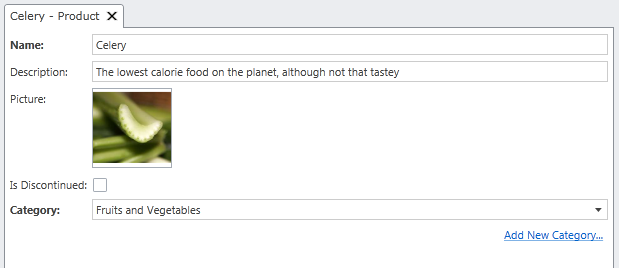
I now have a Product screen that allows us to select a Category from an auto-complete box. You can edit the category by clicking on the category name.
Now I want to allow the user to add new Categories without having to open the Create New Category screen manually. It should be a simple click here on the screen. We could put a button on ribbon at the top but a better idea would be to put a button next to the auto-complete box itself.
Adding Commands to Screens
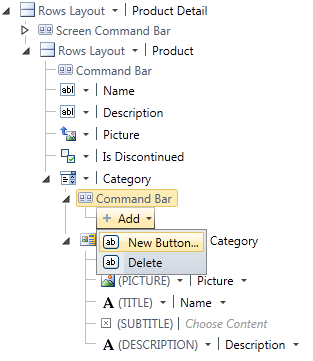
You can add commands to screens in a variety of places. In fact all grouping controls expose what’s called a “command bar” where you can place buttons or links that execute commands. This allows you to place commands in the right contexts, near the controls that they work with. To add a command next to the auto-complete box, open the screen in the Screen Designer and expand the auto-complete box node in the content tree and select “command bar”. Then you can add a new button.
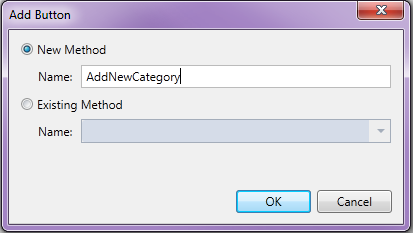
This will open the “Add Button” dialog that will allow you to create a method. You put code in this method to execute the command. For this example I’ll name the method AddNewCategory.
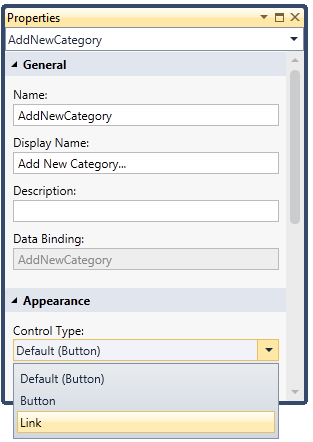
By default this shows up as a button right under the auto-complete box. You can also choose to display this as a link instead by changing the Control Type to “Link” in the property window. I also like to put an ellipses after the display name of the commands to indicate to the user that another screen will open.
When you run the application you will see the command displayed like so:
Calling New Data Screens Programmatically
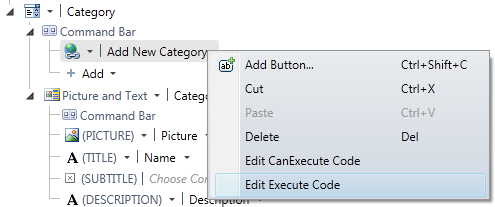
Now we need to write some code to execute our command. In the Screen Designer, right-click on the command and select “Edit Execute Code”.
Now we need to call our CreateNewCategory screen. You can access all the screens in your application through the Application object.
 Private Sub AddNewCategory_Execute()
    ' Write your code here.
    Me .Application.ShowCreateNewCategory()
End Sub
This will open the new data screen we want, however, LightSwitch by default always opens a default edit screen after the save of a new data screen. If you open the CreateNewCategory screen and click the “Write Code” button at the top of the designer, you will see code like this in there:
 Private Sub CreateNewCategory_Saved()
    ' Write your code here.
    Me.Close(False)
    Application.Current.ShowDefaultScreen(Me.CategoryProperty)
End Sub
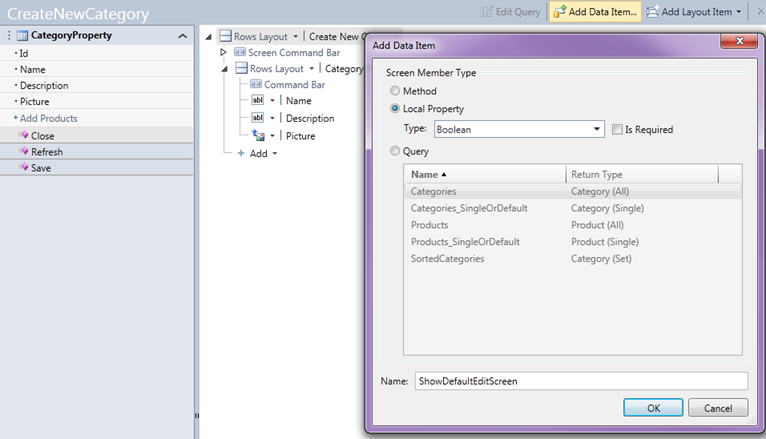
I don’t want the default edit screen to display if the user is adding to the auto-complete box directly. So what we need to do is create a screen parameter and check that so we can optionally display the default edit screen. In the screen designer for the CreateNewCategory screen select “Add Data Item” on the designer toolbar. Add a local property of type Boolean and uncheck “Is Required”. Name the parameter “ShowDefaultEditScreen”. Then click OK.
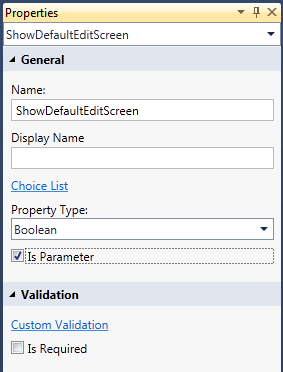
This will add a property to the screen. Next in the property window make sure you check “Is Parameter”
Now drop down the “Write Code” button and select the CreateNewCaegory_Saved() method and write this code:
 Private Sub CreateNewCategory_Saved()
    Me.Close(False)

 'If the parameter was not passed in, or if it is explicitly True, then show the default edit screen    If Not Me.ShowDefaultEditScreen.HasValue OrElse Me.ShowDefaultEditScreen
Then        Application.Current.ShowDefaultScreen(Me.CategoryProperty)

End If
End Sub
Now we just need to pass “False” when we call this screen from our command back on the ProductDetail screen.
 Private Sub AddNewCategory_Execute()
    ' Write your code here.
    Me.Application.ShowCreateNewCategory(False)
End Sub
Go ahead and run this now and see what you get. When you click the “Add New Category…” command the CreateNewCategory screen is displayed to allow you to enter a new Category. Click Save and the screen just closes to reveal the Product detail screen again. To see the new Category, click the “Refresh” button at the bottom of the auto-complete box.
Refreshing Lists of Data Automatically
One thing you might want to do is automatically refresh this auto-complete box for the user instead of making them click the “Refresh” button. Each collection of data on your screen exposes a .Refresh() method that you can call easily from the same screen. In the case of an auto-complete box (or modal window picker), to get this functionality you need to create a custom query and use that instead of the automatic query (more on that in a second).
However in order to call the Refresh from another screen we need to get into some threading details. LightSwitch applications are always multi-threaded so that the applications are always responsive while loading and working with remote data. Since LightSwitch is all about working with data, when you write code (even in the screen), you are writing code on the data thread. In order to have one screen call a method on another screen you need to marshal the call the the main UI thread. This may sound complicated but it’s actually not too bad.
There’s a couple ways to perform a data refresh across screens depending on your needs. One way is to use the technique described in How to Communicate Across LightSwitch Screens. This uses custom events on the Application object to notify all screens when particular sets of data are added to the system from any other screen. But for our purpose here we can do something simpler. Off of the Application object LightSwitch exposes an ActiveScreens collection which gets you the list of all the screens that are open. We can use this collection to check the type of screen and then call a method to refresh the data we want. This avoids having to deal with events and keeps the scope smaller.
So to make this particular refresh possible we need to do a few things.
- Setup the Category auto-complete box on our ProductDetail screen to use a custom query instead of the automatic query.
- Create a Public method called RefreshCategories on our ProductDetail screen that executes the Category Refresh.
- Marshal the call to RefreshCategories onto the main thread from the NewCategory screen after the data is saved.
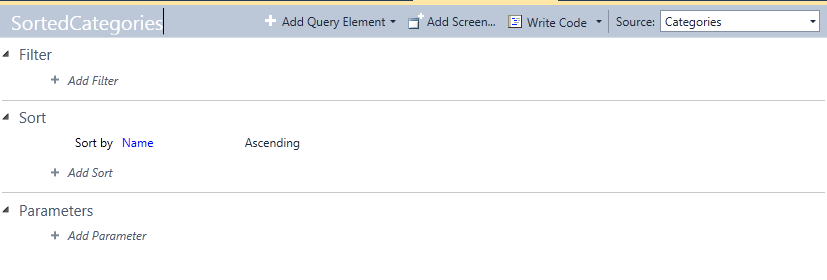
So the first thing you need to do if you haven’t done so already is to create a query using the Query Designer for the auto-complete box and use that on the edit detail screen. I’m going to create a query called SortedCategories that sorts by Category.Name. Right-click on the Categories table and select Add Query and define the query like so:
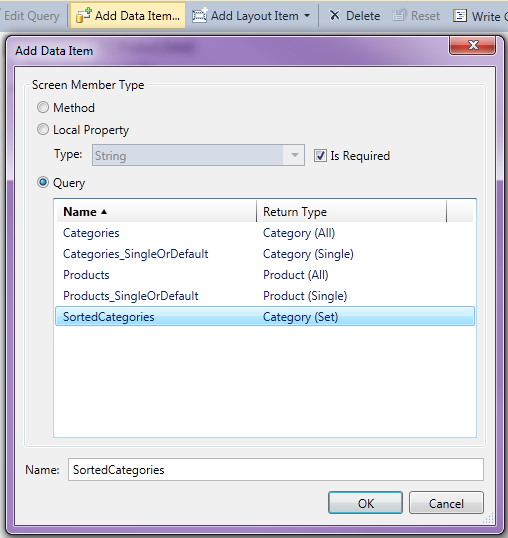
Now open the ProductDetail screen and select “Add Data Item” on the designer toolbar once again. This time select the SortedCategories query.
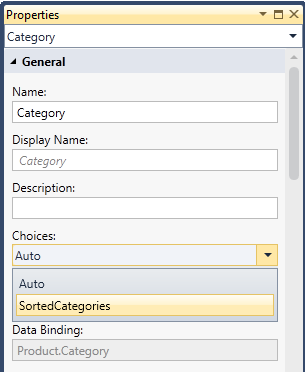
Next set the “Choices” property of the Category auto-complete box to SortedCategories.
Next click the “Write Code” button at the top of the designer and create a Public method called RefreshCategories that calls Refresh on the SortedProducts query.
 Public Sub RefreshCategories()<br>    Me.SortedCategories.Refresh()
End Sub
The last thing we need to do is write the code to call this method back in the CreateNewCategory screen. Recall that we are checking a parameter here to determine whether we should display the default edit screen or not. We could add another parameter to this screen the same way to check whether a refresh is needed so that these checks would be independent. However for this example the ProductDetail screen is the only one sending a “False” for the parameter so I can just write the following for the CreateNewCategory_Saved() method:
 Private Sub CreateNewCategory_Saved()
    Me.Close(False)
    'If the parameter was not passed in, or if it is explicitly True then show the default edit screen
    If Not Me.ShowDefaultEditScreen.HasValue OrElse Me.ShowDefaultEditScreen Then
        Application.Current.ShowDefaultScreen(Me.CategoryProperty)
   Else        'ProductDetail is the only screen sending False. Refresh the Category auto-complete box
Microsoft.LightSwitch.Threading.Dispatchers.Main.BeginInvoke( Sub() For Each s In Me.Application.ActiveScreens If TypeOf s.Screen Is
ProductDetail Then
DirectCast(s.Screen, ProductDetail).RefreshCategories()
End If
Next
End Sub)
End If
End Sub
Notice that this code will call RefrechCategories on all open ProductDetail screens if there are multiple active. And if this code looks too complicated for your taste, you can simply hit the refresh button on the auto-complete box itself. :-)
I hope this helps you in building better user productivity business applications. And as you can see there are a lot of flexible ways to lay out controls and work with screens in Visual Studio LightSwitch. For videos showing some of these techniques please see:
#21 - How Do I: Add Commands as Buttons and Links to Screens?
#22 - How Do I: Show Multiple Columns in an Auto-Complete Dropdown Box?
Enjoy!
