How to Create a Simple Audit Trail (Change Log) in LightSwitch
A common requirement in business applications is to capture changes to data records and save them in a history table of some sort. For instance, when an employee’s HR record is changed, you need to log the original and new field values as well as who made the changes so that there is a visible audit trail. Typically you want to log changes to records that are updated, inserted and deleted. In this post I’ll show you how you can create a simple audit trail to track changes to records in Visual Studio LightSwitch.
Create a Logging Table
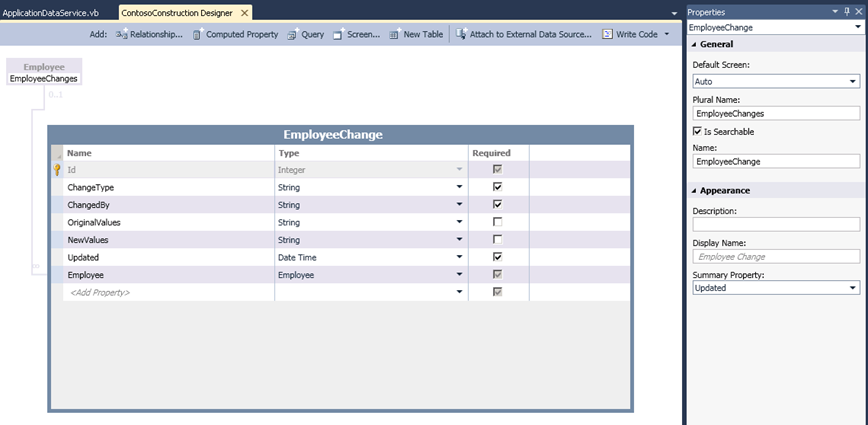
The first thing to do is to create a table that stores the changes. Let’s say we already have an application with an Employee table. We want to be able to capture any updates, inserts or deletes to this table. The first thing to do is add a table that captures the changes. Add a new table to your application using the Data Designer. I’ll name it EmployeeChange and it will have the following fields:
| Field | Type |
| ChangeType | String (required) |
| ChangedBy | String (required) |
| OriginalValues | String (not required) |
| NewValues | String (not required) |
| Updated | Date Time (required) |
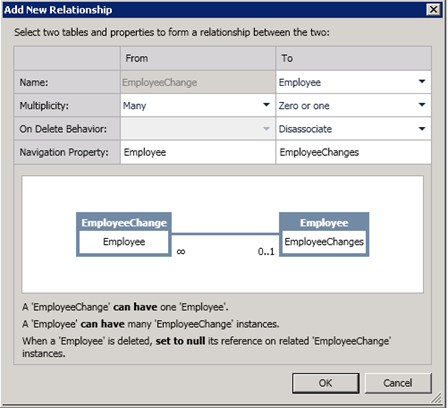
Then in the property window under the Appearance section, set the Summary Property of the EmployeeChange table to the “Updated” field. Next we need to add a new relationship to this table from our Employee table. Click the “Relationship…” button at the top of the designer and in the To column select the Employee table. Then set the Multiplicity to “Zero or One”. This means that our change log record doesn’t require an employee parent record. Why not? Well because in this example we want to also track deleted record information but we want to allow the deletion of the actual record in the Employee table. So we also need to set the On Delete Behavior to “Dissociate” so that when the employee record is deleted, our audit trail remains intact.
So here’s what the schema looks like now.
Write Code to Capture Changes
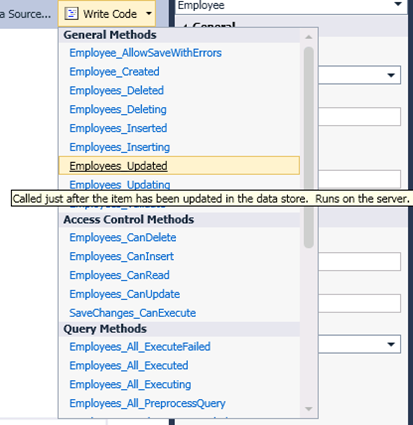
Next we need to write some code into the save pipeline on the data service to intercept when inserts, updates and deletes occur and write appropriate values to the EmployeeChange table. To do this, double-click on the Employee table in the Data Designer and then drop down the “Write Code” button in the top right. There you will see in the General Methods section _Updated / ing, _Inserted / ing, _Deleted / ing methods.
Select _Inserting, _Updating, and _Deleting methods to create the method stubs on your data service. Next we need to write some code that selects the storage properties of the Employee. Storage properties are the actual fields on the underlying table. In other words, we don’t want to include any calculated properties. For Employee records that are updated, we also need to compare the original and current values to determine if we should record a change. The way we do this is by drilling into the “Details” property on the Employee entity. Here you can get at a lot of the underlying framework methods and properties of LightSwitch’s data runtime. In our case I’m just recording the new and original values as strings by concatenating each field’s name and value and separating them by carriage return/line feeds (vbCrLf). You can choose to do this differently depending on how you want to log information to your change log table.
 Private Sub Employees_Updating(entity As Employee)
   Dim change = entity.EmployeeChanges.AddNew()
   change.ChangeType = "Updated" change.Employee = entity
   change.Updated = Now()
   change.ChangedBy = Me.Application.User.FullName

   Dim newvals = "New Values:"
   Dim oldvals = "Original Values:"
   For Each prop In entity.Details.Properties.All().
        OfType(Of Microsoft.LightSwitch.Details.IEntityStorageProperty)()

        If prop.Name <> "Id" Then
            If Not Object.Equals(prop.Value, prop.OriginalValue) Then
                oldvals += String.Format("{0}{1}: {2}", vbCrLf, prop.Name, prop.OriginalValue)
                newvals += String.Format("{0}{1}: {2}", vbCrLf, prop.Name, prop.Value)
            End If
        End If
   Next
  change.OriginalValues = oldvals
  change.NewValues = newvals
End Sub
 Private Sub Employees_Inserting(entity As Employee)
    Dim change = entity.EmployeeChanges.AddNew()
    change.ChangeType = "Inserted" change.Employee = entity
    change.Updated = Now()
    change.ChangedBy = Me.Application.User.FullName

    Dim newvals = "Inserted Values:"
    For Each prop In entity.Details.Properties.All().
        OfType(Of Microsoft.LightSwitch.Details.IEntityStorageProperty)()

        If prop.Name <> "Id" Then
            newvals += String.Format("{0}{1}: {2}", vbCrLf, prop.Name, prop.Value)
        End If
     Next
     change.NewValues = newvals
End Sub
 Private Sub Employees_Deleting(entity As Employee)
    Dim change = entity.EmployeeChanges.AddNew()
    change.ChangeType = "Deleted" change.Updated = Now()
    change.ChangedBy = Me.Application.User.FullName

    Dim oldvals = "Deleted Values:"
    For Each prop In entity.Details.Properties.All().
        OfType(Of Microsoft.LightSwitch.Details.IEntityStorageProperty)()

        If prop.Name <> "Id" Then
            oldvals += String.Format("{0}{1}: {2}", vbCrLf, prop.Name, prop.Value)
        End If
    Next
    change.OriginalValues = oldvals
End Sub
Create a Screen to View the Audit Trail
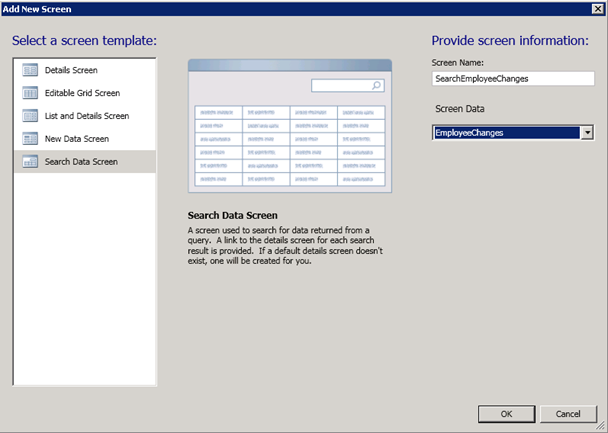
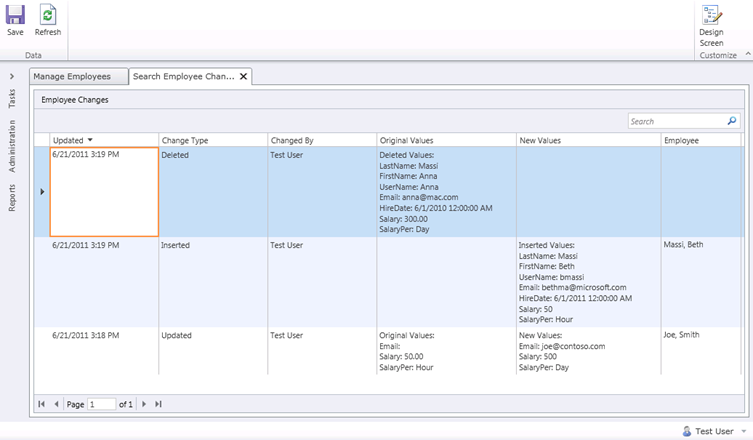
Last but not least we need to create a screen to view the audit trail. You don’t want users to modify these records, just view them, so it’s best to just pick the Search Data Screen template.
Then in the screen designer, select the Updated field and uncheck “Show as Link” so that users cannot modify records. Assuming that you already have an employee screen defined, hit F5 to run the application and open your employee screen. Make some changes to a current record, add a new one and delete another one to test all three scenarios. Then open your audit trail search screen and take a look at the results. You should see something similar to this:
If you needed to track changes on multiple tables then you could add relations from the single audit trail table to other tables the same way as Employee in this example. Experiment with the code provided in order to log changes exactly how you want. I hope this gives you some ideas on how you can create simple audit trails for your LightSwitch applications.
Enjoy!
