Deployment Guide: How to Configure a Machine to Host a 3-tier LightSwitch Beta 1 Application
NOTE: This information applies to LightSwitch Beta 1 ONLY. For Beta 2, please read the Beta 2 Deployment Guide.
A lot of people have been asking in the forums about how to deploy a LightSwitch application and there are some really great tutorials out there like: Deploy and Update a LightSwitch (Beta 1) 3-tier Application
There’s also a lot of information in the official documentation on Deployment:
- Deploying LightSwitch Applications
- How to: Deploy a LightSwitch Application
- How to: Change the Deployment Topology and Application Type
(UPDATE: We also released a video on 2 & 3-tier deployment: How Do I: Deploy a Visual Studio LightSwitch Application? )
Deploying a LightSwitch application on the same machine as you develop on is pretty easy because all the prerequisites are installed for you with Visual Studio LightSwitch, including SQL Server Express. In this post I’d like to walk you through configuring a clean machine to host a 3-tier LightSwitch application that shouldn’t have the development environment installed.
Before I begin please note: There is NO “go live” license for the LightSwitch Beta. You can deploy your LightSwitch applications to IIS for testing purposes ONLY. Also currently the Beta only supports IIS 7 at this time. You can only use Windows 7 or Windows 2008 Server (not 2003) to test deployment for Beta 1 LightSwitch applications. As you read through this guide I’ll note in sections where the team is still fixing bugs or changing experiences for the final release (RTM). Please be aware that the deployment experience will be much easier and full-featured for RTM.
In this post we will walk through details of configuring a web server first and then move onto deployment of a LightSwitch Beta 1 application. (BTW, a lot of this information should be useful even if you are creating other types of .NET web applications or services that connect to databases.)
Configuring the server
- Installing Beta 1 Prerequisites
- Verifying IIS Settings and Features
- Configuring Your Web Site for Network Access
- Configuring an Application Pool and Test Site
- Add User Accounts to the Database Server
Deploying and testing your LightSwitch application
- Publishing a LightSwitch Beta 1 Application
- Installing the LightSwitch Application Package on the Server
- Using Windows Integrated Security from the Web Application to the Database
- Launching the LightSwitch Application
So let’s get started!
Installing LightSwitch Beta 1 Prerequisites
You can use the Web Platform Installer to set up a Windows web server fast. It allows you to select IIS 7, the .NET Framework 4 and a whole bunch of other free applications and components, even PHP. All the LightSwitch prerequisites are there as well including SQL Server Express and the LightSwitch middle-tier framework. This makes it super easy to set up a machine with all the components you need.
NOTE: The team is looking at simplifying this process and possibly making the LightSwitch server component pre-reqs go away so this process will likely change for RTM.
To get started, on the Web Platform tab select the Customize link under Tools and check the Visual Studio LightSwitch Beta Server Prerequisites . This will install IIS 7, .NET Framework, SQL Server Express 2008 and SQL Server Management Studio for you so you DO NOT need to select these components again on the main screen.


If you already have one or more of these components installed then the installer will skip those. Here's the breakdown of the important dependencies that get installed:
- .NET Framework 4
- Middle-tier components for the LightSwitch runtime, for Beta 1 these are installed in the Global Assembly Cache (GAC)
- IIS 7 with the correct features turned on like ASP.NET, Windows Authentication, Management Services
- Web Deployment Tool 1.1 so you can deploy directly from the LightSwitch development environment to the server
- SQL Server Express 2008 (engine & dependencies) and SQL Server Management Studio (for database administration)(Note: LightSwitch will also work with SQL Server 2008 R2 but you will need to install that manually if you want that version)
- WCF RIA Services Toolkit (middle-tier relies on this)
Click the "I Accept" button at the bottom of the screen and then you'll be prompted to create a SQL Server Express administrator password. Next the installer will download all the features and start installing them. Once the .NET Framework is installed you'll need to reboot the machine and then the installation will resume.
Once you get to the SQL Server Management Studio 2008 setup you may get this compatibility message:

If you do, then just click "Run Program" and after the install completes, install SQL Server 2008 Service Pack 1.
Plan on about an hour to get everything downloaded (on a fast connection) and installed.
In the next couple sections I'm going to take you on a tour of some important IIS settings, talk you through Application Pools & Identities and how to get a simple test page to show up on another networked computer. Feel free to skip to the end if you know all this already and just want to see how to actually package and deploy a LightSwitch application. :-)
Verifying Your IIS Settings and Features
Once IIS is installed you’ll need to make sure some features are enabled to support LightSwitch (or any .NET web application). If you installed the Visual Studio LightSwitch Beta Server Prerequisites to set up IIS then these features should already be enabled.
In Windows 7 you can do this by going to “Add or Remove Programs” and selecting “Turn Windows features on or off”. On Windows Server 2008 you can do this through the Server Manager Roles Wizard. You will need to turn on IIS Management Service Role Services, Application Development Features: ASP.NET (this will automatically add additional services when you check it), and under Security: Windows Authentication.

Configure Your Web Site for Network Access
Now before moving on we should make sure we can browse to the default site. First you should be able to open a browser to https://localhost and see the IIS 7 logo. If that doesn’t happen something got hosed in your install and you should troubleshoot that in the IIS forums or the LightSwitch forums.
Next we should test that other computers can access the default site. In order for other computers on the network to access IIS you will need to enable “World Wide Services (HTTP Traffic-In)” under Inbound Rules in your Windows Firewall:

At this point you should be able to navigate to https:// <servername> from another computer on your network and see the IIS 7 logo. (Note: If you still can’t get it to work, try using the machine’s IP address instead of the name)

Configure an Application Pool and Test Site
Next I want to talk a little bit about how application pools and Windows identities work. This will help you determine what is the best way for you to host any web application on a network. You don't actually have to know much about this stuff when deploying a LightSwitch application because the installation package will set up most of this for you. However, I think it's always a good thing to understand what's going on. If you don't care, you can skip this section :-)
When you create a new website in IIS Manager you choose which application pool it should run under. By default the DefaultAppPool is selected. Application pools give you isolation between worker processes (so if one web application crashes it can’t take others with it) but they also allow you to run under different identities. This way you can create an application pool that hosts a web application or set of services that run under a specific Windows Identity and you can allow access only to the resources that identity needs to run the application. In the case of a LightSwitch application, that additional resource will be the database. If you are already on a Windows domain it’s best to create a least-privilege domain user and set that user as the identity of the application pool and grant access to that user to the database (which is probably on another machine, if so you’ll probably want to read this).
For my simple test deployment, I am going to host the database on the same machine as IIS so I can use a local machine account. Open up the Local Users and Groups console and create a local user called LightSwitchApp. Then add this user to the IIS_IUSERS group. Next open up IIS Manager, right-click on Application Pools and select “Add Application Pool....” Type a name for your App Pool, I called mine LightSwitchAppPool and select the .NET Framework version 4 you just installed. Then click OK.

Next right-click on the LightSwitchAppPool and select Advanced Settings and change the Identity to the account you just created. (Once we install the LightSwitch application middle-tier components into a web application running in this pool, they will run under this identity to access resources.)

Before we move on let’s create a test application and make sure computers on our network can see a test page running under this pool. Create a folder C:\LightSwitchTest on the machine and create a Default.htm file (you can do this in notepad) and do something simple like:
<html>
<head>
<title>Welcome</title>
</head>
<body>
<H1>
Welcome to My Site!
</H1>
</body>
</html>
Save the file. Now in order for another machine on your network to browse a web site on this machine three very important things have to happen.
- The firewall has to allow incoming HTTP requests
- The NTFS (file) permissions on the folder containing the application files need to grant access to the same user as the App Pool’s identity
- The Web application has to enable the right authentication for the type of access
So for our case, we’re going to create a web application that runs in the LightSwitchAppPool and allow anonymous access to the site (anyone on the network has access). Anonymous access is the default authentication (or lack thereof) on the Default Web Site. You can see this in IIS Manager by selecting the Default Web Site node and double-clicking on the Authentication icon in the IIS section of the main window. For intranet-based business applications where all users are on a domain it's recommended that you use Windows Authentication so that users are automatically authenticated based on their Windows Credentials. We'll take a look at how to set up authentication and authorization security in a follow-up post. (UPDATE: Here's that follow up post on security.)
So back to our test, the LightSwitchApp user account will need to be granted on C:\LightSwitchTest folder. Right-click on the folder and select Properties and on the Security tab grant Read & execute, List folder contents, and Read permissions.

Next we just need to create a new application back in IIS Manager by right-clicking on the Default Site and select “Add Application”. Specify the alias, in my case LightSwitchTest and then click “Select…” to select the LightSwitchAppPool we just created. Then enter the physical path C:\LightSwitchTest.

Click on “Test Settings…” and you should see that Pass-through authentication is working on the App Pool and the path is accessible. Now hit https:// <servername> /LightSwitchTest from another machine and you should see your custom welcome page.

Add User Accounts to the Database Server
Next we'll need to add a user name and password to our database server that the LightSwitch installation package will use to connect and create the application database.
NOTE: Right now in Beta 1 when you install a LightSwitch application package onto the server it requires SQL Server authentication. This means a SQL Server user name/password is required instead of being able to specify a Windows login. The team is aware of this and has logged a bug. Once you deploy, you can change the application to use Windows Integrated security and I'll show you how to configure that below.
So for now you need to enable SQL Server Authentication on your SQL Express database. You can do this by opening up SQL Server Management Studio. To connect, use .\SQLEXPRESS for the local server name and use Windows Authentication (make sure you are logged in under the same user account when you installed SQL Server Express) .
Now you can right-click on the top database node in the Object Explorer on the left and select Properties. Select the Security page and choose "SQL Server and Windows Authentication mode". Click OK.

Next you'll need to restart the SQL Server service so that it picks up the new authentication mode changes we made. Right-click on the top database node in the Object Explorer again and select "Restart".
Now we need to add a couple users. Right-click on Security node in the Object Explorer and choose New –> Login. Enter the user name, then select "SQL Server authentication" and enter a password you want to use. Then uncheck the "Enforce password expiration" option. Select the Server Roles page and add the user to the dbcreator and public roles. (click image to enlarge)

Do the same thing (New –> Login), and browse for the LightSwitchApp Windows user account (our App Pool's identity) and leave Windows Authentication selected. Add this user to the same dbcreator and public roles.
Publishing a LightSwitch Beta 1 Application
Here is the official documentation on how to publish a LightSwitch application - How to: Deploy a LightSwitch Application. For this example, I'm going to show how to deploy a simple application that does not have any role-based security set up. I'll show how we can configure that in a later post.
So back over on my LightSwitch development machine the first thing we need to do is specify the type of 3-tier deployment we want. In the case of my application, I want it to be a Windows Desktop client because I'm doing some COM automation with Office and I want to run outside of the browser. To specify this, from the menu select Project—> AppName Properties and then select the Application Type tab to choose the type of 3-tier deployment you want.

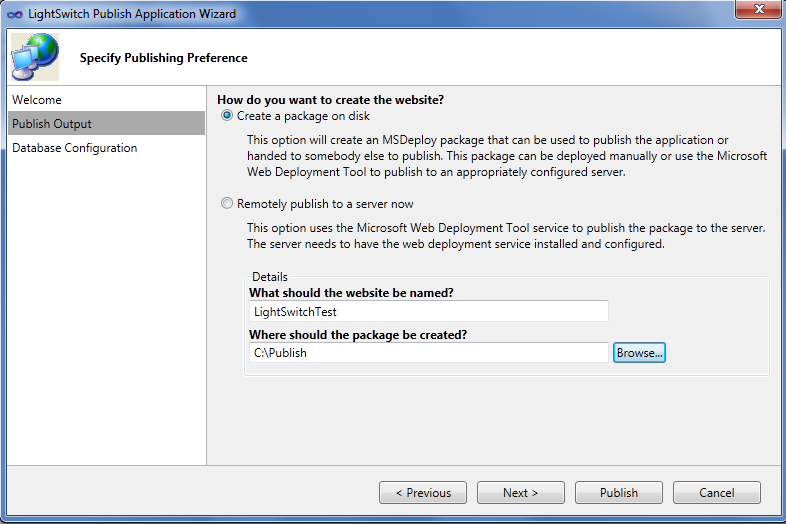
Next, from the main menu select Build –> Publish AppName to open the LightSwitch Publish Application Wizard. Verify the deployment is 3-tier and then click next to get past the Welcome page. In the Publish Output section you select whether you want to remotely publish to the server or just create a package on disk. If you have installed the Web Deployment Tool on your server (which is automatically installed if you installed the LightSwith Prerequisites above) then you can choose to deploy the application directly to your server by selecting “Remotely publish to a server now”. (UPDATE: To see how to remotely publish see this post.)
NOTE: In Beta 1 you can only do remote publishing to a Windows 2008 server running IIS 7 at this time. The team has added support for IIS 6 and Windows 7 and will be available in the next refresh.
For this example I'm going to show how to create and install the package manually so select "Create a package on disk" and then enter LightSwitchTest for the website name and specify a location to where you want the package created. Then click Next.
On the next page you specify the Database Configuration details. You can either create a new database or specify a database that needs to be updated. This refers specifically to the intrinsic database that is maintained by every LightSwitch application and exists regardless of whether you create new tables or attach to an existing database for your data. For the first deployment of the application you are always going to want to select the New Database option as you won't have one created yet. If you are publishing an update to an existing application then you would select Update Existing option.

NOTE: Currently Beta 1 cannot update an existing database. This is a known bug and will be fixed in the next refresh. For now you will need to update the database manually if you make any schema changes and want to publish the update.
Next click Publish and this will create a .ZIP file package in the publish location you specified. Copy that application package over to your web server.
Installing the LightSwitch Application Package on the Server
Back on the web server, navigate to the C:\LightSwitchTest folder and delete the Default.htm file we created earlier for testing. Then open up IIS Manager and right-click on the Default Web Site and select Deploy –> Import Application.

Browse to the .ZIP application package that we created then click Next, verify the virtual directory name and click Next. The contents of the package will be then be displayed.

Click Next and enter the remaining database details – specifying .\SQLEXPRESS as the local SQL Express server name, and entering the SQL Server user name and password we created above.

Click Next and this will kick off the installation that should be pretty quick. Once it completes you should be able to see your database in SQL Server Management Studio and all the web application files on disk.
Using Windows Integrated Security from the Web Application to the Database
Like I mentioned earlier, typically you want to set up Windows Integrated security between your web application and database. It's a lot easier this way because you don't have to worry about managing user names and passwords in a bunch of application connection strings. It also is a lot more secure -- right now our username and password to the database is being stored in clear text on the web application's Web.config.
Since we've configured our LightSwitchAppPool to run under the LightSwitchApp user identity we created earlier, we can change the connection string in the Web.config to use integrated security and the middle-tier will connect to the database under this windows account instead. In IIS Manager right-click on the LightSwitchTest web application and select Explore to navigate to the physical folder. Open the Web.config in notepad and remove the uid and password and add Integrated Security=SSPI:
<?xml version="1.0" encoding="utf-8"?>
<configuration>
<appSettings> ... </appSettings>
<connectionStrings>
<add name="_IntrinsicData" connectionString="Data Source=.\SQLEXPRESS;Database=OMS;Integrated Security=SSPI; " />
</connectionStrings>
<system.web> ...
Save the file. The last thing to do is add access to the application database (in my case I named it OMS). Open up SQL Server Management Studio again, expand the Security –> Logins node in the Object Explorer and double-click on the LightSwitchApp windows login account we added earlier. The Login properties are displayed. Select the User Mapping page and check off the application database to allow access then under the database role membership check db_owner and click OK:

NOTE: These steps should not be necessary at RTM once we are allowed to specify integrated security when installing a LightSwitch application package.
Launching the LightSwitch Application
Now for the fun part! Head over to a networked machine and navigate your favorite browser to the site https:// <servername> /LightSwitchTest and you should see a "Install Silverlight" graphic on the page if you don't have Silverlight installed. Install it then refresh the page and you will see the install page for your application:

Click the big blue "Install… " button and after a few seconds the application will launch out of browser and an application icon will be placed on the desktop. Woo hoo!

Now we have a 3-tier out-of-browser LightSwitch application deployed and running smooth. In my next post on deployment I'll show how we can configure and enable IIS Authentication and LightSwitch Authorization security (UPDATE: Here's that follow up post on security). I’m also working on some How Do I videos so stay tuned. (UPDATE: Here are those videos - How Do I: Set up Security to Control User Access to Parts of a Visual Studio LightSwitch Application? & How Do I: Deploy a Visual Studio LightSwitch Application?
Enjoy!