Integrate Outlook Appointments with SharePoint 2010 Calendar Lists using Data Services
The other day a good friend of mine asked me if it was possible to send appointments created in Outlook into a SharePoint calendar list. It’s easy enough to grab this data from Outlook by building an add-in with Visual Studio, but what also turned out to be really easy was sending this information to SharePoint using its built-in WCF data services, also known as OData. OData is an open REST-ful protocol for exposing and consuming data on the web. I’ve written before about how we could consume these SharePoint 2010 data services and do some analysis in Excel. Today I’d like to show you how easy it is to update data through these services as well.
Creating the Outlook Add-in and Adding the SharePoint Data Service Reference
I’m going to use Visual Studio 2010 to build an Outlook 2010 add-in, but you could also choose to build an add-in for Outlook 2007. As a matter of fact, you could use Visual Studio 2008 to build Outlook 2007 add-ins and access data services, just make sure you target the .NET 3.5 framework or higher.
File –> New –> Project, select the Office 2010 node and select Outlook 2010 add-in. I named this example project UpdateSharePointCalendar. First thing we need to do is add a reference to our SharePoint 2010 data service. You do this the same way you add references to other WCF services. Right-click on the project in the Solution Explorer and select “Add Service Reference”. If you have SharePoint 2010 installed, you can navigate to the data service for the site that contains the data you want to consume. To access the data service of the root site you would navigate to https://<servername>/_vti_bin/ListData.svc. I have SharePoint 2010 installed on my local dev box so for this example I’ll use the data service located at https://localhost/_vti_bin/ListData.svcand name the service reference SPService.
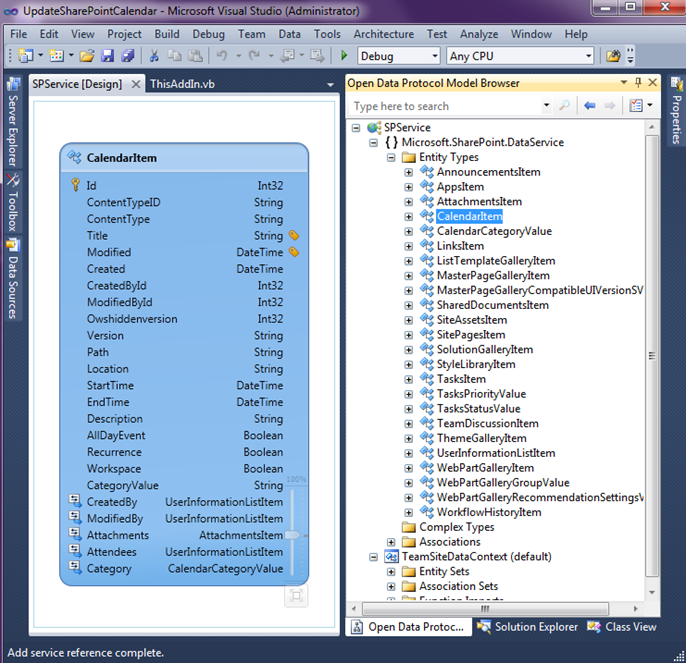
Once we add the service reference, the client entity types will be generated for us and an assembly reference to the System.Data.Services.Client is added. All the SharePoint list data and type information is exposed via the data service. We can browse these types visually using the Open Data Protocol Visualizer. Once you install the visualizer, right-click on the SPService service reference and select “View in Diagram”. Expand the Entity Types and then drag the CalendarItem onto the diagram to explore its properties. A lot of these properties are internal fields to SharePoint, but you can see things like Title, StartTime, EndTime and Description related to the calendar item.
Adding a Form Region and Ribbon to Outlook Appointments
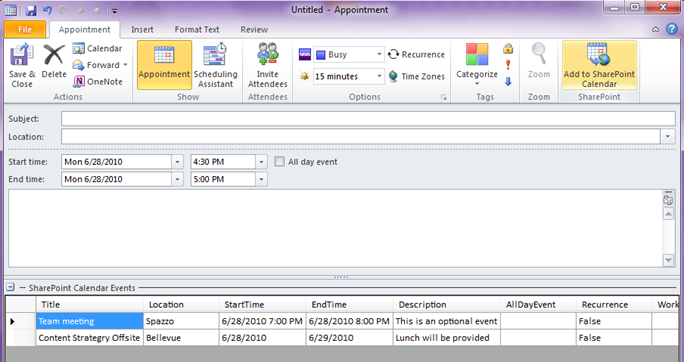
Now that we have our data service reference set up let’s go ahead and add some UI. For this example, I want to display an adjoining form region when a user creates a new Appointment item in Outlook. It should display all the events on the SharePoint calendar for that day. I’ll use a simple read-only data grid for this example but you could display anything here, even WPF controls like I showed in this post. I also want to add a button to the Ribbon that the user can click to send the appointment data to the SharePoint calendar list.
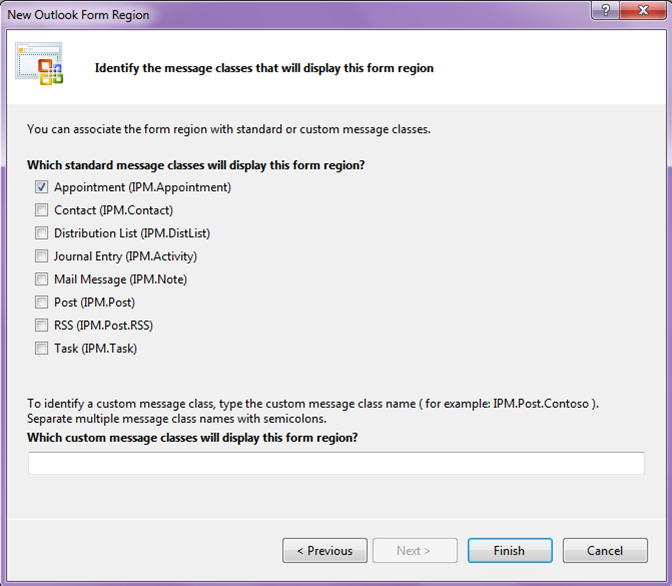
So right-click on the project and select Add –> New Item and select Outlook Form Region, I named it AddToSharePoint, and click Add. Next select “Design a new Form Region”. Next select the type of Form Region, in this case Adjoining. Next, for the name I decided on “SharePoint Calendar Events”. At the bottom of this screen it asks which display modes this region should appear in and by default all three modes are checked. If we were adding this form region to a mail item then this would control when the region would display. However there is no reading pane or separate compose or read mode for an appointment item, so we will need to determine at runtime if the user is creating a new appointment or not. Click Next and finally select the Appointment message class as the class to associate the form region with, then click Finish.
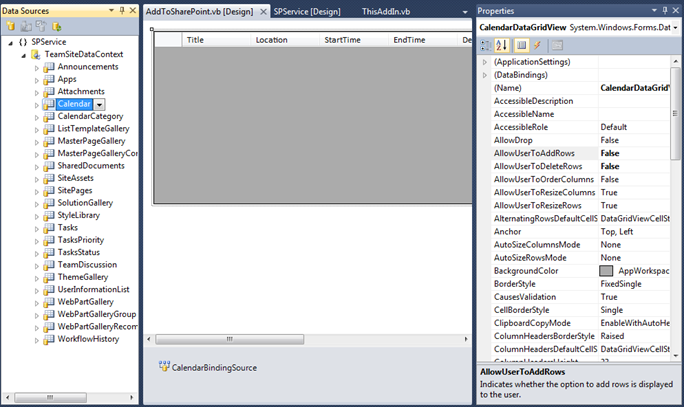
A form region is just a user control and in this example we just want a simple data grid of CalendarItem types so I’m going to open the Data Sources window (Data –> Show Data Sources) and drag the Calendar type onto the user control. This will create a CalendarBindingSource and sets up the data binding automatically for us. All we need to do is set the CalendarBindingSource.DataSource property in code to have our data display in the grid. Next, I just edit the columns I want to display and then set the data grid to read-only.
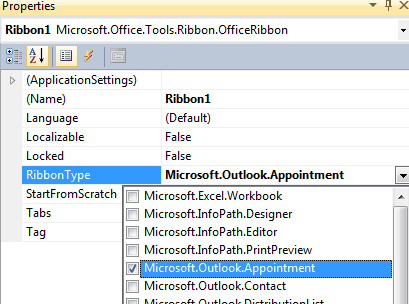
Now I want to add a Ribbon so right-click on the Project in the Solution Explorer and select Add –> New Item, then select Ribbon (Visual Designer) and click Add. The first thing to do is associate the Ribbon with the Appointment so select the Ribbon property called RibbonType and select Microsoft.Outlook.Appointment.
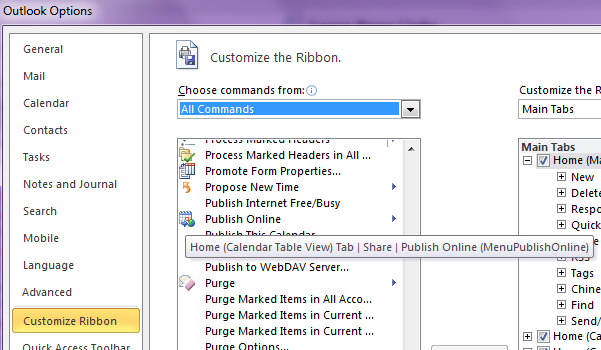
I want this button to appear on the first tab of the new appointment. In order to do this, we need to know the internal control identifiers for Outlook. You can download the Office Fluent User Interface Control Identifiers for Office 2010 here. For this example we can find what we need in the OutlookAppointmentItemControls.xlsx. There we can see that the name of the main Appointment tab is called TabAppointment. So in our ribbon designer select the tab and in the properties set the ControlId to TabAppointment. Finally drop a button from the toolbox onto the Group1 and make it large by setting the ControlSize property (I also named it btnSharePoint). We could create our own image here but I’m lazy and Outlook has some pretty nice ones already. It’s easy to find the IDs of the built-in images if you “Customize Ribbon” in Outlook’s File –> Options. Just hover over the image you like and in parenthesis you’ll see the IDs. Set the Ribbon button’s OfficeImageID property to the one you want, I selected MenuPublishOnline.
Checking if an Outlook Appointment Item is New
Okay now for some code. I mentioned that we only want this UI (the Form Region and the Ribbon) to display if the user is creating a new appointment. Because there is no separate display mode for an Appointment item (FormRegionMode always returns olFormRegionCompose {1}), in order to check this you can use a little trick to see if the appointment’s start time is a valid date. The Appointment Item’s CreationTime.Date will return a date far far into the future so we can test whether the appointment is in this century to determine if it is new or not. So first I’ll add this code to the FormRegionInitializing event of the FormRegionFactory (expand the code region to get to the factory code) which allows you the chance to cancel the creation of the form region:
 ' Occurs before the form region is initialized.
' To prevent the form region from appearing, set e.Cancel to true.
' Use e.OutlookItem to get a reference to the current Outlook item.
Private Sub AddToSharePointFactory_FormRegionInitializing(ByVal sender As Object,
    ByVal e As Microsoft.Office.Tools.Outlook.FormRegionInitializingEventArgs) _
    Handles Me.FormRegionInitializing

    Dim item As Outlook.AppointmentItem = CType(e.OutlookItem, Outlook.AppointmentItem)
    If item.CreationTime.Date <= Today.Date.AddYears(100) Then
        'This isn't a new appointment, it's been created already because the date is valid
        ' so don't show our ribbon customization in this case
        e.Cancel = True
    End If
End Sub
Similarly we can put code into our Ribbon’s Load handler in order to hide our customization if the appointment isn’t new:
 Private Sub Ribbon1_Load(ByVal sender As System.Object,
                         ByVal e As RibbonUIEventArgs) Handles MyBase.Load

    Dim item = TryCast(Globals.ThisAddIn.Application.ActiveInspector.CurrentItem,
        Outlook.AppointmentItem)

    If item IsNot Nothing Then
        If item.CreationTime.Date <= Today.Date.AddYears(100) Then
            'This isn't a new appointment, it's been created already because the date
            ' is valid, so don't show our ribbon customization in this case
            Me.Group1.Visible = False
        End If
    End If
End Sub
Consuming SharePoint 2010 Calendar List Data
Now that we have our UI built and displaying when we want, we are ready to load the calendar data from SharePoint via the data service. First we’re going to create a property to hold the SharePoint DataContext which is what will be tracking changes to the SharePoint CalendarItem entities that were generated for us on the client side when we added the service reference. Then we can write a LINQ query to return the list of CalendarItems for a particular day. Back in the Form Region we’ll hook up the CalendarBindingSource.DataSource property to this list that is returned.
So we’ll write most of our code in the ThisAddIn class, starting with this bit:
 Imports UpdateSharePointCalendar.SPService
Public Class ThisAddIn

    'This DataContext tracks changes to our entities
    Private _ctx As TeamSiteDataContext
    Public ReadOnly Property SPContext() As TeamSiteDataContext
        Get
            If _ctx Is Nothing Then
                _ctx = New TeamSiteDataContext(New Uri("https://localhost/_vti_bin/ListData.svc"))
                _ctx.Credentials = Net.CredentialCache.DefaultNetworkCredentials
            End If
            Return _ctx
        End Get
    End Property

    ''' <summary>
    ''' Returns the Calendar list data from SharePoint for the specified date
    ''' </summary>
    ''' <param name="theDate">the date to search for items</param>
    ''' <returns>A list of CalendarItem entities</returns>
    Public Function GetSPCalendarData(ByVal theDate As Date) As List(Of CalendarItem)

        Dim results = From ci In SPContext.Calendar
                      Where CDate(ci.StartTime) = theDate

        Return results.ToList()
    End Function
Now go back over to the Form Region’s code and add the call to get the data and populate the data grid in the FormRegionShowing event handler.
 Private SPCalendarItem As SPService.CalendarItem
Private WithEvents AppointmentItem As Outlook.AppointmentItem =
        CType(Me.OutlookItem, Outlook.AppointmentItem)

'Occurs before the form region is displayed.
'Use Me.OutlookItem to get a reference to the current Outlook item.
'Use Me.OutlookFormRegion to get a reference to the form region.
Private Sub AddToSharePoint_FormRegionShowing(ByVal sender As Object,
    ByVal e As System.EventArgs) Handles MyBase.FormRegionShowing

    PopulateDataGrid()
End Sub

Private Sub PopulateDataGrid()
    Me.CalendarBindingSource.DataSource =
        Globals.ThisAddIn.GetSPCalendarData(AppointmentItem.Start.Date)
End Sub
Now when we run this we will see in our adjoining form region any Calendar list data from SharePoint for the date we are creating an appointment in Outlook. To modify what is returned from the data service, simply adjust the LINQ query – that’s the beauty of data services, they are easily accessible using LINQ.
Updating SharePoint 2010 Calendar List Data
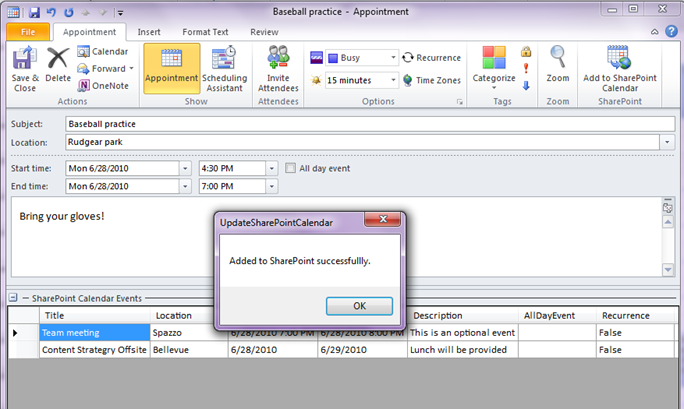
Now for the fun part, updating SharePoint with our appointment data. Because each new appointment will only be associated with one CalendarItem entity, in the above code for the Form Region you will see a private field in the class called SPCalendarItem. This will hold the entity instance just in case the user decides to update the appointment before they close the window. This is just a simple example, you could get much fancier and allow re-edits of the calendar data if you wish, the concept is the same. So in the Form Region let’s add a method that we can call from our Ribbon when the user clicks the button to add the appointment data to SharePoint. We’ll add the actual method that talks to data service in the ThisAddIn class, but first let’s set up how the UI will call it. In the Form Region:
 Friend Sub AddToSPCalendar()
    If AppointmentItem.Subject IsNot Nothing AndAlso
       AppointmentItem.Start <> Nothing Then

        If Globals.ThisAddIn.AddSPCalendarData(AppointmentItem, SPCalendarItem) Then
            MsgBox("Added to SharePoint successfullly.")
            PopulateDataGrid()
        Else
            MsgBox("Could not add appointment to SharePoint.")
        End If
    Else
        MsgBox("Please enter at least a subject and a start time.")
    End If
End Sub
As a side note, if you are using Visual Studio 2010, one of my favorite new features is called “Generate From Usage”. In the above code snippet we are getting an error at this point because we haven’t written the AddSPCalendarData method on our ThisAddIn class yet. But you can just open the smart tag and have VS2010 generate the method stub in the right place for you.
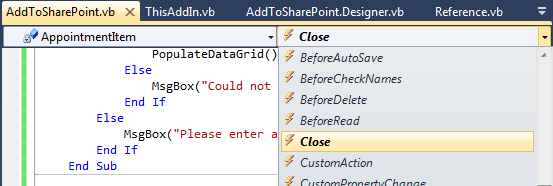
We also want to handle the Close event on the AppointmentItem itself so that we can ask the user if they want to add the Appointment to SharePoint before they close the window. Notice when I declared the AppointmentItem in the Form Region class I specified the WithEvents syntax so that we can declaratively set up event handlers to any of the AppointmentItem events using the Handles clause. Once you specify WithEvents, you can then easily pick from the list of events in the Declarations dropdown at the top of the VB Code editor.
Here’s the code I’ve put in the Close event handler that double-checks the user’s intentions:
 Private Sub AppointmentItem_Close(ByRef Cancel As Boolean) Handles AppointmentItem.Close
     If AppointmentItem.Subject IsNot Nothing AndAlso
        AppointmentItem.Start <> Nothing AndAlso
        SPCalendarItem Is Nothing Then

        Dim result = MsgBox("Do you want to add this appointment to SharePoint?",
                            MsgBoxStyle.YesNoCancel, "Add to SharePoint")
        Select Case result
            Case MsgBoxResult.No
            Case MsgBoxResult.Cancel
                Cancel = True
            Case MsgBoxResult.Yes
                AddToSPCalendar()
        End Select
    End If
End Sub
Now back in the Ribbon you can handle the btnSharePoint_Click event and call the AddToSPCalendar method in the form region like so:
 Private Sub btnSharePoint_Click(ByVal sender As System.Object,
   ByVal e As Microsoft.Office.Tools.Ribbon.RibbonControlEventArgs) Handles btnSharePoint.Click
    'Get the instance of our AddToSharepoint form region
    Dim fr = Globals.FormRegions(Globals.ThisAddIn.Application.ActiveInspector).AddToSharePoint
    fr.AddToSPCalendar()
End Sub
Finally we can add the implementation details in the ThisAddIn class that does the work of adding the appointment data to our SharePoint 2010 Calendar list. In ThisAddIn we are simply creating a new CalendarItem entity and populating it with the data from the AppointmentItem. Once the CalendarItem is created we keep that reference around so that if the user wants to update the AppointmentItem before they close the window they can. Notice that the entire time we have an instance to the SharePoint DataContext which is tracking our changes. This is important to keep in mind because when we call SaveChanges, ALL the entities that are being tracking are updated. The way we’ve written this Add-in we’re only updating or adding one CalendarItem at on any given AppointmentItem at a time but you are not restricted to this. In ThisAddin class:
 ''' <summary>
''' This method takes data from the Outlook.Appointment
''' </summary>
''' <param name="AppointmentItem">The Outlook Appointment</param>
''' <param name="SPCalendarItem">The SharePoint CalendarItem entity instance
''' for this appointment</param>
''' <returns>True if saved successfully to SharePoint</returns>
''' <remarks>If the SPCalendarItem is null, then it will be created and a new event
''' will be added, otherwise the SharePoint entity will be updated.</remarks>
Public Function AddSPCalendarData(ByVal AppointmentItem As Outlook.AppointmentItem,
                                  ByRef SPCalendarItem As CalendarItem) As Boolean
    Dim saved As Boolean = False

    If SPCalendarItem Is Nothing Then
        'Add this appointment to the SharePoint Calendar

        SPCalendarItem = New CalendarItem With
                      {.StartTime = AppointmentItem.Start,
                       .EndTime = AppointmentItem.End,
                       .Recurrence = AppointmentItem.IsRecurring,
                       .Title = AppointmentItem.Subject,
                       .Description = AppointmentItem.Body,
                       .CategoryValue = AppointmentItem.Categories,
                       .Location = AppointmentItem.Location}

        'Tells the DataContext that we want to add
        ' a new CalendarItem entity to the Calendar list
        SPContext.AddToCalendar(SPCalendarItem)
    Else
        'Update the SharePoint CalendarItem
        With SPCalendarItem
            .StartTime = AppointmentItem.Start
            .EndTime = AppointmentItem.End
            .Recurrence = AppointmentItem.IsRecurring
            .Title = AppointmentItem.Subject
            .Description = AppointmentItem.Body
            .CategoryValue = AppointmentItem.Categories
            .Location = AppointmentItem.Location
        End With
    End If
    Try
        'Save the Outlook appointment
        AppointmentItem.Save()
        ' Saves all pending changes through the data service
        SPContext.SaveChanges()
        saved = True
    Catch ex As Exception
        MsgBox(ex.ToString)
        saved = False
    End Try

    Return saved
End Function
Now when we run this we can optionally add new appointments that we create in Outlook to our SharePoint calendar by clicking our custom Ribbon button.
As you can see data services make it much easier to consume and update data particularly in SharePoint 2010. Based on an open protocol, OData, you’ll be seeing more and more producers including Microsoft products themselves start to open up their data stores this way. There are many ways you can take advantage of them, this was just one of the infinite possibilities -- and I have to say it was a fairly fun exercise in Outlook programming as well ;-). I’ve uploaded the sample code onto Code Gallery:
https://code.msdn.microsoft.com/OutlookSPCalendar
For more information on OData see Open Data Protocol Q&A, WCF Data Services (formerly ADO.NET Data Services) and my articles on data services, particularly this one if you are just getting started.
For more information on SharePoint 2010 data services see WCF Services in SharePoint Foundation 2010.
Enjoy!
