Migrating a 2007 Workflow to Visual Studio & SharePoint 2010
Lately I’ve been converting an Office business application we built last year with Visual Studio 2008 to Visual Studio and Office 2010. Last couple posts we tackled converting the Outlook client piece. In this post I want to focus on the server side and show how we can convert the SharePoint 2007 workflow we built with Visual Studio 2008 to a SharePoint 2010 workflow in Visual Studio 2010.
In Visual Studio 2008 under the Office –> 2007 node in the New Project dialog we could choose from a variety of Office client templates. There was included a SharePoint Sequential Workflow and SharePoint State Machine Workflow. These were the only SharePoint templates available to us. As you’ve probably heard already, Visual Studio 2010 provides much more support for SharePoint and includes many more project and item templates, now included in its own SharePoint –> 2010 node:
You can still build Sequential and State Machine workflows for SharePoint 2007 in Visual Studio 2010 but you’ll be able to do a lot more against SharePoint 2010. Let’s see how we can convert the Sequential Workflow we built against SharePoint 2007 to SharePoint 2010 using Visual Studio 2010.
Convert the Solution to Visual Studio 2010
The first step is to open the VS2008 solution in VS2010. This will through the (probably familiar) Visual Studio conversion wizard. This doesn’t change the code itself, it just upgrades the solution and project files. Now if you are doing this on a machine that doesn’t have SharePoint 2007 installed, but instead has SharePoint 2010, then you won’t be able to run this workflow. Makes sense. You need to have the version of SharePoint you’re developing against on the dev box. Luckily, with SharePoint 2010 you can have it installed on a client OS like Win 7.
Create the Order Document Library on SharePoint 2010
Since we want to migrate this example to SharePoint 2010, I have to have that installed that on my development machine (which also means we can’t run the 2007 workflow). We also need to set up SharePoint with the same document library we had before or our migrated code won’t run either.
If you recall this workflow processes purchase orders that are added to the Orders document library so we’ll also need to set that up with the same columns we had before. Even though the UI looks a bit different, the process is the same as I described in the previous article on SharePoint 2007. Once you get the Order document library set up with the additional columns we need, it should look similar to this:
Add a New SharePoint 2010 Sequential Workflow
Since we can’t run the SharePoint 2007 workflow, the easiest thing to do is add a new SharePoint 2010 Workflow project to your solution and then move the workflow code over. With your solution open, select File –> Add –> New Project, expand the SharePoint 2010 node and then select the SharePoint 2010 Sequential Workflow.
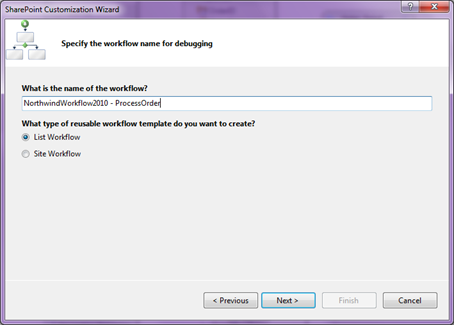
 The SharePoint Customization wizard opens. I’ll name this project NorthwindWorkflow2010 and then I need to select my SharePoint 2010 site, set the display name and select List Workflow. (Notice in SharePoint 2010 we can also create a Site Workflow as well).
Click Next and then select the same lists to associate the workflow with that you were using before in the 2007 Workflow. In the case of this example the only thing to select is the Orders document library in the first dropdown.
Click Next and then select how the workflow should start up. In our case leave the defaults. We want this workflow to start up when an item is added to the list.
Once you hit Finish the project is generated and appears in the Solution Explorer.
Add Service and Assembly References, then Copy your Code
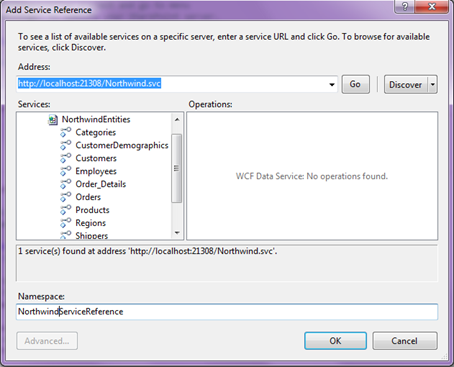
 Next you’ll need to re-add any assembly references you were using before to get your workflow code running. In this example we need to add a reference to the DocumentFormat.OpenXml. I also need to add a service reference to the data service we were using to access our LOB data, in this case NorthwindDataService. In fact, I have this already in the Solution so I can just right-click on the NorthwindWorkflow2010 project, select Add Service Reference, and then in the dialog just click the Discover button to find the data service. Name it NorthwindServiceReference and click OK.
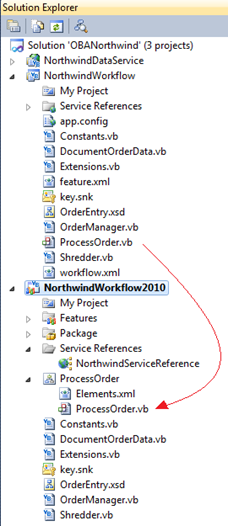
Now comes the fun part. We can just copy all the code files into the new project. First though I need to rename the Workflow1 “sub-folder” to ProcesOrder in the 2010 project. Yes you should notice that the file structure is different in the 2010 project. For instance, you’ll see Package and Features “folders” under the project. This is because there are new tools for packaging features (like Lily showed us on Channel 9) among a ton of other tools. We refer to these “folders” as SharePoint Project Items (SPI).
 Once you rename the Workflow SPI to ProcessOrder then you can delete the actual workflow Workflow1. Then drag the ProcessOrder workflow from the old project into this new one, just make sure you add it to the ProccessOrder SPI. Also drag all the other code files into your new project.
Next open up the Elements.xml file and make sure you see the correct name of your workflow in there. Make sure the CodeBesideClass attribute is correct:
CodeBesideClass="NorthwindWorkflow2010.ProcessOrder"
If this isn’t correct then your workflow will deploy correctly, but it will fail to start so be sure to double-check this.
The only other thing we need to do now is fix up one Imports statement in our code-behind for the workflow because the name of our project changed. In our example, the OrderManager.vb is referencing our service so that needs to be fixed up:
Imports NorthwindWorkflow2010.NorthwindServiceReference
Finally remove the old workflow project (NorthwindWorkflow) from the solution by right-clicking on the project name and selecting remove.
Run it!
Now you should be able to run the new workflow in SharePoint 2010. Set the NorthwindWorkflow2010 as your startup project, make sure you start the NorthwindDataService and then hit F5 to deploy and debug. When we add a new purchase order to the Orders doc library the workflow will run and process our order by putting the order data into the database using the data service just like before, but now we’re developing against SharePoint 2010 and we can take advantage of the new tools in Visual Studio 2010.
If you’d like to play with this workflow (plus all the other pieces of the Northwind Traders application) you can download the entire solution upgraded to Visual Studio, Office and SharePoint 2010 here.
Next time I’ll show how we can create a simple Visual Web Part that displays inventory information from the Northwind database and allows us to assign tasks using the SharePoint server object model.
Enjoy!

