OBA Part 4 - Building an Excel Client against LOB Data
In my last few app building posts we've been building a simple Office Business Application (OBA) for the new Northwind Traders. If you missed them:
- OBA Part 1 - Exposing Line-of-Business Data
- OBA Part 2 - Building and Outlook Client against LOB Data
- OBA Part 3 - Storing and Reading Data in Word Documents
(In the last post on OBA I mentioned we would build out the SharePoint Workflow next but I realized that it's important to see how the Excel client works before we write the workflow, so that will be the next post.)
In this post I want to focus on how we can build an Excel client for our shipping department. This will be a customized Excel spreadsheet that lists the orders that need to be shipped and allows users to enter the ship dates and save them back to the database.
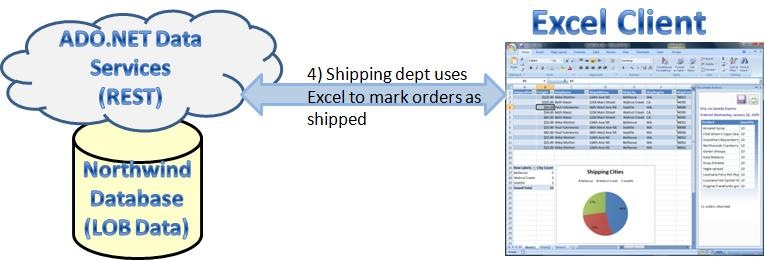
We'll also generate a pivot table and chart so that we can visualize the percentages of cities that we're shipping our products. This is one of the key advantages of building an Excel client. Not only does it lend itself well for editing tabular data, it also makes it very easy to provide additional analysis of that data.
The Excel Document Customization
I've been building upon the the Visual Studio Solution that we started in the first post on OBA when we built the data service. So just add a new project to the solution (File -> Add -> New Project) and select Office 2007 Excel Workbook which is available in Visual Studio 2008 Professional and higher:
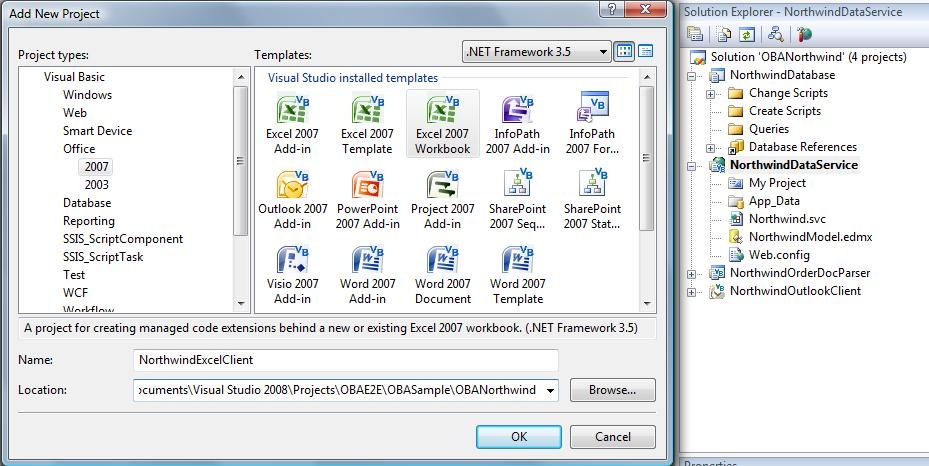
Since we're building a document customization and not an Add-In this means that our code will only run on the specific document as opposed to running in the Excel application over any document that is opened. After we add the project we're asked if we want to import an existing Excel workbook or create a new one. For this example we'll want to create a new one named the same name as our project, NorthwindClientExcel.xlsx. After we specify this, our project is created and the Excel designer opens.
Next step is to add the data service reference just like we did for the Outlook Add-In. Right-click on the project, select Add Service Reference. Click the Discover button and it should find our ADO.NET data service in the solution called NorthwindDataService. Name the service reference NorthwindService.
Data Binding in Excel
Now that we have our service reference we can retrieve the list of Order objects that have not been shipped yet and display them in the first sheet of our workbook. But we'll also want to show the Order Details to the shipping department and display the Quantity and Product that should be shipped. We'll do this using an Excel Action Pane by setting up a master-detail view of the data. So as the user scrolls through the Order rows, the Action Pane will display the Order Details. The user only needs to make changes to the Order rows itself so this design will work well.
The magic control we use in Excel to bind data to rows is called the ListObject. This object can easily bind to a Winforms BindingSource just like any other Winforms control. So to set up our data source so we can bind to a BindingSource we'll want a BindingList(Of Order) so that list change notifications are communicated to the UI. We'll also need to augment the Order partial class on the client so that property change notifications are also sent.
So first create a new class named Order and place it in the same Namespace as the NorthwindService service reference we just added. This is where the client proxy objects are generated for us so in order to extend these classes with our own code we just need to get it into the same Namespace. (Here's a Visual Basic tip, you know you've got it right if you see the Order properties and methods in the Declarations drop down above the editor for the Order class.) We need to fire a change notification on all of the properties of our Order so I've placed code to do this in all the xxxChanged() partial methods like so :
 Imports NorthwindExcelClient.NorthwindService
Imports System.ComponentModel

Namespace NorthwindService

    Partial Public Class Order
        Implements INotifyPropertyChanged

        Public Event PropertyChanged(ByVal sender As Object, _
                                     ByVal e As PropertyChangedEventArgs) _
                                     Implements INotifyPropertyChanged.PropertyChanged

        Private Sub FirePropertyChanged(ByVal propertyName As String)
            If propertyName <> "" Then
                RaiseEvent PropertyChanged(Me, New PropertyChangedEventArgs(propertyName))
            End If
        End Sub

        Private Sub OnShippedDateChanged()
            FirePropertyChanged("ShippedDate")
        End Sub

        Private Sub OnOrderDateChanged()
            FirePropertyChanged("OrderDate")
        End Sub

        'FirePropertyChanged is called from all xxxChanged() partial methods.
        ' I excluded the rest of the code here for clarity....
.
.
.
    End Class
End Namespace
Next we need to create a BindingList(Of Order). I'm going to create a class called MyOrdersList that inherits from this which will also encapsulate the calls to the ADO.NET Data Service. MyOrdersList will use the data service context on the client (NorthwindService in our case) to retrieve and update the Orders. We don't want to allow adds or deletes in this application because orders are going through a workflow and our shipping department is only updating the information on an order, specifically the ShippedDate. So we'll need to override AddNewCore and RemoveItem to prevent this. We'll also override the OnListChanged so that we can tell the data service context to mark the Order entity as updated.
We also need a couple housekeeping fields for saving and for exposing a HasChanges property. The interesting code to notice here is that we're specifying a MergeOption on the data service client to OverwriteChanges after we save as opposed to the default AppendOnly. This means that after we save our changes it will refresh the existing Order entity instances with changes from the database.
 Imports NorthwindExcelClient.NorthwindService
Imports System.ComponentModel

Public Class MyOrderList
    Inherits BindingList(Of Order)

    Private DataServiceContext As New NorthwindEntities(New Uri(My.Settings.ServiceURI))
    Private _hasChanges As Boolean
    Private _isSaving As Boolean

    Public ReadOnly Property HasChanges() As Boolean
        Get
            Return _hasChanges
        End Get
    End Property

    Sub New()
        MyBase.New()
        Me.DataServiceContext.MergeOption = Services.Client.MergeOption.OverwriteChanges
    End Sub

    ''' <summary>
    ''' Do not allow adds.
    ''' </summary>
    ''' <returns></returns>
    ''' <remarks></remarks>
    Protected Overrides Function AddNewCore() As Object
        Throw New NotSupportedException("You cannot add items to the list.")
        Return Nothing
    End Function
    ''' <summary>
    ''' Do not allow deletes.
    ''' </summary>
    ''' <param name="index"></param>
    ''' <remarks></remarks>
    Protected Overrides Sub RemoveItem(ByVal index As Integer)
        Throw New NotSupportedException("You cannot remove items from the list.")
    End Sub
    ''' <summary>
    ''' When a property is updated on an order, then we need to
    ''' tell the data services client to mark it as updated.
    ''' </summary>
    ''' <param name="e"></param>
    ''' <remarks></remarks>
    Protected Overrides Sub OnListChanged(ByVal e As System.ComponentModel.ListChangedEventArgs)
        If Not _isSaving Then
            'The Order partial class is implementing INotifyPropertyChanged so this will work
            If e.ListChangedType = ListChangedType.ItemChanged Then
                Me.DataServiceContext.UpdateObject(Me(e.NewIndex))
                _hasChanges = True
            End If
            MyBase.OnListChanged(e)
        End If
    End Sub
Before we get into the code that will retrieve and save the orders, let's bind this to a ListObject and get it onto our Excel worksheet. Since we're going to have to interact with the list of orders from our Sheet1 as well as the Action Pane displaying the details, I'm going to create a property on the Workbook itself that exposes the MyOrdersList. Double-click on the ThisWorkbook in the project and switch to the Code view:
 Public Class ThisWorkbook

    'This is the data source we'll be working with on the Sheet and Action Pane.
    ' This class communicates with the ADO.NET Data Service
    Private _orderList As MyOrderList
    Public ReadOnly Property OrderList() As MyOrderList
        Get
            If _orderList Is Nothing Then
                _orderList = New MyOrderList()
            End If
            Return _orderList
        End Get
    End Property
Now build the project and open the Data Sources window. Add a new Object Data Source and select MyOrderList then Finish. Drag the MyOrderList onto the designer for Sheet1, just drop it into the first cell, and it will generate all the columns for every property on the Order. You can also change the name of it on the Design tab -- I'll change ours to OrderListObject.
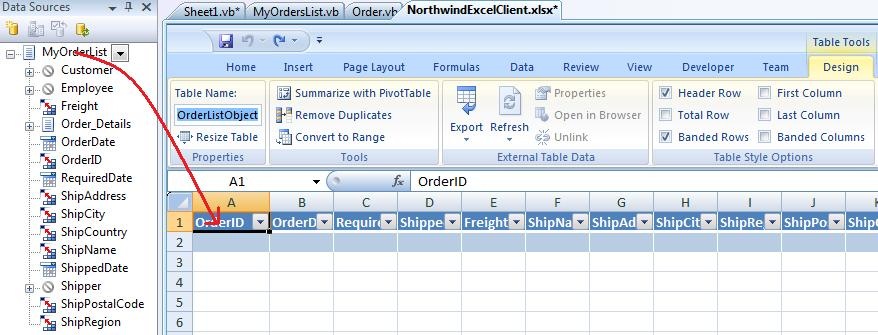
Unfortunately it drops all the columns regardless if we select a drop target of none or not. Right click on the column and select Delete from the drop-down menu to delete a column (don't press the delete key). I'm going to remove the first three and the last three columns that it dropped. You'll also want to set any date fields you're displaying in the sheet to Text format. This is to work around a bug in the ListObject where it won't let you change date values if the formatting isn't set to text. You do this by selecting the column then right-click, select Format Cells, and then select Text from the list.
We can be explicit about setting our data source and binding to columns in the startup event handler:
 Public Class Sheet1

    Private Sub Sheet1_Startup() Handles Me.Startup
        Dim myApp = NorthwindExcelClient.Globals.ThisWorkbook
        Me.OrderBindingSource.DataSource = myApp.OrderList

        Me.OrderListObject.SetDataBinding(Me.OrderBindingSource, "", _
                                          "ShippedDate", _
                                          "Freight", _
                                          "ShipName", _
                                          "ShipAddress", _
                                          "ShipCity", _
                                          "ShipRegion", _
                                          "ShipPostalCode", _
                                          "ShipCountry")

        Me.OrderListObject.AutoSelectRows = True

        myApp.LoadOrders()
    End Sub
Also notice the last line calls a method on ThisWorkbook to load the orders. Let's see how we can do this by writing a query against our ADO.NET data service.
Querying and Saving Orders via our Data Service
Now we can return back to our MyOrdersList and write a method for returning the list of orders that have not yet been shipped. Here I call the service to return a list of unshipped orders, add them all to MyOrderList and then raise the list changed event once to notify the Excel ListObject to refresh it's UI:
  ''' <summary>
''' Queries the open orders from the data service
''' and returns the number of orders returned in the results
''' </summary>
''' <returns>number of orders returned from the service</returns>
''' <remarks></remarks>
Public Function LoadOrders() As Integer
    Dim isLoaded = True
    Me.Clear()

    Me.RaiseListChangedEvents = False

    Dim orders = From o In DataServiceContext.Orders _
                 Where o.ShippedDate Is Nothing _
                 Order By o.OrderDate

    For Each o In orders
        Me.Add(o)
    Next

    Me.RaiseListChangedEvents = True
    Me.OnListChanged(New ListChangedEventArgs(ListChangedType.Reset, 0))
    Return Me.Count
End Function
We're also going to need a way to load the order details, shipper and product entities when requested. This will happen as the user selects rows of data -- we need to display these details in our Action Pane. By default these entity references and collections are not loaded, we need to do this explicitly. This is a good thing in our case because it avoids transferring unnecessary data if the user doesn't select the Order row in the sheet.
 ''' <summary>
''' Loads the Order Details and Product information from the data
'''  service and returns the OrderDetails for the specified order.
''' </summary>
''' <param name="o"></param>
''' <remarks></remarks>
Public Sub LoadOrderDetails(ByVal o As Order)
    If (o IsNot Nothing) Then
        If o.Shipper Is Nothing Then
            Me.DataServiceContext.LoadProperty(o, "Shipper")
        End If
        If o.Order_Details Is Nothing OrElse o.Order_Details.Count = 0 Then
            Me.DataServiceContext.LoadProperty(o, "Order_Details")
            For Each detail In o.Order_Details
                detail.Order = o
                If detail.Product Is Nothing Then
                    Me.DataServiceContext.LoadProperty(detail, "Product")
                End If
            Next
        End If
    End If
End Sub
Finally we need a method that submits changes back to the data service. This is easily done by calling SaveChanges on the service context which sends all the changes we made in the client through the service. Note here that we are not sending them in a single batch, therefore if one order fails to update the ones before the failure will still be saved. You may need to put more robust error handling here depending on what kind of failures you anticipate in your applications. Simple error handling is done for this example in the Action Pane (we'll get there next).
     ''' <summary>
    ''' Saves the customer changes back to the service.
    ''' </summary>
    ''' <returns>true if save was successful, otherwise an exception is thrown</returns>
    ''' <remarks></remarks>
    Public Function SaveChanges() As Boolean
        Dim saved As Boolean
        Try
            _isSaving = True
            Me.DataServiceContext.SaveChanges()
            _hasChanges = False
            saved = True
        Finally
            _isSaving = False
        End Try

        Return saved
    End Function

End Class
Creating the Excel Action Pane Using WPF
Now we're ready to design our Action Pane that will display the order details as well as provide a status message area and a Save and Refresh button. Refresh will re-load the orders from the service and Save will send the changes back. (Later we'll also hook up Excel's save button to do the same thing.)
I've showed how to use WPF in Office applications before when we built the Outlook Add-In in Part 2. It's the same technique here -- use the Winforms ElementHost as a container for your WPF control. So let's create our WPF user control -- add a new item to the project and select WPF category on the left and then choose WPF User Control. I named it WPFActionPane and click OK.
The reason for using WPF in this case is so that we could really get a nice look-and-feel that matches Excel's colors. Additionally we can easily provide a couple simple animations so that users notice the control on the right-hand side of the spreadsheet -- this is the default location of an Action Pane. So here's the layout of the control and the styles used to make the read-only GridView have a nice Excel-friendly look:
 <UserControl x:Class="WPFActionPane"
    xmlns="https://schemas.microsoft.com/winfx/2006/xaml/presentation"
    xmlns:x="https://schemas.microsoft.com/winfx/2006/xaml"
             MinHeight="200" MinWidth="200"
             VerticalContentAlignment="Stretch"
             HorizontalContentAlignment="Stretch" Height="400" >
<UserControl.Resources>
<Storyboard x:Key="LoadingStoryBoard">
    <DoubleAnimation
                    Storyboard.TargetName="ListGrid"
                    Storyboard.TargetProperty="Opacity"
                    From="0.0" To="1.0" Duration="0:0:0.5"
                    AutoReverse="False"  />
</Storyboard>
<Storyboard x:Key="UpdateStoryBoard">
    <ColorAnimation From="White" To="Yellow"
                    Storyboard.TargetName="txtStatus"
                    Storyboard.TargetProperty="Background.Color"
                    AutoReverse="True" />
    <ColorAnimation From="Black" To="White"
                    Storyboard.TargetName="txtStatus"
                    Storyboard.TargetProperty="Foreground.Color"
                    AutoReverse="True" />
</Storyboard>
<Style x:Key="GridViewStyle" TargetType="TextBox">
    <Setter Property="Margin" Value="-3,0,-9,-3" />
    <Setter Property="Cursor" Value="Arrow" />
    <Setter Property="IsReadOnly" Value="True" />
    <Setter Property="BorderBrush" Value="#B8CCE4" />
</Style>
<Style x:Key="ListViewStyle" TargetType="ListView">
    <Setter Property="Background">
        <Setter.Value>
            <LinearGradientBrush EndPoint="0.5,1" StartPoint="0.5,0">
                <GradientStop Color="#4F81BD" Offset="0"/>
                <GradientStop Color="White" Offset="1.0"/>
            </LinearGradientBrush>
        </Setter.Value>
    </Setter>
</Style>
<Style x:Key="ListViewItemStyle" TargetType="ListViewItem">
    <Setter Property="Background" Value="Transparent"/>
    <Setter Property="BorderBrush" Value="Transparent"/>
    <Setter Property="BorderThickness" Value="1"/>
    <Setter Property="HorizontalContentAlignment" Value="Stretch" />
    <Setter Property="VerticalContentAlignment" Value="Stretch" />
    <Setter Property="Height" Value="22" />
    <!--Removes the row higlight-->
    <Setter Property="Template">
        <Setter.Value>
            <ControlTemplate TargetType="{x:Type ListViewItem}">
                <GridViewRowPresenter
                    SnapsToDevicePixels="{TemplateBinding SnapsToDevicePixels}"
                    VerticalAlignment="{TemplateBinding VerticalContentAlignment}"
                    Grid.RowSpan="2"/>
            </ControlTemplate>
        </Setter.Value>
    </Setter>
</Style>
<Style x:Key="GridViewColumnHeaderStyle" TargetType="GridViewColumnHeader">
    <Setter Property="Background" Value="#4F81BD"></Setter>
    <Setter Property="Foreground" Value="#DBE5F1"></Setter>
    <Setter Property="FontWeight" Value="Bold"></Setter>
    <Setter Property="HorizontalContentAlignment" Value="Left"></Setter>
    <Setter Property="BorderThickness" Value="2"></Setter>
    <Setter Property="Focusable" Value="False"></Setter>
    <Setter Property="BorderBrush">
        <Setter.Value>
            <LinearGradientBrush EndPoint="0.5,1" StartPoint="0.5,0">
                <GradientStop Color="White" Offset="0"/>
                <GradientStop Color="#B8CCE4"  Offset="1.0"/>
            </LinearGradientBrush>
        </Setter.Value>
    </Setter>
    <Setter Property="Template">
        <Setter.Value>
            <ControlTemplate TargetType="{x:Type GridViewColumnHeader}">
                <Grid SnapsToDevicePixels="True">
                    <Border BorderThickness="0,0,0,1"
                            BorderBrush="{TemplateBinding Border.BorderBrush}"
                            Background="{TemplateBinding Panel.Background}" Name="HeaderBorder">
                        <Border Padding="{TemplateBinding Control.Padding}" Grid.RowSpan="2">
                        <ContentPresenter
                            RecognizesAccessKey="True"
                            Content="{TemplateBinding ContentControl.Content}"
                            ContentTemplate="{TemplateBinding ContentControl.ContentTemplate}"
                            ContentStringFormat="{TemplateBinding ContentControl.ContentStringFormat}"
                            Name="HeaderContent" Margin="0,0,0,1"
                            HorizontalAlignment="{TemplateBinding Control.HorizontalContentAlignment}"
                            VerticalAlignment="{TemplateBinding Control.VerticalContentAlignment}"
                            SnapsToDevicePixels="{TemplateBinding UIElement.SnapsToDevicePixels}" />
                        </Border>
                    </Border>
                </Grid>
            </ControlTemplate>
        </Setter.Value>
    </Setter>
</Style>
</UserControl.Resources>
 <Grid Height="Auto" Width="Auto" Name="MainGrid">
    <Grid.RowDefinitions>
        <RowDefinition Height="50" />
        <RowDefinition Height="50" />
        <RowDefinition Height="140*" />
        <RowDefinition Height="60" />
    </Grid.RowDefinitions>
    <StackPanel Orientation="Horizontal" HorizontalAlignment="Right" VerticalAlignment="Top"
                Visibility="Hidden" Name="ButtonStack">
       <Button Height="40" Name="cmdSave" Width="40" Margin="3" ToolTip="Save">
            <Image Source="FloppyDisk.png" />
        </Button>
        <Button Height="40" Name="cmdRefresh" Width="40" Margin="3" ToolTip="Refresh">
            <Image Source="Refresh.png" Name="Image1" />
        </Button>
    </StackPanel>
    <StackPanel Grid.Row="1">
        <TextBlock Name="txtShipper" Width="Auto" Height="25"
                 Text="{Binding Path=Shipper.CompanyName, StringFormat=Ship via \{0\}}"
                 Foreground="DarkBlue" />
        <TextBlock Name="txtOrderDate" Width="Auto" Height="25"
                  Text="{Binding Path=OrderDate, StringFormat=Ordered \{0:D\}}"
                  Foreground="DarkBlue"/>

    </StackPanel>
    <Image Grid.Row="2" Source="northwindlogo.gif" Width="140" Height="140" />
    <Grid Grid.Row="2" Background="White" Name="ListGrid">
        <ListView
            ItemsSource="{Binding Path=Order_Details}"
            Style="{StaticResource ListViewStyle}"
            ItemContainerStyle="{StaticResource ListViewItemStyle}"
            Name="ListView1" Margin="4" IsEnabled="True"
            BorderThickness="0" >
            <ListView.View>
                 <GridView
                     ColumnHeaderContainerStyle="{StaticResource GridViewColumnHeaderStyle}">
                        <GridViewColumn Header="Product" Width="150">
                        <GridViewColumn.CellTemplate>
                            <DataTemplate>
                                <TextBox
                                    Text="{Binding Path=Product.ProductName}"
                                    Style="{StaticResource GridViewStyle}"/>
                            </DataTemplate>
                        </GridViewColumn.CellTemplate>
                    </GridViewColumn>
                    <GridViewColumn Header="Quantity" Width="61">
                        <GridViewColumn.CellTemplate>
                            <DataTemplate>
                                <TextBox
                                    Text="{Binding Path=Quantity, StringFormat='n0'}"
                                    Style="{StaticResource GridViewStyle}" />
                            </DataTemplate>
                        </GridViewColumn.CellTemplate>
                    </GridViewColumn>
                    </GridView>
            </ListView.View>
            </ListView>
    </Grid>
   <Grid Grid.Row="3">
       <TextBox Name="txtStatus" TextWrapping="Wrap" Background="Transparent"
              IsReadOnly="True" BorderThickness="0" HorizontalContentAlignment="Stretch"
              VerticalScrollBarVisibility="Auto" Cursor="Arrow"></TextBox>

    </Grid>
</Grid>
</UserControl>
The code that calls the load and save on the orders will be here since this control will interact directly with the list of Orders. In the code-behind of the WPFActionPane we'll also animate the control by running the StoryBoards defined in the XAML when we display the order details and when we display status messages at the bottom of the pane. (Note that I've also included the images referred by the XAML above into the project and set their Build Action to Resource in the properties for the files in the Solution Explorer).
We will pass the reference to the list of Orders into the control which we can then set as the DataContext. This will trigger all the data bindings to hook up to the currently selected Order's details as noted by the dot syntax in the bindings above. For instance, if we want to display the shipper's company name then we specify the Shipper.CompanyName path on the Order object contained in the list.
 Imports NorthwindExcelClient.NorthwindService
Imports System.Windows.Data
Imports System.Windows.Media

Partial Public Class WPFActionPane

    Private _orderList As MyOrderList
    Public Property OrderList() As MyOrderList
        Get
            Return _orderList
        End Get
        Set(ByVal value As MyOrderList)
            _orderList = value
            Me.DataContext = _orderList
        End Set
    End Property

    Private Sub cmdRefresh_Click() Handles cmdRefresh.Click
        Me.LoadOrders()
    End Sub

    Private Sub cmdSave_Click() Handles cmdSave.Click
        Me.SaveOrders()
    End Sub
    ''' <summary>
    ''' Saves changes made to the orders in the sheet
    ''' </summary>
    ''' <returns></returns>
    ''' <remarks></remarks>
    Public Function SaveOrders() As Boolean
        Dim msg = "Orders could not be saved." & vbCrLf
        Try
            'Save changes back to the data service
            If Me.OrderList.SaveChanges() Then
                msg = "Orders saved."
            End If

            Me.SetMessage(msg)

        Catch ex As Exception
            Me.SetMessage(ex.ToString())
        End Try
    End Function
    ''' <summary>
    ''' Re-loads the orders that are not shipped yet.
    ''' </summary>
    ''' <remarks></remarks>
    Public Sub LoadOrders()
        Dim msg = ""
        Try
            Dim count = Me.OrderList.LoadOrders()
            msg = String.Format("{0} orders returned.", count)

            Me.SetMessage(msg)
            Me.ButtonStack.Visibility = Windows.Visibility.Visible
        Catch ex As Exception
            Me.SetMessage(ex.ToString())
        End Try
    End Sub
    ''' <summary>
    ''' Show the Order Details in the ListView by moving the position
    ''' </summary>
    ''' <param name="o"></param>
    ''' <remarks></remarks>
    Public Sub DisplayOrderDetails(ByVal o As Order)
        If o IsNot Nothing Then
            Me.OrderList.LoadOrderDetails(o)
            Dim view = CollectionViewSource.GetDefaultView(Me.DataContext)
            view.MoveCurrentTo(o)

            Me.ListGrid.Visibility = Windows.Visibility.Visible
            Me.ListView1.SelectedIndex = -1
            Dim story = CType(Me.Resources("LoadingStoryBoard"), Animation.Storyboard)
            story.Begin()
        End If
    End Sub
    ''' <summary>
    ''' Sets the status message on the control
    ''' </summary>
    ''' <param name="msg"></param>
    ''' <remarks></remarks>
    Public Sub SetMessage(ByVal msg As String)
        Me.txtStatus.Text = msg
        Dim story = CType(Me.Resources("UpdateStoryBoard"), Animation.Storyboard)
        story.Begin()
    End Sub

End Class
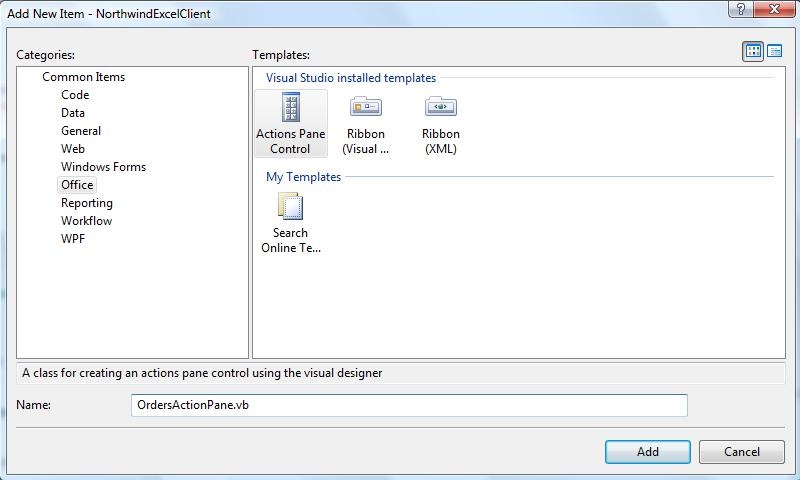
Now we can create the Action Pane. Add a new item to the project and select Actions Pane Control from the Office group. I named it OrdersActionPane:
Now from the toolbox in the WPF Interoperability category you should see the ElementHost, drag that onto the Actions Pane user control, click the smart tag and select the WPFActionPane control as the hosted content and dock it in the parent container. I'm also going to set the font of the OrdersActionPane to Calibri 11 point.
In the code behind for the OrdersActionPane we need to set the OrderList for the WPF control as well as listen to position changed event on the OrderListBindingSource that is hooked up as the DataSource of the ListObject on Sheet1. When the position changes we need to tell the WPF control to display that Order's details. There are many ways to integrate WPF and Windows Forms to manage currency but we're trying to keep this example straightforward so we'll do it the easy way:
 Imports System.Data.Services.Client
Imports NorthwindExcelClient.NorthwindService

Public Class OrdersActionsPane

    Private Sub OrdersActionsPane_Load() Handles Me.Load
        'Pass in our data source to the WPF control
        Me.WpfActionPane1.OrderList = NorthwindExcelClient.Globals.ThisWorkbook.OrderList
        'When the position changes in the spreadsheet, display the order details in the WPF control
        AddHandler NorthwindExcelClient.Globals.Sheet1.MyOrderListBindingSource.PositionChanged, _
                  AddressOf Me.DisplayOrderDetails
    End Sub

    Private Sub DisplayOrderDetails(ByVal sender As Object, ByVal e As EventArgs)
        Dim source = TryCast(sender, BindingSource)
        If source IsNot Nothing Then
            If source.Position > -1 Then
                Me.WpfActionPane1.DisplayOrderDetails(TryCast(source.Current, Order))
            End If
        End If
    End Sub
End Class
Finally we're almost ready to test this out. The last thing we need to do is load the Actions Pane when the application starts as well as expose a LoadOrders to our Sheet. This is because if we're adding charts, pivot tables or other types of controls for data analysis we can't rely on the Action Pane loading the data, we need the sheet to be able to call upon it explicitly. We also will hook up the Excel BeforeSave event so that we can call save on the orders. So back in the ThisWorkbook class:
    Private _orderActions As New OrdersActionsPane

    Private Sub ThisWorkbook_Startup(ByVal sender As Object, _
                                     ByVal e As System.EventArgs) Handles Me.Startup
        'Load the action pane
        Me.ActionsPane.Controls.Add(_orderActions)
    End Sub

    Public Sub LoadOrders()
        _orderActions.WpfActionPane1.LoadOrders()
    End Sub

    Private Sub ThisWorkbook_BeforeSave(ByVal SaveAsUI As Boolean, _
                                        ByRef Cancel As Boolean) Handles Me.BeforeSave
        _orderActions.WpfActionPane1.SaveOrders()
    End Sub
End Class
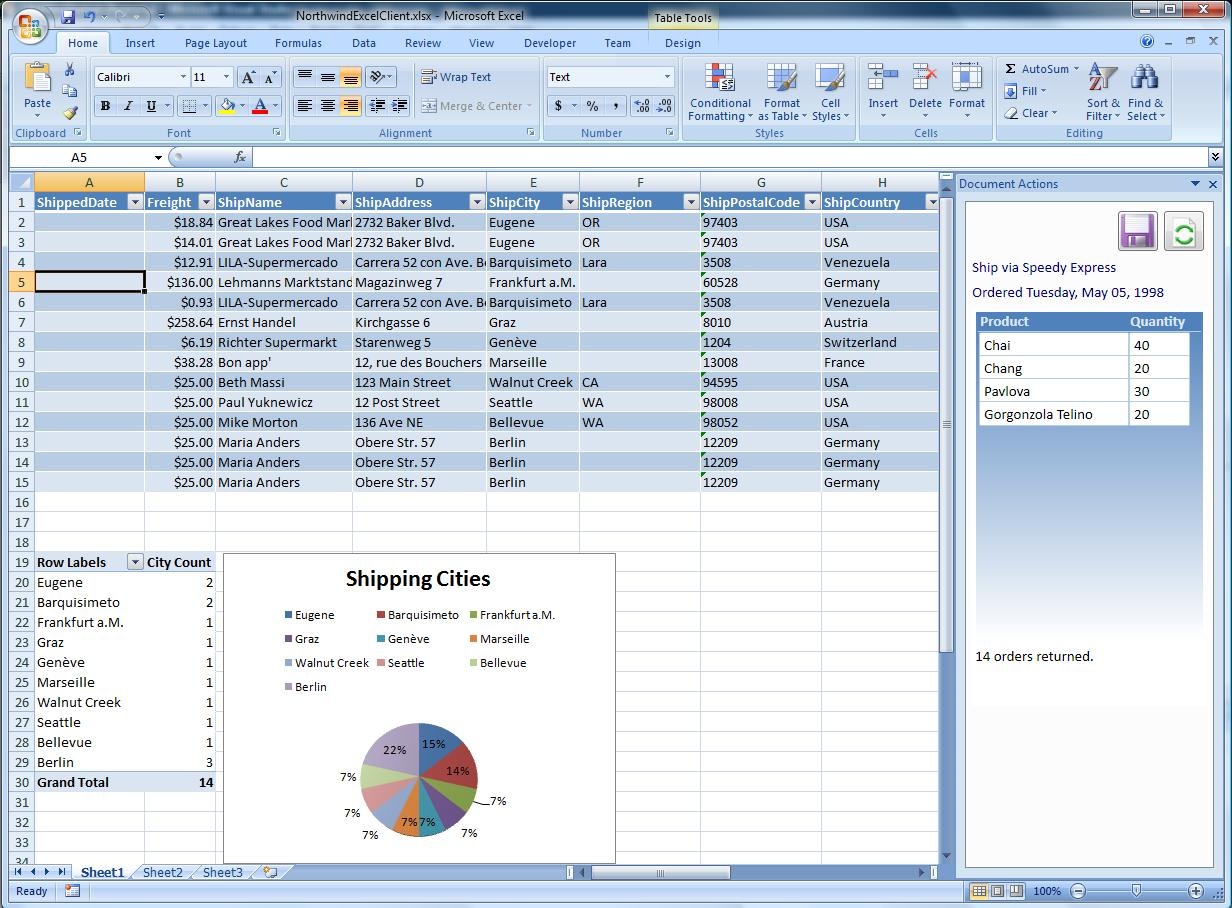
Hit F5 and try it out. You will see all the Orders that have not shipped. As you select a row, the details are displayed in the Action Pane and an animation that shows the Northwind logo fades into and out of view so that it catches the user's attention without annoying them ;-). Modify any of the fields in the Sheet and click save to save your changes back to the service.
Adding a Pivot Table and Chart
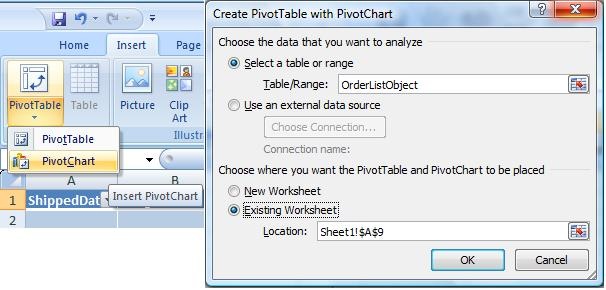
The final thing we want to do is add a pivot table and a pie chart to our Sheet that will display a breakdown of cities we're shipping to. In the designer for Sheet1 select the first cell and then go to the Insert tab. On the left select the arrow under the PivotTable and select PivotChart. A dialog will open which allows you to select the location of the PivotChart. Here I'm just adding it under the ListObject, it will automatically move down as orders come back from the data service.
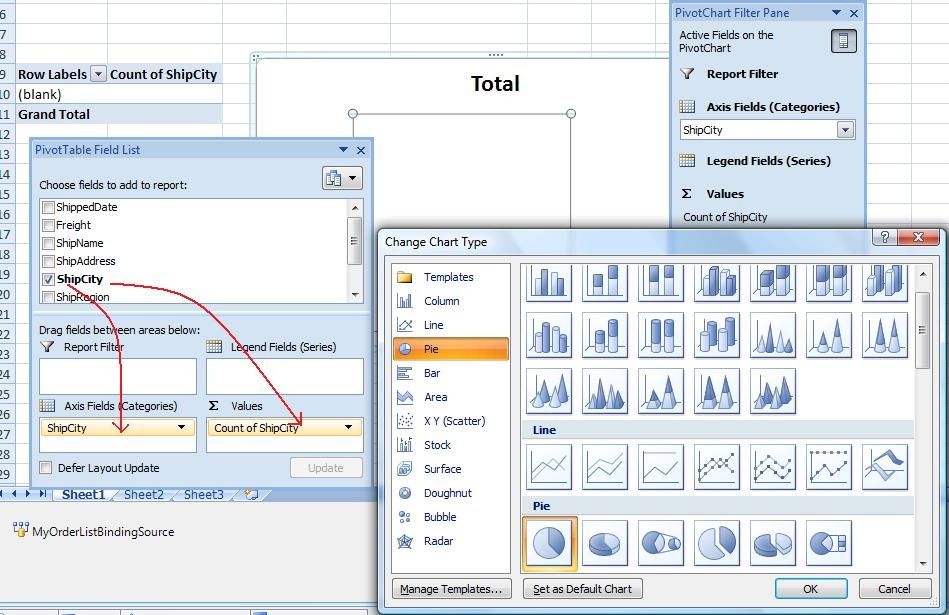
Now you move into specifying the PivotTable fields and values through Excel like you normally would. Here I'm adding the ShipCity as both a label and a value, which automatically assumes a count. I also right-click on the chart and am allowed to change the chart type to a Pie Chart:
We're not quite done though. In order to get our PivotTable to update when the data is retrieved from the service we need to add some code to handle this. First name the PivotTable by right-clicking on it and selecting PivotTable Options -- I named it PivotTableShipCity. Now in the code behind we can handle the ListChanged event on the BindingSource which bubbles up what we're doing in our MyOrdersList class -- when we load the orders in the LoadOrders method, we raise the ListChangedEvent and pass a "Reset" parameter. Now we can check that here:
 Private Sub MyOrderListBindingSource_ListChanged(ByVal sender As Object, _
            ByVal e As System.ComponentModel.ListChangedEventArgs) _
            Handles MyOrderListBindingSource.ListChanged

    If e.ListChangedType = System.ComponentModel.ListChangedType.Reset Then

        Dim table = TryCast(Me.PivotTables("PivotTableShipCity"), Excel.PivotTable)
        If table IsNot Nothing Then
            table.RefreshTable()
        End If
        Me.MyOrderListBindingSource.MoveFirst()

    End If
End Sub
Now when we hit F5 we will see the open orders come down into the spreadsheet and the pie chart will update to display our Excel data visualization. Nice!
I've updated our sample on Code Gallery with a new release that includes this Excel client so have a look.
Now that we understand what our shipping department is doing we can build out our SharePoint workflow. It will need to parse the purchase order using the code from part 3 and it will also need to update the order status based on the change made here to the ShippedDate field. We don't want our Excel client to be tightly coupled to SharePoint so we'll need to think about how we can achieve this all from our SharePoint Workflow. Until next time...
Enjoy!