Setting up Xamarin Live Player
[UPDATE]
You no longer need the preview version of Visual Studio. Updated directions can be found in the Xamarin documentation
[ORIGINAL] Xamarin Live Player is a new tool that allows you to live edit an application running on an Android or iOS device. The interesting bit for many, is that you don’t need a Mac to have this work with your iPhone. The Xamarin Live Player app executes your code for you so that you don’t need to deploy it to the device – you just connect the Xamarin Live Player app to Visual Studio.
The official setup instructions are in the Xamarin documentation but I thought I’d go into a little more detail.
The short version is this
- Install Visual Studio 2017 preview 15.3
- Install the Xamarin Updater extension
- Update the Xamarin for Visual Studio extension
- Install on Xamarin Live Player on your phone
The long version:
First install Visual Studio 2017 preview 15.3. The preview can be downloaded at https://www.visualstudio.com/vs/preview/ I am installing the community edition of the preview, but I already have the released Enterprise Edition on my laptop. That is fine because the previews will install side by side with the release editions of Visual Studio. In addition, it will share components with the release version where it can which will reduce its storage requirements on your hard drive.
At the website, select the Download button, then select the edition of the preview you want to install.
 .
.
The Visual Studio Installer may need to update itself to include the preview options so click update.

When that is done, ensure you have the Mobile development with .NET selected. In my case I also deselected all the optional items on the right to speed up the install.

Click install and wait for it to finish.

When it does, you should have the preview listed alongside any other edition of Visual Studio you already had installed.

Now that it is installed you will also see it in the start menu listed as “Visual Studio 2017 Preview (2)”

When you launch it you will be able to tell it is the preview version by the preview flag in the title bar of the window

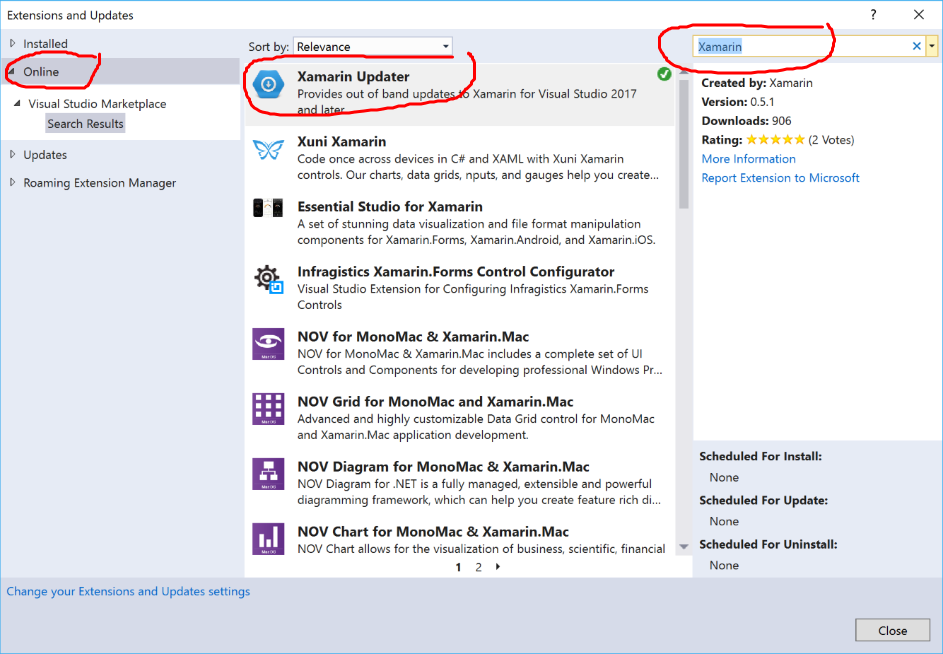
Open the extension manager (from the menu Tools->Extensions and Updates) and search for Xamarin in the Online tab. You should see Xamarin Updater among the items. Click the Download button and the close the dialog.
You may notice it doesn’t install immediately. This extension can’t be installed while Visual Studio is running. Close Visual Studio and the installer will launch.

Click Modify and wait for the installer to finish.

Once the installer is finished. Click close and relaunch Visual Studio Preview. Open the Extension Manager again (Tools->Extensions and Updates) and select the Updates tab. After a moment it should indicate that you have some updates available. Select the “Xamarin for Visual Studio” item and click Update.

Close the dialog and restart Visual Studio again.
After that updates, Visual Studio is ready to go. Launch it and create a new Xamarin project.
Select File-New Project to launch the project template dialog and select a Xamarin Forms project from the Cross-Platform section. Then click OK

In the next dialog select whatever type of app you want, then click OK. For this example, I chose “Blank App”

When your project finishes loading, select the iOS project as the default project for the solution and you will see an additional option on the debug menu for “Live Player” (you can ignore and cancel any other dialogs that ask you to connect to a Mac for now)

Click Live Player (or press F5) and the Live Player connection dialog will appear.

Now that you have Visual Studio prepared, you need to get the Live Player app from your phone's app store. The Live Player app is necessary to connect to Visual Studio and load your app.

Run the app and it will open like this

Tap “Pair to Visual Studio” and point your phone's camera at the QR code, or type the alphanumeric code into Visual Studio.
Voila! Your app will appear on your phone!

Remember, this just allows you to easily get the app on your phone for testing. If you want to build a deployment package and send it to the store you still need a Mac connected to Visual Studio.
XamarinU also has a free lightning lecture (30 minute video) on setting this up and using it! check it out at https://university.xamarin.com/lightninglectures/introducing-the-xamarin-live-player