BCS Solution Packaging Tool
If you’ve read Brad Stevenson’s post Types of Solutions, you’re already familiar with the range of BCS Solutions across three levels:
- Simple out-of-box solutions
- Intermediate declarative solutions
- Advanced code-based solutions
Simple solutions are easily created through the click of a button, and the user doesn’t have to worry about packaging or deployment (see Andrew Harris’ post External Lists in SharePoint Workspace and Juan Balmori Labra’s post External Lists in Outlook).
Intermediate declarative solutions (as the name describes) are a way to step up from what is provided out-of-the-box with simple solutions, to customize and enhance solutions declaratively – without code – to fit your particular needs and requirements. These types of solutions can include re-usable components created and delivered by other developers, or can include components like InfoPath forms, workflows and Web part pages.
One interesting type of solution can be created by combining several of these pieces, and other pieces specific to regular Outlook customizations, to create a full Business Connectivity Services solution in Outlook: an Outlook Intermediate Declarative Solution.
When all of the components and pieces of this solution are assembled, they need to be packaged together as a Visual Studio Tools for Office (VSTO) ClickOnce package, in the same way the simple “out-of-box” Outlook solution is automatically packaged. Similarly, this solution can then be deployed to user’s computers with the click of a button.
As you’ve probably already guessed, the Solution Packaging Tool will help you to package your Outlook Intermediate Declarative solution. This post will show you where to get the tool, outline how to use it, define the types of solutions it can package, introduce the command line interface for the tool and finally, provide a link to download a sample solution that you can use to test things out for yourself.
Solution Packaging Tool
To begin, download the tool from MSDN Code Gallery:
https://code.msdn.microsoft.com/odcsps14bcspkgtool
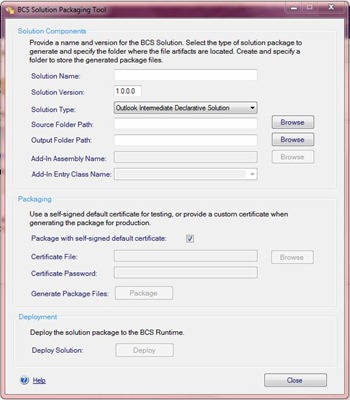
To use the tool, you’ll be following these general steps:
- Create a folder on your local computer and put all of your solution files in this folder
- Create another new folder (which will eventually hold the generated package)
- Give the solution a name and version (i.e. “Customer Tracker” and “1.0.0.1”)
- Browse to and select the folder from step 1 as the “Source Folder”
- Browse to and select the folder from step 2 as the “Output Folder”
- Pick a solution type (read on for details about solution types) from the following:
- Outlook Intermediate Declarative Solution
- Outlook Advanced Code-Based Solution (OIR)
- Data Solution for Office Add-In
- Input a certificate file (when ready with a production solution) or, for now, just use the default certificate that is provided for use during development and testing
- For advanced solution types, add an assembly (read on for details about this solution type)
- Click “Package”
- Click “Deploy”, or open the Output Folder and double-click the .vsto file
The solution will then be installed in Outlook on that machine.
For more information on Intermediate Declarative Solutions, see the content on MSDN and in the SharePoint 2010 SDK. This tool also contains a help guide (click the “Help” button in the bottom left corner of the tool window) which describes in detail:
- Each of the three solution types, and how to package them
- The types of files/artifacts that comprise each type
- How and where to host solutions after packaging (so users can deploy them)
- Using certificate files
- Using the command prompt support
For now, however, let’s examine the solution types in a bit more detail.
Types of Solutions
There are three types of solutions that you can package with the Solution Packaging Tool:
- Outlook Intermediate Declarative Solutions
- Outlook Advanced Code-Based Solutions (leveraging the Solution Manifest)
- Data Solutions for Office Add-Ins (which don’t leverage the Solution Manifest)
When we refer to an “Intermediate Declarative Solution” rather than just individual declarative customization components, we’re generally referring to the solution created for Outlook.
If you add custom code assemblies to further enhance this type of Outlook solution, you’re moving up the scale to an Advanced Code-Based solution, but you can still leverage some of the capabilities of Declarative solutions (Solution Manifest, form regions, InfoPath forms) without fully diving into an all-code solution. Specifically, this type of solution would still leverage the Solution Manifest (OIR.config) file to dictate how the External Data for the solution should appear and behave in Outlook. You can still use the Solution Packaging Tool for this type of solution.
Lastly, if you’re interested in developing Office Add-Ins using Visual Studio (for Excel, PowerPoint, etc.) you’ll be fully creating Advanced Code-Based Solutions which control all the functionality of the solution. We do still provide one level of assistance here, however. You can create something called a Data Solution, which is comprised of a BDC Model (containing External Content Type definitions with security and connection information) and External Content Type Subscription files (which define how/when to retrieve data to the Rich Client Cache).
This will allow you to focus on developing your Office Add-In user-experience and functionality, and let the Data Solution take care of the lifecycle of the external items of data to and from the external system. This Data Solution package can also be created using the Solution Packaging Tool. However, the Office Add-In itself will need to be packaged separately using Visual Studio.
So to reiterate, the three types of solutions that can be packaged using the Solution Packaging Tool are:
- Outlook Intermediate Declarative Solutions
- Outlook Advanced Code-Based Solutions (with a Solution Manifest)
- Data Solutions for Office Add-Ins
You’ll notice these three types in the tool’s “Solution Type” dropdown selection menu.
Command Line Interface
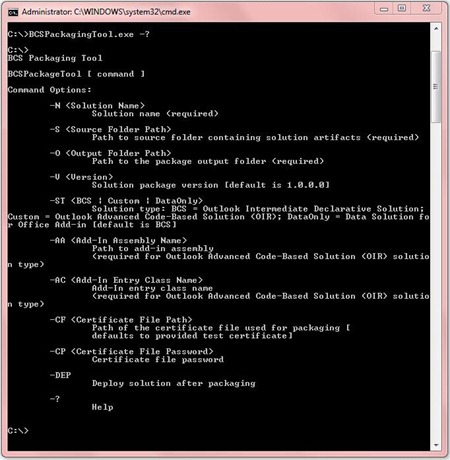
The tool also supports a command prompt interface, which some users may find faster and easier to use than the graphical user interface. The commands can also be useful in script files.
Sample Solution to Get Started
If you want to try out the tool, or simply want to check out a sample Intermediate Declarative solution, you can download our Contoso Sales Manager sample solution from the tool site. On the download page, at the right side in the “Releases” section click “Sample Solution”.
A ReadMe file is provided to walk you through setting it up.
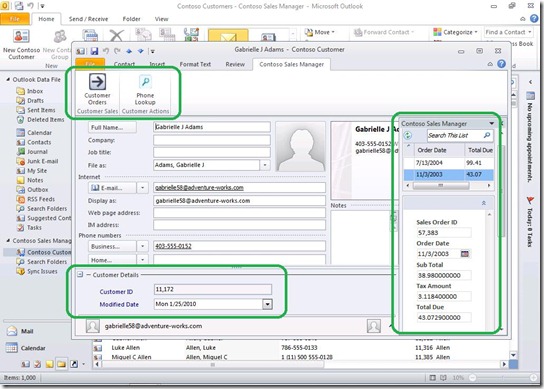
This solution allows you to track contacts from an External System database (a sample database provided free by Microsoft named “Adventure Works”) in Outlook as native Outlook contacts, with the ability to create, edit and delete customers to the backend External System.
It also provides a taskpane, visible in the contact view which shows a list of all orders placed by that customer in the database. When an order is selected from the list, the order details show in the taskpane as well.
Finally, there is a URL-based action in the custom ribbon for each customer item, which searches the internet at MSN white pages to look up that user’s telephone number as a parameter and provide contextual information.
Sample Solution pre-requisites
Client
- Office Professional Plus 2010
Server
- Windows Server 2008
- SharePoint Server 2010 with Enterprise Client Access License
- SQL Server 2008 (and SQL Server Management Studio)
- SharePoint Server 2010 Software Development Kit (and Samples)
Again, for more information on creating Intermediate Declarative Solutions or developing Advanced Code-Based Solutions, see the content in the SharePoint 2010 SDK or on MSDN.
Enjoy!
- Russell Palmer, Program Manager


