Starting Windows Phone Development: Lesson 1 of n – Application Layout and Events Handling
It often surprises me how much of content is available to develop for Windows Phone, if you are looking for baby steps this series of lessons is defiantly not for you. However, if you are developer, regardless of background or platform and looking quickly to get your hands dirty, then you are at the right place. I will not be setting up a fixed or target number of lessons, I will share ideas along the way and keep adding more. This does not mean I don’t have an agenda, on the contrary! I started by asking myself about developer tasks during the life cycle of building an application, and came up with this:
- Application Layout and Events Handing
- Access to Application Isolated Local Storage
- Navigation between Pages and passing Parameters
- Communicating with Services and Data Binding
- Threading and Asynchronous Calls
- Access to Phone Resources like Address Book and GPS
- Panorama and Pivot Applications
- Animation and Transitions using Blend for Visual Studio 2012
and the list will keep on growing 
To get you up to speed, you need to download the Windows Phone SDK 8.0 from: https://dev.windowsphone.com/en-us/downloadsdk.
As I mentioned earlier, this a special series that focuses on a point, a task, a recipe. So don’t be surprised if we wont be building fancy samples, I am here to help you get on your feet with Windows Phone Development as soon as possible.
You can always find the lesson source code attached at the end of the blog post.
Quick facts before we start
- Windows Phone applications are constructed of XAML pages
- XAML pages are used to set the page layout and there is a CS or VB file tied to it for our code like event handlers
- XAML is somehow like HTML, we describe how the page would look using tags
Creating the application
| Step | Details |
| 1 | So lets start with launching Visual Studio and creating a new Windows Phone App Project. I will be using Visual C#. I called it Lesson1 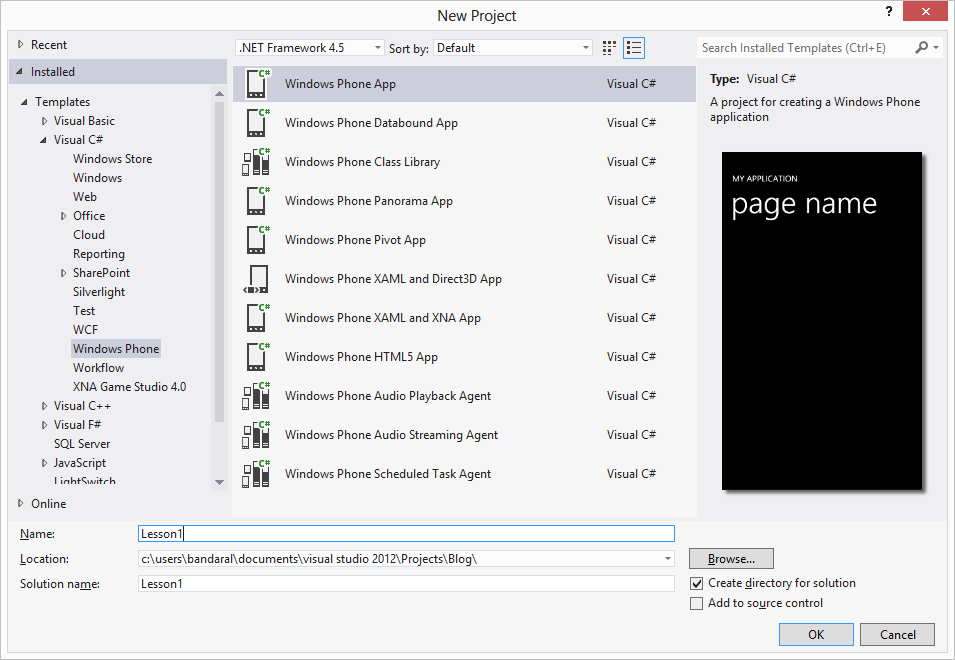 You will be prompted to choose the platform you are targeting, 7.1 that is Mango and 8. Up to my knowledge, mostly whatever you build on 7.1 can work on Windows Phone 8 but not the other way around. I choose Windows Phone OS 8.0. You will be prompted to choose the platform you are targeting, 7.1 that is Mango and 8. Up to my knowledge, mostly whatever you build on 7.1 can work on Windows Phone 8 but not the other way around. I choose Windows Phone OS 8.0. 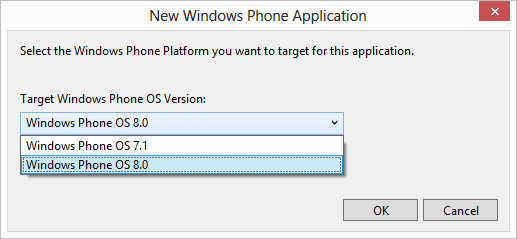 |
| 2 | Once Visual Studio loads the project files, you will notice that you have live preview on the left and the XAML editor on the right. I will not rely that much on the designer during this series because of the nature of the topics being discussed, almost all topics are code running behind  |
How do you describe your application pages using XAML?
There are lots of controls for you to do so like a Grid, a Canvas, or my favorite a StackPanel. In this lesson we will use the StackPanel to describe our page layout.
How does a StackPanel actually work?
I love StackPanels because you can stack controls on either horizontally or vertically with now swat, you can even have a StackPanel stacking another StackPanel, how cool is that? 
Check the code below: I laid 2 StackPanels inside the ContentPanel, one with Horizontal orientation and the second with Vertical orientation each containg 4 buttons.

and then check the designer screenshot rendering both StackPanels below:

XAML is simple to use, we use the tags to layout controls and predefined properties to describe their behavior or format. You will get used to it quickly.
So, what’s cooking today?
A lame sample indeed  , So I was thinking of asking the user to enter 2 numbers and then we multiply them and return the result either in a message box or simple push it back in a label somewhere on the page for the user. It will look like this one below:

Layout is simple, we have 2 StackPanels like the first example above with the 4 buttons, but this time instead of stacking buttons in the first StackPanel, I stacked text and input boxes. From now on, we refer to text on application page as TextBlock and input boxes as TextBox.

Notice that I added an InputScope to the TextBox telling the application that we want the numbers keyboard to show up instead of the normal full keyboard when capturing user input:

What about my code?
We have a the layout ready and all we need to do is tell out application how to behave when something happens on the GUI aka an Event.
| Step | Details |
| 1 | Wiring up even handlers with the GUI is simple thanks to Visual Studio. Just select your desired control in our case the Messagebox button and double click on it. Another way of doing this is that after selecting go to the Properties pane on the right bottom of your screen (I had to drag it next to the control for the screenshot) click on the Lighting button which will display all the element events and then double click on the empty textbox next to Click.  |
| 2 | Visual Studio will load the CS file associated with our XAML page now and create an empty event handler for you.  The behavior is simple, we are pushing a MessageBox to user with the result. The MessageBox.Show function accepts a string which means I have to do the calculation and then cast it as a string using the ToString function. The behavior is simple, we are pushing a MessageBox to user with the result. The MessageBox.Show function accepts a string which means I have to do the calculation and then cast it as a string using the ToString function. |
| 3 | Repeat Step 1 but this time on the other button and update the even handler code.  The behavior code is simpler than the message box because we are not concatenating strings, we just push the result to a TextBlock. The behavior code is simpler than the message box because we are not concatenating strings, we just push the result to a TextBlock. |
Let’s test it out..!
The SDK comes equipped with an Emulator, we will cover this in later lessons, but for now just hit ctrl+F5 to Build and Deploy our application to the emulator and run it. Please be patient and wait until it loads our application. Once loaded, enter some values for X and Y. Notice how the numbers keyboard is shown instead of the full keyboard.

Now try once to tap the Messagebox button and another time the TextBlock button.
 |
 |
I hope you enjoyed the lesson, to sum it up:
- Windows Phone applications are made up of XAML pages
- We use XAML markup to describe our page layout and code behind CS or VB files to write our event handlers
- Controls are represented like HTML markup in tags, each control has its own properties to define its behavior and format like the setting the InputScope for a TextBox
- To wire an event handler to a control we simply double click the control on the designer view or select it and navigate the event handlers property sheet using the properties window.
- Anything pushed/input to/from the screen is considered a string
- We use the double.Parse to cast from a string and ToString to cast to a string
- To build, deploy, and run our code we use ctrl+F5 keys, this will launch the emulator, deploy, and run our application
Let me know if you have any questions