- Home
- Azure Data
- Azure Database Support Blog
- Automating Azure SQL DB index and statistics maintenance using Azure Automation
- Subscribe to RSS Feed
- Mark as New
- Mark as Read
- Bookmark
- Subscribe
- Printer Friendly Page
- Report Inappropriate Content
First published on MSDN on Jan 15, 2018
To provide complete solution to maintain you Azure SQL DB statistics and maintenance we provide our maintenance script here
In this article, we will explain step by step how to automate this maintenance on Azure (You can also use that to automate your own T-SQL tasks)
General steps:
- Create Azure automation account
- Import SQLServer module
- Add Credentials to access SQL DB
- Add a runbook to run the maintenance
- Schedule task
Step by step instructions:
- Create new automation account
- Login to your Azure portal and click "New" (the green plus sign)
Type "automation" in the search box, and choose automation.
Figure 1 – new automation account

- Click "create"
Fill the form, choose a name for your automation account, and choose in which resource group it will be placed.
make sure you choose "YES" for the Create Azure Run As account.
Figure 2 – add automation account form.
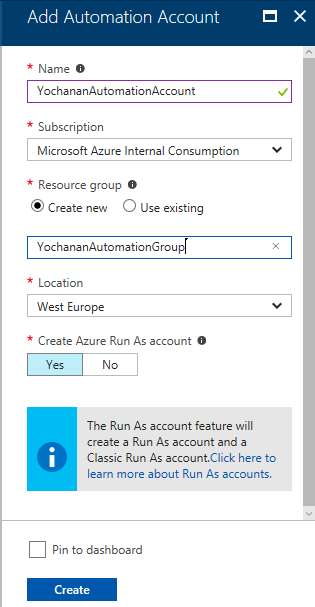
Click "create" and wait for the account to be created. The new automation configuration blade will be opened once the provision completed.
- Import SQLServer module
Click on "Modules" at the left options panel, and then click on "Browse Gallery" and search for "SQLServer"
Figure 3 – add module

Choose "SqlServer" by matteot_msft
Figure 4 – module name

- Then click on "import" and the "OK"
Wait for the import to complete
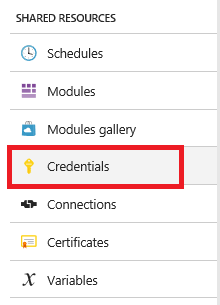
- Add Credentials to access SQL DB
This will use secure way to hold login name and password that will be used to access Azure SQL DB
You can skip this and use it as clear text if you like to use clear text skip to the next step.
Under "Shared Resources" click on credentials
Figure 5 – Add new credential object
- Then click on "Add Credential"
- Type "SQLLogin" as the name of the credential.
- In the username field type the SQL Login that will be used for maintenance and its password.
Click "Create"
- Add a runbook to run the maintenance
Click on "runbooks" at the left panel and then click "add a runbook"
Figure 6 – Add a runbook

Choose "create a new runbook" and then give it a name and choose "Powershell" as the type of the runbook and then click on "create"
Figure 7 – add new PowerShell runbook

Copy and paste the following row to the new runbook.
Make sure you change your database properties.
$AzureSQLServerName = "<ServerName>" $AzureSQLDatabaseName = "<DatabaseName>" $AzureSQLServerName = $AzureSQLServerName + ".database.windows.net" $Cred = Get-AutomationPSCredential -Name "SQLLogin" $SQLOutput = $(Invoke-Sqlcmd -ServerInstance $AzureSQLServerName -Username $Cred.UserName -Password $Cred.GetNetworkCredential().Password -Database $AzureSQLDatabaseName -Query "exec [dbo].[AzureSQLMaintenance] @Operation='all' ,@LogToTable=1" -QueryTimeout 65535 -ConnectionTimeout 60 -Verbose) 4>&1 Write-Output $SQLOutput
TIP : to redirect the verbose output to the runbook log we use the technique as described here
- Click on Publish and confirm.
- Schedule task
Click on Schedules
Figure 8 – Schedules

- Click on "Add a schedule" and follow the instructions to choose existing schedule or create a new schedule.
Choose a time when the application is in the idlest figure, as running the maintenance might impact on performance while it's executing.
Figure 9 – Create new Schedule

Monitoring
you can monitor the success of the job by reviewing the Automation overview page 
Figure 10 – Job Overview.
then you can click on each category and drill down... 
Figure 11 – Job executions
then you can click on a specific execution and get more details about it including the output of the script 
Figure 12 – Details of job execution and output information.
I hope you enjoy this post, please share any thoughts on a comment here in this post.
Notes:
- Automation account has a limit of 500 minutes of execution time per subscription per month on its free tier. More information about automation account limits can be found here
More information:
Getting Started with Azure Automation
Create a standalone Azure Automation account
My first PowerShell runbook
- « Previous
-
- 1
- 2
- Next »
You must be a registered user to add a comment. If you've already registered, sign in. Otherwise, register and sign in.