
Connect Visual Studio to MS Azure Government
Update:
For the latest documentation on connecting via Visual Studio.
Check out the Azure Environment Selector for VS 2017!
The Visual Studio (VS) IDE is a powerful development tool. Coupled with the massive list of development tools it provides, Visual Studio also allows servers to be managed. This capability provides an end-to-end development and test experience, with the power to provision infrastructure and services at the fingertips of the developer.
MS Azure Government (MAG) is a completely isolated environment and as such requires unique Azure endpoints in order to mange the services offered there. MAG requires a management certificate to authenticate requests to the service management API behind the scenes in VS. The Publish Settings File contains both the unique endpoints and the management certificate. The following steps are similar across the various flavors of VS 2012, VS 2013 Community, and VS 2015 Preview.
- Open the Management Portal for MS Azure Government and download the Publish Settings File for your subscription.
- Once your Publish Settings File is downloaded, in Visual Studio, right click on the Server Explorer and select Manage Subscriptions.
-
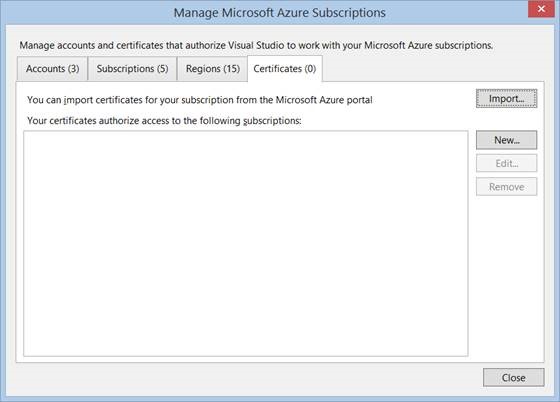
- Navigate to the Certificates Tab and click the Import Button.
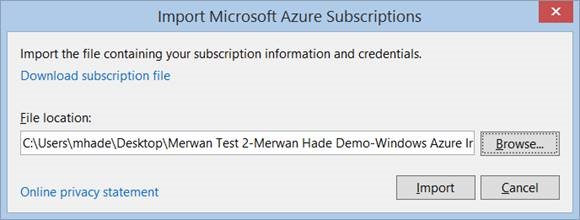
- In the Import Microsoft Azure Subscriptions Dialog, browse to the location on disk where you saved the Publish Settings File in Step 1 and click the Import Button.

- NOTE: The publish settings file provides the management endpoint for each subscription (in a property called the ServiceManagementUrl)
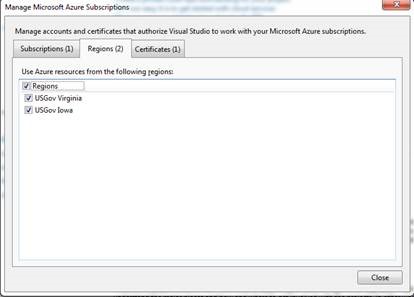
- Verify that the MS Azure Government Regions populate on the Regions Tab

Well, that’s it. Happy provisioning your Azure Government infrastructure and services via the Visual Studio IDE!
Steve K.
 Light
Light Dark
Dark
0 comments