Understanding Azure MSI (Managed Service Identity) tokens & caching
Hi,
Now that Azure MSI turned generally available for App Services and Azure Functions, there is no more excuse not to use it. As a recap, Azure MSI is a great way to develop more secure applications and to setup more secure environments. The reason for this is mostly because it saves you from having to generate credentials (Service Accounts or Apps) yourself.
The whole purpose of MSI is to let the system, in this case Azure, generate an identity that can be consumed later on by:
- a virtual machine
- an app service
- an Azure function
- a data factory
in other words, a very nice feature for both developers and system admins. MSI is more secure because no credentials have to be stored and the MSI endpoint can only be leveraged by an eligible Azure Resource instance. When a VM or an App Service makes a call to the MSI endpoint, the underlying service verifies that the caller is well-known and that MSI was enabled for it.
It will therefore return an Access Token for the requested resource for further use. Now that I have recapped what MSI is all about and why you should use it, let's see how it works a little more in-depth via a small walkthrough.
Here is the scenario:
- Creation of an App Service with MSI enabled
- Assign the MSI SPN to an AAD Group through PowerShell and make sure the group has access to a Storage Account
- Use the Kudu PowerShell Console to retrieve a token. I'll also spend a bit of time letting you know how it works, lifetime and caching wise.
Let's get started with the creation of the App Service with MSI enabled, these four first commands (taken from the official doc) will do the job:
New-AzureRmResourceGroup -Name myResourceGroup -Location $location
New-AzureRmAppServicePlan -Name $webappname -Location $location -ResourceGroupName myResourceGroup -Tier Free
New-AzureRmWebApp -Name $webappname -Location $location -AppServicePlan $webappname -ResourceGroupName myResourceGroup
Set-AzureRmWebApp -AssignIdentity $true -Name $webappname -ResourceGroupName myResourceGroup
so far so good, not too hard. Let's now assign the MSI SPN created by the last cmdlet above to a Security Group. Note that this is of course not mandatory but with MSI as with users, it's better to work with groups rather than assigning permissions directly to the SPN.
$app=Get-AzureRmWebApp -Name $webappname
Add-AzureRmADGroupMember -TargetGroupObjectId $gid -MemberObjectId $app.Identity.PrincipalId
where $gid is the object identifier of the group you want to add the SPN to.
So, let's pretend this group is called Storage Contributors and is granted the new RBAC role Storage Blob Data Reader at subscription level. This SPN should now be able to read any blob from any storage accounts hosted in that subscription, typically, you'd of course just do it at one Storage Account level.
Now that your App Service is provisioned, MSI was turned on and the corresponding SPN was defined as a member of a group that has Storage Blob Data Reader at subscription level, we're ready to test MSI right from the App Service without having to deploy anything.
To do this, just go to the App Service's Portal Page ==> Advanced Tools ==> Go ==> Debug ==> PowerShell Console.
In the App Service's PowerShell Console, run the following:
$ProgressPreference="SilentlyContinue"
$secret = (get-item env:MSI_SECRET).value
$endpoint = (get-item env:MSI_ENDPOINT).value
$headers = @{Secret = "$($secret)"}
$req=Invoke-WebRequest -UseBasicParsing
  -Uri "$($endpoint)?api-version=2017-09-01&resource=https://storage.azure.com/"
  -Headers $headers|ConvertFrom-JSON
$headers = @{}
$headers.Add("x-ms-version","2018-03-28")
$headers.Add("x-ms-client-request-id",[guid]::NewGuid())
$headers.Add("x-ms-date",(Get-Date).AddHours(1).ToString("ddd, dd MMM yyyy HH:MM:ss G\MT"))
$headers.Add("Authorization","Bearer $($req.access_token)")
$resp=Invoke-WebRequest -UseBasicParsing -Uri "https://yourstorageaccount.blob.core.windows.net/acontainer/ablob.txt" -Method HEAD -Headers $headers
$resp.StatusCode
When MSI is enabled for an App Service, two environment variables MSI_ENDPOINT and MSI_SECRET are available (note that they change every time you restart the App Service) and can be used to obtain an access token for a given resource. In the above example, I'm asking a token for a Storage Account. Then I simply build a HEAD (enough to see if the token is valid) request towards the target storage account.
Note that at the time of writing, generated Access Tokens are valid for 8 hours unlike the AAD V1 endpoint that typically returns 1 hour lifetime Access Tokens.
Remember that we added our SPN to a group, so, it is reflected in the returned token as shown below:
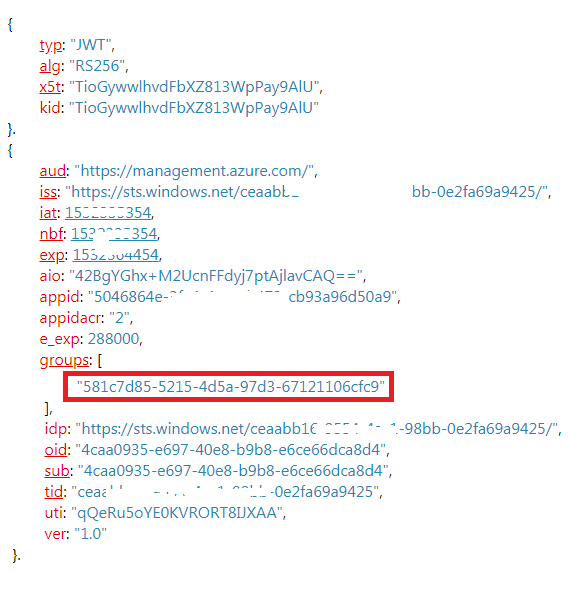
I have obfuscated a few values but the important part is the groups attribute. If you followed the steps I listed earlier, you should end up with something similar. However, the lifetime is 8 hours and it seems that the underlying MSI mechanism is caching tokens based on requestor/resource combination. Indeed, if now you add your MSI SPN to another group, and repeat the above steps, you will not see the new group as part of the token. Restarting the App Service has no impact other than changing the local MSI endpoint & secret. However, if you try to request a token for another resource, say for instance https://management.azure.com, you will see your newly added groups as part of the token.
Bottom line: at the time of writing, tokens are cached by an underlying backend service, that is independent from the App Service, for approximately their lifetime duration (+- 8 hours). There is no way, to force a refresh but requests towards new resources (aka audiences) will return access tokens reflecting the latest RBAC changes.
Important note: while the tokens are cached, the RBAC validation isn't, at least not when direct permissions are assigned to the SPN, meaning that if you ask a token for https://management.azure.com/, change the permissions (other than groups) and replay the exact same token, the new permissions will be taken into account by ARM.
Happy MSI.