Using Oozie SLA on HDInsight clusters
Introduction
Often we have several jobs running on our HDInsight clusters that have tight timelines requirements associated with them. This could be in terms on how much time it takes for the job to start, how much time does the job run, what is the maximum time before which the jobs should complete etc. Oozie allows defining these SLA requirements in our workflows and coordinators to ease monitoring such metrics. Oozie SLA monitoring allows oozie to actively check the state of these jobs and notify when SLA is met or missed.
Three metrics that are tracked by Oozie are:
- Start Time
- End Time
- Job Duration
For more details on Oozie SLA please refer to this Oozie Documentation
Configuring Oozie SLA
Oozie SLA monitoring requires configuring Oozie JMS using ActiveMQ to consume the notifications published by Oozie and further trigger actions like triggering emails. It further requires changes in oozie-site.xml to enable oozie to publish these notifications. All these steps can either be performed manually as detailed in below sections, or this entire procedure has been automated to allow for a simple one command configuration of Oozie SLA. Both these options are explained below.
Automated Installation
If you are configuring Oozie SLA on an already running cluster, you can do so either using Azure portal as defined in the below section or by logging into the headnode and running the automation script.
Script Action based installation from the Azure portal
You can also use script actions to install Oozie SLA from Azure portal both during cluster creation or once the cluster is created.
During Cluster Creation
- Start creating a cluster as described at Create Hadoop clusters in HDInsight.
- Under Optional Configuration, for the Script Actions blade, click add script action to provide details about the script action, as shown below:

Property Value Name Oozie SLA Installation Script URI https://ooziesla.blob.core.windows.net/ooziesla/oozie_sla_config.sh Head/Worker Check only Headnode Parameters <CLUSTER_ADMIN_USERNAME> <CLUSTER_ADMIN_PASSWORD> <CLUSTER_NAME>Ex: admin DummyPassword oozieslasample - Click Save to save the configuration and continue with cluster creation.
On a Running Cluster
If you are configuring Oozie SLA on an already running cluster use the steps described in Applying Script action on a running cluster with the same property values as defined above.
Installation from within the cluster [Headnode]
The automation script is also hosted on Github which can be used to configure Oozie SLA from the cluster's headnode.
Run the below commands on the headnode to achieve the same.
Manual Installation
If you prefer to perform these steps manually for better control, the steps are detailed below
Steps to Configure JMS using ActiveMQ
- Create a dir /opt/ActiveMQmkdir /opt/ActiveMQ
- Download the ActiveMQ from below link depending on the OS, and extract it in the /opt/ActiveMQ directoryhttps://activemq.apache.org/activemq-5143-release.html
- sudo tar -xvf apache-activemq-5.14.3-bin.tar.gz
- Give the directory appropriate permissionchmod 775 /opt/ActiveMQchown root:root /opt/ActiveMQ
- Go to bin directory and start the daemoncd /opt/ActiveMQ/apache-activemq-5.14.3/bin/sudo ./activemq start
- as root user.
Oozie Config Changes
Login to ambari and make the following changes to Oozie Config
- Add oozie.services.ext property in oozie-site.xml to include the following services.org.apache.oozie.service.JMSAccessorService,org.apache.oozie.service.PartitionDependencyManagerService,org.apache.oozie.service.HCatAccessorService,org.apache.oozie.service.ZKLocksService,org.apache.oozie.service.ZKXLogStreamingService,org.apache.oozie.service.ZKJobsConcurrencyService,org.apache.oozie.service.ZKUUIDService,org.apache.oozie.service.JMSTopicService,org.apache.oozie.service.EventHandlerService,org.apache.oozie.sla.service.SLAService
- org.apache.oozie.service.JMSTopicService,
- org.apache.oozie.service.EventHandlerService,
- org.apache.oozie.sla.service.SLAService
- Your modified ext property should similar to this
- Add the below properties in Custom-Oozie Site:
- Add the event handlers property*<name>oozie.service.EventHandlerService.event.listeners</name><value> org.apache.oozie.jms.JMSJobEventListener,org.apache.oozie.sla.listener.SLAJobEventListener,org.apache.oozie.jms.JMSSLAEventListener,org.apache.oozie.sla.listener.SLAEmailEventListener </value>*
- Set Oozie Scheduler threads to 15 [Optional]<name>oozie.service.SchedulerService.threads </name><value>15</value>
- Add JMS Properties*<name>oozie.jms.producer.connection.properties</name><value>default=java.naming.factory.initial#org.apache.activemq.jndi.ActiveMQInitialContextFactory;java.naming.provider.url#tcp://<ActiveMQ server>:61616</value>*
- Add the JMS topic name*<name>oozie.service.JMSTopicService.topic.prefix</name><value></value> - Empty Value. [This can be used to append a prefix to the topic in oozie.service.JMSTopicService.topic.name. For eg: oozie.]*
- Save all the settings and restart Oozie.
Sample workflow with SLA monitoring enabled
Below is a sample worfklow that shows SLA monitoring in action
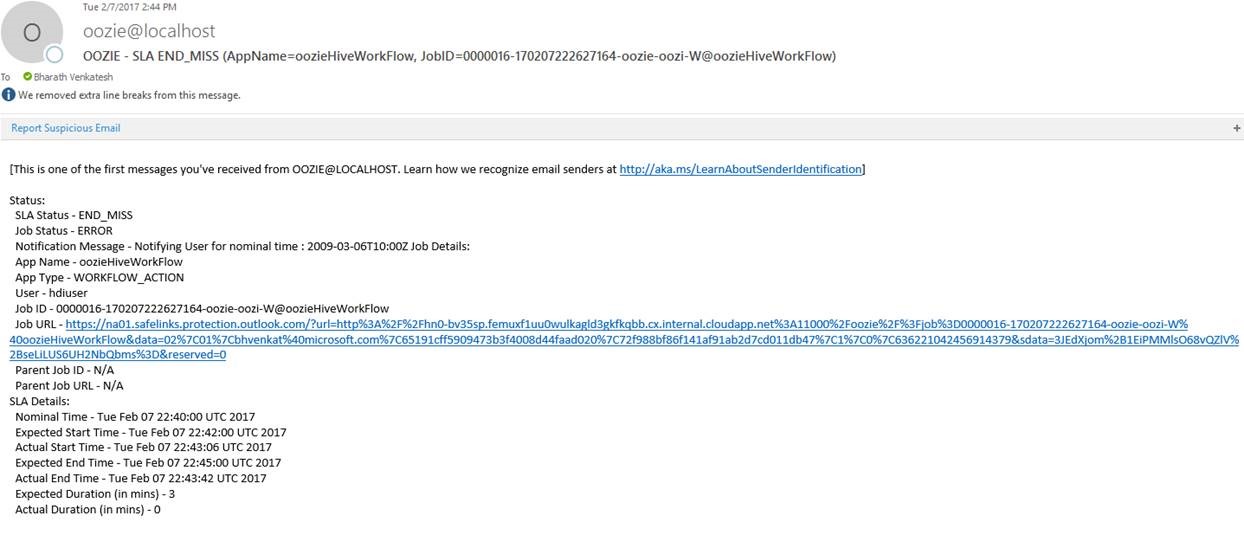
Once this workflow is run, on an SLA miss, you will get an email similar to this if email notification is configured
Further if you look at your Oozie UI, you will see a new tab for SLA.

Here if you search for your job, a result similar to this will give you its SLA status

PS: Feel free to drop in your questions and provide any feedback in the comments section.