Ask Learn
Preview
Ask Learn is an AI assistant that can answer questions, clarify concepts, and define terms using trusted Microsoft documentation.
Please sign in to use Ask Learn.
Sign inThis browser is no longer supported.
Upgrade to Microsoft Edge to take advantage of the latest features, security updates, and technical support.
Note
Access to this page requires authorization. You can try signing in or changing directories.
Access to this page requires authorization. You can try changing directories.
Written by Kanchan Mehrotra, Tony Wu, and Rakesh Patil from AzureCAT. Reviewed by Solliance. Edited by Nanette Ray.
This article is also available as an eBook:
Find Part 1 and Part 2 of the this series here:

The GlusterFS file system is a free, scalable, open-source distributed file system specifically optimized for cloud storage, and it works great for applications hosted on Azure. Unlike Lustre, it does not have separate metadata servers. Instead, metadata is integrated into the file storage.
The GlusterFS architecture includes a server node and a client node in a cluster. You can designate a single node for both storage and metadata—separate servers are not required. GlusterFS stores and locates data using an elastic hash algorithm and doesn’t need any metadata servers, so I/O bottlenecks are removed, which improves performance and parallel access. Servers can be added or removed whenever required.
For our tests, we used the following node configuration:
With this cluster topology, we captured performance statistics for throughput and IOPs. The test environment used openMPI (included in CentOS 7.2) as the MPI interface.
To get started, you need at least two nodes of any Linux distribution to serve as server nodes (metadata server and storage server). GlusterFS can be installed on any Linux distribution. We used an OpenLogic CentOS 7.3 image from Azure Marketplace for our tests. We chose a virtual machine size of DS14v2 and attached 10 additional P30 data disks of 1 TB each.
If required, install LIS packages using the following commands:
 sudo yum update
sudo reboot
sudo yum install microsoft-hyper-v
NOTE: As with our Lustre deployment, we performed the GlusterFS tests without the LIS packages. Since we tested, SR-IOV drivers have become available for accelerated networking.
If you want to use the RPMs from the CentOS Storage SIG, run the following commands, which install the centos-release-gluster RPM and provide the required yum repository files:
 yum install centos-release-gluster
yum install glusterfs-cli glusterfs-geo-replication glusterfs-fuse glusterfs-server glusterfs
To start GlusterFS management services, run the following commands in order:
 systemctl enable glusterd.service
systemctl enable glusterfsd.service
systemctl start glusterd.service
systemctl start glusterfsd.service
systemctl status glusterfsd.service
systemctl status glusterd.service
Set up RAID level 0 for the 10 additional data disks attached with the node. Implementing RAID 0 on this storage node provides 10 TB of volume (1 TB × 10 = 10 TB]. To do this:
Update the system and install the mdadm package so you can configure and manage RAID devices in Linux:
 yum clean all && yum update
yum install mdadm –y
Verify whether the attached hard drives can be detected as follows:
ls -l /dev | grep sd
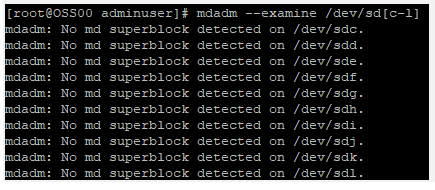
Verify whether the attached drives already use any existing RAID configuration:
mdadm --examine /dev/sd[c-l]
Create the md device (that is, /dev/md0) and apply RAID 0 as follows:
mdadm -C /dev/md0 -l raid0 -n 10 /dev/sd[c-l]
Verify the status of the RAID level, devices, and array:
cat /proc/mdstat
Run the following command:
mdadm --examine --scan | sudo tee /etc/mdadm.conf
Create a logical volume on top of the RAID 0 implementation as follows:
 pvcreate --dataalignment 1024K /dev/md/md0
vgcreate --physicalextentsize 256K rhgs-data /dev/md/md0
lvcreate -L 9216g -T rhgs-data/brickpool -c 256K
lvchange --zero n rhgs-data/brickpool
lvcreate -V 9216g -T rhgs-data/brickpool -n brick1
Format and mount the bricks using the following commands:
Assume that the brick will reside on the volume created in the previous step (/dev/rhgs-data/brick1):
 mkfs.xfs -f -K -i size=512 -n size=8192 /dev/rhgs-data/brick1
mkdir -p /rhs/brick1
Echo the following line of text into fstab (File System TABle):
echo -e "/dev/rhgs-data/brick1\t/rhs/brick1\txfs\ tdefaults,inode64,nobarrier, noatime,nouuid 0 2" | sudo tee -a /etc/fstab
Mount the device:
mount -a && mount
Verify that you can now see the volume mounted at /rhs/brick1 by running the following command:
df –h
To establish a trusted pool, probe the first server from a second server to set its host name. To do this, on the first server (“server1”), run:
gluster peer probe server2
Then, on the second server ("server2"), run:
gluster peer probe server1
After a trusted pool has been established, we can create a GlusterFS volume. For our testing purposes, we set up a distributed volume, but you can choose another type. Each volume type has advantages and disadvantages as follows:
To set up a distributed GlusterFS volume, execute the following commands in order:
On server1, run:
mkdir /data/brick1/gv0
On server2, run:
mkdir /data/brick1/gv0
From any single server, run:
 gluster vol create dist-vol glusterserver1:/rhs/brick1/dist-vol glusterserver2:/rhs/brick1/dist-vol
gluster volume start dist-vol
Finish the volume setup using the gluster volume command as follows:
To confirm that the volume has started (Status: Started), use the info keyword:
gluster volume info
To see how many bricks are attached to the volume, use the status keyword:
gluster volume status
To scale your environment, add a new brick to an existing cluster by using the add-brick keyword:
gluster volume add-brick dist-vol Server02:/rhs/brick1/dist-vol
Rebalance the nodes in the cluster using the rebalance keyword:
gluster volume rebalance dist-vol fix-layout start
For automatic high-availability failover in our tests, we mounted the GlusterFS volume as a FUSE client, although Network File System (NFS) is also supported.
To Install the FUSE package, run:
yum install glusterfs-fuse
Create the directory that serves as a mount point for the GlusterFS volumes:
mkdir /mnt/gluster
Mount the volume on the client at the specified mount point:
mount -t glusterfs server0:/dist-vol /mnt/gluster
Install the testing tools. If you installed the IOR and MDTest tools as part of the Lustre file system evaluation, you do not need to reinstall them. If not, see the Appendix.
To evaluate the performance of our GlusterFS file system, we ran tests to measure maximum throughput and IOPs just as we did with the Lustre file system. We changed various IOR test parameters, including the transfer rate, block size, number of processes, and number of client nodes.
As with our Lustre tests, the performance of GlusterFS varied depending on the following:
To measure read and write throughput, we used the following IOR syntax:
 mpiexec --hosts=<client_hostname> -np <n_procs> /gluster/software/ior/bin/ior
   -a MPIIO -v -B -F -w -t 32m -b 4G -o /mnt/gluster/test.`date
   +"%Y-%m-%d_%H-%M-%S"`
Where:
-v indicates verbose mode
-B indicates by passing cache
-z indicates random task ordering
-F indicates file per process
-w indicates write operation
-r indicates read operation
-t indicates transfer rate (size of transfer in bytes)
-b indicates block size
-o indicates output test file
<client_hostname> is the name of the host used for the client
<n_procs> is the number of processes
Table 1 shows the results.
Table 1. Maximum throughput results for GlusterFS 
Write throughput results are shown in Figure 1. The y-axis shows maximum throughput and the x-axis shows the number of GlusterFS server nodes.
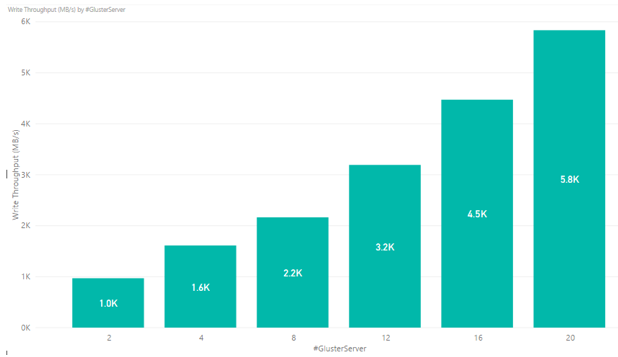
Figure 1. Write throughput results for GlusterFS showing linear performance as servers are added
Read throughput results are displayed in Figure 2. The y-axis shows maximum throughput and the x-axis shows the number of GlusterFS server nodes.
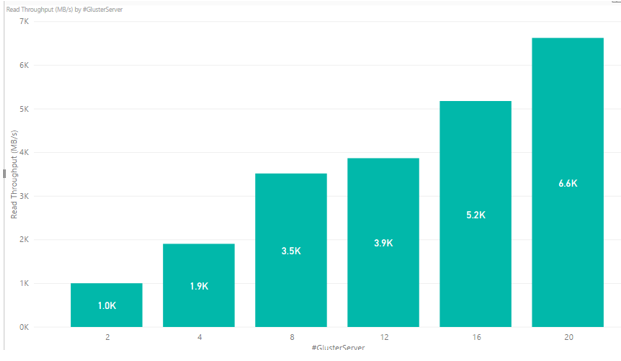
Figure 2. Read throughput results for GlusterFS showing linear performance as servers are added
To measure IOPs on Azure, we used the following syntax:
 mpiexec --hosts=<client_hostname> -np <n_procs> /lustre/software/ior/bin/ior
   -a MPIIO -v -z -F –w -r -t 4k -b 320m -o /mnt/lustre/test.`date
   +"%Y-%m-%d_%H-%M-%S"`
The results are shown in Table 2.
Table 2. IOPs results for GlusterFS 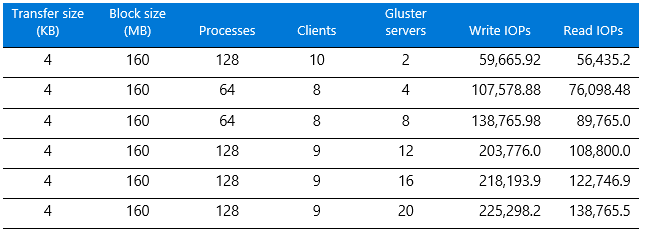 The write IOPs results show a linear increase as the number of GlusterFS servers are increased—but only up to a certain point, as Figure 3 shows. We observed no real gain above 12 servers but ran out of time to try more performance tuning, which we suspect would help.

Figure 3. Write IOPs results per number of GlusterFS servers
The read IOPs performance increases as the number of GlusterFS servers is increased, as Figure 4 shows.

Figure 4. Read IOPs results per number of GlusterFS servers
GlusterFS performance was good, and we thought the overall user experience was subjectively better than Lustre. Unfortunately, the results may not be entirely reliable, and we hope to investigate further in the future.
Here are our observations and conclusions:
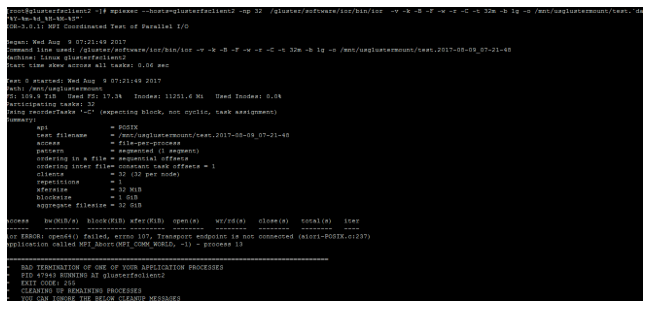
Figure 5. Transfer endpoint error during GlusterFS testing
Thank you for reading!
This article is also available as an eBook:
![]()
Azure CAT Guidance
"Hands-on solutions, with our heads in the Cloud!"
Ask Learn is an AI assistant that can answer questions, clarify concepts, and define terms using trusted Microsoft documentation.
Please sign in to use Ask Learn.
Sign in