Ask Learn
Preview
Ask Learn is an AI assistant that can answer questions, clarify concepts, and define terms using trusted Microsoft documentation.
Please sign in to use Ask Learn.
Sign inThis browser is no longer supported.
Upgrade to Microsoft Edge to take advantage of the latest features, security updates, and technical support.
Note
Access to this page requires authorization. You can try signing in or changing directories.
Access to this page requires authorization. You can try changing directories.
Written by Kanchan Mehrotra, Tony Wu, and Rakesh Patil from AzureCAT. Reviewed by Solliance. Edited by Nanette Ray.
This article is also available as an eBook:
Find Part 1 of the this series here:
Lustre is currently the most widely used parallel virtual file system (PVFS) in high-performance computing (HPC) solutions. Lustre file systems can scale to tens of thousands of client nodes and tens of petabytes of storage. Our Lustre file system performed well on Azure for large file system. You can refer to the testing results in this article for more details. ![]()
Lustre clusters contain four kinds of systems:
A single node can be used to serve as both an MDS and MGS as we have done in our testing. Figure 1 shows a standard Lustre file system architecture. 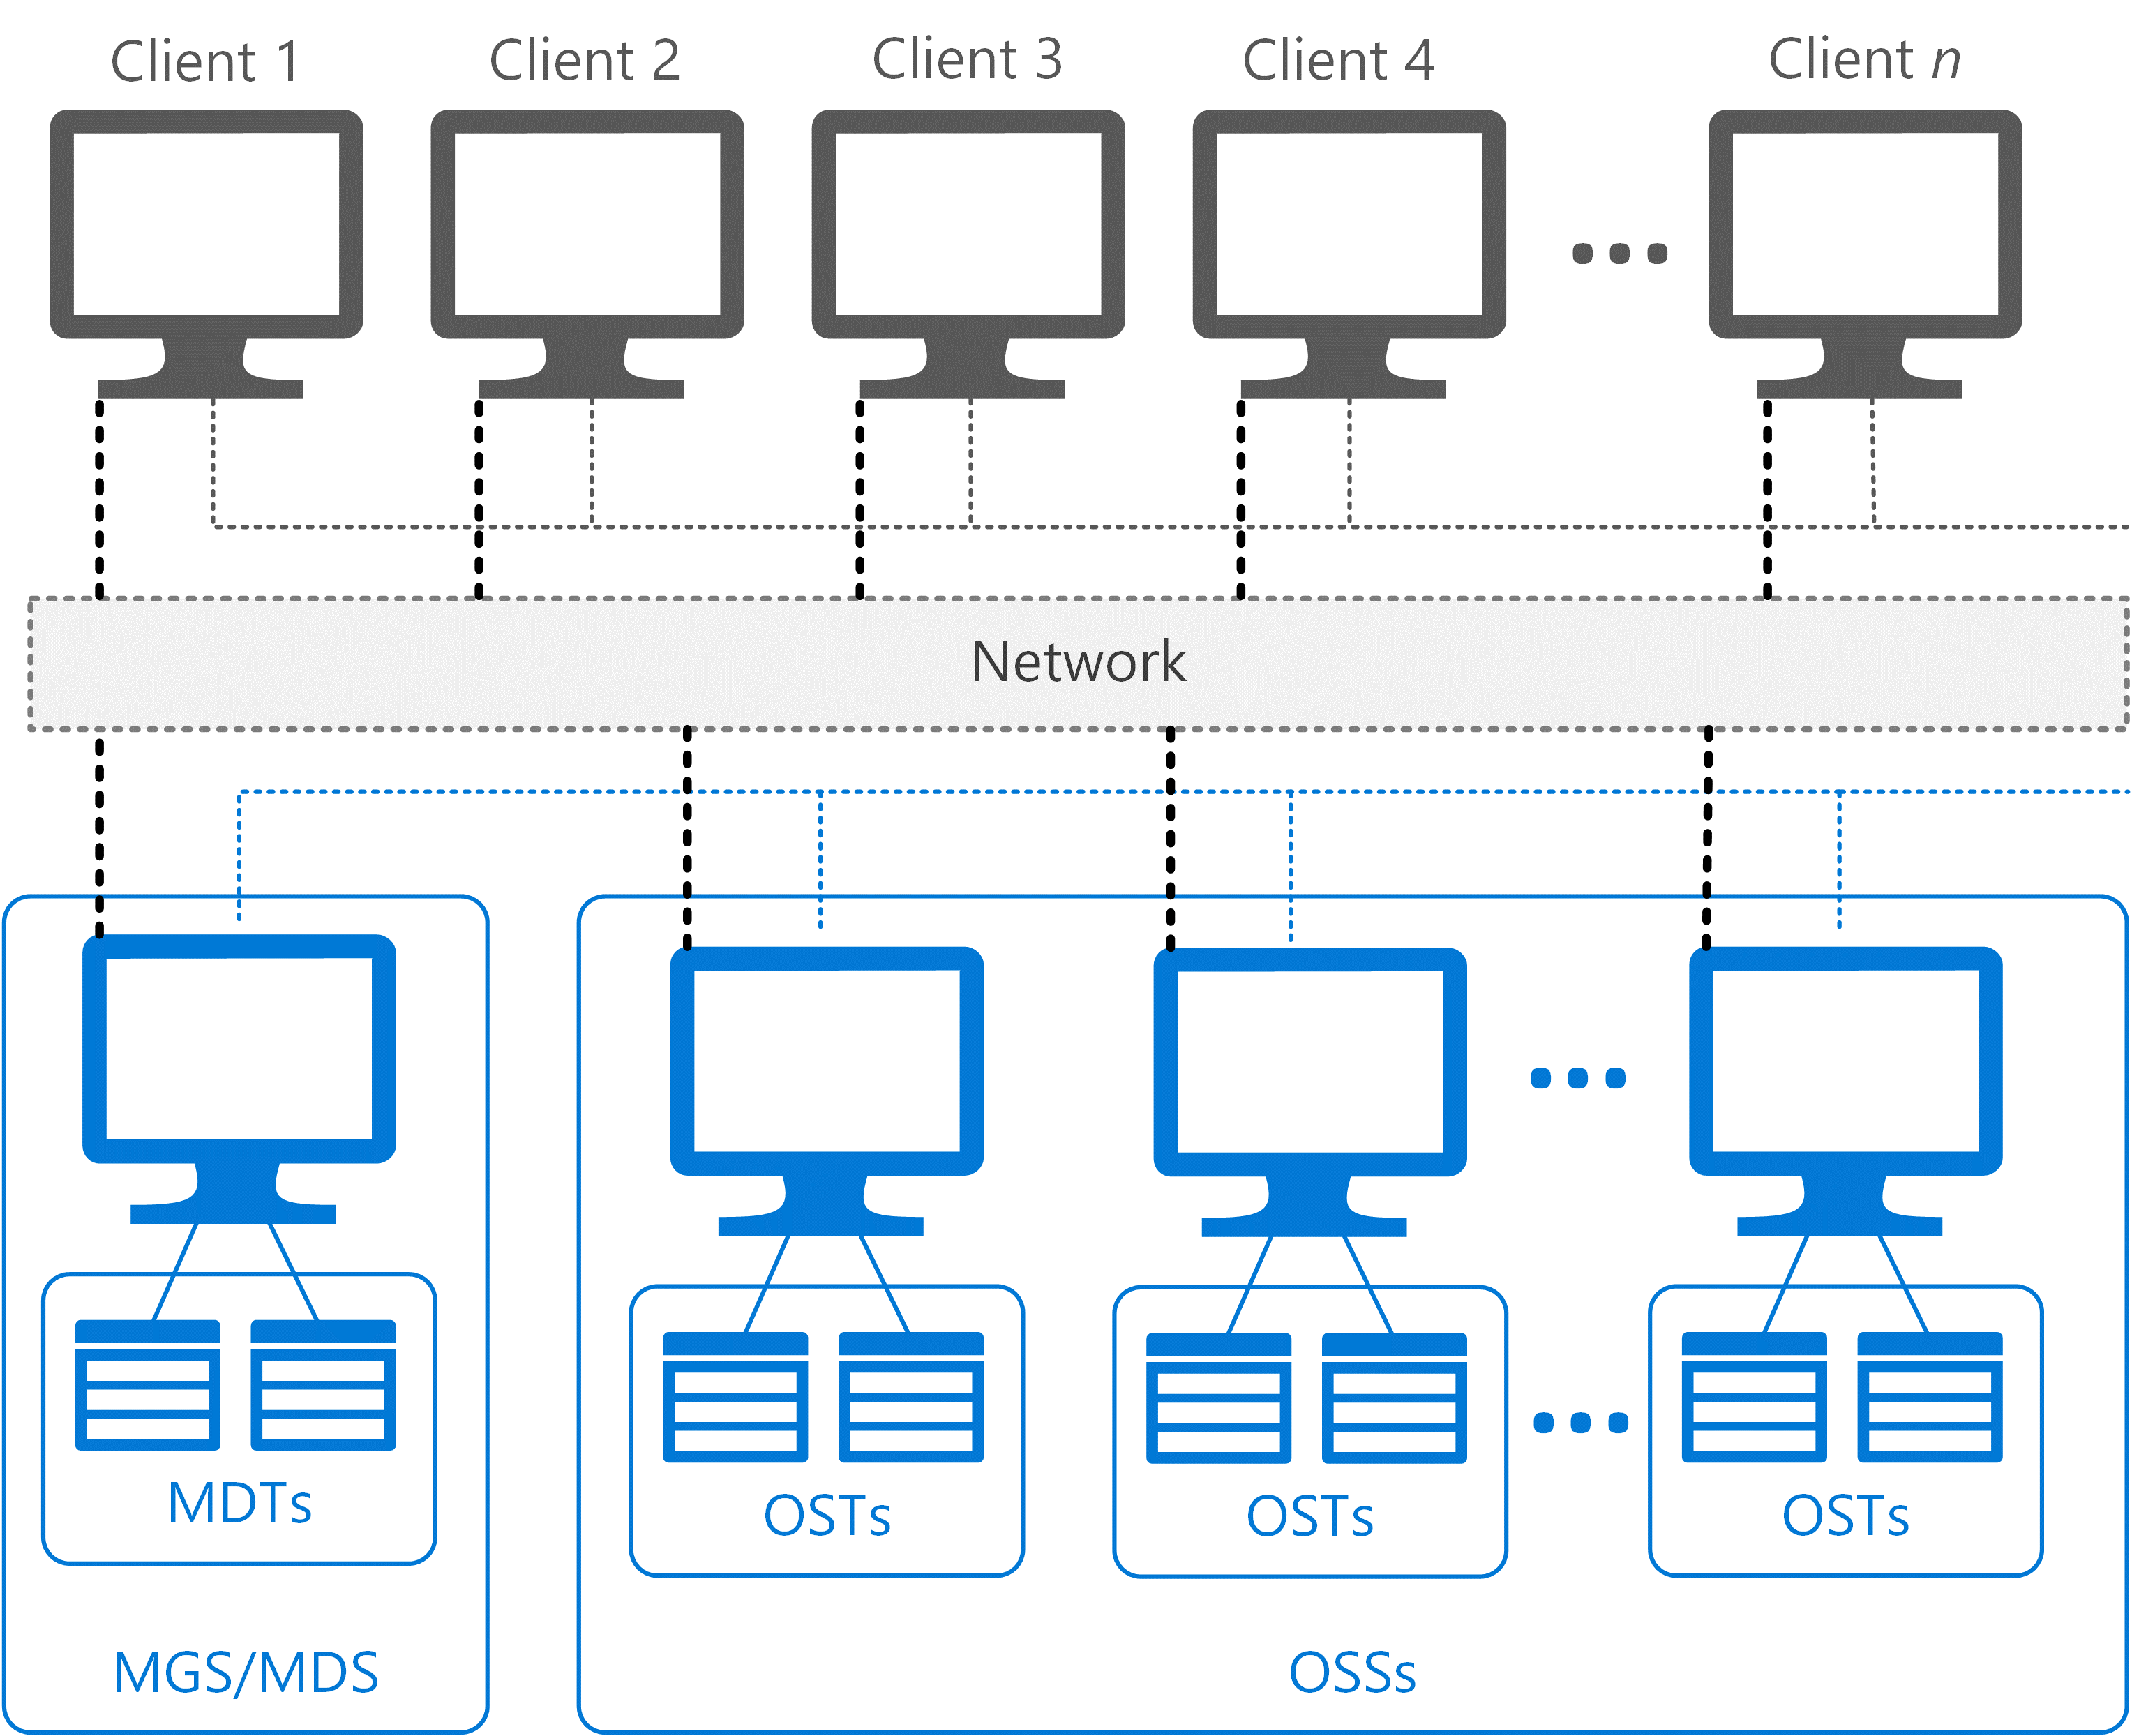
Figure 1. Lustre file system architecture
Lustre runs on a variety of Linux kernels from Linux distributions, including Red Hat Enterprise Linux (RHEL) and CentOS. For our performance evaluation, we installed Lustre 2.9.0 on an OpenLogic CentOS 7.3 image from the Azure Marketplace and configured the nodes as follows:
To scale the cluster, we added more OSSs with 10 additional disks of 1 TB each. We ran performance tests for varieties of OSS nodes—that is, 1, 2, 4, 8, 12…20. The test environment also used openMPI (included in CentOS 7.2) as the Message Passing Interface (MPI).
TIP: This document walks you through a manual Lustre installation, so you can see how to scale specific components later if desired. However, you can also install and configure Lustre 2.9.0 using an Azure Resource Manager template available on GitHub. To test your setup, install the testing tools described later in this document. Azure Marketplace also includes Intel Cloud Edition for Lustre software.
 sudo yum update
sudo reboot
sudo yum install microsoft-hyper-v
NOTE: LIS packages are intended to improve network performance, but we performed our benchmark tests without them. We didn’t see any performance improvements when LIS packages were installed and sometimes even saw lower performance. When we tested, the NDIS single root I/O virtualization (SR-IOV) interface was not available, but it will help.
 [lustreserver]
name=lustreserver
baseurl=https://downloads.hpdd.intel.com/public/lustre/latest-feature-release/el7/server/
enabled=1
gpgcheck=0

[e2fs]
name=e2fs
baseurl=https://downloads.hpdd.intel.com/public/e2fsprogs/latest/el7/
enabled=1
gpgcheck=0

[lustreclient]
name=lustreclient
baseurl=https://downloads.hpdd.intel.com/public/lustre/latest-feature-release/el7/client/
enabled=1
gpgcheck=0
yum repolist
Install the Linux kernel with Lustre software patches:
yum install kernel-3.10.0-514.el7_lustre.x86_64
Install the Lustre software command-line tools:
yum install lustre-2.9.0-1.el7.x86_64
Install the Lustre kernel module patches:
yum install kmod-lustre-2.9.0-1.el7.x86_64
Install the Lustre back-end file system tool for ldiskfs-based servers:
yum install kmod-lustre-osd-ldiskfs-2.9.0-1.el7.x86_64
Install the helper library for mount.lustre and mkfs.lustre for ldiskfs-based servers:yum install lustre-osd-ldiskfs-mount-2.9.0-1.el7.x86_64
Install and update e2fsprogs:
yum install e2fsprogs
 #Configure LNET
echo "options lnet networks=tcp"> /etc/modprobe.d/lnet.conf
#Automatically start servers
chkconfig lnet --add
chkconfig lnet on
chkconfig lustre --add
chkconfig lustre on
reboot
Whether you created a single MGS/MDS node as we did or separate nodes, the next step is to configure the node in the cluster. The following parameters are used:
fsname: Names the file system, for example, LustreFS
mgs: Indicates the node is MGS
mdt: Indicates the node is MDS
backfstype: Identifies the backing file system
To configure the MGS/MDS node, execute the following:
 mkfs.lustre --fsname=LustreFS --mgs --mdt --backfstype=ldiskfs --reformat /dev/sdc
mkdir /mnt/mgsmds
mount -t lustre /dev/sdc /mnt/mgsmds
Before adding the OSS node to the Lustre cluster, we implemented RAID level 0 on all the additional disks attached to the machine (10 × 1 TB). RAID 0 provides no fault tolerance, but we selected the locally redundant storage replication option for Azure Storage. Azure provides three-way mirroring on disk, and we wanted to stress-test the file system. We first installed the mdadm package, which allowed us to configure and manage RAID devices in Linux.
To implement RAID 0 on the storage node:
 yum clean all && yum update
yum install mdadm –y
ls -l /dev | grep sd
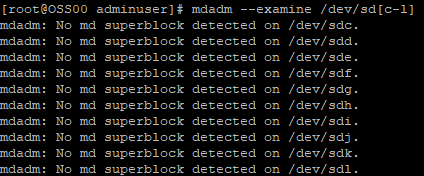
After the new hard drives are detected, check whether the attached drives already use RAID:
mdadm --examine /dev/sd[c-l]
Create the md (multiple device) device (that is, /dev/md0) and apply the RAID level:
mdadm -C /dev/md0 -l raid0 -n 10 /dev/sd[c-l]
After the md device is created, verify the status of the RAID level, devices, and array used:
cat /proc/mdstat
RAID 0 is now configured on the OSS server. On the node, run the following commands to configure the object storage target (OST):
 mkfs.lustre --fsname=LustreFS --backfstype=ldiskfs --reformat --ost --mgsnode=MGSMDS00 --index=0 /dev/md0
mkdir /mnt/oss
mount -t lustre /dev/md0 /mnt/oss
NOTE: Whenever you add another OSS node to the cluster, increment the index—for example, from 0 to 1.
For the client node to work with the Lustre cluster, you must install the required RPM packages and configure the node. For other kernel versions than the one we used, see the Lustre Support Matrix.
Install the kmod-lustre client package:
yum install kmod-lustre-client-2.9.0-1.el7.x86_64
Install the Lustre client 2.90 client package:
yum install lustre-client-2.9.0-1.el7.x86_64
Install the Lustre client DKMS packages:
yum install lustre-client-dkms-2.9.0-1.el7.noarch --skip-broken
 mkdir <directory>
mount -t lustre <hostname>@tcp:<filesystem> <directory>
Where:
<directory> is the directory to be mounted with the Lustre file system, such as /mnt/lustre.
<hostname> is the name of the host used for the management server. In our case, MDS and MGS are served by a single node named MGSMDS00.
<filesystem> is the name of the Lustre file system. We specified the name LustreFS earlier while creating the file system (see “Configure MGS/MDS node”).
For example:
 mkdir /mnt/lustre
mount -t lustre MGSMDS00@tcp:/LustreFS /mnt/lustre
Display all the nodes attached in the cluster:
lfs check servers
Write a file in the mounted path to see the OST at which that file is located. For example:
lfs find –obd LustreFS-OST0000_UUID /mnt/lustre
Where LustreFS-OST0000_UUID is UUID of that OST as shown:

To validate performance of the Lustre file system, we ran tests to measure maximum throughput and IOPs. We changed various IOR test parameters, including the transfer rate, block size, number of processes, and number of client nodes.
Our results were good, but inconclusive, because of the many factors that affected the performance of our system:
To measure read and write throughput, we used the following IOR syntax:
 mpiexec --hosts=<client_hostname> -np <n_procs>  /lustre/software/ior/bin/ior
    -a MPIIO -v -B  -F -w -t 32m  -b 4G -o /mnt/lustre/test.`date
    +"%Y-%m-%d_%H-%M-%S"`
Where:
-v indicates verbose mode
-B indicates by passing cache
-F indicates file per process
-w indicates write operation
-t indicates transfer rate (size of transfer in bytes)
-b indicates block size
-o indicates output test file
<client_hostname> is the name of the host used as the client
<n_procs> is the number of processes
Table 1. Maximum throughput results for Lustre file system 
Figure 2 presents the write throughput results, with the y-axis showing maximum throughput and the x-axis showing the number of OSS nodes.

Figure 2. Graphical representation of write throughput results
Figure 3 shows how read throughput improves with the number of server nodes. The y-axis shows maximum throughput and the x-axis shows the number of OSS nodes.

Figure 3. Graphical representation of read throughput results
To measure IOPs, we used the following syntax:
 mpiexec --hosts=<client_hostname> -np <n_procs>  /lustre/software/ior/bin/ior
    -a MPIIO -v -z  -F –w -r -t 4k  -b 320m -o /mnt/lustre/test.`date
    +"%Y-%m-%d_%H-%M-%S"`
Where:
-v indicates verbose mode
-z indicates random task ordering
-F indicates file per process
-w indicates write operation
-r indicates read operation
-t indicates transfer rate (size of transfer in bytes)
-b indicates block size
-o indicates output test file
<client_hostname> is the name of the host used as the client
<n_procs> is the number of processes
The results are shown in Table 2.
Table 2. IOPs results for Lustre file system 
Figure 4 provides the read IOPs results. The y-axis shows IOPs, and the x-axis shows the count of OSS nodes.
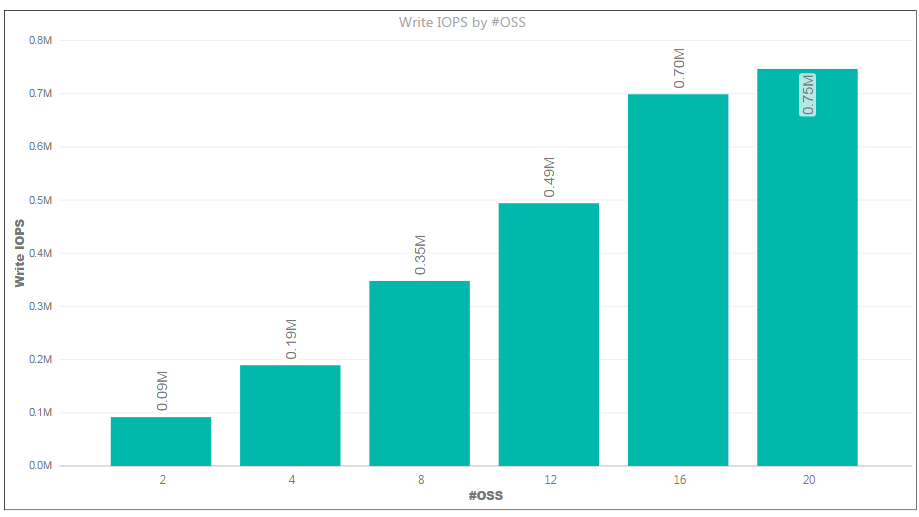
Figure 4 . Write IOPs showing linear scale as nodes are added
Our nonlinear results, shown in Figure 5, were unexpected and most likely related to the caching effect. We ran out of time for further investigation, but we suspect the Lustre caching effects were the culprit. 
Figure 5. Read IOPs showing nonlinear scale
For the metadata operation testing, we used MDTest with the following syntax on the client node:
 mpiexec --hosts=<client_hostname> -np <n_procs> /lustre/software/mdtest/mdtest
    -I 10 -i 2 -z 5 -b 5 -d /mnt/lustre/
Where:
-I indicates the number of items per directory in the tree
-i indicates iterations
-b indicates block size
-z indicates random task ordering
-d is the directory where the tests are run (multiple paths require fully-qualified pathnames)
Figure 6 shows the MDTest output.

Figure 6 . Sample MDTest output for client host with four processes
Overall, system performance was good, but we noticed a few testing quirks. Here are our observations and conclusions:
Thank you for reading!
This article is also available as an eBook:
![]()
Azure CAT Guidance
"Hands-on solutions, with our heads in the Cloud!"
Ask Learn is an AI assistant that can answer questions, clarify concepts, and define terms using trusted Microsoft documentation.
Please sign in to use Ask Learn.
Sign in