Ask Learn
Preview
Ask Learn is an AI assistant that can answer questions, clarify concepts, and define terms using trusted Microsoft documentation.
Please sign in to use Ask Learn.
Sign inThis browser is no longer supported.
Upgrade to Microsoft Edge to take advantage of the latest features, security updates, and technical support.
Note
Access to this page requires authorization. You can try signing in or changing directories.
Access to this page requires authorization. You can try changing directories.
Authored by Rakesh Patil (AzureCAT). Edited by Nanette Ray and RoAnn Corbisier.
A whitepaper of this content is available on Azure.com:
Introduction
Recently, AzureCAT worked with a customer to set up GlusterFS, a free, scalable, open source distributed file system that works great for applications hosted on Microsoft Azure. Like our customer, you too can make the most of common, off-the-shelf hardware by using GlusterFS to create large, distributed storage solutions.
In this article, we introduce some key concepts of the GlusterFS file system and its underlying components, then show how to use the Gluster command line to create various types of volumes for your Azure solution as a shared file system. A template is available to help you get started as well.
GlusterFS is a scalable distributed network file system that runs in user space using Filesystem in Userspace (FUSE) libraries. GlusterFS is the file system for Gluster storage, which provides a flexible file services layer for users and applications that can be easily scaled to adjust to your workloads. GlusterFS is often used for media streaming, data analysis, and other data-heavy, bandwidth-intensive tasks. You can deploy it on virtual or physical servers on premises or in the cloud.
Deployment flexibility is a key strength of Gluster storage. It’s suitable for large static files that don't change, such as media files, document assets, and images. We found that large, immutable (write once, never change) files are a good fit for GlusterFS. These benefits are also what made GlusterFS a good fit for our customer.
NFS is considered the single point of failure in the architecture, but for high availability, you can use Cluster Trivial Database (CTDB) technology with NFS (out of scope for this document). The BeeGFS and Ceph storage systems are also being used currently as distributed parallel file systems in Azure HPC solutions. Later in this article, we discuss some improvements to small file performance and metadata-intensive workloads.
In a scale out system, one of the biggest challenges is keeping track of the logical and physical locations of data and metadata. Unlike other traditional storage solutions, Gluster storage doesn’t need a metadata server and locates files algorithmically using an elastic hashing algorithm. This no-metadata server architecture ensures better performance, linear scalability, and reliability. 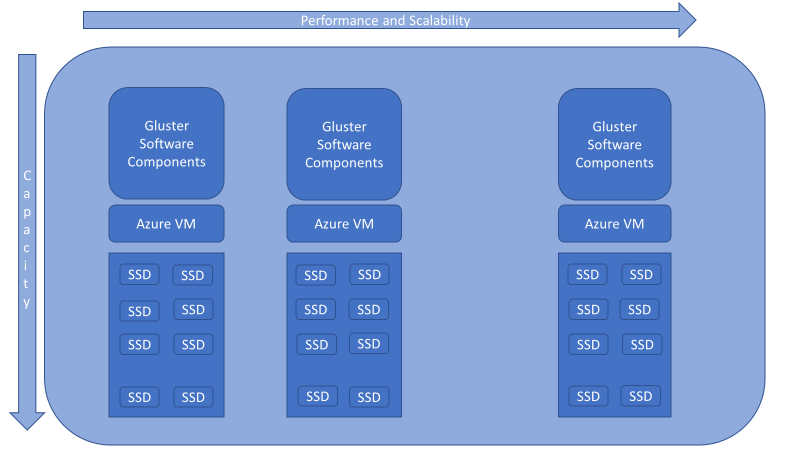
Figure 1 . GlusterFS design for Azure.
We recommend that you become familiar with the GlusterFS documentation, but to get started, you ‘ll need to know at least the following terms:
In our customer deployments, we use GlusterFS with Azure applications for the following reasons:
When you set up GlusterFS, you need to specify the type of storage volumes you need. The type you choose depends on your workload and the tradeoff between data protection and capacity. In our typical Azure deployments, we rely on both distributed and distributed-replicated volumes.
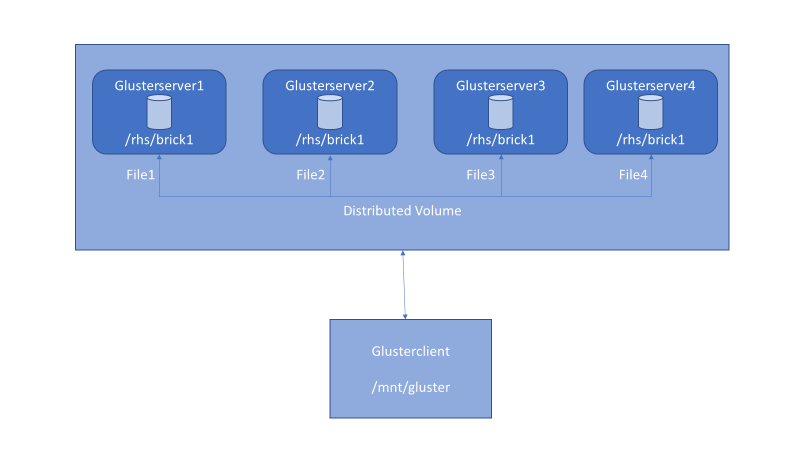
Figure 2 . Distributed volume setup with GlusterFS.

Figure 3 . Replicated volume setup with GlusterFS.
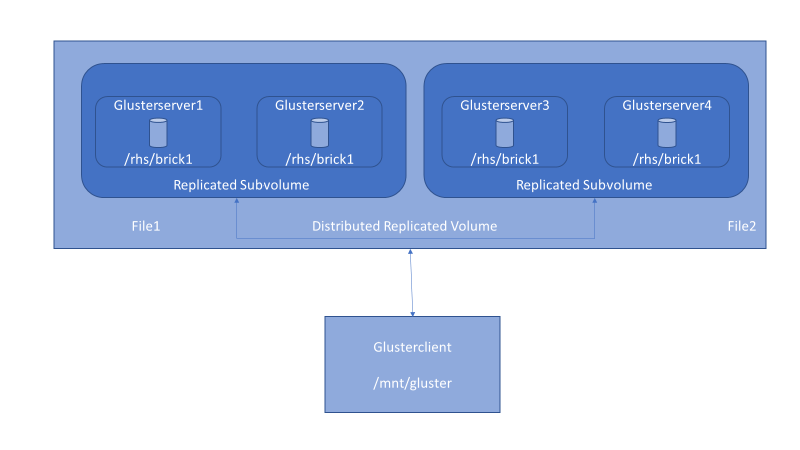
Figure 4 . Distributed-replicated volume setup with GlusterFS.

Figure 5 . Dispersed volume setup with GlusterFS.
To get started, you need at least the following:
NOTE: Make sure you have enough space for the dynamically generated configuration files that GlusterFS creates and stores in /var/lib/glusterd. Either keep enough space for /var file system, or have /var configured on different partition.
GlusterFS can be installed on any Linux distribution. In this article, we discuss RHEL (Red Hat Enterprise Linux) a bit, then CentOS, because you need Resilient Storage Add-On software from Red Hat to install Gluster on RHEL machines. On CentOS, you can directly install the upstream version of the software from the Gluster repository.
In Azure, you can configure individual Gluster storage instances into a cluster. In this example, we set up four instances named glusterserver1-4.
Their IP addresses are 10.3.0.4 to 10.3.0.7.
Instances are added to availability set – gfstestavtest. When Gluster storage replicates data among bricks, you must associate the replica sets with a specific availability set. By using availability sets in the replication design, incidents within the Azure infrastructure won’t affect all members of a replica set simultaneously.
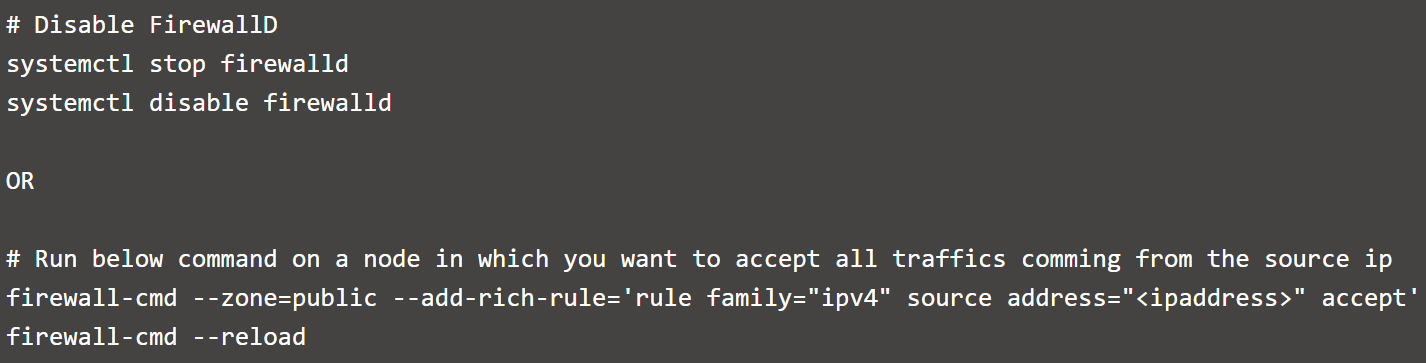
Before installing GlusterFS, make sure that the firewall settings don’t prevent access to the ports used by the Gluster nodes. By default, Glusterd listens on TCP/24007 but opening that port is not enough on the Gluster nodes. Each time you add a brick , it opens a new port that you can see with gluster volumes status.
Firewall configuration tools differ between RHEL/CentOS 6 and 7 as follows:


However, if the default ports are already in use, you can open a specific port with the following command: 
Or:
The following instructions install and set up GlusterFS on Azure VMs:
 [root@glusterserver1 ~]# yum install centos-release-gluster
Loaded plugins: fastestmirror, langpacks

base                                                                                       | 3.6 kB  00:00:00
extras                                                                                     | 3.4 kB  00:00:00
openlogic                                                                                  | 2.9 kB  00:00:00

updates                                                                                    | 3.4 kB  00:00:00
(1/5): base/7/x86_64/group_gz                                                              | 155 kB  00:00:00
(2/5): openlogic/7/x86_64/primary_db                                                       |  15 kB  00:00:00
(3/5): extras/7/x86_64/primary_db                                                          | 138 kB  00:00:00
(4/5): base/7/x86_64/primary_db                                                            | 5.6 MB  00:00:00
(5/5): updates/7/x86_64/primary_db                                                         | 3.8 MB  00:00:00

Determining fastest mirrors

Resolving Dependencies

--> Running transaction check
---> Package centos-release-gluster310.noarch 0:1.0-1.el7.centos will be installed
--> Processing Dependency: centos-release-storage-common for package: centos-release-gluster310-1.0-1.el7.centos.noarch
--> Running transaction check
---> Package centos-release-storage-common.noarch 0:1-2.el7.centos will be installed
--> Finished Dependency Resolution

Dependencies Resolved

==================================================================================================================
 Package                                  Arch              Version                       Repository         Size
==================================================================================================================

Installing:
 centos-release-gluster310                noarch            1.0-1.el7.centos              extras            4.2 k

Installing for dependencies:
 centos-release-storage-common            noarch            1-2.el7.centos                extras            4.5 k
[root@glusterserver1 ~]# yum install  glusterfs-cli glusterfs-geo-replication glusterfs-fuse glusterfs-server glusterfs
Dependencies Resolved

==================================================================================================================
 Package                            Arch            Version                      Repository                  Size
==================================================================================================================

Installing:
 glusterfs                          x86_64          3.10.0-1.el7                 centos-gluster310          526 k
 glusterfs-cli                      x86_64          3.10.0-1.el7                 centos-gluster310          193 k
 glusterfs-fuse                     x86_64          3.10.0-1.el7                 centos-gluster310          135 k
 glusterfs-geo-replication          x86_64          3.10.0-1.el7                 centos-gluster310          221 k
 glusterfs-server                   x86_64          3.10.0-1.el7                 centos-gluster310          1.3 M

Installing for dependencies:
 glusterfs-api                      x86_64          3.10.0-1.el7                 centos-gluster310           92 k
 glusterfs-client-xlators           x86_64          3.10.0-1.el7                 centos-gluster310          812 k

[root@glusterserver1 ~]# systemctl enable glusterd.service
Created symlink from /etc/systemd/system/multi-user.target.wants/glusterd.service to /usr/lib/systemd/system/glusterd.service.
[root@glusterserver1 ~]# systemctl enable glusterfsd.service
Created symlink from /etc/systemd/system/multi-user.target.wants/glusterfsd.service to /usr/lib/systemd/system/glusterfsd.service.
[root@glusterserver1 ~]# systemctl start glusterd.service
[root@glusterserver1 ~]# systemctl start glusterfsd.service
[root@glusterserver1 ~]# systemctl status glusterfsd.service

? glusterfsd.service - GlusterFS brick processes (stopping only)
   Loaded: loaded (/usr/lib/systemd/system/glusterfsd.service; enabled; vendor preset: disabled)
   Active: active (exited) since Thu 2017-03-09 09:05:07 UTC; 8s ago
  Process: 43749 ExecStart=/bin/true (code=exited, status=0/SUCCESS)
 Main PID: 43749 (code=exited, status=0/SUCCESS)
 Mar 09 09:05:07 glusterserver1 systemd[1]: Starting GlusterFS brick processes (stopping only)...
Mar 09 09:05:07 glusterserver1 systemd[1]: Started GlusterFS brick processes (stopping only).

[root@glusterserver1 ~]# systemctl status glusterd.service
? glusterd.service - GlusterFS, a clustered file-system server
   Loaded: loaded (/usr/lib/systemd/system/glusterd.service; enabled; vendor preset: disabled)
   Active: active (running) since Thu 2017-03-09 09:05:00 UTC; 20s ago
  Process: 43554 ExecStart=/usr/sbin/glusterd -p /var/run/glusterd.pid --log-level $LOG_LEVEL $GLUSTERD_OPTIONS (code=exited, status=0/SUCCESS)
 Main PID: 43555 (glusterd)
   CGroup: /system.slice/glusterd.service
           +-43555 /usr/sbin/glusterd -p /var/run/glusterd.pid --log-level INFO
Mar 09 09:04:58 glusterserver1 systemd[1]: Starting GlusterFS, a clustered file-system server...
Mar 09 09:05:00 glusterserver1 systemd[1]: Started GlusterFS, a clustered file-system server.

[root@glusterserver1 ~]#
To set up RHEL 7, register the system with Subscription Manager, identify available entitlement pools, and attach the entitlement pools to the system.
Use the pool identifiers to attach the Red Hat Enterprise Linux Server and Red Hat Gluster Storage entitlements to the system. Run the following command to attach the entitlements:
Next we get the glusterd service going:
Before you can set up a GlusterFS volume, you must create a trusted storage pool. On glusterserver1:
 [root@glusterserver1 ~]# for i in 2 3 4; do gluster peer probe glusterserver$i ; done
peer probe: success.
peer probe: success.
peer probe: success.

[root@glusterserver1 ~]# gluster peer status
Number of Peers: 3
 Hostname: glusterserver2
Uuid: def7c4cd-f875-46ff-a93d-f8f1c059ceb7
State: Peer in Cluster (Connected)

Hostname: glusterserver3
Uuid: f6f2c4c8-38d7-405a-a8b7-774df2bff4be
State: Peer in Cluster (Connected)

Hostname: glusterserver4
Uuid: 1e704349-7c20-4b4d-83b5-41cd664472d0
State: Peer in Cluster (Connected)
On all servers participating in the Gluster cluster, we want to create bricks out of disks put together using Linux software RAID as it provides better performance than directly using logical volume manager (LVM) volumes.
 [root@glusterserver1 ~]# mdadm --create md0 --level=0 --chunk=256K --raid-devices=4 /dev/sdc /dev/sdd /dev/sde /dev/sdf
mdadm: Defaulting to version 1.2 metadata
mdadm: array /dev/md/md0 started.

[root@glusterserver1 ~]# cat /proc/mdstat
Personalities : [raid0]
md127 : active raid0 sdf[3] sde[2] sdd[1] sdc[0]
      419168256 blocks super 1.2 256k chunks
unused devices: <none>
 [root@glusterserver1 ~]# mdadm --examine --scan | sudo tee /etc/mdadm.conf
ARRAY /dev/md/md0  metadata=1.2 UUID=27958936:396b9ea2:978e91ab:8d6d0faf name=glusterserver1:md0
Since all four servers will be a part of Gluster’s trusted storage pool, it’s a good idea to have similarly configured bricks on each. The example shows how to create thinly provisioned LVM volumes on top of software RAID. Thin provisioning helps optimize available of space. So, on each server in the cluster, do the following:
 [root@glusterserver1 ~]# pvcreate --dataalignment 1024K /dev/md/md0
  Physical volume "/dev/md/md0" successfully created.

[root@glusterserver1 ~]# pvscan
  PV /dev/md127                      lvm2 [399.75 GiB]
  Total: 1 [399.75 GiB] / in use: 0 [0   ] / in no VG: 1 [399.75 GiB]

[root@glusterserver1 ~]# vgcreate --physicalextentsize 256K rhgs-data /dev/md/md0
  Volume group "rhgs-data" successfully created

[root@glusterserver1 ~]# vgscan
  Reading volume groups from cache.
  Found volume group "rhgs-data" using metadata type lvm2

[root@glusterserver1 ~]# lvcreate -L 390g -T rhgs-data/brickpool -c 256K
  Using default stripesize 64.00 KiB.
  Logical volume "brickpool" created.

[root@glusterserver1 ~]# lvscan
  inactive          '/dev/rhgs-data/lvol0' [975.00 MiB] inherit
  ACTIVE            '/dev/rhgs-data/brickpool' [390.00 GiB] inherit

[root@glusterserver1 ~]# lvchange --zero n rhgs-data/brickpool
  Logical volume rhgs-data/brickpool changed.

[root@glusterserver1 ~]# lvscan
  inactive          '/dev/rhgs-data/lvol0' [975.00 MiB] inherit
  ACTIVE            '/dev/rhgs-data/brickpool' [390.00 GiB] inherit

[root@glusterserver1 ~]# lvcreate -V 380g -T rhgs-data/brickpool -n brick1
  Using default stripesize 64.00 KiB.
  Logical volume "brick1" created.

[root@glusterserver1 ~]# lvscan
  inactive          '/dev/rhgs-data/lvol0' [975.00 MiB] inherit
  ACTIVE            '/dev/rhgs-data/brickpool' [390.00 GiB] inherit
  ACTIVE            '/dev/rhgs-data/brick1' [380.00 GiB] inherit
On each server, create the file system and mount point:
 [root@glusterserver1 ~]# mkfs.xfs -f -K -i size=512 -n size=8192 /dev/rhgs-data/brick1
meta-data=/dev/rhgs-data/brick1  isize=512    agcount=16, agsize=6225856 blks
         =                       sectsz=4096  attr=2, projid32bit=1
         =                       crc=1        finobt=0, sparse=0
data     =                       bsize=4096   blocks=99613696, imaxpct=25
         =                       sunit=64     swidth=256 blks
naming   =version 2              bsize=8192   ascii-ci=0 ftype=1
log      =internal log           bsize=4096   blocks=48639, version=2
         =                       sectsz=4096  sunit=1 blks, lazy-count=1
realtime =none                   extsz=4096   blocks=0, rtextents=0

[root@glusterserver1 ~]# mkdir -p /rhs/brick1
Next, mount the file system on the mount point and add the entry to the fstab file:
 [root@glusterserver1 ~]# echo -e "/dev/rhgs-data/brick1\t/rhs/brick1\txfs\tdefaults,inode64,nobarrier,noatime,nouuid 0 2" | sudo tee -a /etc/fstab
/dev/rhgs-data/brick1   /rhs/brick1     xfs     defaults,inode64,nobarrier,noatime,nouuid 0 2
[root@glusterserver1 ~]# mount -a
[root@glusterserver1 ~]# df -h
Filesystem                     Size  Used Avail Use% Mounted on
/dev/sda2                       30G  1.3G   29G   5% /
devtmpfs                       3.4G     0  3.4G   0% /dev
tmpfs                          3.5G     0  3.5G   0% /dev/shm
tmpfs                          3.5G   41M  3.4G   2% /run
tmpfs                          3.5G     0  3.5G   0% /sys/fs/cgroup
/dev/sda1                      497M   62M  436M  13% /boot
/dev/sdb1                       14G   41M   13G   1% /mnt/resource
tmpfs                          697M     0  697M   0% /run/user/1000
/dev/mapper/rhgs--data-brick1  380G   33M  380G   1% /rhs/brick1
After the bricks are in place, you can create a GlusterFS volume. The volume combines the capacity from each node. In this example, we create the two most common volume types, distributed and distributed-replicated. A distributed volume has no fault tolerance but has the maximum capacity. A distributed-replicated volume has node-level fault tolerance but has reduced capacity.
In this example, we set up a distributed volume as follows:
 [root@glusterserver1 ~]# gluster vol create dist-vol glusterserver1:/rhs/brick1/dist-vol glusterserver2:/rhs/brick1/dist-vol glusterserver3:/rhs/brick1/dist-vol glusterserver4:/rhs/brick1/dist-vol

volume create: dist-vol: success: please start the volume to access data

[root@glusterserver1 ~]# gluster volume info
Volume Name: dist-vol
Type: Distribute
Volume ID: 3b9b2208-c530-40d3-8d8e-b6806852f986

Status: Created
Snapshot Count: 0
Number of Bricks: 4
Transport-type: tcp

Bricks:
Brick1: glusterserver1:/rhs/brick1/dist-vol
Brick2: glusterserver2:/rhs/brick1/dist-vol
Brick3: glusterserver3:/rhs/brick1/dist-vol
Brick4: glusterserver4:/rhs/brick1/dist-vol

Options Reconfigured:
transport.address-family: inet
nfs.disable: on
Next, start the volume:
 [root@glusterserver1 ~]# gluster volume start dist-vol
volume start: dist-vol: success

[root@glusterserver1 ~]# gluster volume info
Volume Name: dist-vol
Type: Distribute
Volume ID: 3b9b2208-c530-40d3-8d8e-b6806852f986
Status: Started
Snapshot Count: 0
Number of Bricks: 4
Transport-type: tcp

Bricks:
Brick1: glusterserver1:/rhs/brick1/dist-vol
Brick2: glusterserver2:/rhs/brick1/dist-vol
Brick3: glusterserver3:/rhs/brick1/dist-vol
Brick4: glusterserver4:/rhs/brick1/dist-vol
Options Reconfigured:
transport.address-family: inet
nfs.disable: on
When you set up a distributed-replicated volume, it’s critical to specify the bricks in the right order for data protection. The number of bricks must be a multiple of the replica count for a distributed-replicated volume. Each replica_count of consecutive bricks will form a replica set, with all replica sets combined into a distribute set. To ensure that replica-set members aren’t placed on the same node, list the first brick on every server, then the second brick on every server in the same order, and so on.
 [root@glusterserver1 /]# gluster vol create repl-vol replica 2 glusterserver1:/rhs/brick1/repl-vol glusterserver2:/rhs/brick1/repl-vol glusterserver3:/rhs/brick1/repl-vol glusterserver4:/rhs/brick1/repl-vol force
volume create: repl-vol: success: please start the volume to access data

[root@glusterserver1 /]# gluster volume info
Volume Name: repl-vol
Type: Distributed-Replicate
Volume ID: 72260bf9-381f-4c08-8ee1-d4979f04e1f0
Status: Created
Snapshot Count: 0
Number of Bricks: 2 x 2 = 4
Transport-type: tcp
 Bricks:
Brick1: glusterserver1:/rhs/brick1/repl-vol
Brick2: glusterserver2:/rhs/brick1/repl-vol
Brick3: glusterserver3:/rhs/brick1/repl-vol
Brick4: glusterserver4:/rhs/brick1/repl-vol
Options Reconfigured:
transport.address-family: inet
nfs.disable: on
 [root@glusterserver1 /]# gluster volume start repl-vol
volume start: repl-vol: success
Gluster storage volumes can be accessed using a machine installed with one of the following protocols:
The following table shows which of the supported access protocols work with TCP and RDMA.
| Protocol | Supports TCP? | Supports RDMA? |
| FUSE | ||
| SMB | ||
| NFS |
Native Client is a user-mode, FUSE-based client that provides high concurrency and fast writes.
On the client, install the FUSE package as follows:
 [root@glusterclient ~]# yum install glusterfs-fuse
Loaded plugins: fastestmirror, langpacks
Loading mirror speeds from cached hostfile

Resolving Dependencies
--> Running transaction check
---> Package glusterfs-fuse.x86_64 0:3.7.9-12.el7.centos will be installed
--> Processing Dependency: glusterfs-client-xlators(x86-64) = 3.7.9-12.el7.centos for package: glusterfs-fuse-3.7.9-12.el7.centos.x86_64
--> Processing Dependency: glusterfs(x86-64) = 3.7.9-12.el7.centos for package: glusterfs-fuse-3.7.9-12.el7.centos.x86_64
--> Processing Dependency: libglusterfs.so.0()(64bit) for package: glusterfs-fuse-3.7.9-12.el7.centos.x86_64
--> Processing Dependency: libgfxdr.so.0()(64bit) for package: glusterfs-fuse-3.7.9-12.el7.centos.x86_64
--> Processing Dependency: libgfrpc.so.0()(64bit) for package: glusterfs-fuse-3.7.9-12.el7.centos.x86_64
--> Running transaction check
---> Package glusterfs.x86_64 0:3.7.9-12.el7.centos will be installed
---> Package glusterfs-client-xlators.x86_64 0:3.7.9-12.el7.centos will be installed
---> Package glusterfs-libs.x86_64 0:3.7.9-12.el7.centos will be installed
--> Finished Dependency Resolution

Dependencies Resolved
 ==================================================================================================================
 Package                              Arch               Version                           Repository        Size
==================================================================================================================

Installing:
 glusterfs-fuse                       x86_64             3.7.9-12.el7.centos               base             109 k

Installing for dependencies:
 glusterfs                            x86_64             3.7.9-12.el7.centos               base             462 k
 glusterfs-client-xlators             x86_64             3.7.9-12.el7.centos               base             837 k
 glusterfs-libs                       x86_64             3.7.9-12.el7.centos               base             331 k

Transaction Summary
Next, create the directory that serves as a mount point for the Gluster volumes:
[root@glusterclient ~]# mkdir /mnt/gluster
Now mount the volume on the client at the specified mount point:
[root@glusterclient ~]# mount -t glusterfs glusterserver1:/dist-vol /mnt/gluster
The server specified in the mount command is used to fetch the GlusterFS configuration volfile, which describes the volume name. The client then communicates directly with the servers listed in the volfile (which may not actually include the server used for mount).
You can specify the following mount options:
GlusterFS is great for cloud storage, but it does have some known issues. Maybe you’re seeing I/O errors or a slowdown in performance. To help with your recovery and tuning efforts, the following sections discuss a couple of workarounds and configuration tweaks that you can use with GlusterFS.
The term split brain applies to Gluster volumes in a replicated volume configuration. A file is said to be in split brain when copies of the same file in different bricks that constitute the replica pair have mismatching data or metadata contents. When the copies conflict with each other, automatic healing isn’t possible.
When a split brain occurs, applications can’t perform certain operations like read and write on the file. When an application tries to access split-brain files, an I/O error results.
Three types of split brains can occur:
The only way to resolve split brains is by manually inspecting the file contents from the back end and deciding which is the true copy (source), then modifying the appropriate extended attributes so healing can happen automatically.
To help mitigate data inconsistency, you can configure a quorum on the trusted server pool and enforce it on the server and client. This quorum is on the server side, that is, the Glusterd service. Whenever the Glusterd service on a GlusterFS server observes that the quorum isn’t met, it brings down the bricks to prevent data split brain.
You can configure the quorum percentage ratio for a trusted storage pool. If the percentage ratio of the quorum isn’t met due to network outages, the bricks of the volume participating in the quorum in those nodes are taken offline. By default, the quorum is met if the percentage of active nodes is more than 50 percent of the total storage nodes.
For a replicated volume with two nodes and one brick on each machine, if the server-side quorum is enabled and one of the nodes goes offline, the other node is also taken offline because of the quorum configuration. As a result, the high availability provided by the replication is ineffective. To prevent this situation, it’s recommended to add a dummy node to the trusted storage pool that doesn’t contain any bricks.
Another way to minimize split-brain data loss is to implement a client-side quorum. The client-side quorum determines the number of bricks that must be up before data modification is allowed. In a two-node replicated configuration, it’s typically set to 51 percent. If the client-side quorum is not met, files in that replica group become read only.

Figure 6 . Client-side quorum configuration.
In the figure above, when the client side quorum is not met, servers in a replicated group (Subvolume A) become inactive, while Subvolume B continues to function normally.
Gluster is known to perform poorly for small files and metadata-intensive workloads and even worse when hardware such as SSDs and InfiniBand are used. The reason for this performance lag is network overhead caused while fetching files and directory metadata, called lookup. With large files, the cost of lookups is significantly less than the transfer time improvements, but for small files, the problems with lookups amplify greatly. For more information about how the path traversal problem works, see Dan Lambright’s great explanation on the Gluster Community blog.
To cope with this lookup amplification, you can adjust some throughput configurations. One way is to improve Gluster’s metadata cache translator (md-cache), so the stat information lookup requests are cached indefinitely on the client. This solution requires client-side cache entries to be invalidated if another client modifies a file or directory. The invalidation mechanism is called an upcall. With upcalls enabled, the Gluster profile shows that the number of lookups drops to a negligible number on all subvolumes. This drop translates directly to better throughput for small file workloads.
To enable upcall in md-cache, specify the following:
$ gluster volume set <volname> features.cache-invalidation on
$ gluster volume set <volname> features.cache-invalidation-timeout 600
$ gluster volume set <volname> performance.stat-prefetch on
$ gluster volume set <volname> performance.cache-samba-metadata on
$ gluster volume set <volname> performance.cache-invalidation on
$ gluster volume set <volname> performance.md-cache-timeout 600
$ gluster volume set <volname> network.inode-lru-limit: <big number here>
In this example, you can use something like 90,000 for inode-lru-limit.
Another way to tune performance is to consider the impact from so-called negative lookups, which happen when looking for an entry that doesn’t exist in a volume. Any file system’s performance can suffer when negative entries exist. Typically, file creation operations also slow down to search for the file in all subvolumes. Negative lookups really impact small file performance, where a large number of files are being added and created in quick succession to a volume.
To improve performance, you can set a flag that disables the negative lookup fan-out behavior for the same volume in a balanced volume set:
$ gluster volume set VOLNAME cluster.lookup-optimize <on/off>
The recommended way to deploy Azure resources is with a template. To quickly set up a working Gluster volume on Azure, you can use the Quickstart template contributed by the Azure community.
NOTE: Before using this template, consider the following issues we encountered:
This template is available from GitHub.
You can install Gluster storage and GlusterFS in your on-premises infrastructure (physical or virtual) or in the cloud. Doing so can help make sure your data is redundant, failproof, and performance oriented. You can also implement asynchronous geo-replication for disaster recovery.
For more information, refer to the Gluster website.
![]()
Azure CAT Guidance
"Hands-on solutions, with our heads in the Cloud!"
Ask Learn is an AI assistant that can answer questions, clarify concepts, and define terms using trusted Microsoft documentation.
Please sign in to use Ask Learn.
Sign in