Testing Applications for Inclusion into Windows Web Application Gallery
The Web Application Gallery makes it easy for Windows users to find and deploy a free open source, community application onto a computer running Windows XP or later. To learn more about how to build Web Deploy zip package so that the application can be included in the Web Application Gallery, read the Package An Application for the Web Application Gallery guide . Once you have build Web Application Gallery integration for your zip package, you would need to test the application across all the scenarios we test application for as described in this article .
First lets prepare the feeds we require to test the application . These steps describe how to create the feeds :
Step 1. Download the Web Platform Installer
The Web Platform Installer orchestrates the installation of applications from the Web Application Gallery, and is the tool you use to validate local feeds with your modified zip package. You can down the Web Platform Installer from: https://www.iis.net/extensions/webpi.If you already have Web Platform Installer installed, please make sure it is the latest version of Web Platform Installer.
Step 2. Download Web Application Gallery feeds locally.
Download the two WebPI feeds to your computer:
- WebProductList.xml: https://www.microsoft.com/web/webpi/4.2/WebProductList.xml. This XML feed contains the products and application dependencies for Web Platform Installer.
- WebApplicationList.xml:https://www.microsoft.com/web/webpi/4.2/WebApplicationList.xml. This XML feed contains the information for all applications in the Web App Gallery.
Step 3. Make Sure the Local XML Feeds Can Talk to Each Other
In the WebProductList.xml feed, look for the reference to WebApplicationList.xml. Change the location to point the location that you installed WebApplicationList.xml on your local computer.
Example:
<link rel="enclosure" href="file:///C:/wag/WebApplicationList.xml" />
Save the change.
Step 4. Modify the Local WebApplicationList.XML Feed to Point to the New Application Package
Next, you'll have to modify the WebApplicationList.xml to point to your new zip package xml file for testing. You will be eidting the XML entry for an application that would be similar to yours or, if your package is already included in the Web Application Gallery, the XML entry for your existing application.
When you find "<productId>SimilarApp</productId>", you will see a child <entry type="application"> element. Within this element,look for the <installerURL> element.
Example
<installerURL>https://site.org/app1.0.zip</installerURL>
Change the location within that element to point to your local application zip package.
Example
<installerURL>file://C:/wag/app1.0.zip</installerURL>
You will also need to find the <sha1> element and change it to the new hash value or remove it. If you forget this step, your application testing will fail based on mismatched hash values.
Save the changes.
Step 5. Set Up the Test Environment with Dependencies
When a user installs an application from the Web Application Gallery, the Web Platform Installer will check the user's machine for application dependencies. If the user's machine is missing an application dependency, such as FastCGI for PHP applications, Web Platform Installer will take care of installing those dependencies. However, the Web Platform Installer test feed configuration does not support application dependency installations; the test feed configuration assumes all dependencies are present.
As a result, when you are testing your application install in a clean machine, you will have to install application dependencies yourself. There are two ways to simplify the installation of application dependencies in your test feed environment:
- You can use the Web Platform Installer to install Internet Information Services (IIS), FastCGI 1.0, Web Deployment Tool 1.0, and other dependencies for your application like SQL Express.
- You can install a similar application from Web Platform Installer or Web Application Gallery. For example, if you are testing a PHP application and want to set up a clean machine with the right dependencies, you can install another PHP application from the Web Application Gallery. That installation process will automatically install and configure the right dependencies on your computer for PHP application testing.
Once you have the test environment configured, you are ready to run Web Platform Installer against your local modified feed.
Step 6. Run Web PI with Local feed
Follow these steps so that Web Platform Installer will point to the local feed when it loads:
- Launch Web Platform Installer
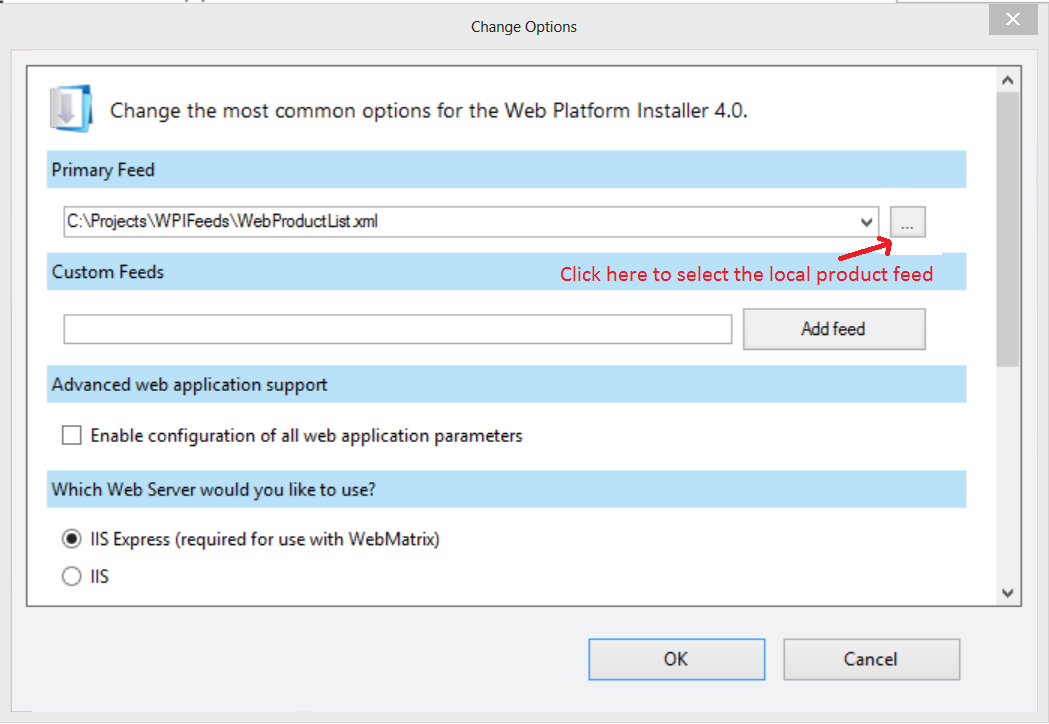
- Click on Options and Change the Primary feed location from “default” to you’re the path of your local WebProductList.xml . Click on OK
Now WebPI reads the content from the local Application feed and we can start validating the application.
Before we continue , let me list out the validation scenarios for App Gallery:
- Test the application installation scenario on Web PI onto IIS
- Test the application installation scenario on Web Matrix
- Test database detection on Web Matrix
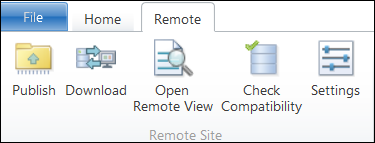
- Test Publishing the application to a remote server using Web Matrix
- Test Downloading the application from the remote site to an existing local application site
IIS Scenarios:
Test the application installation scenario on Web PI onto IIS
Install the app against IIS using WPI by following these steps :
- Launch Web Platform Installer
- Click on 'Options' to select IIS and Click OK
- Look for the application you are testing and Click on Add
- Click on Install
Web Platform Installer will now install the test application package onto Internet Information services ( IIS )
App Run time Validation on IIS:
Browse the application created by Web PI and perform the following actions :
- Complete any configuration of the site if the application requires it
- Make changes to the application like create an article , modify existing article , add modules etc. to identify app functionality is not broken
Web Matrix Scenarios:
Test the application installation scenario on Web Matrix
- Launch Web Platform Installer
- Click on 'Options' to select IIS Express and Click OK
- Look for the application you are testing and Click on Add
- Click on Install
Web Platform Installer will now install the test application package onto IIS Express (Web Matrix)
App Runtime Validation on Web Matrix :
Browse the application created by Web PI and perform the following actions:
- Complete any configuration of the site if the application requires it
- Make changes to the application like create an article , modify existing article , add modules etc. to identify app functionality is not broken
Database Detection:
In Web Matrix, click on the Database Tab to check if the database is visible in Web Matrix and can be accessible. If your application does not use a database, this step can be ignored.
If the app does require a database and you are not able to see the database in Web Matrix, then the cause for this could be either:
- The file in which the database information is stored has not been parameterized. Please refer to some of our samples here :
- The regular expression or the XPATH expressions used to parameterize the database information is incorrect. Modify these expressions and re-install the application on Web Matrix
Test publishing the application to a remote server using Web Matrix
If database detection passes (if applicable to your app) , the next step is to test the publish feature of Web Matrix . You test publishing to a remote server you may have set up or an Azure Site or a hosted site.
Make sure you have the following information of your remote server, hosted site or Azure site:
- Protocol is always Web Deploy
- Server name
- User credentials for the site
- Site name
- URL of the remote site
- Database connection string on the remote site ( if your application uses a database )
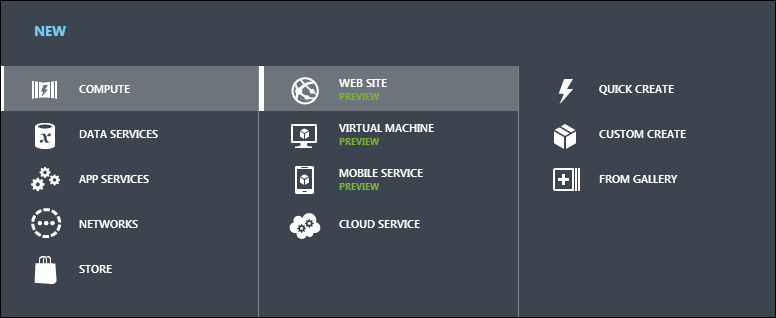
If your application is part of Azure Gallery , we would recommend using an Azure site for testing Publish and Download feature . Here’s how you can create an Azure Site :
- Log in to Azure Management portal
- Click on NEW àCompute à WebSites
- Create a site with Custom Create if your application uses a database ; if not then you can create a site with Quick create
Now let’s test Publish feature:
- Open your newly created site for your application in Web matrix
- Click on Publish button
- Enter the information or you can import a publish settings file for your site which has this information

- Click on Validate Connection
- If Validation passes , click on Continue
- Web Matrix performs a publish compatibility test that lets you know if your remote site has the required dependencies

- Click on Continue if there are no warnings. If there are warning , check your remote site and make sure it has been set up correctly
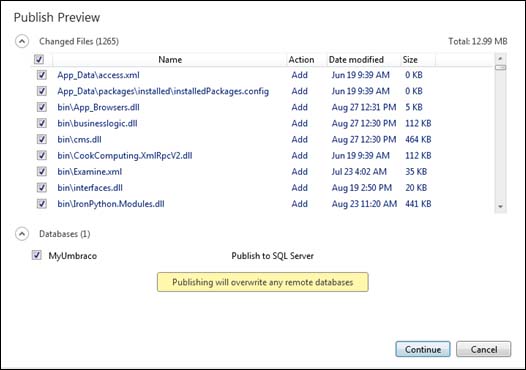
- In the publish preview section, wait till all the content is loaded. Click on continue button to initiate publishing to the remote site
- If publish succeeds, browse the remote site and check if the site functionality has not been broken . For example , if Page X exists on local site on Web Matrix then Page X should also exist on the remote site after the publishing the remote site
Test downloading the application from the remote site to an existing local application site
Now we need to test if Web Matrix can download your application successfully from the remote site maintaining the state of the app
- Click on Download button in Web Matrix
- Let the content load in Download preview and click on Continue
- If download succeeds, browse the site on Web Matrix to make sure the app functionality is not broken and the state of the app is the same as the remote site. For example , if Page X exists on remote site then Page X should also exist on the local site after the downloading the remote site
Note # If you encounter any issues during publishing and downloading , please review the logs to debug the issue . If you are unable to debug the issue; please let us know at appgal@microsoft.com along with the log information and a link to the package.