How to apply “The content of IE Settings” in GPO (which used IEM (IE Maintenance) before IE10) to IE10+ Version since IEM have been deprecated from IE10
Background
As we known that Internet Explorer Maintenance (IEM) has been removed from IE10. Client machine with IE10+ installed cannot get the content configured in IEM from DC GPO.
Here is official reference:
https://technet.microsoft.com/en-us/library/jj890998.aspx
In earlier versions of the Windows® operating system, Internet Explorer Maintenance (IEM) could be used to configure a subset of Internet Explorer 10 settings in an environment using Group Policy. In Windows® 8, the IEM settings have been deprecated in favor of Group Policy Preferences, Administrative Templates (.admx), and the Internet Explorer Administration Kit 10 (IEAK 10).
Because Group Policy Preferences and IEAK 10 use asynchronous processes when they run, we recommend that you choose to use only one of the tools within each group of settings, for example using only IEAK 10 within the Security settings or Group Policy Preferences within the Internet Zone settings. In addition, it's important to remember that policy is enforced and can't be changed by the user, while preferences are configured, but can be changed by the user.
For more information about Group Policy, see Configuring and Administering Group Policy Settings , Using Group Policy Preferences , Using Administrative Templates , Group Policy Settings Reference for Windows and Windows Server , Group Policy ADMX Syntax Reference Guide , and Enable and Disable Settings in a Preference Item .
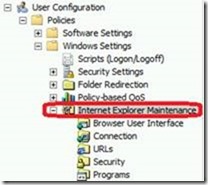
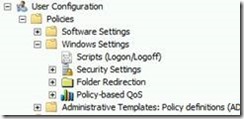
Once upgrade IE version to IE10+ in Windows 2008 R2 DC, it also can be found that IEM is disappeared in “Edit” window of GPO.
Before upgrading to IE10 on Windows 2008 R2 DC |
After upgrading to IE10 on Windows 2008 R2 DC |
Target & Suggestions
The target of this article is: How to apply “The content of IE Settings” from DC to IE10+ installed client after IEM have been deprecated from IE10.
Currently, there are two popular DC OS: Windows 2012 and Windows 2008 R2.
Windows 2012 DC:
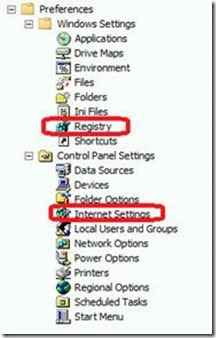
Either “Preferences -> Windows Settings -> Registry” or “Preferences -> Control Panel Settings -> Internet Settings” can help to apply “The content of IEM” to IE10+.
Here is official reference:
How to configure Group Policy Preference settings for Internet Explorer 11 in Windows 8.1 or Windows Server 2012 R2: https://support.microsoft.com/kb/2898604
The detailed steps will be attached in end of this article.
Windows 2008 R2 DC:
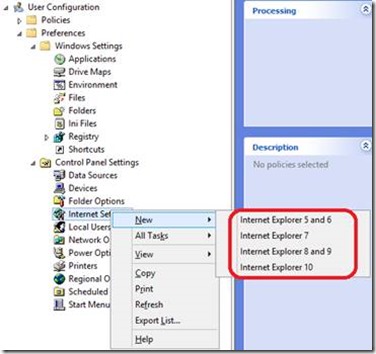
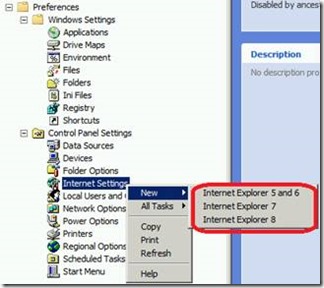
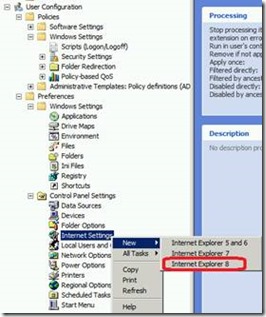
There is NO “IE10/IE11” items in “Preferences -> Control Panel Settings -> Internet Settings”. This is by design because Windows 2008 R2 was released before IE10/IE11.
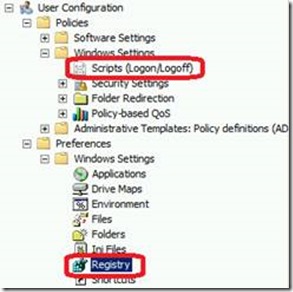
It’s suggested to use “Preferences -> Windows Settings -> Registry” or logon scripts to apply “The content of IE Settings” to IE10+.
The detailed steps will be attached in Detailed Steps part of this article.
It’s suggested to use “Preferences -> Windows Settings -> Registry” applying “The content of IEM” to IE10+ or logon scripts |
There is NO “IE10/IE11” item in “Preferences -> Control Panel Settings -> Internet Settings” |
Detailed Steps:
We use setting “Internet Properties -> LAN Settings” as an example to show you detailed steps by following three method.
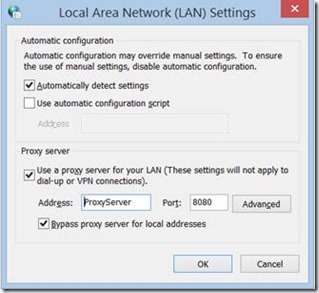
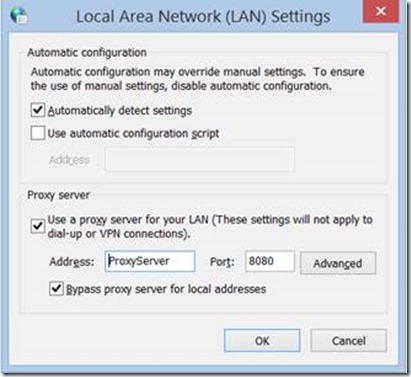
In this example, we want to set “LAN Settings” as below picture shows.
1) Checked “Automatically detect settings”.
2) Enable “Proxy Server” as “ProxyServer:8080”.
3) Selected “Bypass proxy server for local addresses”.
Method 1: Use “Preferences -> Windows Settings -> Registry”
Conditions: This method can be used in Windows 2008 R2 DC and Windows 2012 DC, and can be applied to IE8, IE9, IE10+ version on Windows 7 above OS. For Windows XP client, GPP can be applied after installed “Group Policy Preference Client Side Extensions for Windows XP (KB943729) https://www.microsoft.com/en-us/download/details.aspx?id=3628”
Steps
1) Please configure “Internet Properties -> LAN Settings” in local IE on DC in advanced:
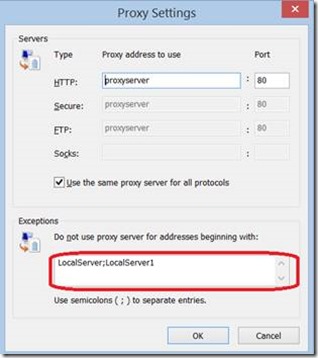
If “Exceptions” is required, please configure it at here:
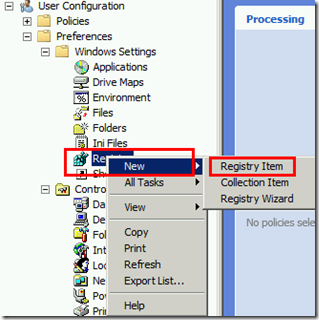
2) Please click “Registry Item” on GPO.
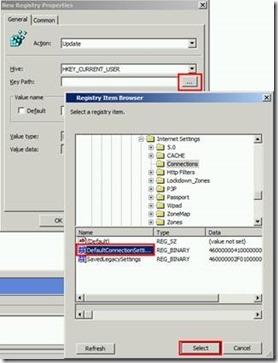
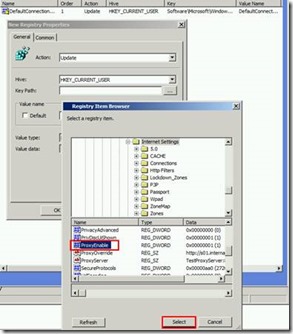
3) Click “…” button in below picture and enter path of “HKEY_CURRENT_USER\Software\Microsoft\Windows\CurrentVersion\Internet Settings\Connections”, then choose “DefaultConnectionSettings” and click “Select” button.
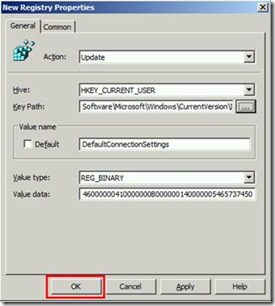
4) Click “OK” to confirm this setting.
5) Use same method as step 3)-4) to new “Registry Item” in same GPO.
Enter path of “HKEY_CURRENT_USER\Software\Microsoft\Windows\CurrentVersion\Internet Settings” and then choose “ProxyEnable” and click “Select” button.
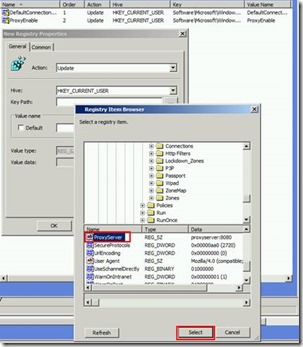
6) Enter path of “HKEY_CURRENT_USER\Software\Microsoft\Windows\CurrentVersion\Internet Settings” and then choose “ProxyServer” and click “Select” button.
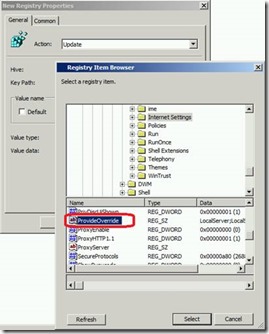
7) If you checked “Bypass proxy server for local addresses” or configured “Exceptions”, please enter path of “HKEY_CURRENT_USER\Software\Microsoft\Windows\CurrentVersion\Internet Settings” and then choose “ProvideOverride” and click “Select” button.
Note : if checked “Bypass proxy server for local addresses”, “ProvideOverride” will contain “<local>” at the end of value, such as “LocalServer;LocalServer1;<local>”.
8) The whole configuration should as below:
9) Apply this GPO to the test OU and run “gpupdate /force” in clients.
10) It will work on IE8, IE9, IE10 and IE11 clients.
Method 2: Use “Preferences -> Control Panel Settings -> Internet Settings”
Conditions: This method can be used in Windows 2008 R2 DC and Windows 2012 DC, but only for IE5-IE9 installed clients from Windows 2008 R2 DC, and for IE5-IE11 installed clients from Windows 2012 DC. For Windows XP client, GPP can be applied after installed “Group Policy Preference Client Side Extensions for Windows XP (KB943729) https://www.microsoft.com/en-us/download/details.aspx?id=3628”
Steps
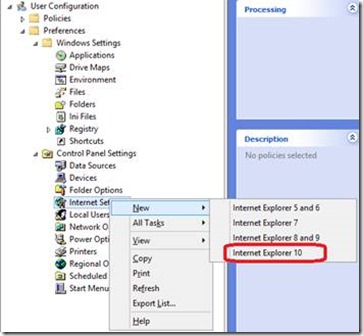
1) Select one of below item with IE (version).
Windows 2008 R2 DC |
Windows 2012 DC |
In Windows 2008 R2 DC, please install https://support.microsoft.com/kb/2530309, so that the settings from item “Internet Explorer 8” in below picture will apply to IE8 and IE9 installed clients. |
In Windows 2012 DC, refer to https://support.microsoft.com/kb/2898604 The settings from item “Internet Explorer 10” in below picture in fact will apply to IE10 and IE11 installed clients. |
2) Use “Internet Explorer 10” in Windows 2012 DC as an example: click “Internet Explorer 10” option in above right picture, “New Internet Explorer 10 Properties” window pop up.
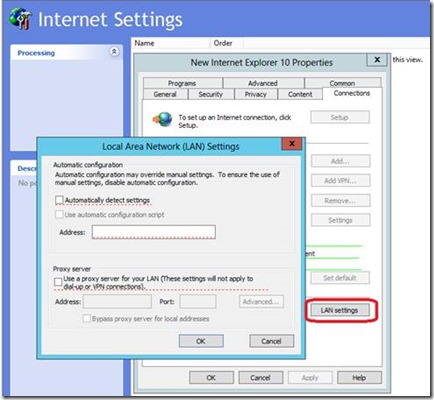
3) Click “LAN settings” button on “New Internet Explorer 10 Properties” window. There are “red dashed line” under the items.
4) Press F5 (or F6) to confirm the entry with “red dashed line” turning to “green dashed line” so that the settings will be applied.
Function keys:
F5 – Enable all settings on the current tab.
F6 – Enable the currently selected setting.
F7 – Disable the currently selected setting.
F8 – Disable all settings on the current tab.
Those that are red underlined (or have a red circle next to them) are going to be ignored. Those that are underlined with a green solid line (or next to a green circle) are going to be noted, captured in the GPO, and enforced on the target user or computer.
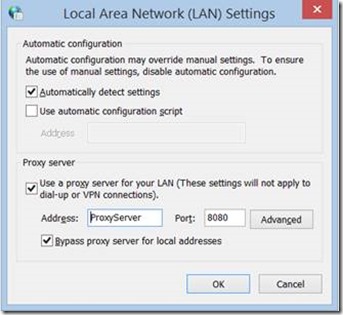
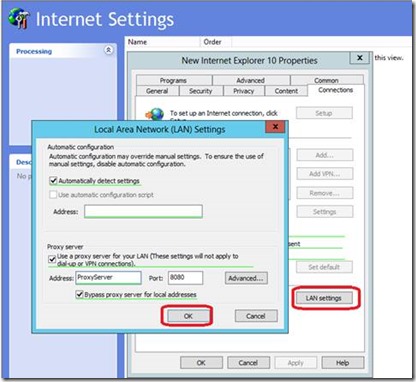
5) Configure proxy server as above picture, and click “OK” to confirm and quit.
a. Checked “Automatically detect settings”.
b. Enable “Proxy Server” as “ProxyServer:8080”.
c. Selected “Bypass proxy server for local addresses”.
6) Apply this GPO to the test OU and run “gpupdate /force” in IE10/IE11 installed clients.
Note: The similar steps can be performed from Windows 2008 R2 DC to IE8 and lower IE version installed clients.
Method 3: Use “Logon Script”
Condition: This method can be used in Windows 2008 R2 DC and Windows 2012 DC, and can be applied to IE8, IE9, IE10+ version installed clients from both DCs. Note: it has been tested in IE8+
Steps
Note : step 1~4 can be done in any IE machine, here we use DC as example.
1) Please configure “Internet Properties -> LAN Settings” in local IE on DC in advanced:
2) Then open registry table by running “regedit” on DC.
3) Export below value to a file named as “registry.reg”.
Windows Registry Editor Version 5.00
[HKEY_CURRENT_USER\Software\Microsoft\Windows\CurrentVersion\Internet Settings]
"ProxyEnable"=dword:00000001
"ProxyServer"="proxyserver:8080"
[HKEY_CURRENT_USER\Software\Microsoft\Windows\CurrentVersion\Internet Settings\Connections]
"DefaultConnectionSettings"=hex:46,00,00............................\
...............................................................................................\
.................................................................................................\
................................................................
4) The create another file named as “Test.bat”:
reg import registry.reg
5) Copy “registry.reg” and “Test.bat” into according policy sysvol path (general it’s similar as “sysvol/domain/Policies/GPOUniqueID/User/Scripts/Logon”) on DC and set “Test.bat” as logon script.
6) Apply this GPO to the test OU. End-user must re-logon in client to get logon-script.
Related References:
Red / Green: GP Preferences doesn’t work even though the policy applied and after gpupdate \force
How to Add Trust Sites into IE before IE10 through Group Policy
How to configure Internet Explorer security zone sites using group polices
Regards,
Xiaoman Wang from GBSD DSI Support Team
