Customizing Windows Azure Pack Portal of an Express Deployment
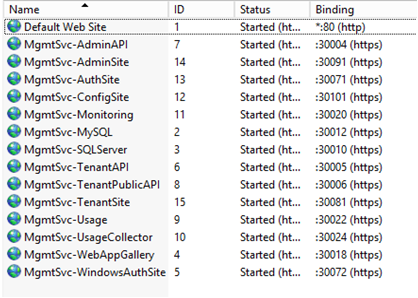
Express Deployment of Windows Azure Pack (WAP) is a good option for demo, testing or proof-of-concept deployment. After you have installed the express deployment, you will see couple of sites running on the same portal machine. For example, you will see that the default URLs for accessing the Admin Site is configured on port 30091 and the Tenant Site is configured on port 30081.
Poor User Experience
The default Express Deployment gives poor user experience when using the system. For example, experience using the Admin Site.
1. First, you open Admin Site which is https://wapportal:30091. Your customer has to remember the port number which is not well known.
2. Then browser will show you a certificate error. You need ignore the error and click continue.
3. Now, you will be redirected to https://wapportal:30072, which is the Admin Authentication Site.
4. Then, you see another certificate error. You need to ignore the error and click continue.
5. Then you will be asked to provide the admin credentials and finally redirect back to the Admin Site.
As you experienced, you will see two certificate errors during this login, and these two sites are not working on the default port 443. This affects customer experience even for demo/POC purpose.
It is same for Tenant Portal. During login to the Tenant Portal, user will see two certificate errors and need to remember the port number which Tenant Portal is listening on.
Customizing the Admin and Tenant Portal
This article provides a step by step document to guide you re-configure follow customer facing WAP portal sites to provider a better user experience. By this customization, all sites will run on default HTTPS port 443 and avoid the certificate errors.
l Management portal for tenants
l Management portal for administrators
l Tenant authentication site
l Admin authentication site
By default installation, these four sites are running on same machine with follow bindings.
Site Name |
Binding |
WAP Admin Site |
https://<YourPortalMachine>:30091 |
WAP Admin Auth Site |
https://<YourPortalMachine>:30072 |
WAP Tenant Site |
https://<YourPortalMachine>:30081 |
WAP Tenant Auth Site |
https://<YourPortalMachine>:30071 |
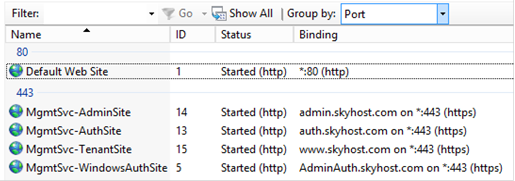
After customization, these four sites are running on same machine with follow bindings.
Site Name |
Binding |
WAP Admin Site |
|
WAP Admin Auth Site |
|
WAP Tenant Site |
|
WAP Tenant Auth Site |
This includes four sections:
· Update DNS
· Replace certificates
· Re-Configure Admin Site URL and port
· Re-Configure Tenant site URL and port
Update DNS
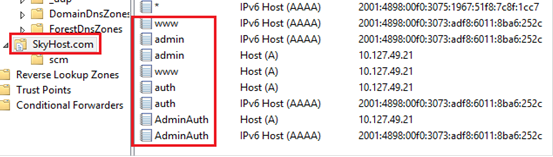
On the DNS server, create follow A records with follow settings.
FQDN |
IP Address |
admin.skyhost.com |
IP address of the portal machine |
AdminAuth.skyhost.com |
IP address of the portal machine |
www.skyhost.com |
IP address of the portal machine |
auth.skyhost.com |
IP address of the portal machine |
Here is a screenshot of the settings on my DNS server. 10.127.49.21 is the IPv4 address of my portal machine.
Replace Certificates
Before replace the certificates and HTTPS bindings, you need request certificates with follow subject name.
· admin.skyhost.com
· AdminAuth.skyhost.com
· auth.skyhost.com
Also, you can request only 1 wildcard certificate with subject name *.skyhost.com.
You can setup your own CA server for demp/poc purpose. For details about how to setup your own CA server, how to request and issue certificate using your own CA server, please reference this article.
Active Directory Certificate Services
https://technet.microsoft.com/en-us/library/cc732625.aspx
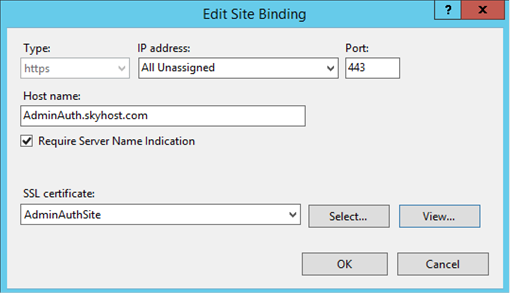
After you installed the certificate on your portal machine, we can replace it and change the HTTPS bindings with follow steps. I use the Admin Auth site as a sample.
1. Logon to your express deployment WAP Portal Server using Administrator
2. Open IIS MMC, expand sites, then right click MgmtSvc-WindowsAuthSite,
3. Select Edit Bidnings… , click Edit…
4. On the Edit Site Binding window,
a. Change the Port to 443
b. Change the Host name to AdminAuth.skyhost.com
c. Check the Require Server Name Indication option
d. Select the right certificate from the SSL certificate dropdown box.
e. Click OK to save the changes.
f. Below is a screenshot for your reference.
5. Repeat the same for Admin Site, Tenant Site and Tenant Auth Site.
6. After the changes, you should see follow result on IIS MMC.
Re-Configure Admin Site URL and port
In this section, we will run couple of Powershell cmdlets to update the WAP portal database with new tenant portal URL and port we configured in previous section.
1. Logon to your express deployment WAP Portal Server as a WAP Administrator.
2. Start a PowerShell window
3. Import the WAP PowerShell module:
Import-Module -Name MgmtSvcConfig
4. Update WAP Admin Portal with the updated FQDN settings by running the following command:
Set-MgmtSvcFqdn -Namespace "AdminSite" -FullyQualifiedDomainName "admin.skyhost.com" -Port 443 -Server "your portal DB server" -user “your portal DB server admin user” –password “your portal DB server admin user password”
5. Update WAP Admin Auth Site with the updated FQDN settings by running the following command:
Set-MgmtSvcFqdn -Namespace "WindowsAuthSite" -FullyQualifiedDomainName "AdminAuth.skyhost.com" -Port 443 -Server "your portal DB server" -user “your portal DB server admin user” –password “your portal DB server admin user password”
6. Re-establish trust for the Admin Site
Set-MgmtSvcRelyingPartySettings -Target Admin -MetadataEndpoint 'https://AdminAuth.skyhost.com/FederationMetadata/2007-06/FederationMetadata.xml' -Server "your portal DB server" -UserName "your portal DB server admin user" -Password "your portal DB server admin user password"
7. Re-establish trust for the Admin Auth Site
Set-MgmtSvcIdentityProviderSettings -Target Windows -MetadataEndpoint 'https://admin.skyhost.com/FederationMetadata/2007-06/FederationMetadata.xml' -Server " your portal DB server " -UserName " your portal DB server admin user" -Password "your portal DB server admin user password"
Re-Configure Tenant site URL and port
In this section, we will run couple of Powershell cmdlets to update the WAP portal database with new tenant portal URL and port we configured in previous section.
1. Logon to your express deployment WAP Portal Server as a WAP Administrator.
2. Start a PowerShell window
3. Import the WAP PowerShell module:
Import-Module -Name MgmtSvcConfig
4. Update WAP Tenant Portal with the new settings by running the following command:
Set-MgmtSvcFqdn -Namespace "TenantSite" -FullyQualifiedDomainName "www.skyhost.com" -Port 443 -Server "your portal DB server" -UuserName “your portal DB server admin user” –password “your portal DB server admin user password”
5. Update WAP Tenant Auth Site with the new settings by running the following command:
Set-MgmtSvcFqdn -Namespace "AuthSite" -FullyQualifiedDomainName "Auth.skyhost.com" -Port 443 -Server "your portal DB server" -UserName “your portal DB server admin user” –Password “your portal DB server admin user password”
6. Re-establish trust for the Tenant Site
Set-MgmtSvcRelyingPartySettings -Target Tenant -MetadataEndpoint 'https://Auth.skyhost.com/FederationMetadata/2007-06/FederationMetadata.xml' -Server "your portal DB server" -UserName "your portal DB server admin user" -Password "your portal DB server admin user password"
7. Re-establish trust for the Tenant Auth Site
Set-MgmtSvcIdentityProviderSettings -Target Membership -MetadataEndpoint 'https://www.skyhost.com/FederationMetadata/2007-06/FederationMetadata.xml' -Server "your portal DB server" -UserName "your portal DB server admin user" -Password "your portal DB server admin user password"
Verify the Customization Result
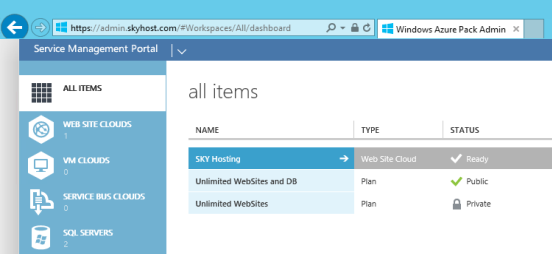
Logon to the Admin Portal by https://admin.skyhost.com, you should able see follow screen without any certificate errors.
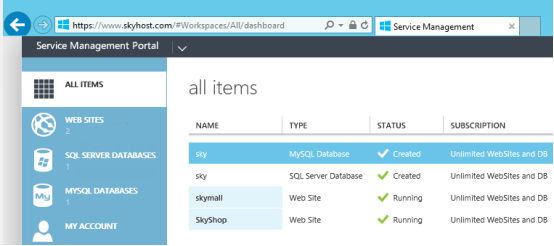
Logon to the Tenant Portal by https://www.skyhost.com, you should see follow screen without the certificate errors as well.
Summary
In this article, we talked about how to reconfigure portal names, ports and use trusted certificates after installed an express deployment of Windows Azure Pack. All the information in this article applies to the distributed deployment of Windows Azure Pack as well.
To customizing the portal, we need:
Update DNS records
Replace the certificates used by the customer facing portal sites
Updated WAP Database with the new configurations
Thanks,
Wei Zhao