Microsoft BizTalk Server and Microsoft Dynamics AX Integration - Part 1 - Configuring Microsoft Dynamics AX – Application Integration Framework (AIF) for Integration with BizTalk
This is the first part of the four part series where I would be sharing what all needs to be configured in Dynamics AX and BizTalk Server in order for both to be integrated and send / receive messages from each other.
In first part I am starting with explaining the configuration that needs to be performed on Microsoft Dynamics AX – AIF (for integration with BizTalk)
In order to integrate BizTalk with Microsoft Dynamics AX we need to configure the Application Integration Framework which acts as a bridge between the two. The following steps lists down the steps to set up the Application Integration Framework which exposes data to BizTalk Microsoft Dynamics AX adapter.
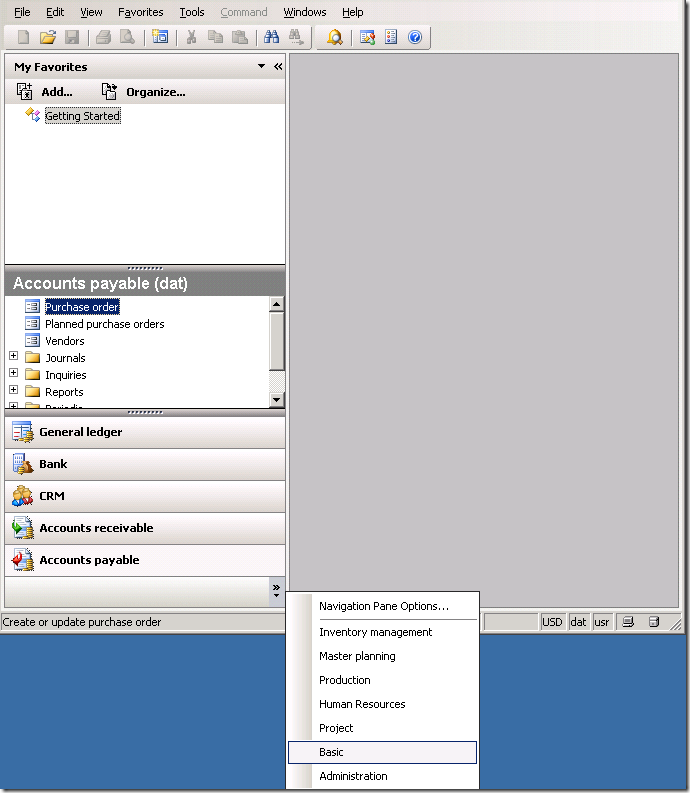
1. Start the Microsoft Dynamics AX client, and browse to the Basic Module
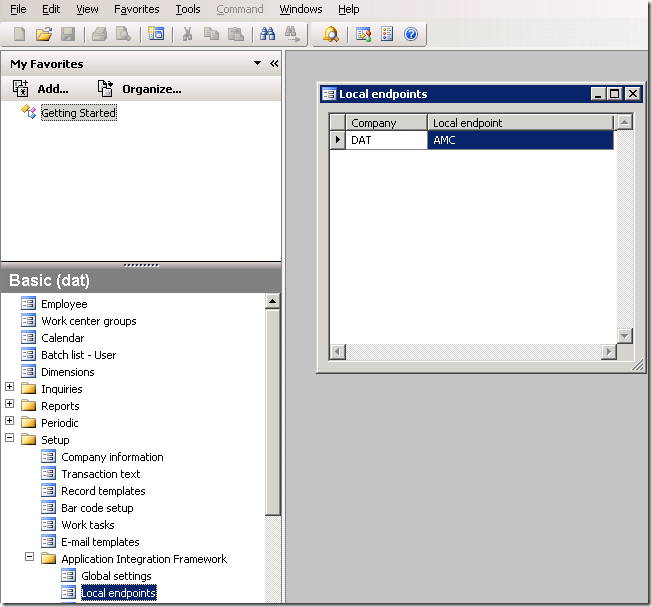
2. Create the Local Endpoint or make sure that the Local Endpoint is configured:
A local endpoint is the origination for sent messages and the destination for received messages. There may be more than one local endpoint, depending on how many companies are configured for your Microsoft Dynamics AX installation.
a. Click Basic à Setup à Application Integration Framework à Local endpoints.
b. Press CTRL+N to create a new local endpoint record.
c. Select a company from the Company field.
d. Enter a name for the endpoint in the Local endpoint field.
e. The name for the local endpoint should be representative of the Microsoft Dynamics AX company name that participates in the exchange.
f. Press CTRL+S to save the data.
3. Configure an adapter
The following adapters are available after installing Microsoft Dynamics AX:
a. AifFileSystemAdapter
b. AifMSMQAdapter
c. AifWebServiceAdapter
d. AifBizTalkAdapter
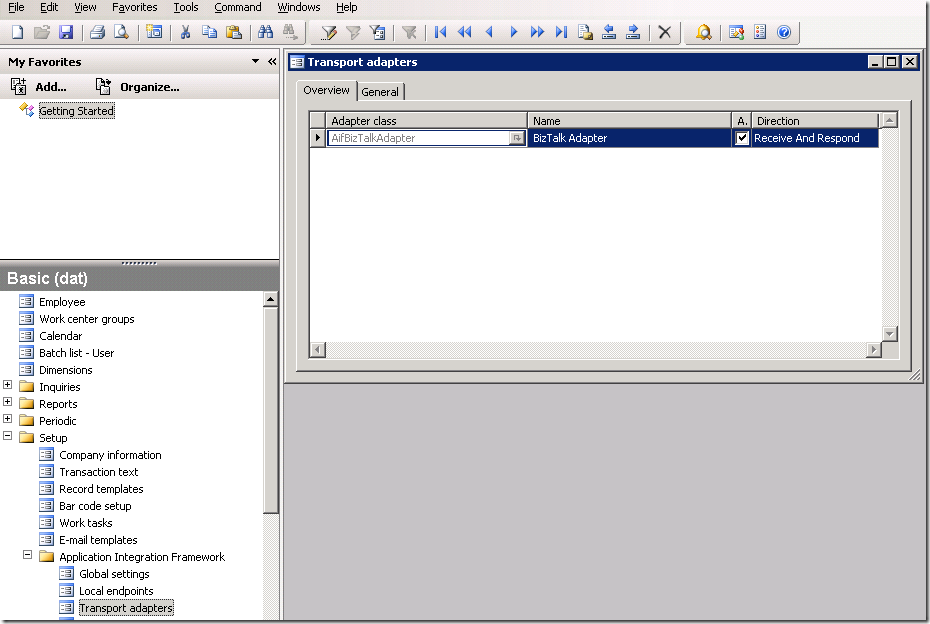
To configure an adapter for use in a channel, you activate it and specify its direction (inbound, outbound, or both) on the Transport adapters form. Ensure that Transport Adapter is configured for AifBizTalkAdapter.
a. Click Basic à Setup à Application Integration Framework à Transport Adapters.
b. Press CTRL+N to create a new transport adapter record.
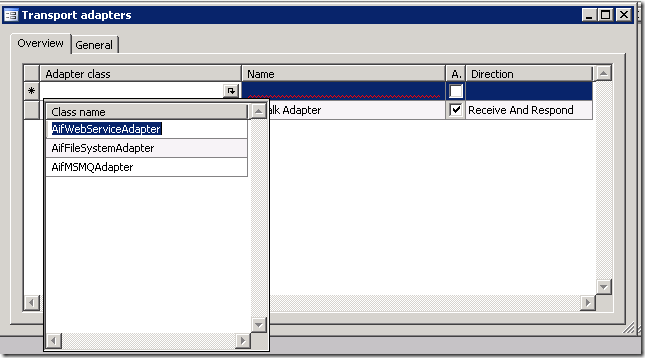
c. Select the AifBizTalkAdapter from the list of Adapter classes available.
d. Enter a Name and make it active by selecting the “Active” checkbox (that is shown in the above figure as “A”), so that it is available for use.
e. The default value for AifBizTalkAdapter is “Receive and Respond” and this cannot be changed (as AifBizTalkAdapter is used for both sending and receiving data between BizTalk and Microsoft Dynamics AX).
4. Creating and configuring channels
Channels define the transport method that enables messages to move in and out of the framework to reach the endpoint. Before configuring a channel, a transport adapter must be available.
Channels may support inbound transfers only, outbound only, or both. Configuration settings are different depending on the direction for the transfer in the channel as well as for different adapters. Inbound channels may use a response channel that handles verification or error responses to inbound transfers.
a. Click Basic à Setup à Application Integration Framework à Channels.
b. Press CTRL+N to create a new channel.
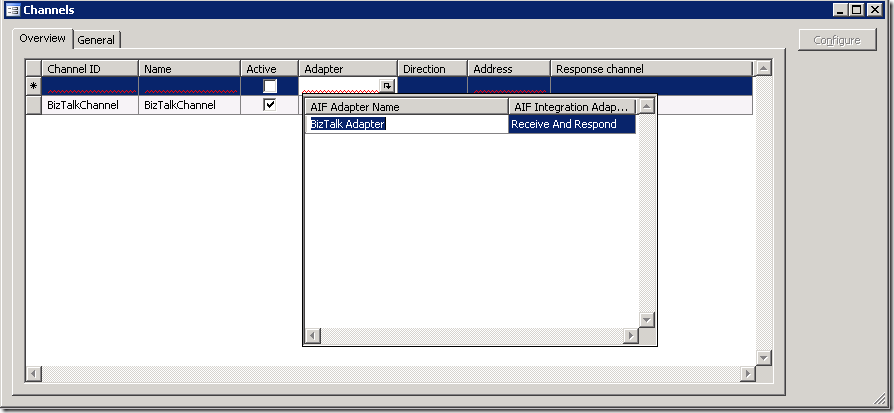
c. Select an adapter in the Adapter field.
You must first have activated an adapter on the Transport adapters form before it appears in the list of available adapters.
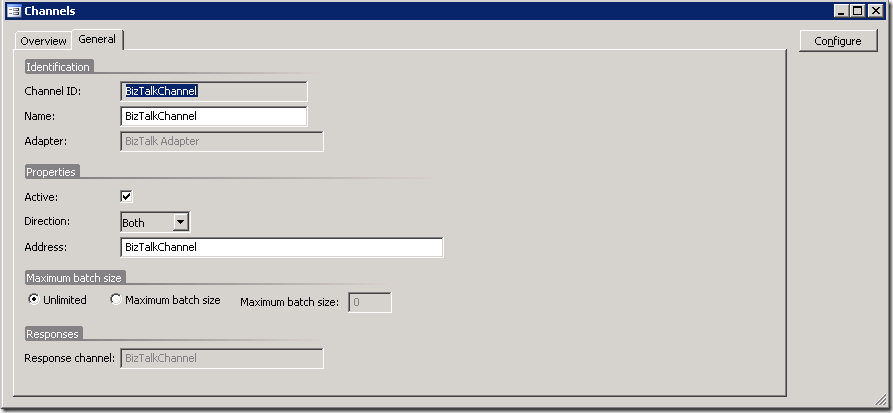
d. Enter the unique identification information for the new channel, including an identifier in the Channel ID field and a friendly name in the Name field.
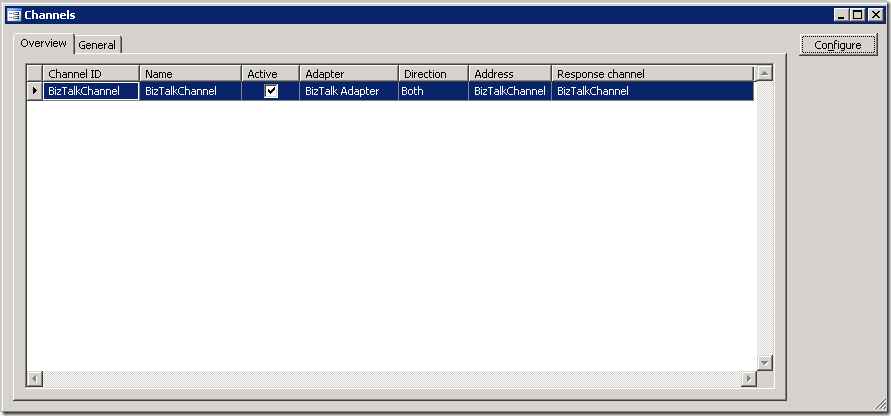
a. Provide the channel ID as “BizTalkChannel”
b. Provide the friendly Name as “BizTalkChannel”
e. To activate the channel and allow it to participate in document exchanges, click Active (or “A” as shown in the figure).
f. Configure the address for the adapter.
a. Provide the address as “BizTalkChannel”
g. Select from the available directions for the transfers to be performed in this channel The list of available directions depends on the adapter.
a. Provide the direction as “Both”
h. If the direction is set to Inbound / Both, you can select a response channel.
Inbound channels can use an outbound channel called a "response channel" to transfer or "respond back" to the source endpoint with verification results or error responses to inbound transfers.
i. On the General tab, set the Maximum batch size to the maximum number of messages to be processed at one time from the queues. You can select Unlimited if you do not want to limit this number.
j. Press CTRL + S to save the created / configured channel.
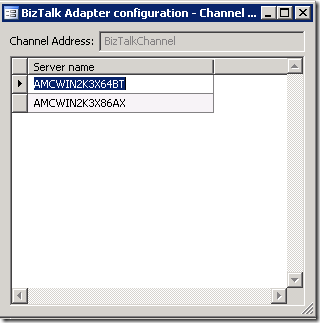
k. Now select the Channel created and press “Configure”, and enter the list of BizTalk Server groups as shown below:
l. Enter the names of the computers running BizTalk Server that belong to the specified BizTalk group. Press CTRL+N to add each server to the list.
m. Press CTRL+S to save the channel.
5. Configure an action:
An action refers to the document and the operation to be performed on it, such as Send or Receive.
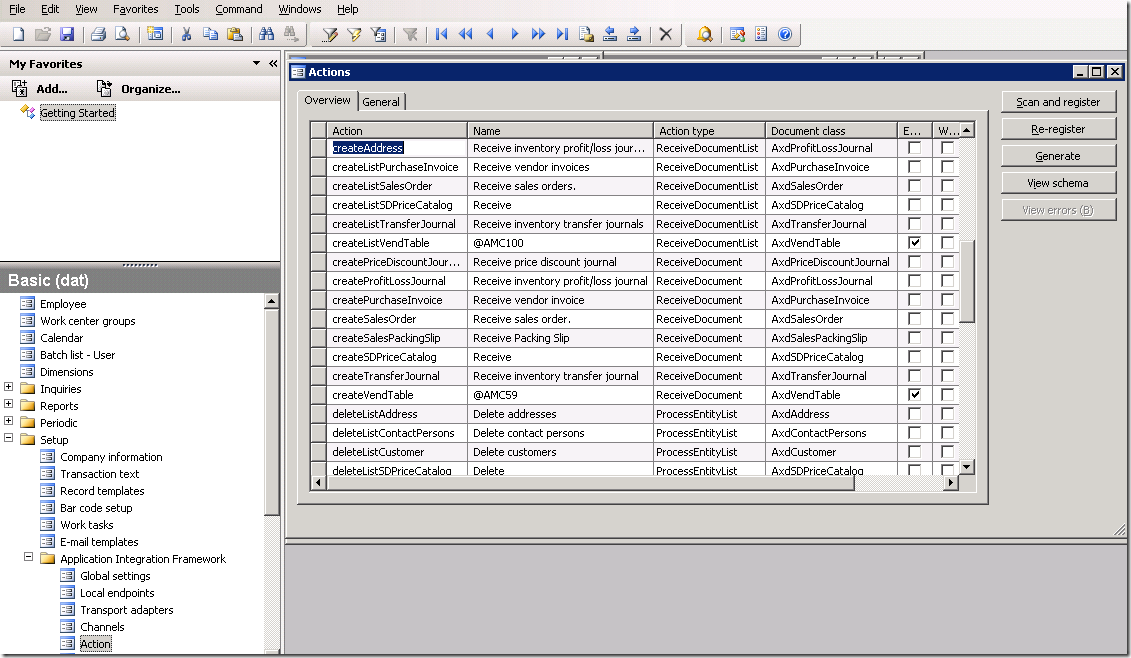
a. Click Basic à Setup à Application Integration Framework à Action.
b. To register all actions for document classes that exist, click Scan and register.
c. After all items are scanned and registered, select “Enabled” (in above figure the checkboxes with Column named as “E… ”) to enable the actions you need for your exchange.
Enable the action corresponding to the Interface, for example: “createListVendTable” for Interface 32.
6. Creating and configuring endpoints
Using Application Integration Framework (AIF), you enable document exchanges between endpoints and the local endpoint. A local endpoint is the origination for sent messages and the destination for received messages. That is, the local endpoint refers to your Microsoft Dynamics AX installation.
An endpoint is the destination for an outbound document and the source of an incoming document. That is, an endpoint represents your trading partner in a document exchange.
Before you can configure an endpoint, the following must already exist and be configured:
a. A local endpoint.
b. A named action for the exchange, consisting of a document and a description of the operation to be performed on it.
c. Microsoft Dynamics AX users to be associated with the endpoint.
d. An outbound channel must be already be defined if needed.
Steps to configure / create endpoint:
a. Click Basic à Setup à Application Integration Frameworkà Endpoints.
b. Press CTRL+N to create a new endpoint, or select an existing endpoint from the list to be modified.
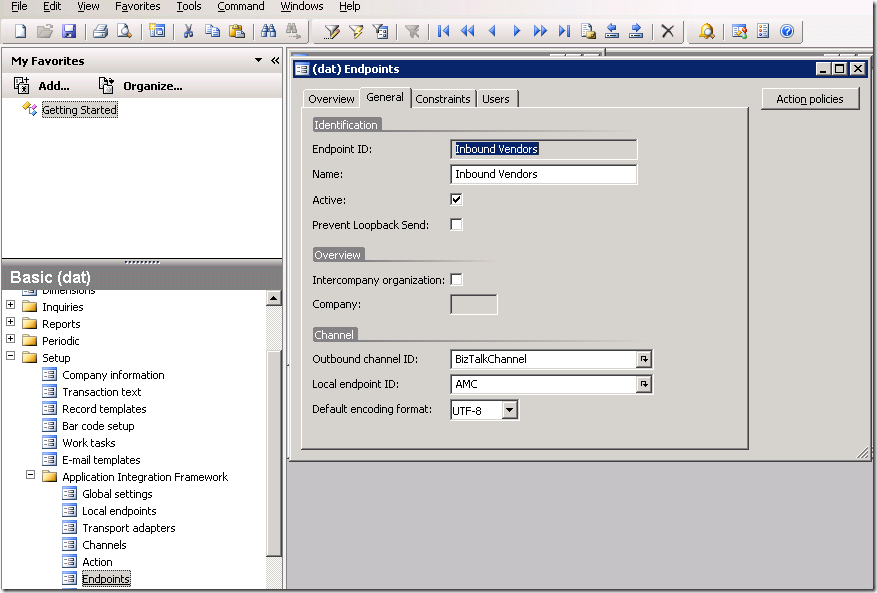
c. Enter a unique Endpoint ID and user friendly name.
i. Enter Endpoint ID as “Inbound Vendors”. (an example)
ii. Enter friendly name as “Inbound Vendors”. (an example)
d. Go to “Constraints” tab and select “No Constraints” checkbox (as shown in figure below
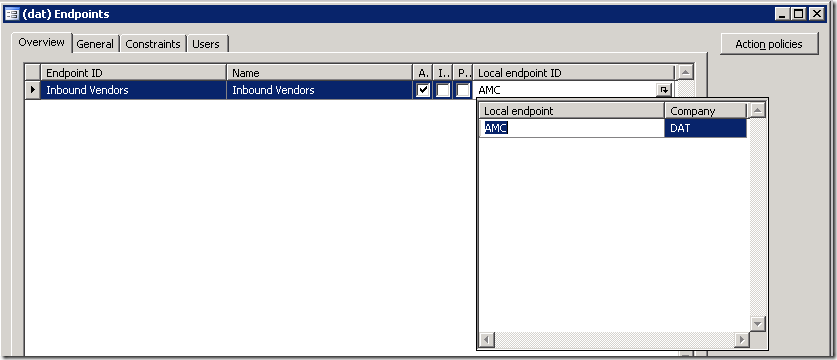
e. Go back to the “Overview” tab, and select / provide the “Local endpoint ID” from the list of local endpoint configured. (for example “Company Name” as shown in figure below)
f. Now click on the “General” tab and select the “Outbound channel ID” from the list of Channels already configured (for example “BizTalkChannel” as shown below)
e. Configure Action Policies:
To enable exchange of documents for endpoints, select which actions an endpoint may perform. This process is called configuring endpoint action policies.
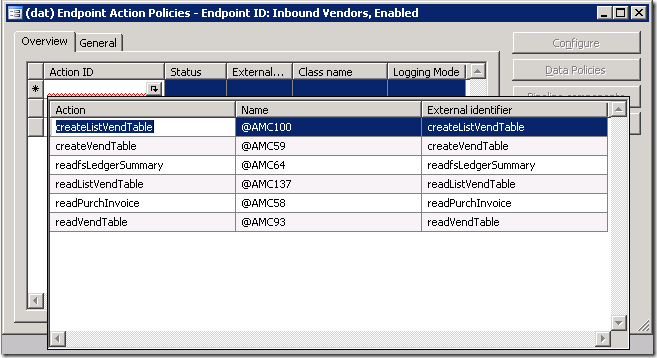
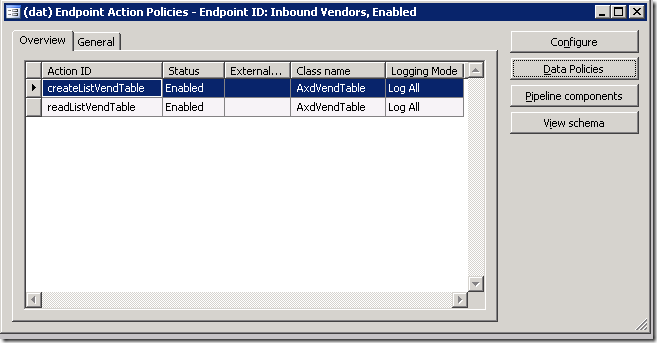
a. To Configure the Action Policies for the End Point and associate action and endpoint, click on the “Action Policies”
i. Press CTRL + N to create a new Endpoint Action policy and select from the List of Actions displayed
ii. Set the Status as “Enabled” and Logging Mode as “Log All”
f. Configure Action Data Policies:
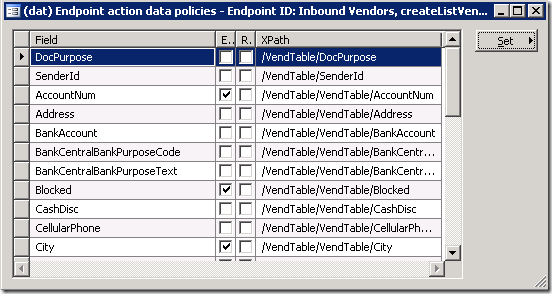
A document is made up of many data fields. When you set up a document exchange, you decide, on a field-by-field basis, which data fields are transferred. This is known as the data policy. You configure the data policy on the Data Policies form.
a. To Configure the Action Data Policies for each of the Action Policies configured above.
i. Select the Action Id in the window shown in figure above and click on Data Policies.
ii. Enable the fields as per the schema / requirements of the Interface
iii. Mark the fields as required which are not Optional as part of the Interface requirements / schemas.
g. Configure an endpoint user
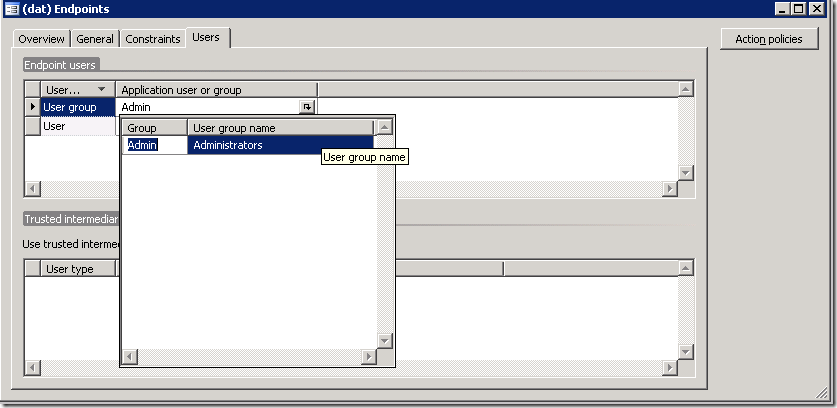
You must enter information for at least one endpoint user or trusted intermediary who is authorized to initiate transactions for the endpoint on the Users tab.
Follow the steps mentioned below:
a. Click the Users tab.
b. Under Endpoint users, in the User type field, select either User or User group.
c. In the Application user or group field, select a valid Microsoft Dynamics AX user or user group name
For our purpose on the Users Tab follow the steps below:
i. On the “Users” tab, press (CTRL + N) for associating the new User / Groups
ii. Select “User Group” under User type and “Admin” from the list under Application user or group
In order for the Application Integration Framework (AIF) to begin sending and receiving documents with adapters, four services must be running as batch jobs within Microsoft Dynamics AX:
a. AIFOutboundProcessingService
b. AIFInboundProcessingService
c. GatewaySendService
d. GatewayReceiveService
Until these batch jobs are started, no documents can be processed in adapter-based exchanges. Inbound documents do not enter your Microsoft Dynamics AX system and outbound documents accumulate in the AIF outbound processing queue.
Refer the link below for more details.
https://msdn.microsoft.com/en-us/library/aa570105(AX.10).aspx
In next article I would be continuing the series and would be explaining what needs to be configured in order to “Send Data from BizTalk to Dynamics AX”.
