Demonstrating interop between SharePoint Server 2010 and Windows Server AppFabric
Calling a .NET4 WCF/Workflow Service hosted in AppFabric from a .NET3.5 Workflow hosted in SharePoint
Introduction
To better serve the breadth ISV and customer community, we have launched this Application Server Group ISV Partner Team Blog. This will be a central location for our team to publish content about our ASG technology, to the breadth ISV community, based on our learning from customer and partner engagements.
The following blog put together by our team goes into some details of demonstrating interoperability between SharePoint Server 2010 (Beta1) and Windows Server AppFabric (Beta1). As you may be aware SharePoint 2010 uses .NET 3.5 based Workflow technologies while the Windows Server AppFabric hosts, manage and administers .NET4 Workflows. This perceived incompatibility has caused considerable concern to customer and partner community and this blog demonstrates that all is not lost. The design pattern applied is quite straightforward and is implemented as communication between .NET4 Services and a SharePoint Service using a code activity akin to calling a.NET4 Workflow Service from a WF .NET3.5 Workflow Service.
The scenario demonstrates of interoperability of a 'human' business process running on Microsoft's SharePoint Server 2010 with a dependent 'system' application running on Windows Server AppFabric. While there are many business processes that would leverage this architecture, we modeled this blog post around a purchasing scenario. For this scenario, a purchase request is created by the buyer on the SharePoint Sever which is passed on to the 'composite' Purchasing Application running on Windows Server App Fabric. The Purchasing Application communicates with the vendors for price/availability; and communicates the 'selection' to the buyer via SharePoint user interfaces. In the implementation, the buyer creates the requisition and uploads this document on the SharePoint 2010. A SharePoint Workflow (based off .NET 3.5) makes a service call to an Application (.NET 4 WCF Workflow Service) hosted in Windows Server AppFabric which processes the request and returns an appropriate response.
We hope to follow-up this blog with a couple of other blog posts that elaborate on a few other important interoperability scenarios between these two very important technologies from Microsoft.
Overview
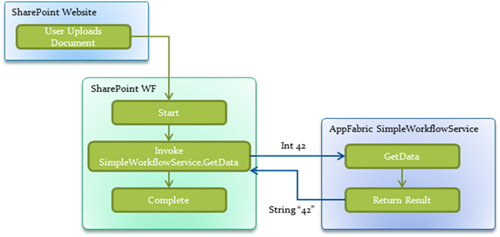
The SharePoint Workflow is launched whenever a user adds a new document to the Shared Documents library through the SharePoint Web UI (see Figure 1 below). An activity within the SharePoint Workflow calls out to the SimpleWorkflowService (a .NET 4 Workflow Service hosted in Windows Server AppFabric) and invokes the GetData operation. The operation takes an integer as input and simply echoes back the integer in string form. Upon returning from the call, the SharePoint Workflow completes.
Microsoft Technologies Deployed
The following server techologies are used in this demonstration.
- SharePoint Server 2010 (Beta 1) with an active SharePoint Site and administrative privileges.
- Visual Studio 2010 (Beta 2).
- Windows Server AppFabric (Beta 1).
Scenario Build-Out Steps
This build out comprises the following steps:
-
- Create the SharePoint Workflow and its related solution.
- Create the .NET 4 WCF Workflow Service project and deploy it in the Windows Server App Fabric.
- Add SharePoint Workflow associations
- Configure and Deploy the SharePoint Workflow
Step 1: Create the SharePoint Workflow
Task 1 - Create the SharePoint Workflow
-
- Open Visual Studio 2010.
- Choose File->New Project, and select Visual C#|SharePoint|2010 in the Installed Templates tree view. Select the Sequential Workflow project template and name the project CallExternalService as shown:

- Click OK.
- In the next screen, enter the URL to your SharePoint site and click next:

- On the next screen, enter the workflow name (e.g., CallExternalService) and select the List Workflow type (because we want to the workflow to launch in response to events from a document library). Click Next.

- For the lists screen, leave the defaults as they are and click next.

- On the start conditions, only check “The workflow starts automatically when an item is created” so that the workflow only launches when a document is added to the Shared Documents library. Click Finish.

Step 2: Create the WCF Workflow Service Project
In this step, we will add a WCF Workflow Service project to the solution and configure it to be hosted using Windows Server AppFabric.
Task 1 – Add the WCF Workflow Service Application project
In this task we will use the default workflow service that Visual Studio generates for new WCF Workflow Service applications. This workflow service simply takes in an integer and returns a string (which is the string value of the integer). The service exposes one operation, GetData that wraps the integer and string values in Request / Response payloads respectively. It has a signature as follows:
public GetDataResponse GetData(GetDataRequest request)
-
- In the Solution Explorer, right click the solution name and choose Add->New Project…
- Select Visual C#|Workflow in the Installed Templates tree view.
- Select the WCF Workflow Service Application project template. Name the project SimpleWorkflowService and click OK.
Task 2 – Configure the Project to be hosted in AppFabric
By default, the newly created project will be hosted in the Visual Studio Development Server. In order to host the service in AppFabric, we simply need create a virtual directory in IIS that map to the project directory. This is most easily done within Visual Studio.
-
- Right click the SimpleWorkflowService project and choose properties.
- In the properties screen, choose the Web tab.
- Scroll down to the Server section. Change the radio button from Use Visual Studio Development Server to Use Local IIS Server and then click Create Virtual Directory.

Step 3: Modify the SharePoint Workflow
In this step, we will modify the SharePoint workflow and project so that it calls the SimpleWorkflowService.
Task 1 – Add a Service Reference to the SimpleWorkflowService
-
- Right click the CallExternalService project and choose Add Service Reference…
- Click the Discover button.
- Set the Namespace to ExternalServices and click OK to create the proxy.
Task 2 – Update Workflow1
In this task we will configure the workflow to setup the parameter to pass during the call to GetData, log what will be sent, perform the call and then log the return value.
-
Double click Workflow1 in Solution Explorer to display the workflow in the designer.
Below the first activity, add a LogToHistoryListActivity, followed by a SendActivty, followed by another LogToHistoryListActivity by dragging them from the Toolbox. The sequence should look as shown:

Right click a blank space in the design surface and choose View Code…
In the code behind, replace the contents of the Workflow1 class with the following:
public Guid workflowId = default(System.Guid);public SPWorkflowActivationProperties workflowProperties = new SPWorkflowActivationProperties();public ExternalServices.GetDataRequest sendActivity1_request1 = new CallExternalService.ExternalServices.GetDataRequest(); public String logToHistoryListActivity1_HistoryDescription = default(System.String); public String logToHistoryListActivity2_HistoryDescription = default(System.String);public Workflow1(){InitializeComponent();}private void onWorkflowActivated1_Invoked(object sender, ExternalDataEventArgs e){//Simulate taking data (e.g., from ListItem) in to pass as parameter to the external WCF Workflow ServicesendActivity1_request1.@int = 42;}private void PrepLogData(object sender, EventArgs e){//Build the string to loglogToHistoryListActivity1_HistoryDescription = String.Format("Workflow was started. Preparing to send '{0}'.", sendActivity1_request1.@int);}private void DataReceived(object sender, SendActivityEventArgs e){//Extract the return value from the response payload and log itCallExternalService.ExternalServices.GetDataResponse response = e.SendActivity.ParameterBindings[SendActivity.ReturnValuePropertyName].Value as CallExternalService.ExternalServices.GetDataResponse;logToHistoryListActivity2_HistoryDescription = "Returned: " + response.@string;}All of the class level fields are for the activities to exchange data. The first two (workflowId and workflowProperties) are added by the item template by default. The sendActivity1_request1 represents the message that will be sent to GetData with the input value. Within the onWorkflowActivated1_Invoked method, we set this value to the constant 42. The two HistoryDescription fields will store the string of what we want to write out to the SharePoint Workflow History list in the first and second LogToHistoryList activities. The onWorlflowActivated1_Invoked method will be called when the first activity in the sequence runs and it will serve to initialize the input parameter to GetData. PrepLogData is called by the first LogToHistoryList activity. The DataReceived method is called by the SendActivity after it has gotten the response from the external SimpleWorkflowService. Before these can be used, we have to wire them up to the activities in our workflow.
Switch back to design view.
Select the onWorkflowActivated1 activity. Set the value of the Invoked property to onWorkflowActivated1_Invoked by selecting it from the drop down list.
Select logToHistoryListActivity1 and for its HistoryDescription property, bind the value to the logToHistoryListActivity1_HistoryDescription field and set the value of its MethodInvoking property to PrepLogData.

Select sendActivity1. Click in the ServiceOperationInfo property and then click the ellipses. Click the Import button, click <Current Project> and select the IService interface that was generated by the Add Service Reference operation, then click OK.

Select the GetData operation in the list and click OK.

Set the AfterResponse property to the DataReceived method. For the ChannelToken, type the name myChannel and tab out of the field. Then expand the ChannelToken property. For the EndpointName specify BasicHttpBinding_IService (this is the name of the channel endpoint inserted in the app.config when the service reference was added in the CallExternalService project). For the OwnerActivityName specify Workflow1. For the request, bind it to the sendActivity1_request1 field.

Select the logToHistoryListActivity2. Bind its HistoryDescription to logToHistoryListActivity2_HistoryDescription.

Step 4: Configure and Deploy the SharePoint Workflow
SharePoint 2010 workflow packages cannot read the values from the app.config that were added by the Add Service Reference. In order for our client endpoint configuration to be available to the SendActivity, we need to put this endpoint in the web.config of the SharePoint site.
Task 1 – Modify the SharePoint Site Web.config
-
Open the app.config of the CallExternalService project, it should look similar to the following:
<configuration><system.serviceModel><bindings><basicHttpBinding><binding name="BasicHttpBinding_IService" closeTimeout="00:01:00"openTimeout="00:01:00" receiveTimeout="00:10:00" sendTimeout="00:01:00"allowCookies="false" bypassProxyOnLocal="false" hostNameComparisonMode="StrongWildcard"maxBufferSize="65536" maxBufferPoolSize="524288" maxReceivedMessageSize="65536"messageEncoding="Text" textEncoding="utf-8" transferMode="Buffered"useDefaultWebProxy="true"><readerQuotas maxDepth="32" maxStringContentLength="8192" maxArrayLength="16384"maxBytesPerRead="4096" maxNameTableCharCount="16384" /><security mode="None"><transport clientCredentialType="None" proxyCredentialType="None"realm="" /><message clientCredentialType="UserName" algorithmSuite="Default" /></security></binding></basicHttpBinding></bindings><client><endpoint address="https://localhost/SimpleWorkflowService/Service1.xamlx"binding="basicHttpBinding" bindingConfiguration="BasicHttpBinding_IService"contract="ExternalServices.IService" name="BasicHttpBinding_IService" /></client></system.serviceModel></configuration>Select everything inside of the system. serviceModel section (that is the binding and the client elements) and copy it.
Open the SharePoint site’s web.config (e.g., C:\inetpub\wwwroot\wss\VirtualDirectories\100\web.config) and locate the system.serviceModel section. Verify that the only child element is the serviceHostingEnvironment. If there are already binding and client elements, you may need to merge the settings. Otherwise, just paste what we copied from app.config below the serviceHostingEnvironment element.
Save the web.config.
Right click on the CallExternalService project and select Deploy.
Verifying the Interoperability
Now we will test the interoperability by activating the Workflow (adding new doc) within SharePoint and verify that it works as expected.
Task 1 – Adding a New Document & Checking Workflow Status
-
- Open web browser to the SharePoint site.
- Click the Shared Documents link.
- In the Shared Documents screen, click Add New Document.

- Browse to a file and click OK.

- Give the document a name and click Save.

- The listing for the new document should appear as follows:

- Clicking the Completed hyperlink will show the log output in the Workflow History section, including the results of the service call:

The last entry in the Workflow History confirms the ‘Returned: 42’ value by the Workflow hosted in the Windows Server AppFabric.