How to fix SQLIOSim error “Failed to create random hash”

Hi there! If you have been working with SQL Server for any length of time, I am sure you know how crucial I/O is to the overall reliability of your SQL Server instance. Many years ago (over a decade now, actually!) we released SQLIOSim, which has been included in the out-of-box installations for SQL Server for many releases now. You can find this utility in the same folder that SQLServr.exe is (typically something like C:\Program Files\Microsoft SQL Server\MSSQL14.SQL2017\MSSQL\Binn).

This post is not about how to run SQLIOSim and what is the right usage for the tool (for example, it is not appropriate to use this for performance benchmarking, rather it is a pass / fail type verification of how reliable your storage is under load.) This post is about a very specific (and very rare) error which I recently hit on a server. In that case, SQLIOSim was running and the server had to be hard-rebooted due to I/O stack problems (the RAID controller in that server was faulty.) After reboot and fixing the issue with the RAID controller, I tried to restart SQLIOSim, but it would fail to run and complain with an error as below:

Error: 0x8009000F Error Text: Object already exists. Description: Failed to create random hash

This was not an error which I’d seen earlier so I had to debug it a bit. After some searching I found some very interesting facts:

  • SQLIOSim uses Microsoft CryptoAPI to generate random values for the synthetic test data that it uses
  • CryptoAPI in turn uses something called a ‘key container’ which the cryptographic provider in turn uses to perform the actual work of generating random numbers

Now, one user account in Windows can have multiple ‘key containers’. SQLIOSim uses the so-called ‘default key container’ for the user account which is running the SQLIOSim utility. So the theory I started forming was that somehow I had lost access to the default key container for my user account.

Before you proceed, I must warn you that the steps below are potentially dangerous if executed wrongly. Here are two regulatory disclaimers I must present, and by reading further you agree to these disclaimers and absolve me of any liability. If you need help and have questions on the steps below, please consider contacting Microsoft Support for professional assistance.

Disclaimers Please note that the third-party links are provided as-is and Microsoft does not offer any guarantees or warranties regarding the content on the third party site. Using tools like KeyPal, and / or editing NTFS permissions on System folders / files incorrectly can cause serious problems that may require you to reinstall your operating system. Use the tools at your own risk. This Information is provided for the purpose of illustration only and is not intended to be used in a production environment.  THIS INFORMATION IS PROVIDED “AS IS” WITHOUT WARRANTY OF ANY KIND, EITHER EXPRESSED OR IMPLIED, INCLUDING BUT NOT LIMITED TO THE IMPLIED WARRANTIES OF MERCHANTABILITY AND/OR FITNESS FOR A PARTICULAR PURPOSE.

Disclaimer noted, now to investigate the issue further, I first used the KeyPal utility which can be quite useful for low-level CryptoAPI investigations, and located the default container for my account. The default key container is identified by the name of the user account, which in this case happens to be ‘myuser’. KeyPal prints out the details about the ‘unique container’ name (the GUIDs below) which correspond to a file which actually stores the key pairs for the default container. You can read more about the gory details at this page and here.

Keycontainer 50 : myuser
 Uniquecontainer: 4f274a21613b2c41c894534e8d09a8cd_0e489cc1-3b9a-49dc-b00b-6c6697e27995

FYI, the number ‘50’ mentioned above is the ordinal of the key container. Now that I located the Uniquecontainer name for the default key container for my user account, I used Windows Explorer to locate that file in the OS disk. In my case for example it was found (full path below) at:

c:\users\myuser\AppData\Roaming\MicrosoftCryptoRSAS-1-5-21-<somenumbers>-<somenumbers>-<somenumbers>-<somenumbers>\4f274a21613b2c41c894534e8d09a8cd_0e489cc1-3b9a-49dc-b00b-6c6697e27995

When I looked at the NTFS permissions for this file in Windows Explorer, it showed no entry for myuser. I then edited the NTFS permissions to grant Full Control to ‘myuser’. Once I did that, SQLIOSim executed correctly as it could then access the key container and then perform the necessary cryptographic random number generation for the test!

SQL Server 2017 Setup: the step ‘sql_inst_mpyConfigAction_upgrade_confignonrc_Cpu64’ seems stuck, or slow? Here’s why!

EDIT 8 March 2019: The progress reporting of these steps has greatly improved in SQL Server 2019. Individual sub-steps (downloading, installing etc.) are now reported. Thank you for your feedback.

SQL Server 2017 is one more step further in Microsoft’s philosophy of bringing advanced analytics capabilities closer to where the data resides. With Python now supported as an ‘external script’ language (adding to the existing support for R), customers have the full power of Python at their disposal, including external packages like Tensorflow.

Now, what we have seen with some cases is that when the option to install Python has been selected, setup seems to ‘be stuck’ with the string sql_inst_mpyConfigAction_upgrade_confignonrc_Cpu64 being displayed on UI for a while. This is actually not a hang, it is just the setup taking a longer time. The reason for this is that when we install Python with SQL, we have to download and install the Python runtime. That step can take a while, because of the size of the associated packages. If you look at our documentation, you will notice that the size of the Microsoft Python Open component (circled in the screenshot below) is 850MB+). Depending on the speed of the Internet connection that download can take a while!

image

On top of the time it would take to download, there is an additional step of extracting the various files from within the CAB file into their actual folders within the SQL Server binary folder. That step too takes a while, typically because of disk speeds and also sometimes anti-virus scanning overheads. You can see the progress of that extraction step if you periodically look at the below file (replace the 20170804_162723 date-time stamp folder name with the actual one on your server):

C:\Program Files\Microsoft SQL Server\140\Setup Bootstrap\Log\20170804_162723\RSetup.log

When you look at this file, you will see lines indicating setup is extracting several files. When you close and open the file again, you should notice the timestamp increasing. That will prove to you that SQL Python Setup is indeed progressing and not ‘hung’. In my experience, the overall installation time for this step can be order of magnitude of a few minutes – not too bad, but it can be anxious moments if you just rely on the UI!

In summary:

  • SQL Server 2017 Python setup can take a while, due to file download and file extraction times. A few minutes is normal.
  • To save on download times, pre-download the CAB files mentioned above and pass the path to those files using the MRCACHEDIRECTORY command line parameter as shown in this blog post

Happy scripting with Python and SQL Server 2017!

The ‘aggregate concatenation’ T-SQL (anti-)pattern

[Update 20 March 2019: this functionality is now natively provided in SQL Server 2017+ / Azure SQL DB through the STRING_AGG intrinsic]

Some time back, Dimitri Furman who works as a Senior Consultant in the Microsoft Services team shared a very useful tip. It pertains to a pattern of usage wherein strings from multiple rows are concatenated into a single large (typically comma delimited) string. The usual way that we see this being accomplished is by code like the below:

DECLARE @res NVARCHAR(max)

SELECT @res = COALESCE(@res + ',', '') + FirstName + LastName
FROM AdventureWorks2016CTP3.Person.Person

SELECT @res

While the above is quite simple to read, it is quite slow (as you will see soon) and worse – it does not ‘inline’ meaning you cannot use the above inside a inline table-valued function. This last property was very important for us, because in the case we were looking at, the above COALESCE based concatenation code was in a scalar UDF, which clearly is a big ‘no-no’ from a performance perspective. Also, we did not want to utilize SQLCLR so the usage of the GROUP_CONCAT CLR UDA was ruled out.

Now, here is a much better way to refactor the above concatenation ‘loop’ into the below:

SELECT STUFF((
SELECT ',' + FirstName + LastName
FROM AdventureWorks2016CTP3.Person.Person
FOR XML PATH('')
,TYPE
).value('.', 'nvarchar(max)'), 1, 1, '') AS RawResult

On first glance, it may seem counter-intuitive that the second version could be faster, but that is indeed the case. For the above queries, here is the comparison:

COALESCE loop XML Path
CPU time = 7969 ms,  elapsed time = 7984 ms CPU time = 15 ms,  elapsed time = 16 ms

The usage of XML PATH in this way is not exactly ‘breaking news’ but the performance difference is dramatic. And more importantly for the case we were discussing at work, the XML PATH based code can be inlined, making it suitable for use in TVFs. And in our real case, that’s exactly what we wanted to do (refactor the UDF into a TVF.)

Have a great week ahead!

T-SQL ranking functions to the rescue once again!

This week I happened to assist with an internal application where there was a performance issue with a specific query. One of my observations with that query was that it was doing self-joins in order to determine the latest iteration of a specific record. That’s a common anti-pattern which can be fixed by using T-SQL’s windowing functions, such as ROW_NUMBER() or RANK().

The Inefficient Way

To give more context, here is an example from the Contoso Retail DW database. The requirement (very similar to the actual customer case) here is to obtain a list of all the customers who have placed an order with us, and for each of those customers, obtain the date of the latest order. The implementation that I first noticed was using a self-join as given below; notice the special case handling where the customer has 2 orders on the same day and then the order number (the OnlineSalesKey column here) becomes the tie-breaker:

SELECT l.CustomerKey
	,l.DateKey AS LatestOrder
FROM dbo.FactOnlineSales l
LEFT JOIN dbo.FactOnlineSales r ON l.CustomerKey = r.CustomerKey
	AND (
		l.DateKey < r.DateKey
		OR (
			l.DateKey = r.DateKey
			AND l.OnlineSalesKey > r.OnlineSalesKey
			)
		)
WHERE r.DateKey IS NULL

This query is *extremely* inefficient, burning 100% CPU on my i7 laptop with 8 logical CPUs! On my laptop it will run for well over 10 minutes before I get impatient and cancel. For reference, here is the estimated execution plan for the above query (scroll to the right and note the query cost of 167692).

badplan

Just for kicks, I ran the above query with MAXDOP 144 (NOT a good idea, but this was for fun) on our lab machine which has 144 logical CPUs and here is the picture I see there 🙂 Obviously NOT something you want in production!

144procs

Rewriting the query

Now, the efficient way to re-write this is to use Ranking Functions in T-SQL. These have been around a while (SQL 2005 actually!) but I feel they are under-utilized. Here is the query re-written using the ROW_NUMBER() function. This solution also elegantly takes care of the above tie-breaking logic which required the disjunction (OR predicate) in the previous query.

WITH NumberedOrders
AS (
	SELECT CustomerKey
		,Datekey
		,ROW_NUMBER() OVER (
			PARTITION BY CustomerKey ORDER BY Datekey DESC
				,OnlineSalesKey DESC
			) AS RowNumber
	FROM FactOnlineSales
	)
SELECT CustomerKey
	,Datekey
FROM NumberedOrders
WHERE RowNumber = 1

Here is the new execution plan. Note that the cost is also much lesser: 447.

goodplan

Here are the execution statistics of this query, it completes in 43 seconds compared the self-join approach taking forever!

  • Table ‘FactOnlineSales’. Scan count 9, logical reads 92516, physical reads 0, read-ahead reads 72663, lob logical reads 0, lob physical reads 0, lob read-ahead reads 0.
  • Table ‘Worktable’. Scan count 0, logical reads 0, physical reads 0, read-ahead reads 31263, lob logical reads 0, lob physical reads 0, lob read-ahead reads 0.
  • SQL Server Execution Times:
  • CPU time = 19231 ms, elapsed time = 43834 ms.

Moral of the story: next time you see query patterns involving self joins to achieve this kind of ‘latest record of a particular type’ take a pause and see if T-SQL Ranking Functions can help!

Common sub-expression elimination in SQL Server: what you need to know

In working with our customers, I come across some very interesting patterns in T-SQL. Not all of these patterns are complex on the face of it, but their impact can sometimes be substantial. Here is a simple example to demonstrate what I am referring to:

SELECT CASE WHEN EXISTS (SELECT *
                         FROM   Person.Person AS P
                         WHERE  P.BusinessEntityID = SOD.ProductID) THEN 1 ELSE 0 END AS Col1,
       CASE WHEN EXISTS (SELECT *
                         FROM   Person.Person AS P
                         WHERE  P.BusinessEntityID = SOD.ProductID) THEN 1 ELSE 0 END AS Col2
FROM   Sales.SalesOrderDetail AS SOD;

This query is clearly fictional, but it will suffice for our walkthrough here 🙂 Now here’s the execution plan for the above statement (you can also test this by using AdventureWorks2012 and above):

httpsmsdnshared.blob.core.windows.netmedia201606image922

Observe that the Person.Person table is accessed twice in the above plan. In the real customer scenario that I was looking at, the table involved was accessed using a nested loop join, for a total of 13 million seeks. And these 13 million were repeated again for the second usage of the subquery.

My attempt to rewrite the query was to use a LEFT OUTER JOIN syntax, as reflected in this simple example:

select CASE WHEN P.BusinessEntityID IS NOT NULL THEN 1 ELSE 0 END as Col1,

CASE WHEN P.BusinessEntityID IS NOT NULL THEN 1 ELSE 0 END as Col2

from Sales.SalesOrderDetail SOD

LEFT OUTER JOIN Person.Person P ON P.BusinessEntityID = SOD.ProductID

Here is the execution plan for the optimized version:

httpsmsdnshared.blob.core.windows.netmedia201606image923
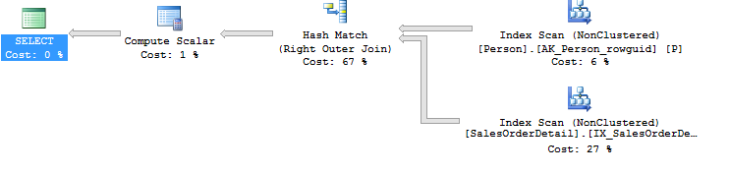
These two queries are functionally equivalent (because in this case there is a unique key on the BusinessEntityId column) and return the same set of results. As you can see the Person table is just accessed once in the revised query. The cost of the re-written query is also ~ 6 times lesser than the original query! This kind of optimization is referred to as Constant Subexpression Elimination. There are some strategies used by SQL Server (see this paper and this one as well for some ideas) but not every possible scenario (such as the above one) can be optimized. Also, this paper from Microsoft Research covers future ideas on the topic.

For now, it is best to review your T-SQL code for multiple instances of the same subquery and replace those with an explicit JOIN instead.

Unable to launch runtime for ‘R’ script: Check this first

This post is a quickie, hoping that the tip will come in handy to others who are facing the same issue.

Note: the steps below were written for SQL Server 2016 pre-release versions. They are NOT valid for RTM and subsequent releases.

Today I was trying to enable the R Services (a.k.a. Advanced Analytics) feature in SQL Server 2016, which brings the world of R into SQL Server. I thought that I had diligently followed instructions on installing and configuring the integration. Next, I tried to execute the basic script below (sort of like a ‘loopback’ test for this feature to check if the configuration is okay:

sp_execute_external_script @language =N’R’,@script =N’OutputDataSet <- InputDataSet’, @input_data_1 =N’SELECT 1 as Col’ WITH RESULT SETS ((col int not null));

Unfortunately it kept returning the error messages below:

Msg 39021, Level 16, State 1, Line 1
Unable to launch runtime for ‘R’ script. Please check the configuration of the ‘R’ runtime.
Msg 39019, Level 16, State 1, Line 1
An external script error occurred:
Unable to launch the runtime. ErrorCode 0x80070490: 1168(Element not found.).
Msg 11536, Level 16, State 1, Line 1
EXECUTE statement failed because its WITH RESULT SETS clause specified 1 result set(s), but the statement only sent 0 result set(s) at run time.

I went back to the instructions and realized I had forgotten one step which is to download an updated version of the post-installation configuration script from the Microsoft Download Center. Clicking on the previous link actually gives us an updated registerRext.exe. Running the registerRext.exe /uninstall followed by registerRext.exe /install with this updated version fixed my problem!

Do note that the errors mentioned above could have been caused by other issues, but at a minimum please ensure that you are using the updated registerRext.exe.

What’s new in the Server 2016 CTP 3.3 ScriptDom Parser

We just made SQL Server 2016 CTP 3.3 publicly available a few days ago, and it has some new features which are also reflected in the managed T-SQL parser (Microsoft.SqlServer.TransactSql.ScriptDom). As readers of this blog may know, I am a big fan of this parser and to see it keeping pace with the latest preview release of the SQL Server engine feels great!

Here are the main changes you can leverage if you are using the SQL Server 2016 CTP 3.3 ScriptDom parser:

  • The ScriptDom parser is up to date with the new support for delayed compression of delta rowgroups in Columnstore indexes: the new COMPRESSION_DELAY option in ALTER INDEX helps if you are using non-clustered indexes in a real-time analytics scenario. See this article for more details.
  • The RSA_3072, RSA_4096 algorithms are now added as algorithms inside the ScriptDom parser. These are typically used in the CREATE ASYMMETRIC KEY syntax.

I also wanted to inform anyone who is planning to upgrade their previous installation of SQL Server 2016 preview (CTP 3.2 typically) to the release notes, which contain a very important step (if you are using FILESTREAM) you must take BEFORE upgrading to CTP 3.3. So please take a minute and check the release notes prior to upgrading!

Hope this helps!

Error 0xC1900101 – 0x20017 upgrading to Windows 10 build 10162

We are all excited about the upcoming release of Windows 10 on the 29th of July. In the meantime, you can install a preview version from the Windows Insider web page, or if you’d like to wait, you can reserve your free upgrade by following the steps here.

At the beginning…

At Microsoft, we are at the forefront of the ‘self-hosting’ ballgame. Some time back, I had installed Windows 10 preview build 10074. This week, with the newer builds being released in rapid succession, I decided to switch the Preview Build frequency to ‘Windows Insider Fast’ so that I could get hold of the latest (at the time) 10162 build:

image

Everything seemed to work alright with the update to 10162…

image

… till the point where it rebooted the computer:

image


Ahem…

Instead of seeing the usual ‘Upgrading Windows, sit tight..’ screen, this is what I saw:

clip_image002

Well. the keyboard layout screen was certainly not expected! But when I selected US keyboard, it asked me whether I wanted to Troubleshoot or shutdown; which is again quite strange:

clip_image004

So I played along and tried to troubleshoot, at which stage I was basically left with options such as Reset the PC:

clip_image006

And even Reset PC failed with a helpful error message that the ‘drive where Windows is installed is locked’:

clip_image010

Left with no option – post reboot, I was greeted with the infamous error 0xC1900101 – 0x20017, which has plagued some users in the Windows 8.1 upgrade as well:

image


Some clues

At this time, I also noticed a very strange issue: any USB mass storage device I would plug in to the laptop was not assigned a drive letter. It would show up in Disk Management, but when I would try to give it a drive letter, Disk Management would popup a cryptic message: ‘The operation failed to complete because the Disk Management console view is not up-to-date. Refresh the view by using the refresh task. If the problem persists close the Disk Management console, then restart Disk Management or restart the computer’.

Well, this was getting stranger and stranger! But somehow, it appeared that the two issues were inter-related. Internally, I was told that the error code 0xC1900101 – 0x20017 was also related to USB drivers. And the above disk management error was in the past attributed to ‘ghost’ drives.

Hide and seek

With that clue in mind, I took at look at my Device Manager screen and enabled the ‘Show Hidden Devices’ under the View menu. In my case, I found some devices under Storage Volumes which only showed up when Hidden Devices were enabled. And those were clearly not attributed to any devices I had installed on my laptop (i.e. I had nothing related to Roxio Saib in reality on my laptop):

image

So I decided to delete these hidden Roxio devices (in another case where I had seen an identical problem the devices showed up as Unknown Device under Storage Volumes, in which case I proceeded to delete those Unknown Devices under Storage Volumes).

WARNING: Using Device Manager incorrectly can cause serious problems that may require you to reinstall Windows. Microsoft cannot guarantee that problems resulting from deleting incorrect devices can be solved. Use these steps at your own risk. Please note again that in this walkthrough, we have only deleted Hidden, Unknown devices which were listed under the Storage Volumes category.

clip_image002[5]

There were two of these Roxio Saib devices (which clearly did not apply to my laptop) and I proceeded to clean both instances up, followed by a reboot:

image


We’re there!

After the reboot, I re-tried the Update:

image

At the end of this, and post restart, lo and behold! The expected ‘Upgrading Windows’ screen appeared:

clip_image002[7]

And after around 20 minutes, the upgrade to 10162 was done successfully!

clip_image004[5]

For those of you who had the misfortune to run into the error code 0xc1900101 – 0x20017 when upgrading to Windows 10, I hope this walkthrough helps you get unblocked! And in case you are still unsure or not confident of what to do, please contact Microsoft Customer Services and Support to get more direct help on your issue.

The strange case of the large LiveKernelReports folder

Some time back, I ran into a bit of a space crunch on the C: drive of my laptop which runs Windows 8.1. On digging a bit, I found a 2GB+ file at C:\Windows\LiveKernelReports\WinsockAFD-20150114-1722.dmp. Now, this was the first time I had seen a folder called LiveKernelReports and definitely the first time that I had seen a dump file with the name WinsockAFD*.dmp.

Important note: if you are not a developer and came here trying to figure out what to do with the files in this folder, please proceed directly to the ‘So What?’ section below.

Inside the Dump File

The first thing I did (of course Smile) was to open up the dump file under the WinDbg debugger. In kernel mode dumps, the !analyze –v command generally gives good analysis results, so I decided to start from there (full output of !analyze is at the end of this post as an Appendix).

Firstly, the bugcheck code was 0x156. If you are a developer, and you have the Windows 8.1 SDK, you will see this file C:\Program Files (x86)\Windows Kits\8.1\Include\sharedbugcodes.h which has the bugcheck names. 0x156 is WINSOCK_DETECTED_HUNG_CLOSESOCKET_LIVEDUMP.

Second, this bugcheck, unlike most of the ones we know, did not ‘crash’ or ‘blue screen’ the system.

Live Kernel Dumps

All of this is great, but what’s really happening here? How come I got kernel dumps without the system ‘crashing’? Well, the answer is that in Windows 8.1 the Windows development team added some great reliability diagnostics in the form of ‘Live Kernel Dump Reporting’. With this feature, certain Windows components can request a ‘live dump’ to be gathered. In my above case, both a minidump (~ 278KB) and a ‘larger’ dump (~ 2GB) were gathered when the AFD (Ancillary Function Driver for WinSock) runtime detected that a socket did not close ‘in time’ (see bold sections in the Appendix for more information.)

The Windows Error Reporting feature will then use the minidump to help the Windows development team figure out if this is a ‘trending’ issue, prioritize it and then hopefully fix it if it is due to an issue with Windows. The ‘larger’ dump which I mentioned above is not normally uploaded unless the development team ‘asks’ for it again via the Windows Error Reporting and Action Center mechanisms (to ultimately give the end user control on what gets submitted.)

So What?

That is the million dollar question Smile As an end user, you may be wondering what to do with these types of dump files. The advice I can give you is: if the dump files are causing you to go very low on disk space, you can probably move the dump file off to cheaper storage, like an external HDD. BUT if you are repeatedly getting these dump files, it may be advisable to check for any third party drivers, especially anti-virus products or any other network related software. Sometimes older versions of such software may not ‘play well’ with Windows 8.1 and may be causing a stalled network operation, in turn leading to these dump files.

If you are an IT Pro and seeing these dump files on server class machines and / or on multiple PCs, you would do well to contact our CSS (Customer Service and Support) staff who can guide you further on why these dump files are occurring and what should be the course of action.

In Closing

I hope this helps understand this system folder and why it plays an important role in improving the reliability of Windows. If you are interested in this topic, I highly recommend this talk from Andrew Richards and Graham McIntyre, who are both on the Windows Reliability team. They explain how the OCA / WER mechanism works. Amazing stuff, check it out!

Appendix: !analyze –v output

0: kd> !analyze -v
…

WINSOCK_DETECTED_HUNG_CLOSESOCKET_LIVEDUMP (156)
Winsock detected a hung transport endpoint close request.
Arguments:
…

DEFAULT_BUCKET_ID:  WINBLUE_LIVE_KERNEL_DUMP

BUGCHECK_STR:  0x156

…

STACK_TEXT:
…

ffffd001`28e46660 fffff803`bdddd64d : ffffffff`800026bc 00000000`00000000 ffffc001`1f52ec00 00000000`00000000 : nt!DbgkpWerCaptureLiveFullDump+0x11f
ffffd001`28e466c0 fffff801`21b7e3b4 : 00000000`00000001 ffffd001`28e46889 00000000`00000048 ffffe000`3e9afda0 : nt!DbgkWerCaptureLiveKernelDump+0x1cd
ffffd001`28e46710 fffff801`21b7b4ff : ffffe000`3e9afda0 00000000`0000afd2 ffffe000`3e9afd00 00000000`00000002 : afd!AfdCaptureLiveKernelDumpForHungCloseRequest+0xa8
ffffd001`28e46770 fffff801`21b89cad : ffffe000`3e9afda0 ffffd001`28e46889 00000000`0000afd2 ffffd001`28e46808 : afd!AfdCloseTransportEndpoint+0x64ef
ffffd001`28e467d0 fffff801`21b89674 : 00000000`00000001 ffffe000`42d71010 00000000`00000000 ffffe000`3e9afda0 : afd!AfdCleanupCore+0x14d
ffffd001`28e468f0 fffff803`bdc47349 : ffffe000`42d71010 ffffe000`3d3fd080 00000000`00000000

…

Inline Index Definition in SQL Server 2016 CTP2

Firstly, I am sure you are as excited as I am about the next version of SQL Server, and you can try the public preview (a.k.a. Community Technology Preview 2 – CTP2) by visiting the evaluation page and install it NOW! Today morning, at the start of a  new week and I found something new in SQL 2016 CTP2 which has not been widely discussed as yet: inline index definition enhancements.

As a regulatory disclaimer though I must mention that the information here may be subject to potential change in future releases beyond CTP2.


Current State

SQL Server 2014 introduced T-SQL grammar support allowing us to declare index definitions inline with the CREATE TABLE itself. While this was mainly driven by the semantics of the in-memory OLTP tables, the elegance of defining indexes along with the table is compelling. However there were some drawbacks:

  • Inline definition of columnstore indexes was not allowed.
  • Inline indexes could not have a filter predicate associated.

I’m glad to see that both of these have scenarios have been addressed in SQL Server 2016 CTP2. Here are some examples of the new syntax which work in SQL Server 2016 CTP2:

Inline Filtered Index

create table t1
(
    c1 int,
    index IX1 (c1) where c1 > 0
)
go

Inline Columnstore Index

— inline clustered columnstore index definition
create table t2
(
    c1 int,
    c2 int,
    c3 nvarchar(500),
    index CCSI1 clustered columnstore
)

— inline nonclustered columnstore index definition
create table t3
(
    c1 int,
    c2 int,
    c3 nvarchar(500),
    index NCCSI1 nonclustered columnstore (c1, c2)
)

The CREATE TABLE help in SQL 2016 CTP2 Books Online has been updated to reflect these enhancements.

I’ll be posting other such nuggets on an ongoing basis, so stay tuned!