AD FS 2.0 to secure WCF and Workflow Services hosted in Windows Server AppFabric
This blog entry is a sequel to the October 30th Blog “Securing WCF Services hosted in Windows Server AppFabric with Windows Identity Foundation (WIF)” where we demonstrated how to use WIF to secure Services hosted in AppFabric. And in this blog post we extend the same scenario to demonstrate how you can leverage Active Directory Federation Services 2.0 (AD FS 2.0) to provide you a solution for your ‘federated identity’ needs. The AD FS approach also provides you the solution that mitigates security risks (by using ActAs delegation) and authorizes access through all three tiers: the client, the middle tier (e.g., AppFabric hosted Services) to the data tier (e.g., databases) – we will cover this too.
This blog is targeted towards both the architect and developer community. The blog demonstrates how you can apply AD FS 2.0 into your architecture to provide federated identity solution and provides adequate details for you to attempt it in your project.
AD FS 2.0
AD FS 2.0 is a Server Role within Windows Server that provides support for WS-Federation, WS-Trust and SAML, with an easy to use management UI and a powerful claims processing rules engine. In a nutshell, it allows you to register your applications (Relying Parties), Claims Providers (e.g., other STS’s) and Attribute Stores (Identity Providers like Active Directory), and define the rules that govern how incoming claims are mapped to claims your application expects. The Figure 1 below illustrates these major features.
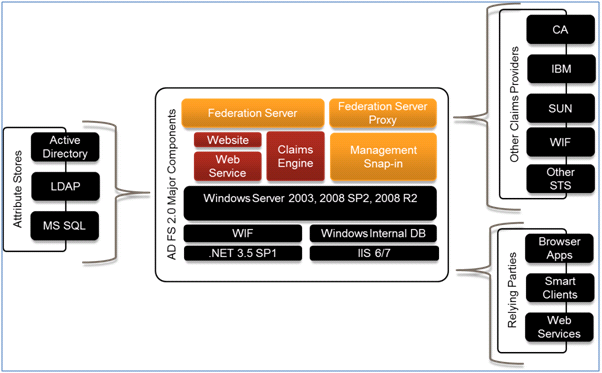
Figure 1: Major Features of AD FS 2.0 (Source MSDN.com)
One the biggest advantages you’ll notice almost immediately when getting started with AD FS is that you now have that “missing UI” for Security Token Service (STS) configuration that you don’t get when using the STS templates provided by Visual Studio.
Build Out
You can download AD FS 2.0 from here. In order to make use of AD FS 2.0 for our scenario, you will also need the following (see the Additional Resources for links):
· WIF – Windows Identity Foundation and WIF .NET 4 SDK.
To set up a test lab environment for this, the easiest approach is to have two VPC’s. One that only runs your Active Directory and the other that is joined to the former’s domain, and has AD FS 2.0, WIF, and VS2010 installed.
Lab Setup
In authoring this blog entry, we used a lab environment configured with two VPC’s. Step-by-step guidance on setting up the AD FS 2.0 test lab is available in the ‘references’ – the last section on this blog. Both these VPCs use a base Windows Server 2008 with Service Pack 2; details around these VPCs along with some major ‘steps’ are below:
VPC 1: FSAD – Domain Controller
- Add Domain Controller role: This will installs DNS
- Automatically and assign this machine a static IP address.
VPC2: FSWEB – AD FS Server & Development environmen
- Install .NET 3.5 SP1
- Assign this machine a static IP address
- Join domain; install AD FS 2 in federation server mode – this will install IIS
- Install VS 2010 (installs .NET 4).
- Create a self-signed SSL certificate.
- Register HTTPS binding on Default Web Site to use the self-signed cert.
- Complete AD FS Config Wizard selecting Stand-alone server option.Note: Before running on Server 2008 (not needed for R2) you need to add the entry below (or the service will fail to start) to Microsoft.IdentityServer.Servicehost.exe.config file, located in the ADFS 2 install directory (default C:\Program Files\Active Directory Federation Services 2.0).
<runtime>
<generatePublisherEvidence enabled="false"/>
</runtime> - Install WIF SDK (run as admin, be patient before clicking next on license screen, if it says please wait while computing disk space, restart computer and try again, waiting slightly longer).
Scenario
This blog builds upon the scenario presented in the previous blog (Securing WCF Services hosted in Windows Server AppFabric with Windows Identity Foundation (WIF)) which used a custom STS solution; this current blog will use AD FS 2.0 as the enterprise-grade STS. Figure 2 below provides a quick comparison of the scenarios in both the blogs –you will notice the big difference is previously we used a custom STS and this time around we used AD FS 2.0. With the release of AD FS2.0, we expect larger number of deployments taking a dependency on AD FS 2.0.
The coolest part about swapping in AD FS 2.0 from the previous scenario is that there are no have no code changes to make – all that was needed was a bit of configuration and this is what we will demonstrate in this blog.
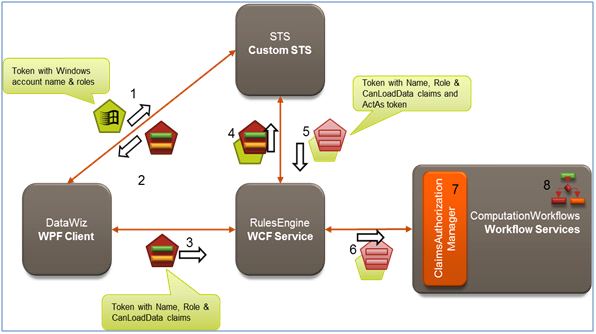

Figure 2 a and b: Contrast scenarios using Custom STS (top) with current scenario of using AD FS 2.0 (bottom).
For this blog scenario we will update our architecture so that it leverages AD FS 2.0 as the STS, so that you are able to learn how to abstract usage of Identity Stores (referred to as Attribute Stores in AD FS interfaces) behind the STS using AD FS 2.0. Identity Stores could be Active Directory, MS SQL, LDAP, or any other custom provider. Subsequently in this blog posting we will also enhance the scenario presented to demonstrate integration of Microsoft SQL Server with Active Directory to append other identity related information to the claims.
The blog will also show to configure AD FS using its management MMC UI to configure the claims issuance rules for our applications, as well enabling ActAs delegation.
Implementation
In showing how to implement the scenario, we will start with the finished version of the Visual Studio solution we described in the previous blog posting and show how we can enhance it to leverage federated security, delegation and AD FS 2.0. To accomplish this we need will setup RulesEngine to use AD FS and configure AD FS to secure it; repeat this for the ComputationWorkflows project; and update the service references and related configuration in the RulesEngine and the DataWizApp. Figure 3, below shows our new implementation approach.
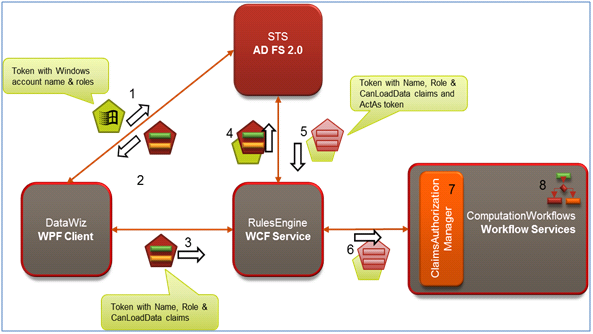
Figure 3: Using AD FS 2.0 STS to secure Services
Securing the RulesEngine with AD FS
To enable RulesEngine to use AD FS instead of the development STS, we run FedUtil, via Add STS Reference again. The key difference this time is the address we use for the federation metadata is on the Security Token Service screen we use the address of AD FS instead of the development STS. The following screens show the entire process.
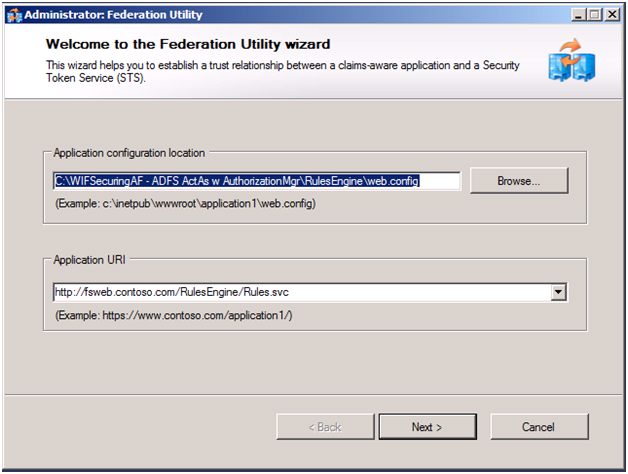
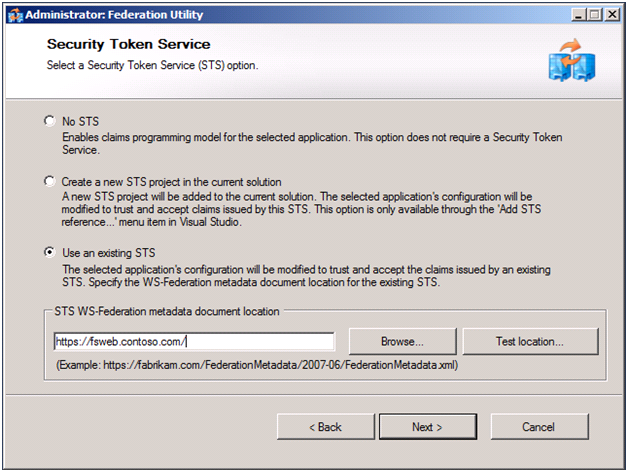

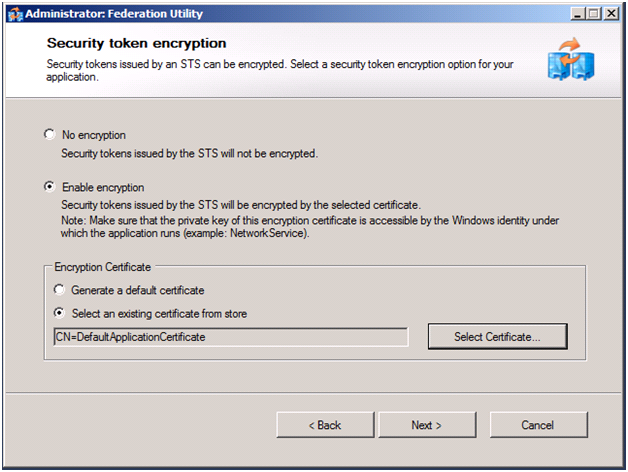
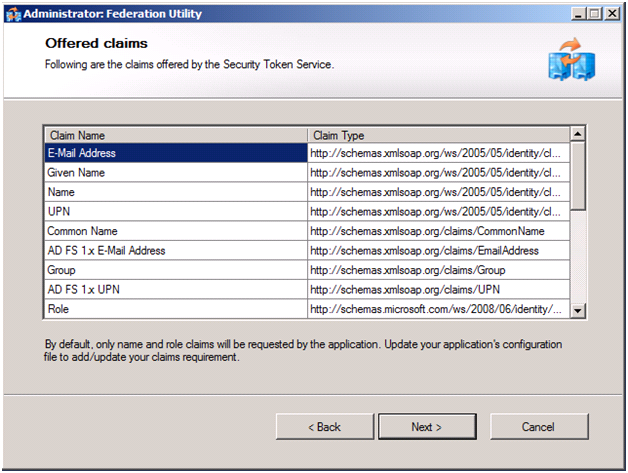
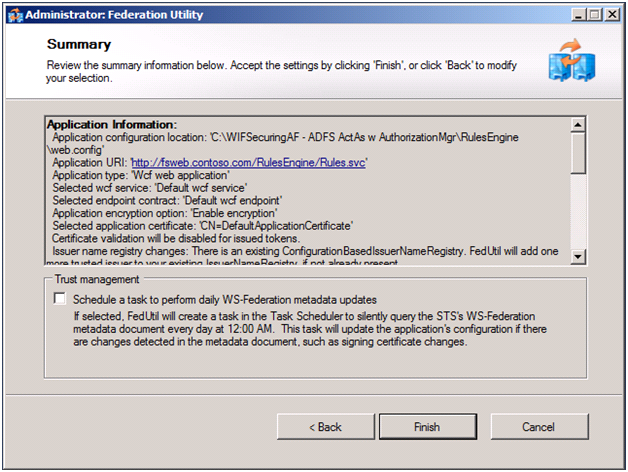
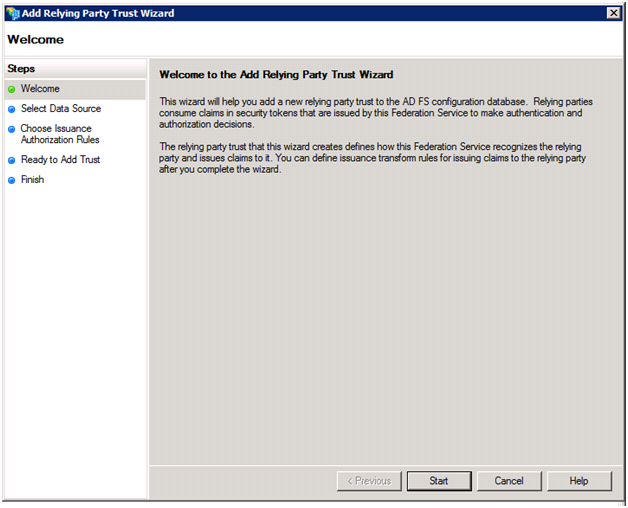
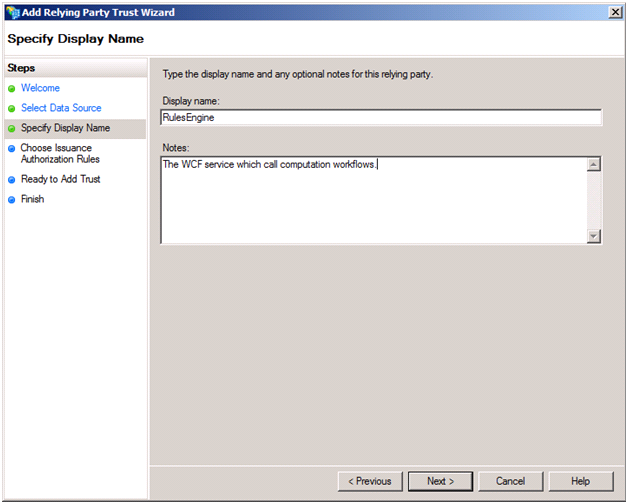
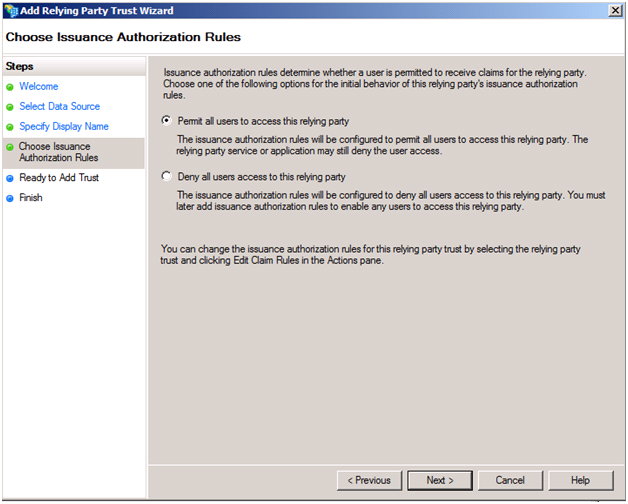
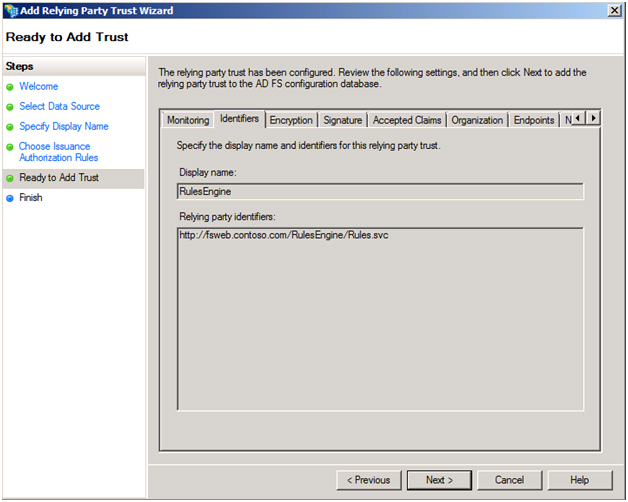
Figure 4 to 9: Configuration Changes
The above configuration changes will take care of updating the RulesEngine web.config so that it calls AD FS during authentication.
Modifications to Web.Config files
We have two more modifications to make in web.config. We need to configure service clients (like DataWiz and RulesEngine) to request the desired claims; these claims are expressed in web.config. AD FS will only provide requested tokens, unlike our Dev STS which doesn't care and always sends the same set of tokens. In our scenario, FedUtil by default requests Name and Role, but we must manually request CanLoadData. This amounts to editing the custom binding added by FedUtil, and adding that claim to system.serviceModel\bindings\customBinding\binding\security\secureConversationBootstrap\issuedTokenParameters\additionalRequestParameters\SecondaryParamaters\Claims as shown below:
<issuedTokenParameters keySize="256" keyType="SymmetricKey" tokenType="">
<additionalRequestParameters>
<trust:SecondaryParameters xmlns:trust="https://docs.oasis-open.org/ws-sx/ws-trust/200512">
<trust:KeyType xmlns:trust="https://docs.oasis-open.org/ws-sx/ws-trust/200512">https://docs.oasis-open.org/ws-sx/ws-trust/200512/SymmetricKey</trust:KeyType>
<trust:KeySize xmlns:trust="https://docs.oasis-open.org/ws-sx/ws-trust/200512">256</trust:KeySize>
<trust:Claims Dialect="https://schemas.xmlsoap.org/ws/2005/05/identity"
xmlns:trust="https://docs.oasis-open.org/ws-sx/ws-trust/200512">
<wsid:ClaimType Uri="https://schemas.xmlsoap.org/ws/2005/05/identity/claims/name"
Optional="true" xmlns:wsid="https://schemas.xmlsoap.org/ws/2005/05/identity" />
<wsid:ClaimType Uri="https://schemas.microsoft.com/ws/2008/06/identity/claims/role"
Optional="true" xmlns:wsid="https://schemas.xmlsoap.org/ws/2005/05/identity" />
<wsid:ClaimType
Uri="https://contoso.com/claims/canloaddata"
Optional="true"
xmlns:wsid="https://schemas.xmlsoap.org/ws/2005/05/identity" />
</trust:Claims>
<trust:KeyWrapAlgorithm xmlns:trust="https://docs.oasis-open.org/ws-sx/ws-trust/200512">https://www.w3.org/2001/04/xmlenc#rsa-oaep-mgf1p</trust:KeyWrapAlgorithm>
<trust:EncryptWith xmlns:trust="https://docs.oasis-open.org/ws-sx/ws-trust/200512">https://www.w3.org/2001/04/xmlenc#aes256-cbc</trust:EncryptWith>
<trust:SignWith xmlns:trust="https://docs.oasis-open.org/ws-sx/ws-trust/200512">https://www.w3.org/2000/09/xmldsig#hmac-sha1</trust:SignWith>
<trust:CanonicalizationAlgorithm xmlns:trust="https://docs.oasis-open.org/ws-sx/ws-trust/200512">https://www.w3.org/2001/10/xml-exc-c14n#</trust:CanonicalizationAlgorithm>
<trust:EncryptionAlgorithm xmlns:trust="https://docs.oasis-open.org/ws-sx/ws-trust/200512">https://www.w3.org/2001/04/xmlenc#aes256-cbc</trust:EncryptionAlgorithm>
</trust:SecondaryParameters>
</additionalRequestParameters>
<issuer address="https://fsweb.contoso.com/adfs/services/trust/13/kerberosmixed" bindingConfiguration="https://fsweb.contoso.com/adfs/services/trust/13/kerberosmixed" binding="customBinding" />
<issuerMetadata address="https://fsweb.contoso.com/adfs/services/trust/mex" />
</issuedTokenParameters>
In addition, AD FS exposes multiple service endpoints and when FedUtil runs, it basically chooses the first endpoint which is a certificate based one. Since we are using Windows domain credentials, we need to use a Kerberos endpoint. These endpoints are all listed in the web.config commented out under an alternativeIssuedTokenParameters section, you just need to remove the one that’s within the issuedTokenParameters section and replace it with one of the others from the commented region. The second highlighted line in the config above shows the updated endpoint in place.
Configuring AD FS for Securing the Solution
Now that we’ve configured the RulesEngine to use ADFS, we need to tell ADFS about the RulesEngine. To do this we open the AD FS 2.0 Management Snap-in from Start Menu->Administrative Tools->AD FS 2.0 Management. In the tree view we expand the Trust Relationships node and then right-click the Relying Party Trusts node, selecting Add Relying Party Trust… which loads wizard of the same name. We click Start past the welcome screen:
On the Select Data Source screen, we can simply import the Federation Metadata requirements of the RulesEngine from a file (since we are not using HTTPS to host the RulesEngine, the first radio is not an option). As you can see in the screenshot, the FederationMetadata.xml documentforRulesEngine is located under the RulesEngine project.

Next you enter a user friendly display name and any notes.
Then, by default we don’t want to perform any authorization at the ADFS STS, so we just leave the Permit all option selected.
You can review the various settings pulled in from the FederationMetadata and your selections on the following screen.
You will then be prompted with the Edit Claims Rules screen, which you’ll want to display to configure how claims are issued from ADFS for the RulesEngine. In our scenario, we need to define rules to issue three claims: Name, Role and CanLoadData. We will also define a fourth, DOB, to show how we can obtain values from claims from attribute stores other than Active Directory. The following screenshot shows our Issuance Transform Rules with all claims added; we will then see how we configure the Name, Role and CanLoadData claims (the first three in the screenshot). We’ll return to showing how we add the DOB claim at the end of this blog post.
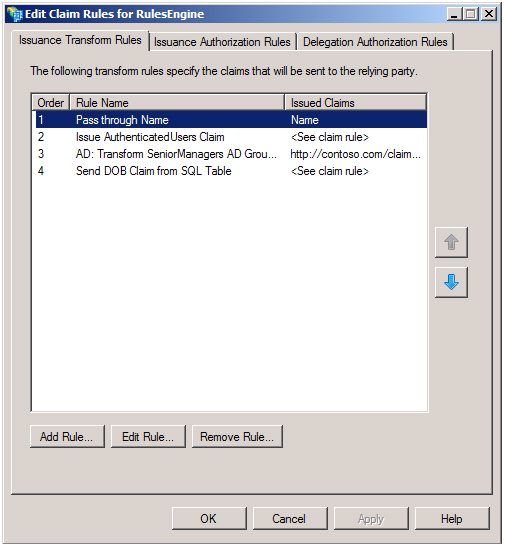
Let’s start with the Name claim. Here we receive the name via the presented Windows credentials, so we just need to pass it through. To create such a rule, click Add Rule… and the in the Claim rule template select Pass Through or Filter and Incoming Claim.
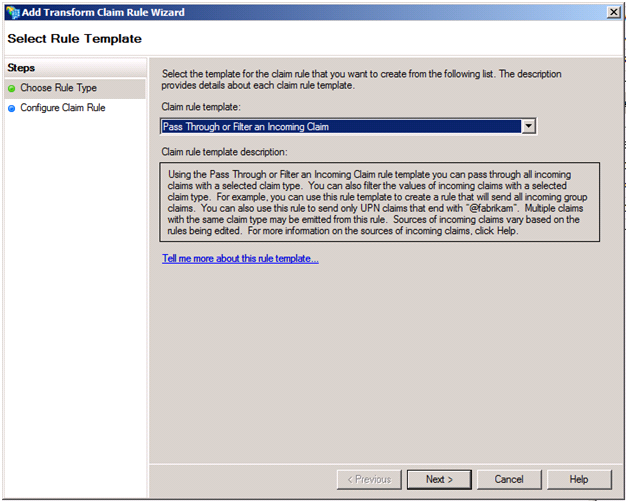
Click Next. Enter a user friendly description for the rule. Because we are after the incoming Name claim, select that in the first drop down and leave Pass through all claim values selected. Your screen should look as follows:
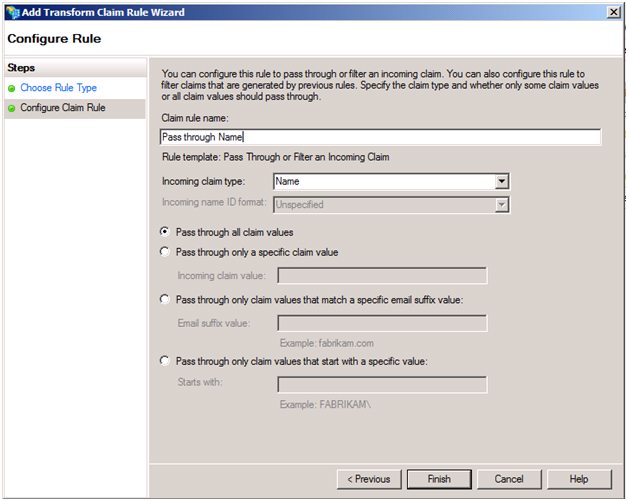
Clicking Finish will add the rule to the Issuance Transform Rules listing, but more importantly results in the Name claim being properly forwarded from the AppWiz client to the RulesEngine.
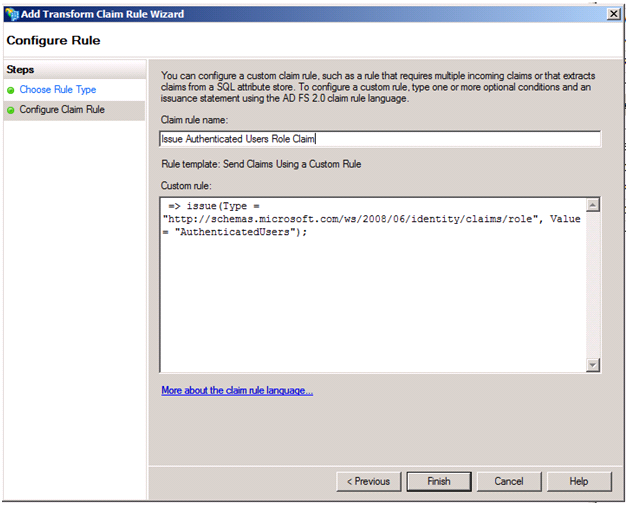
Next, let’s see how we add the Role claim that always provides a value of “AuthenticatedUsers”. Again, we click Add Rule… here we simply want to issue a new Role claim (we don’t want to pass through or transform the existing one). The only way to issue a completely new claim is to use a Custom Rule. So in the Claim rule template, select Send Claims Using a Custom Rule and click next.

All rules that you configure through the rule templates are ultimately expressed in this rule syntax (see the Additional References section for details on the syntax).
Note: A quick point, for any rule you’ve configured that’s not a Custom Rule, you can edit it and click View Rule Language… to see it- this is a great way to bootstrap your custom rule authoring.
Here we write a custom rule, that basically reads irrespective of any incoming claim (the condition that would normally be to the left of the => is empty means this), create and output to the claimset a new claim with the “role” type and a value of “AuthenticatedUsers”. Clicking Finish adds this rule and now we have our second claim being issued.
The third claim we add is for CanLoadData. Recall users who belong to the SeniorManagers Windows group should get this claim with a value of true. To add this rule, again we begin by clicking Add Rule… this time selecting Send Group Membership as a Claim as and clicking Next.
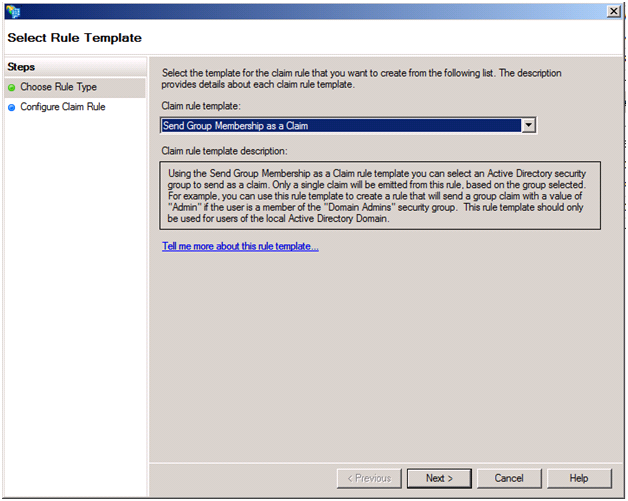
Now we give the rule a friendly name, select the SeniorManager group from AD, specify that the outgoing claim type is canloaddata and give it a value of true as follows:
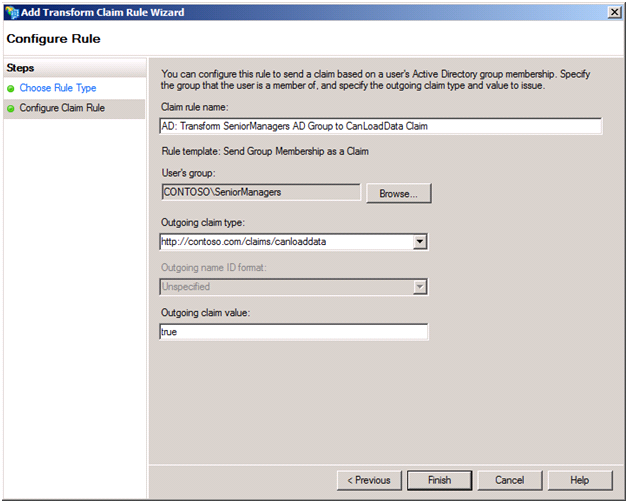
After clicking Finish, we have our third rule in place. Now SeniorManagers will automatically get the canloaddata claim as expected by our scenario.
Back on the Edit Claims Rules for RulesEngine screen, if you click the Issuance Authorization Rules tab you should see this single rule called Permit Access to All Users. This is what we want, as we don’t want to perform any authorization at the STS in our scenario (we just want it to authenticate). We could add similar rules here that control if a user is even granted tokens to present to the RulesEngine.
Securing the ComputationWorkflows with AD FS
Securing the ComputationWorkflows project happens in a way similar to what we did for the RulesEngine. We add an STS Reference to AD FS from the ComputationWorkflows project, this time using the address for the LoadService.xamlx as the value of the Application URI in the first screen of FedUtil. Incidentally, this actually ends up taking care of both services because the service endpoints are not explicitly described in the web.config as it uses a protocolMapping. We run through the rest of FedUtil following exactly the same steps as we did for RulesEngine.
Next, we need to register the ComputationWorkflows application with ADFS. We add the Relying Party Trust as previously described, but this time use the FederationMetada.xml located under the ComputationWorkflows project. We then create the following issuance rules:
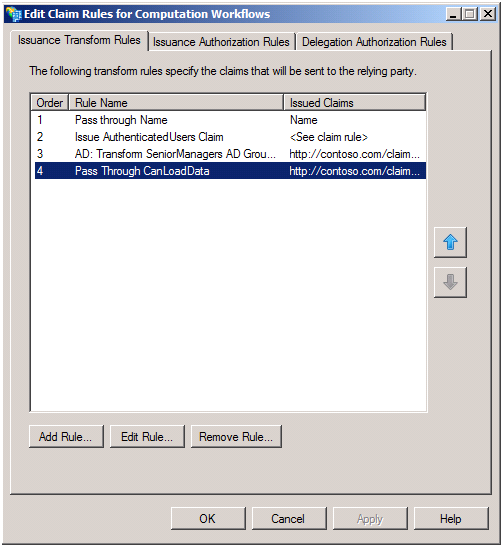
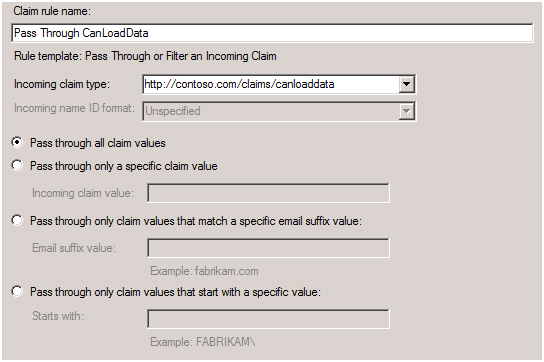
The first three are exactly the same as those we added to RulesEngine. The fourth one is new. This one is responsible for taking the CanLoadData claim acquired and passed down by the RulesEngine and passing it thru to the ComputationWorkflows when it performs the ActAs delegated call. This rule uses the Pass Through or Filter an Incoming Claim rule template and is configured as follows:
Just as for the RulesEngine, we don’t specify any authorization at the STS, so our Issuance Authorization Rules tab contains just the single Permit Access to All Users entry.
Now, the ComputationWorkflow has a unique requirement because it is the target of invocations that use delegated, ActAs credentials. By default, delegation is disabled. In order to allow it, on the Delegation Authorization Rules tab, we click Add Rule… and select Permit All Users in the drop down and click Next.
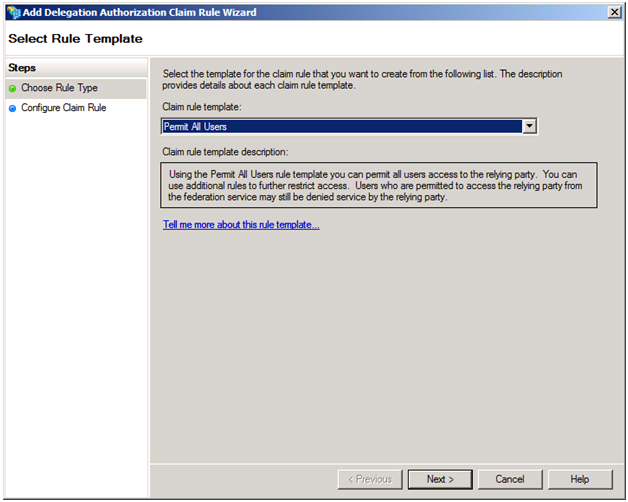
Clicking Finish will allow any callers to use delegated credentials. In the real world, you will likely choose a specific account that is allowed to perform delegation (such as NETWORK SERVICE) and then specify a Permit or Deny Users Based on an Incoming Claim rule template that checks for that account name.
With that we have fully configured AD FS for both services, now we just need to update the service references so the clients know to authenticate against AD FS.
Update the Service References in the RulesEngine
First, in Visual Studio, from the RulesEngine project update the service reference to the Load service so that it gets the new federation settings. We need to adjust web.config so that the Download endpoint uses the same settings as were automatically applied to Load when we updated the service reference. Open web.config and update the client endpoint for the Download service. Change the binding to custom and the bindingConfiguration value so it uses the same configuration name as Load. Here’s an example:
<system.serviceModel>
<client>
<endpoint address="https://localhost/ComputationWorkflows/DownloadService.xamlx"
binding="customBinding" bindingConfiguration="WS2007FederationHttpBinding_IService2"
contract="Download.IService" name="WS2007FederationHttpBinding_IService">
<identity>
<certificate encodedValue="…" />
</identity>
</endpoint>
<endpoint address="https://localhost/ComputationWorkflows/LoadService.xamlx"
binding="customBinding" bindingConfiguration="WS2007FederationHttpBinding_IService2"
contract="Load.IService" name="WS2007FederationHttpBinding_IService1">
<identity>
<certificate encodedValue="…" />
</identity>
</endpoint>
</client>
Update the DataWizApp client's Service Reference
Simply update service reference on Contoso (rules engine) and the app.config is updated for federation with AD FS.
Because this client will need to also request CanLoadData, add the canloaddata claim to the requested claims and select the Kerberos ADFS endpoint(by modifying the SecondaryParameters Claims collection in the custom binding as we had shown previously when we configured the RulesEngine to use AD FS).
Integrating AD FS with other data stores: Provide additional claim information in the form of attributes acquired from Microsoft SQL Server. Extra Credit J
While Active Directory might store organization and contact information, it would not likely store other user information such as preferences, favorites, authorized working hours or similar items useful to the application. Here we show how we can leverage multiple attribute stores simultaneously (e.g., Active Directory & SQL) from ADFS to provide richer claims about the identity.
For simplicity we will use the following database create in our local copy of SQL Express. It contains a single table called Users, which itself has three columns: Id, Name and DOB:
/****** Object: Table [dbo].[Users] Script Date: 12/11/2010 14:27:05 ******/
IF EXISTS (SELECT * FROM sys.objects WHERE object_id = OBJECT_ID(N'[dbo].[Users]') AND type in (N'U'))
DROP TABLE [dbo].[Users]
GO
/****** Object: Table [dbo].[Users] Script Date: 12/11/2010 14:27:05 ******/
SET ANSI_NULLS ON
GO
SET QUOTED_IDENTIFIER ON
GO
IF NOT EXISTS (SELECT * FROM sys.objects WHERE object_id = OBJECT_ID(N'[dbo].[Users]') AND type in (N'U'))
BEGIN
CREATE TABLE [dbo].[Users](
[Id] [int] IDENTITY(1,1) NOT NULL,
[Name] [varchar](255) COLLATE SQL_Latin1_General_CP1_CI_AS NOT NULL,
[DOB] [date] NOT NULL
)
END
GO
SET IDENTITY_INSERT [dbo].[Users] ON
INSERT [dbo].[Users] ([Id], [Name], [DOB]) VALUES (3, N'CONTOSO\John Doe', CAST(0xDF080B00 AS Date))
INSERT [dbo].[Users] ([Id], [Name], [DOB]) VALUES (4, N'CONTOSO\Jane Doe', CAST(0x3F080B00 AS Date))
SET IDENTITY_INSERT [dbo].[Users] OFF
You may want to add additional records that match the names of users you will test with.
After creating the database, you need to create a login for Network Service (or the account under which AD FS is running) and give it database owner permissions (a little overkill, but for simplicities sake).
Now we can look at what it takes to configure AD FS to query the Users table. First we need to register the database by adding a SQL Attribute Store. Within the AD FS 2.0 MMC, right-click the Attribute Stores folder and select Add Attribute Store… in the dialog that appear provide a user friendly display name, select SQL as the Attribute store type and enter the connection string and click OK:

Now we can access this DB for querying from our claims issuance rules, so let’s add a rule that adds the DOB value queried for the user from the Users table to the set of emitted claims. For RulesEngine, add custom rule that looks up DateOfBirth DOB. To do this, go to the Relying Party Trusts folder. Right-click on the RulesEngine entry and select Edit claims rules… on the Issuance Transform Rules tab click Add Rule… IN the first dialog, select the Send Claims Using a Custom Rule template (queries to other Attribute Stores always use custom rules) and click Next. Define the rule as follows:
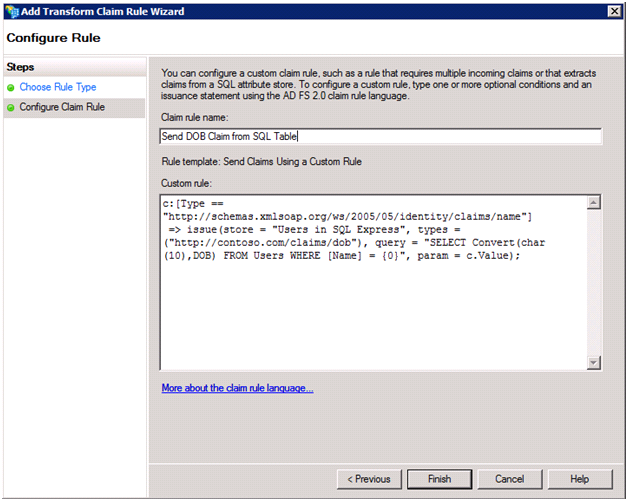
Notice the syntax for the query parameter in the issue statement is parameterized to use the value of the incoming Name claim in an approach similar to String.Format(). Note that the parameter {0} is not surrounded by single quotes as you might be inclined to do…adding these quotes will generate an error.
There are a few items to point out when writing a custom rule for this. First, in the select statement a column maps to a claim type (where the types parameter in the rule lists out the types in order). Returning multiple rows results in multiple claim values for that claim type. In our case, we have only one column and one row, so we emit exactly one claim of the DOB type with the value of the DOB field in the database. The second gotcha, is that all values must of a string form (e.g., varchar, char, text, etc) which is why in the above we needed to cast DOB because in the database is stored as a Date. Finally, the value set for the store parameter is the Display Name you entered when you registered the new Attribute Store.
With this rule in place, you can access the DOB claim in service code as you would any other (e.g., Service.svc.cs), even within a workflow service (following the steps we showed in the first blog entry)!
Conclusion
In conclusion, you saw how it was possible to replace a custom STS solution with AD FS 2.0 that that was needed to do so was configuration changes. And more importantly we also demonstrated how easy it is to integrate data from other stores to provide other claim data/attributes. I do hope this blog post series helped you with your architectural decisions around securing Services hosted by Windows Server AppFabric.
Additional Resources
- Prequel Blog - Securing WCF Services hosted in Windows Server AppFabric with Windows Identity Foundation (WIF): https://blogs.msdn.com/b/appfabriccat/archive/2010/10/30/securing-wcf-services-hosted-in-windows-server-appfabric-with-windows-identity-foundation-wif.aspx
- ADFS 2.0: https://www.microsoft.com/downloads/en/details.aspx?FamilyID=118c3588-9070-426a-b655-6cec0a92c10b&displaylang=en
- WIF Runtime: https://www.microsoft.com/downloads/en/details.aspx?FamilyID=eb9c345f-e830-40b8-a5fe-ae7a864c4d76&displaylang=en
- WIF SDK: https://www.microsoft.com/downloads/en/details.aspx?FamilyID=c148b2df-c7af-46bb-9162-2c9422208504&displaylang=en
- Setting up an AD FS 2.0 with WIF lab environment: https://technet.microsoft.com/en-us/library/adfs2-federation-wif-application-step-by-step-guide(WS.10).aspx
- AD FS Claims Rules Language Syntax: https://technet.microsoft.com/en-us/library/dd807118(WS.10).aspx
Acknowledgement
Acknowledge contributions from Mark Simms and Paolo Salvatori
Namaste!