Securing WCF Services hosted in Windows Server AppFabric with Windows Identity Foundation (WIF)
A key challenge while designing and deploying Web Services is access control and this blog post is the first in a two part series focused on leveraging Windows Identity Foundation (WIF) to secure Services hosted in Windows Server AppFabric. In this first blog post we focus on securing both WCF and Workflow Services and also delve into using ‘delegation’. Delegation is an interesting challenge, especially in scenarios wherein it’s important to maintain a caller’s original identity irrespective of how many Service hops are traversed between the Client and the final Service. In the sequel to this blog, the second one, we will use Active Directory Federation Services 2.0 to manage access control.
Background
While this blog posting does not elaborate the fundamentals of access control in great detail, some background is provided for context. Additionally a good set of references are linked to this blog.
Windows indentity foundation (WIF)
Windows Identity Foundation (WIF) provides the infrastructure for securing both Websites and (WCF) Services using a claims-based approach. WIF enables .NET developers to externalize identity logic from their application, thereby greatly improving developer productivity. WIF is part of Microsoft's identity and access management solution built on Active Directory. WIF provides implementation for well accepted user authentication protocols like WS-Federation/WS-Trust and the ‘token’ format (SAML) wherein the identity is a part of the request envelope and travels between applications. While WIF does not provide an identity store (user names and passwords), it is designed to query both LDAP identity Stores (AD) and relational databases (SQL).
WIF offers APIs for ASP.NET and WCF developers that can be used to build claims-aware and federation capable applications. WIF was developed under the well-known codename "Geneva" Framework and is currently available for download and deployment. Windows Identity Foundation is supported on IIS6/Windows Server 2003 and IIS7/Windows Vista, Windows Server 2008 and Windows 7.
Getting Started
In order to develop using WIF on Visual Studio 2010, you will need two things. First, you will need the runtime components which are referred to as the Windows Identity Foundation. You will also need to install the Windows Identity Foundation SDK 4.0. The SDK provides Visual Studio project templates and enhances Visual Studio with a menu option called Add STS Reference that allows you to provide authentication functionality.
Using WIF to Secure Services Hosted by AppFabric
There are quite a few blog posts that provide incorrect information and suggest that Workflow Services cannot be easily secured. With this posting we hope to dispel that myth!
WIF and AppFabric integration - it just works.
Note: You don't need to use the WF Security Activity Pack unless your Workflow Services are making delegated identity calls to other services. If your Workflow Services are the end of the call chain, then WIF is usually all you need.
Scenario
To demo the AppFabric-WIF integration, we use the Contoso DataWiz application. This application allows users to upload data to a warehouse and extract data from the store with a subsequent request. The upload scenario is typical. In the download scenario, a user creates a request for the backend services that in turn will create and deliver a file containing the requested data. Once the data is ready for delivery, the user is sent an e-mail containing a link to the file.
The following screenshots of the DataWiz application describe the aforementioned process.
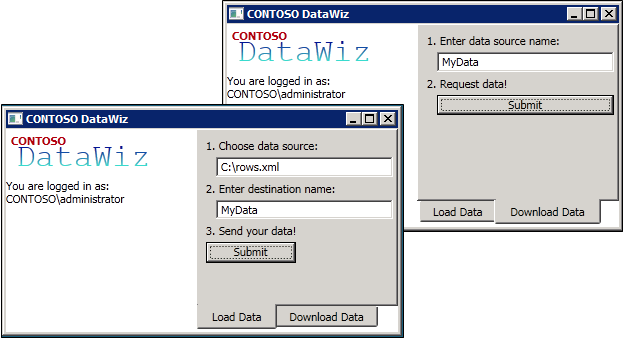
The DataWiz is a WPF Client; the Rules Engine is a WCF Service and the Data Store is fronted by a Workflow Service.
Architecture
This section has two parts, where the first introduces the architecture at the Services level, whereas the second provides an integrated architecture that accounts for access control.
Service Architecture View – Implementation Pattern
The figure below shows the architecture to implement the scenario
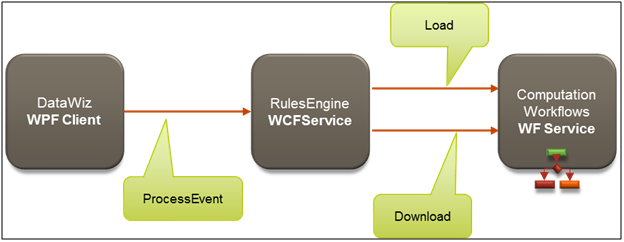
The Rules Engine/WCF Service is invoked when the user clicks the ‘Submit’ button on the WCF Client. The event handler invokes the ‘ProcessEvent’ operation. The RulesEngine then examines which event was raised and calls either the Download operation of the DownloadService or the Load operation of the LoadService, both of which we collectively refer to as Computation Workflow.
Integrated Access Control View
In this section we integrate access control to the implementation pattern elaborated above. In the graphic below, Secure Token Service is included. Access control is required to authenticate and authorize web service calls when both upload and download operations are invoked.
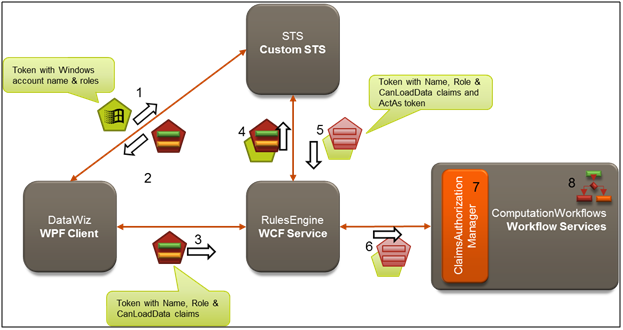
Let’s walk thru a submission following the numbered sequence and introducing the important concepts along the way.
1. A user launches the DataWiz, and it uses the logged on Windows Credentials (say CONTOSO\Administrator). When user clicks Submit on the Load Data tab, the user’s Kerberos or NTLM credentials (basically the user name and groups) are sent as claims within a security token to the STS (Security Token Service) as part of a request for another security token containing claims that the Rules Engine understands.
2. The STS is a Web Service that takes the incoming security token and issues a new security token matching the client’s request. In this scenario, from the Windows credentials presented we need a token containing three claims: Name (has a value of the Windows user name), Role (having the value “AuthenticatedUsers”) and CanLoadData (which is only present and has a value of “true” if the caller is a member of the SeniorManagers Windows group). The STS creates this token and send it back to the DataWiz client.
3. Now that the DataWiz client has the right claims to present to the RulesEngine, it calls the ProcessEvent operation and includes the token in the message headers. At this point, the RulesEngine could perform an authorization check against the presented claims and allow or deny the call based on some rules. For simplicity, it authorizes all callers. The RulesEngine will determine which service it needs to call. The RulesEngine has been configured to call the Computation Workflow by delegating the identity of the original caller (e.g., CONTOSO\Administrator) while preserving the identity actually running the RulesEngine (which is NETWORK SERVICE). This form of delegation is called ActAs delegation, because the client (the RulesEngine in this case) will be calling the underlying Computation Workflow acting as the original caller (CONTOSO\Administrator).
4. In order to get tokens relaying both identities, the RulesEngine must call out to the STS again presenting both identities.
5. The STS takes the presented identity of the caller (Network Service) and adds it to a chain of identities (referred to as actors) beneath the ActAs identity (CONTOSO\Administrator) and returns a new set of tokens.
6. The RulesEngine presents these security tokens in its call to a computation workflow.
7. In the case of a Load, an authorization check is required by Contoso to ensure that the user has the CanLoadData claim with a value of “true” before actually allowing the workflow service to respond to the request. No such check is done for calls to Download. This check is performed by a ClaimsAuthorizationManager.
8. WCF Workflow Services may perform additional authorization on claims using logic defined in the workflow.
The key take away of this solution is that we have eliminated the use of a trusted sub-system approach to security. In the trusted sub-system approach, the Computation Workflows would have been called using the identity of the middle-tier service (e.g., the RulesEngine) that called it, instead of the identity of the original caller. This introduces the risk that the caller may obtain privileges from the middle-tier’s identity which he should not be permitted to execute at the back-end. By delegating the original caller’s identity all the way through to the back-end we have mitigated this risk.
Implementation
In order to succinctly illustrate the key implementation steps, we provide a link to the finished solution files for your review and use, <link to codeplex here>.
In sections below we will move forward with the assumption that the upload/download process/components are developed and the solution is being enhanced to apply access control to it. This is typical of how most projects are developed.
Starting out
We start with a working solution that has the WPF DataWiz client project, the WCF Service RulesEngine project and the WCF Workflow Service ComputationWorkflows project. These three applications communicate in an unsecured fashion. DataWiz app calls the rules engine's ProcessEvent with a Load or Download event parameter, and then the RulesEngine calls the appropriate Workflow Service in the ComputationWorkflows project. Both service projects are hosted and managed by Windows Server AppFabric.
Both WCF and WCF/WF Services have includeExceptionDetailsInFaults=true so that errors propagate back to the DataWiz client when they occur, irrespective of depth.
In the following sections we will proceed through steps to secure the RulesEngine and ComputationWorkflows projects by creating the STS project and modifying the client to authenticate with the STS. In this scenario, we implement our STS using templates included in the WIF SDK.
Securing the RulesService with a Custom STS
The first step is to use STS to perform authentication for the RulesEngine. To do this, we right click on the RulesEngine Project and select Add STS Reference.
The three screenshots show the sequence; and to reiterate the only action we take is to select Create a new STS Project in the current solution in the Security Token Service screen.
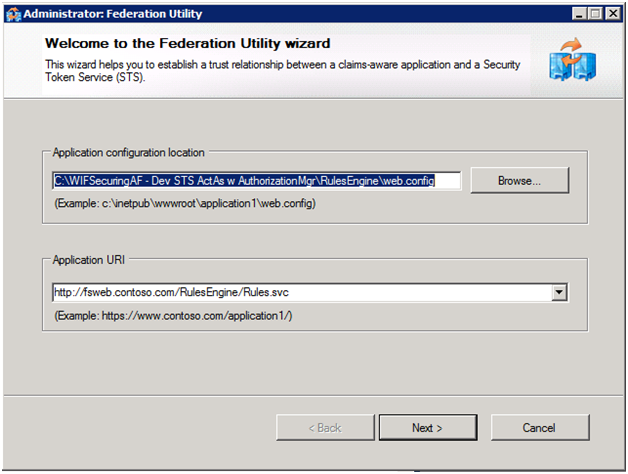
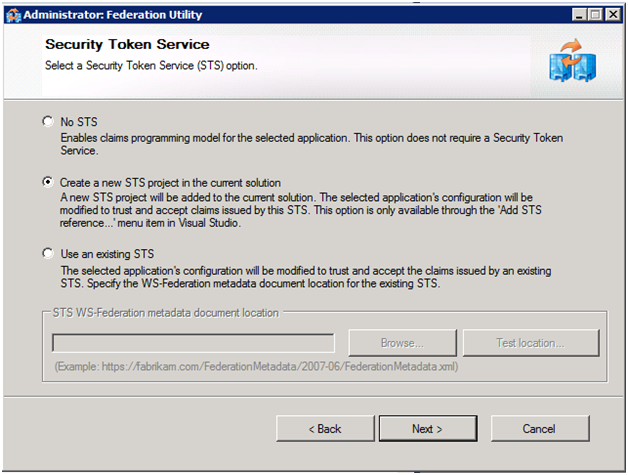
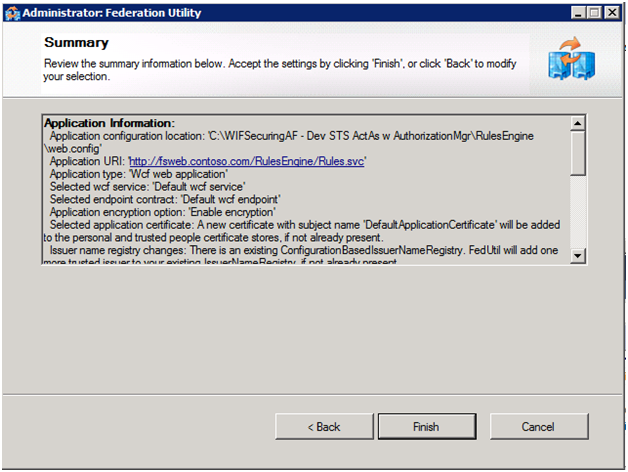
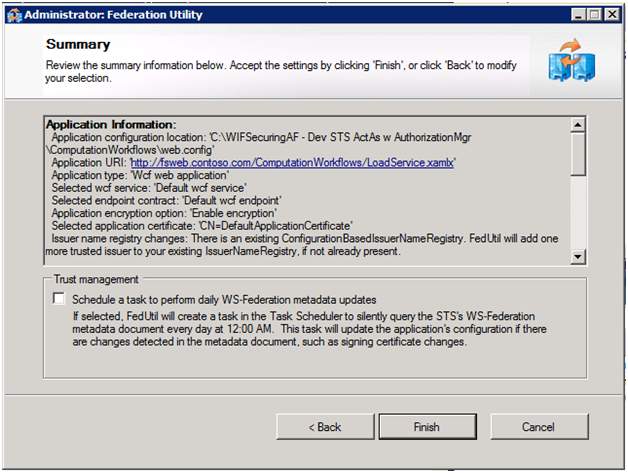
Let’s now review the important details on the summary screen: the wizard (FedUtil.exe aka FedUtil) automatically creates the two certificates we will use - one for data encryption of tokens between applications like the RulesEngine and the STS; and the second for data signing (for digitally signing the token so it can be recognized as coming only from the STS).
As a result of running FedUtil, our solution now contains a fourth project representing a custom STS Observer that is a starter STS, one that’s good for use while developing the solution, but far from ready for production use. In addition, our RulesEngine Service is now configured to use this STS for authenticating clients.
In terms of authorization - we don't do any here (although we could). This service is focused on getting the right tokens passed down to the appropriate Computation Workflow service based on the incoming parameters. We'll return to finish the delegation parts after we secure the ComputationWorkflows and update the STS to support delegation.
Update the Custom STS to Emit Desired Claims and Support ActAs Delegation
Next, we need to make a series of changes to auto-generated STS so that it will issue the three claims we want and support ActAs delegation.
First, we need to modify GetOuputClaims() of the CustomSecurityTokenService class (located under the App_Code folder of newly added STS project) to emit a role claim with a value of “authenticatedusers” and canloaddata claims when the user being authenticated belongs to the SeniorManagers role. The following code snippet shows the complete method implementation:
protected override IClaimsIdentity GetOutputClaimsIdentity( IClaimsPrincipal principal, RequestSecurityToken request, Scope scope )
{
if ( null == principal )
{
throw new ArgumentNullException( "principal" );
}
IClaimsIdentity outputIdentity = new ClaimsIdentity();
//TODO: demonstrate looking up other attributes here (e.g., from SQL Membership/Role/Profile store)
outputIdentity.Claims.Add( new Claim( System.IdentityModel.Claims.ClaimTypes.Name, principal.Identity.Name ) );
outputIdentity.Claims.Add( new Claim( ClaimTypes.Role, "AuthenticatedUsers" ) );
if (principal.IsInRole("SeniorManagers"))
{
outputIdentity.Claims.Add(new Claim("https://contoso.com/claims/canloaddata", "true"));
}
if (request.ActAs != null)
{
outputIdentity = ((IClaimsIdentity)principal.Identity).Copy();
IClaimsIdentity currentActAsIdentity = request.ActAs.GetSubject()[0].Copy();
IClaimsIdentity lastActor = currentActAsIdentity;
while (lastActor.Actor != null)
{
lastActor = lastActor.Actor;
}
lastActor.Actor = outputIdentity;//set last actor in chain to Id of caller (RulesEngine's ID)
outputIdentity = currentActAsIdentity; //set the ActAs Identity as the primary identity, instead of using the immediate caller's identity
}
return outputIdentity;
}
In the above, note how you could use another identity store queried by STS (possibly SQL membership/roles schema). Also, note how we setup the chain of identities when delegating (as we determine by checking the request.ActAs property for a non-null value), such that the identity returned is the identity we are acting as, but the actual identity of the caller is the first actor.
In order to enable handling of the additional ActAs security token we add the ActAsSecurityTokenServiceFactory class whose primary duty is construct a service host STS that’s configured with a Saml11SecurityTokenHandler for processing the ActAs token. The bulk of this work is done in the CreateServiceHost override, which is as follows:
public override ServiceHostBase CreateServiceHost(string constructorString, Uri[] baseAddresses)
{
CustomSecurityTokenServiceConfiguration config = new CustomSecurityTokenServiceConfiguration();
Uri baseUri = baseAddresses.FirstOrDefault(a => a.Scheme == "http");
if (baseUri == null)
throw new InvalidOperationException("The STS should be hosted under http");
config.TrustEndpoints.Add(new ServiceHostEndpointConfiguration(typeof(IWSTrust13SyncContract), GetWindowsCredentialsBinding(), baseUri.AbsoluteUri));
// Set the STS implementation class type
config.SecurityTokenService = typeof(CustomSecurityTokenService);
// Create a security token handler collection and then provide with a SAML11 security token
// handler and set the Audience restriction to Never
SecurityTokenHandlerCollection actAsHandlers = new SecurityTokenHandlerCollection();
Saml11SecurityTokenHandler actAsTokenHandler = new Saml11SecurityTokenHandler();
actAsHandlers.Add(actAsTokenHandler);
actAsHandlers.Configuration.AudienceRestriction.AudienceMode = AudienceUriMode.Never;
//Set the appropriate issuer name registry
actAsHandlers.Configuration.IssuerNameRegistry = new ActAsIssuerNameRegistry();
// Set the token handlers collection
config.SecurityTokenHandlerCollectionManager[SecurityTokenHandlerCollectionManager.Usage.ActAs] = actAsHandlers;
WSTrustServiceHost host = new WSTrustServiceHost(config, baseAddresses);
return host;
}
As part of CreateServiceHost we configure the ActAsHandlers to use a custom Issuer Name Registry, that simply checks that the certificate used to sign the token is the same one used by our STS. We do this by adding the new ActAsIssuerNameRegistry class as follows.
public class ActAsIssuerNameRegistry : IssuerNameRegistry
{
/// <summary>
/// Overrides the base class. Validates the given issuer token. For a incoming SAML token
/// the issuer token is the Certificate that signed the SAML token.
/// </summary>
/// <param name="securityToken">Issuer token to be validated.</param>
/// <returns>Friendly name representing the Issuer.</returns>
public override string GetIssuerName(SecurityToken securityToken)
{
X509SecurityToken x509Token = securityToken as X509SecurityToken;
if (x509Token != null)
{
// Warning: This sample does a simple compare of the Issuer Certificate
// to a subject name. This is not appropriate for production use.
// Check your validation policy and authenticate issuers based off the policy.
if (String.Equals(x509Token.Certificate.SubjectName.Name, "CN=STSTestCert"))
{
return x509Token.Certificate.SubjectName.Name;
}
}
throw new SecurityTokenException("Untrusted issuer.");
}
}
Note: Both of the aforementioned classes (ActAsIssuerNameRegistry and ActAsSecurityTokenServiceFactory) are variants from the sample code in the Identity Training Kit 2010 under WebServicesAndIdentity\Source\Ex3-InvokingViaDelegatedAccess\End\ActAsSts\App_Code.
Finally, because we need to use our custom factory instead of WIF’s default one, we update Service.svc so that it contains the following line:
<%@ ServiceHost language="C#" Factory="ActAsSecurityTokenServiceFactory" Service="ActAsSts.CustomSecurityTokenServiceConfiguration" %>
Securing the ComputationWorkflows with a Custom STS and a Claims Authorization Manager
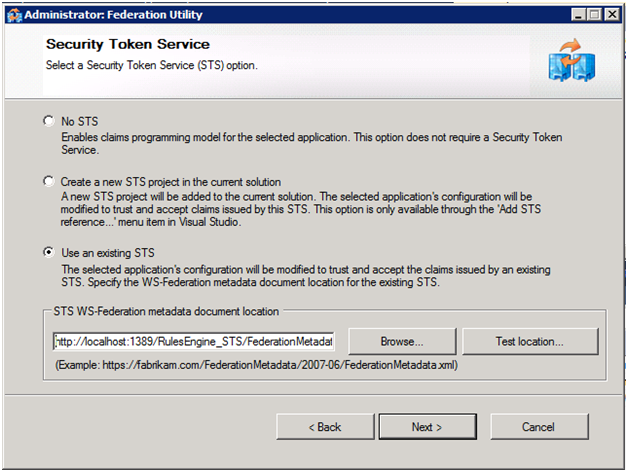
With our STS in place we can now use it for authenticating users accessing our ComputationWorkflows services via delegation. We do this by selecting Add STS Reference from the context menu of the ComputationWorkfows project. The steps we take through FedUtil this time are similar, but instead of creating a new STS, we configure the use of our existing one (whose metadata lives at https://localhost:1389/RulesEngine_STS/FederationMetadata/2007-06/FederationMetadata.xml and uses the DefaultApplicationCertificate created previously for encryption), as shown in the following screen shots:
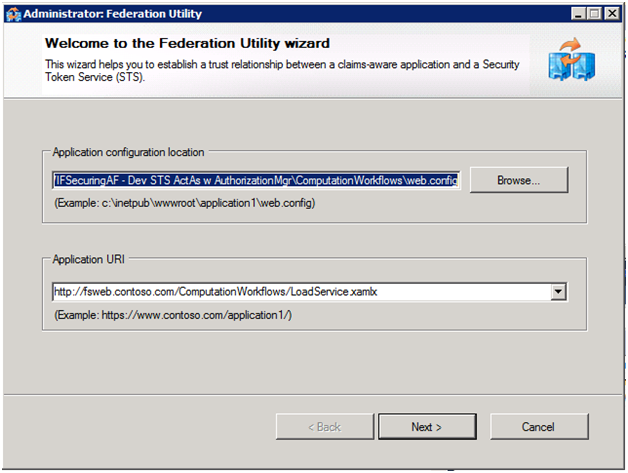


Note: You may have noticed that in this last run of FedUtil we used the LoadService.xamlx as our endpoint. To enable the STS to also apply to DownloadService.xamlx, we added both to the list of applications defined in the audienceUris section of the ComputationWorkflows’ web.config:
<audienceUris>
<add value="https://fsweb.contoso.com/ComputationWorkflows/LoadService.xamlx" />
<add value="https://fsweb.contoso.com/ComputationWorkflows/DownloadService.xamlx" />
</audienceUris>
Now let’s turn our attention to how we can perform authorization for our workflow services. Here we have two options, we can perform the authorization before the message reaches the workflow or we can perform the authorization within the workflow. Performing it before it reaches the workflow is valuable because it removes any authorization logic that would be cluttering up the business logic of your workflow design, and allows you to change the authorization logic independently of the service implementation. In order to perform authorization in this fashion, we need to create a class that derives from ClaimsAuthorizationManager and add it to the ComputationWorkflows project. Recall that we wanted to restrict access to the Load operation (the action) only to users who have a CanLoadClaims claim. The following code shows the complete implementation, do notice how few lines of code you need to get this done.
public class DataWizClaimsAuthorizationManager : ClaimsAuthorizationManager
{
public override bool CheckAccess(AuthorizationContext context)
{
if (context.Action[0].Value == "https://tempuri.org/IService/Load")
{
return ((IClaimsPrincipal)context.Principal).Identities[0].Claims.Exists(c => c.ClaimType == "https://contoso.com/claims/canloaddata");
}
else
{
return true;
}
}
}
In order for this ClaimsAuthorizationManager to sit in the message processing pipeline, we simply need to register it in the web.config of the ComputationWorkflows. This is done by adding the claimsAuthorizationManager element to the service element within the microsoft.identityModel section:
<microsoft.identityModel>
<service>
<audienceUris> … </audienceUris>
<issuerNameRegistry> … </issuerNameRegistry>
<claimsAuthorizationManager type="DataWizClaimsAuthorizationManager"/>
</service>
</microsoft.identityModel>
NOTE: A ClaimsAuthorizationManager can equally be used to authorize access to code-based WCF services, and is built and configured in exactly the same way.
View claims as Appfabric Tracked Events
While it was not a requirement of our scenario, it’s worth a brief review to see how we can examine claims with the Workflow Services. Let’s say we simply want to log some of the claims as custom tracking records so that we can view them in the AppFabric Tracked Events View, similar to the following:
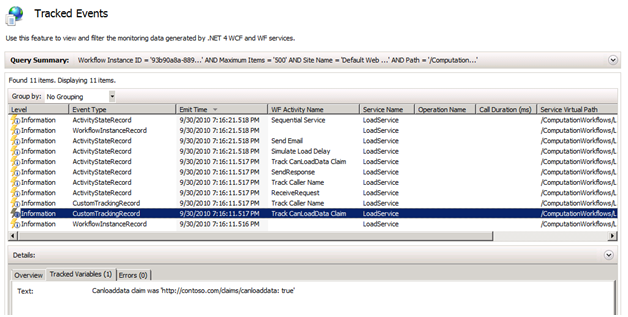
We can do that simply by creating a custom activity that takes as input a string and creates a custom tracking record from that string (see the source code for this). The crux of getting at an individual claim is illustrative of how you always access claims using WIF—via the System.Threading.Thread.CurrentPrincipal property. For example, to get the value for the previous screenshot, we used the following Visual Basic expression:
String.Format("Canloaddata claim was '{0}'", _
(From claim In DirectCast(System.Threading.Thread.CurrentPrincipal, Microsoft.IdentityModel.Claims.IClaimsPrincipal).Identities(0).Claims _
Where claim.ClaimType = "https://contoso.com/claims/canloaddata").FirstOrDefault())
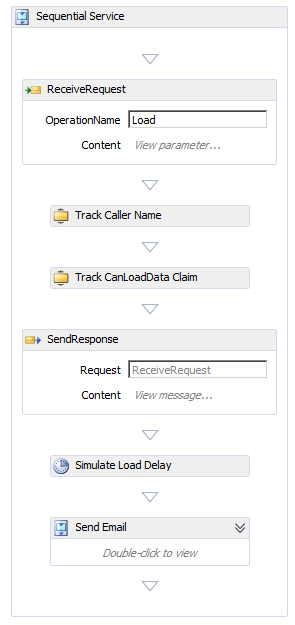
The previous expression was evaluated by the Track CanLoadDataClaim activity in this sequence (notice the location of this activity; we only access the identity between the ReceiveRequest and SendResponse):
Update the ComputationWorkflow service references in the RulesService
Now that we have finished securing both service projects, we need to update the clients so that they get the new configurations and know to call the STS. We start with the RulesService, which itself has two service references (one to the LoadService and one to the DownloadService). We update the service reference to the LoadService (right click on the Load Reference and select Update Service Reference). This updates the web.config with federation configuration, but we still have some work to do.
In order to capture the Identity of the RulesService’s clients (e.g., users of the DataWiz app) so we can pass down the incoming credentials to the ComputationWorkflows, we need to configure WIF to persist this original identity after it has finished its authorization (otherwise it would just discard it). This identity is referred to as a Bootstrap Token. We do this by modifying RuleEngine’s web.config by adding saveBootstrapTokens=true attribute to the service element as shown:
<microsoft.identityModel>
<service saveBootstrapTokens="true">
Since we updated the Service Reference to Load, its client endpoint in web.config is correctly configured to use the STS. We need to copy Load client endpoint and tweak it for use by Download (since they use the same settings). All we need to update are the address and contract values, so that it looks as shown:
<endpoint address="https://localhost/ComputationWorkflows/DownloadService.xamlx" binding="ws2007FederationHttpBinding" bindingConfiguration="WS2007FederationHttpBinding_IService" contract="Download.IService" name="WS2007FederationHttpBinding_IService">
<identity>
<certificate encodedValue="…" />
</identity>
</endpoint>
Now, in order to actually pass down ActAs credentials, we need to change how create and use a proxy to the target ComputationWorkflows Workflow Service. Specifically, we have to make use of WIF's extension methods. First, we need to add a reference to Microsoft.IdentityModel to the ComputationWorkflow project. Then, we need to add a using statement as follows:
using Microsoft.IdentityModel.Protocols.WSTrust; //need to add this for channel extension methods
Finally, we need to modify the code to get the bootstrap token and pass it in with the request. For example, here’s how we changed the implementation of the ProcessEvent operation for the Download event (the first lines that are commented out are for reference as to how we had called it without ActAs):
//Download.ServiceClient proxy = new Download.ServiceClient();
//eventId = proxy.Download(new Download.Download() { sourceName = from });
SecurityToken bootstrapToken = ((IClaimsPrincipal)Thread.CurrentPrincipal).Identities[0].BootstrapToken;
ChannelFactory<RulesEngine.Download.IService> factory = new ChannelFactory<Download.IService>("WS2007FederationHttpBinding_IService");
factory.ConfigureChannelFactory(); //configures the factory to use federated client credentials
Download.IService proxy = factory.CreateChannelActingAs(bootstrapToken);
eventId = proxy.Download(new Download.DownloadRequest() { Download = new Download.Download() { sourceName = from } }).@string;
In the above, observe the call to factory.CreateChannelActingAs. This is an extension method provided by WIF that enables us to pass along the bootstrap token as an ActAs token in addition to our own token when an operation, like Download, is invoked.
Finish it up by Updating the DataWizApp Client's Service Reference
Finally, we also need to update the DataWizApp’s service reference to the RulesEngine service. This time we don’t need to add a reference to Microsoft.IdentityModel because we aren’t using WIF on the client side. After updating the reference on Contoso (which maps to the rules engine), app.config is updated for federation with STS and our solution will flow credentials as described in the scenario
Additional Resources
1. Download the DataWiz Code Sample:
File Attachment - WIFSecuringAF - Dev STS ActAs w AuthorizationMgr.zig
2. WIF DevCenter on MSDN https://msdn.microsoft.com/en-us/security/aa570351.aspx
3. Identity Developer Training Kit (VS 2010 Edition) https://www.microsoft.com/downloads/en/details.aspx?displaylang=en&FamilyID=c3e315fa-94e2-4028-99cb-904369f177c0
4. Download WIF https://www.microsoft.com/downloads/en/details.aspx?FamilyID=eb9c345f-e830-40b8-a5fe-ae7a864c4d76&displaylang=en
5. Download WIF 2010 SDK https://www.microsoft.com/downloads/en/details.aspx?FamilyID=c148b2df-c7af-46bb-9162-2c9422208504&displaylang=en
Namaste!
Acknowledge review and comments from
Paolo Salvatori https://blogs.msdn.com/members/leprino/.