One-Click Publishing of .NET4 Workflow (XAML) Definitions for Services hosted in AppFabric – similar to the ‘Activate’ Workflows in SharePoint Server 2010!
Simplifying publishing of the Workflow definitions
Typically Business Analysts (IT Pro) own the process of creating Workflow definitions while publishing this definition, particularly to production environments, is relegated to IT/Production Systems Staff. While this approach is acceptable in many commercial establishments, there is also the need for corporations with relatively smaller IT Org footprint to handover responsibility of publishing and managing Workflow definitions to the IT Pros.
SharePoint Server makes it possible for IT Pros and Business Analysts to seamlessly design and ‘activate’ Workflow definitions with ‘one-click’ https://technet.microsoft.com/en-us/library/cc262348.aspx; IT industry expects similar experiences to publish definitions while using .NET4 based Windows Workflow (WF) applications. IT Pros abhor the use of the Workflow Designer within Visual Studio 2008 and consequently, the re-hosted Workflow Designer Application (see this link for more on re-hosting Workflow Designer) with the ‘one-click’ publish function is required. Increasingly, developers are looking for samples to jump start the implementation of the ‘one-click’ publication of Workflow definitions to Windows Server AppFabric. This blog entry addresses this need.
Without this ‘one-click’ approach the publishing process (deploying Workflow definitions from a re-hosted Workflow Designer), is very tedious. Requiring manual file copy; creating the package on the re-hosted Designer; importing the package and running the configuration steps on the remote AppFabric Server. Another advantage of automating the process is that it is less prone to potential errors due to the manual steps. Investing in this ‘one-click’ feature will pay off in multiple ways for a long time.
Scenario
For this blog post, we define a scenario wherein an ISV Developer is building a Workflow Studio that re-hosts the Windows Workflow Designer. The ‘one-click’ method leverages Microsoft's Web Deployment Framework to publish XAMLX Workflow definitions from the Workflow Studio to the designated Windows Server AppFabric Server (with IIS role enabled).
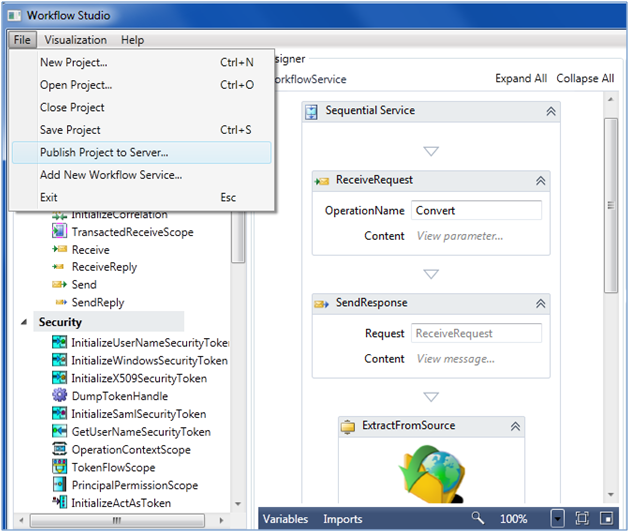
The Workflow Studio is a lightweight equivalent to the Visual Studio 2010 Workflow Designer experience. This Workflow Studio includes the ‘one-click’ publishing method in addition to other features that are required to manage the definition once deployed to the AppFabric Server.
Solution
Overview
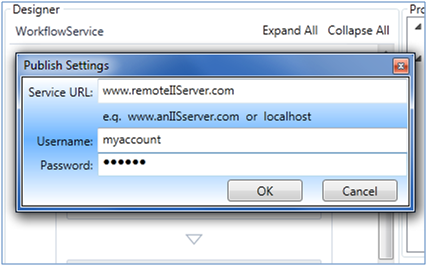
One key requirement for performing the remote publishing of the Workflow definition is that the Workflow Studio Application needs to provide the IIS Server's URI/location along with user account credentials. This is illustrated in the graphic below.
The other ‘steps’ in developing the ‘one-click’ method are presented below.
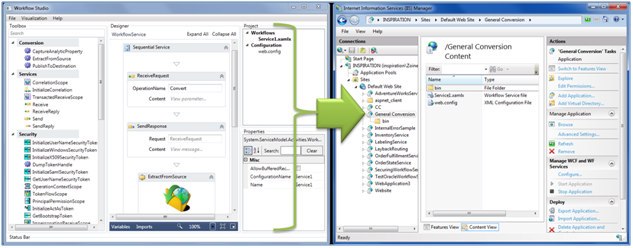
Step 1: Publish local project as an application on the remote IIS Server
Web Deploy is used to publish the project as an application on the IIS Server. The code below leverages the Web Deploy API to perform the remote publishing actions. This action synchronizes a project directory ‘source’ (e.g., Workflow Studio) with a destination application hosted on the target IIS Server. The source in this scenario is the Workflow Studio’s Workflow project directory containing XAMLX,.config files and supporting .NET assemblies. The destination is the remote IIS Server. Also required is a reference to Microsoft.Web.Deployment.dll in order to use the Web Deploy API in the Workflow Studio Application code. This assembly is available at %program files%/IIS/Microsoft Web Deploy/ .
In scenarios where the IIS Server does not provide a trusted certificate, there is the need to provide a delegate to enable the Workflow Studio deployment code to trust any certificate from the server. The ‘one-click’ Publish operation in the Workflow Studio is very similar to that provided by Visual Studio 2010 via the Web Deploy command line switch: -allowUntrusted.
    1: using System.Net;
    2: ServicePointManager.ServerCertificateValidationCallback = (s, c, chain, err) =>
    3: {
    4:     return true;
    5: };
In preparing the Web Deploy DeploymentObject for synchronization, some options are required to be set and these are: DeploymentBaseOptions, DeploymentProviderOptions and the DeploymentSyncOptions.
DeploymentBaseOptions define host information and DeploymentProviderOptions define provider info and key attribute data. The DeploymentSyncOptions provide settings for customizing the actions of the synchronization itself. The web deployment synchronization involves creating a Deployment Object from a source of information (project, website, application, app pool etc.) and synchronizing this info to a destination object. The source in this case is the project we want to publish as an IIS application on the server.
In the code sample below, we start by configuring the DeploymentBaseOptions for the source as well as the Destination. Setting TempAgent to true enables this synchronization operation to run from a temporary, "on demand" installation of Web Deploy. This is handy for cases where the Web Deploy Remote Agent Service may not be installed at the destination. Two notes: there are different Authentication Type settings used and the choice depends on needs of the destination; and the second is the string used for destinationBaseOptions.ComputerName which is the path to the Web Deployment handle and this is the Web deploy installation default.
Note: Web Deploy supports over 30 different providers out-of-the-box. These providers supply a useful set of tools that address a wide array of synchronizing needs. Resources that can be synchronized include: web sites, applications, content folders and files, databases, registry keys, assemblies in the GAC and more. A custom provider is built for this ‘one-click’ Application and is covered detail in the following section.
After creating the DeploymentBaseOptions, we create the DeploymentProviderOptions for the source and destination, setting the WellKnownProvider and Path for each. We use the IisApp WellKnownProvider because it will be able to use the project folder to create/update a copy of it as an IIS Application at the destination. The path of the source’s DeploymentProviderOptions points to the project’s directory, and the path for the destination’s DeploymentProviderOptions direct the IisApp Provider to the website and application that will be the target of this sync.
Next DeploymentSyncOptions are created, setting DoNotDelete switch to true. The DoNotDelete switch is important; this leaves any un-matching files at the destination alone. Without this setting turned on, these files would be deleted during the sync which is detrimental to this and follow-on projects.
With all knobs for the synchronization created; the Deployment Object, created, is configured with the source information. We call a SyncTo operation on this Object, passing in the Destination and Sync options. The return value of this Operation is a structure that contain information useful to provide the status on the publish process to the IT Pro.
    1: DeploymentBaseOptions sourceBaseOptions = new DeploymentBaseOptions()
    2: {
    3: ComputerName = "localhost";
    4: TempAgent = true;
    5: };
    6:
    7: string deploymentServer = Server;
    8: DeploymentBaseOptions destinationBaseOptions = new DeploymentBaseOptions()
    9: {
   10: ComputerName = "https://SERVER.COM:8172/msdeploy.axd";
   11: UserName = Username;
   12: Password = Password;
   13: AuthenticationType = "Basic";
   14: };
   15:
   16: if (deploymentServer.Equals("localhost"))
   17: {
   18:     destinationBaseOptions.ComputerName = "localhost";
   19:     destinationBaseOptions.AuthenticationType = "NTLM";
   20: }
   21:
   22: DeploymentProviderOptions sourceProviderOptions = new DeploymentProviderOptions("IisApp");
   23: sourceProviderOptions.Path = @"C:\projectDirectory";
   24:
   25: DeploymentProviderOptions destinationProviderOptions = new DeploymentProviderOptions("IisApp");
   26: destinationProviderOptions.Path = "Default Web Site/ExampleApp";
   27:
   28: DeploymentObject projectSourceObject = DeploymentManager.CreateObject(
   29:     sourceProviderOptions,
   30:     sourceBaseOptions);
   31:
   32: DeploymentSyncOptions syncOptions = new DeploymentSyncOptions();
   33: syncOptions.DoNotDelete = true;
   34:
   35: DeploymentChangeSummary results = projectSourceObject.SyncTo(
   36: destinationProviderOptions,
   37: destinationBaseOptions, syncOptions);
   38:
   39: if (results.Errors > 0)
   40: {
   41: MessageBox.Show(
   42: String.Format("Publish Failed. {0} errors. {1} warnings.",
   43: results.Errors, results.Warnings), "Publish Failed",
   44: MessageBoxButton.OK, MessageBoxImage.Error);
   45: }
   46: else
   47: {
   48: MessageBox.Show(
   49: String.Format("Publish Succeeded. Added {0} objects. Deleted {1} objects. Updated {2} objects. Transferred {3} bytes.",
   50: results.ObjectsAdded, results.ObjectsDeleted, results.ObjectsUpdated, results.BytesCopied), "Publish Succeeded",
   51: MessageBoxButton.OK, MessageBoxImage.Information);
   52:
   53: System.Diagnostics.Process.Start("https://" + deploymentServer + "/" + dirName + "/" + System.IO.Path.GetFileName(fileNames[0]));
   54: }
The above synchronization is a quick sample that does the job, which can be modified in a number of ways to suit your deployment needs. For your reference, there are a few links at the end of this post to elaborate on the MSDeploy API scenarios.
Step 2: Enable Net.Pipe Protocol
Since these Workflow Services are hosted in Windows Server AppFabric, each application requires the net.pipe protocol enabled so that AppFabric can manage instances of the published service.
These changes are required to be applied on the server at applicationHost.config file (%windows%\ System32\inetsrv\config\ ) . In order to modify these settings, a Deployment Object is created using the Application on the Server, add the DeploymentSyncParameter that will set the Enabled Protocols and Synchronize this Object to the Application on the Server. Here another Publish is being processed using Web Deploy, using Provider AppHostConfig and DeploymentSyncParameter is added to the Deployment Object before the Sync.
    1: DeploymentObject iisAppObject = DeploymentManager.CreateObject(
    2: DeploymentWellKnownProvider.AppHostConfig,
    3: "Default Web Site/WorkflowApplication",
    4: destinationBaseOptions);
    5:
    6: DeploymentSyncParameter protocolParameter =
    7: new DeploymentSyncParameter("EnableProtocols",
    8: string.Empty, string.Empty,
    9: string.Empty);
   10:
   11: protocolParameter.Add(
   12: new DeploymentSyncParameterEntry(
   13: DeploymentSyncParameterEntryKind.DeploymentObjectAttribute,
   14: @"application", "application/@enabledProtocols", string.Empty));
   15:
   16: protocolParameter.Value = @"http,net.pipe";
   17:
   18: iisAppObject.SyncParameters.Add(protocolParameter);
   19:
   20: DeploymentProviderOptions destinationOptions = new DeploymentProviderOptions(
   21: DeploymentWellKnownProvider.AppHostConfig);
   22:
   23: destinationOptions.Path = "Default Web Site/WorkflowApplication";
   24:
   25: iisAppObject.SyncTo(
   26: destinationOptions, destinationBaseOptions, new DeploymentSyncOptions());
Summary
Earilier in this post, we have demonstrated the ease with which we are able to provide the re-hosted Workflow Designer client, a lightweight application that handles a complicated remote publishing process, in a relatively simple manner. Overall, we achieved the ‘one-click’ publication of the Workflow definitions.
References
Below are a compilation of resources that could be useful as you build these interesting features on the re-hosted Workflow Designer.
1. Microsoft.Web.Deployment Namespace
2. Web Deploy Command Line Reference
4. Web Deployment Tool Official Forum on IIS.net
6. ASP.NET Configuration File Hierarchy and Inheritance
7. “MSDeploy API Scenarios”, James Coo
8. "..connection to a IIS server with self-issued certificate ..", Kateryna Rohonyan
9. “MSDeploy Custom Provider Take 1”, Sayed Ibrahim Hashimi
10. “Writing Extensible Providers for WebDeploy V1 RTM”, Web Deploy Team Blog
11. “Search your configuration sections in web.config files using IIS 7.0 APIs”, CarlosAg
12. “How to read/write administration.config”, Kanwaljeet Singla