Upgrade your WinML application to the latest bits
A while ago I've blogged about WinML, the framework added in the Universal Windows Platform to integrate your Windows 10 device as part of the Intelligent Edge. This new set of APIs allows your Windows application to leverage offline machine learning models, so that you can perform tasks like identifying an object in an image even without an Internet connection.
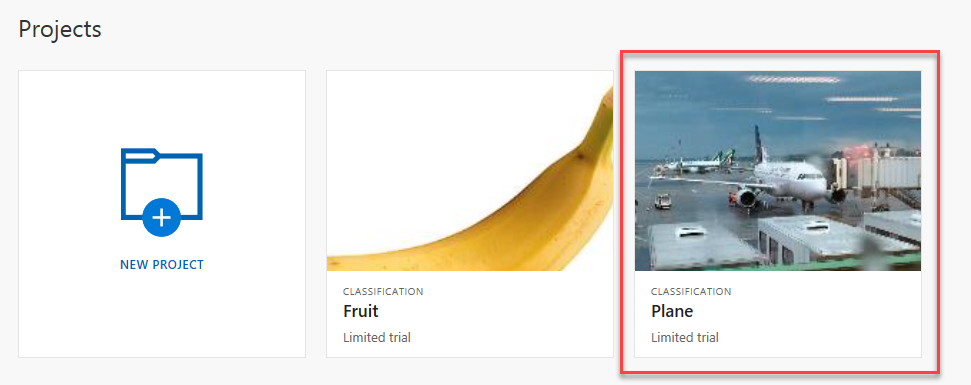
The post was written at the time of the release of Windows 10 1803, which was the first version to introduce WinML. However, the work was still in progress and, as such, all the APIs were included in a namespace called Windows.AI.MachineLearning.Preview. The post was also leveraging a service provided by Azure called Custom Vision, which easily allows to create machine learning models based on a set of data we provide to the tool. You can just upload a set of photos, identify them with one or more tags and the tool will generate the model for you. In our case, since we wanted a model to recognize planes, we uploaded multiple photos of airplanes and tagged them with the keyword plane. We used Custom Vision because, other than providing a set of REST endpoints that can be consumed online, it allows also to export the model for offline usage. Among the various supported formats we can find also ONNX, which is the one supported by WinML.
However, since the time of writing, many things have changed. First, Windows 10 has reached version 1809, which has improved the WinML APIs and moved them out of preview. Also the ONNX format has evolved and it has reached version 1.2. Among the benefits, now we have full support to hardware acceleration. Windows will automatically use the best hardware you have (CPU, GPU, etc.) in order to provide the best and fastest processing of the machine learning model. However, these improvements come with a (small) price. There have been some breaking changes in ONNX 1.2 and in the WinML APIs; as such, the code we have written in the previous post doesn't work anymore if you try to import the most recent Custom Vision model into a UWP application which uses the latest Windows 10 SDK.
Let's see, step by step, how we can move the sample we have created in the previous post to use the latest bits. You can find the source code on GitHub.
Generating a new model
When it comes to the model generation, nothing has changed. Everything I wrote in the previous post is still valid. Open the Custom Vision portal and login with your Microsoft / Office 365 account. If you didn't delete the previous project, you should still find the plane one we have previously created.
If, instead, it's the first time you play with Custom Vision and WinML, please refer to the previous post since the steps to create a model haven't changed. Just remember, when you create a new project, to choose one of the domains marked with the Compact suffix, since they're the only ones that can be exported for offline usage. Once the model is ready, you can export it by moving to the Performance tab and pressing Export, exactly like we did the last time. This will bring up a window with the list of all the supported formats:
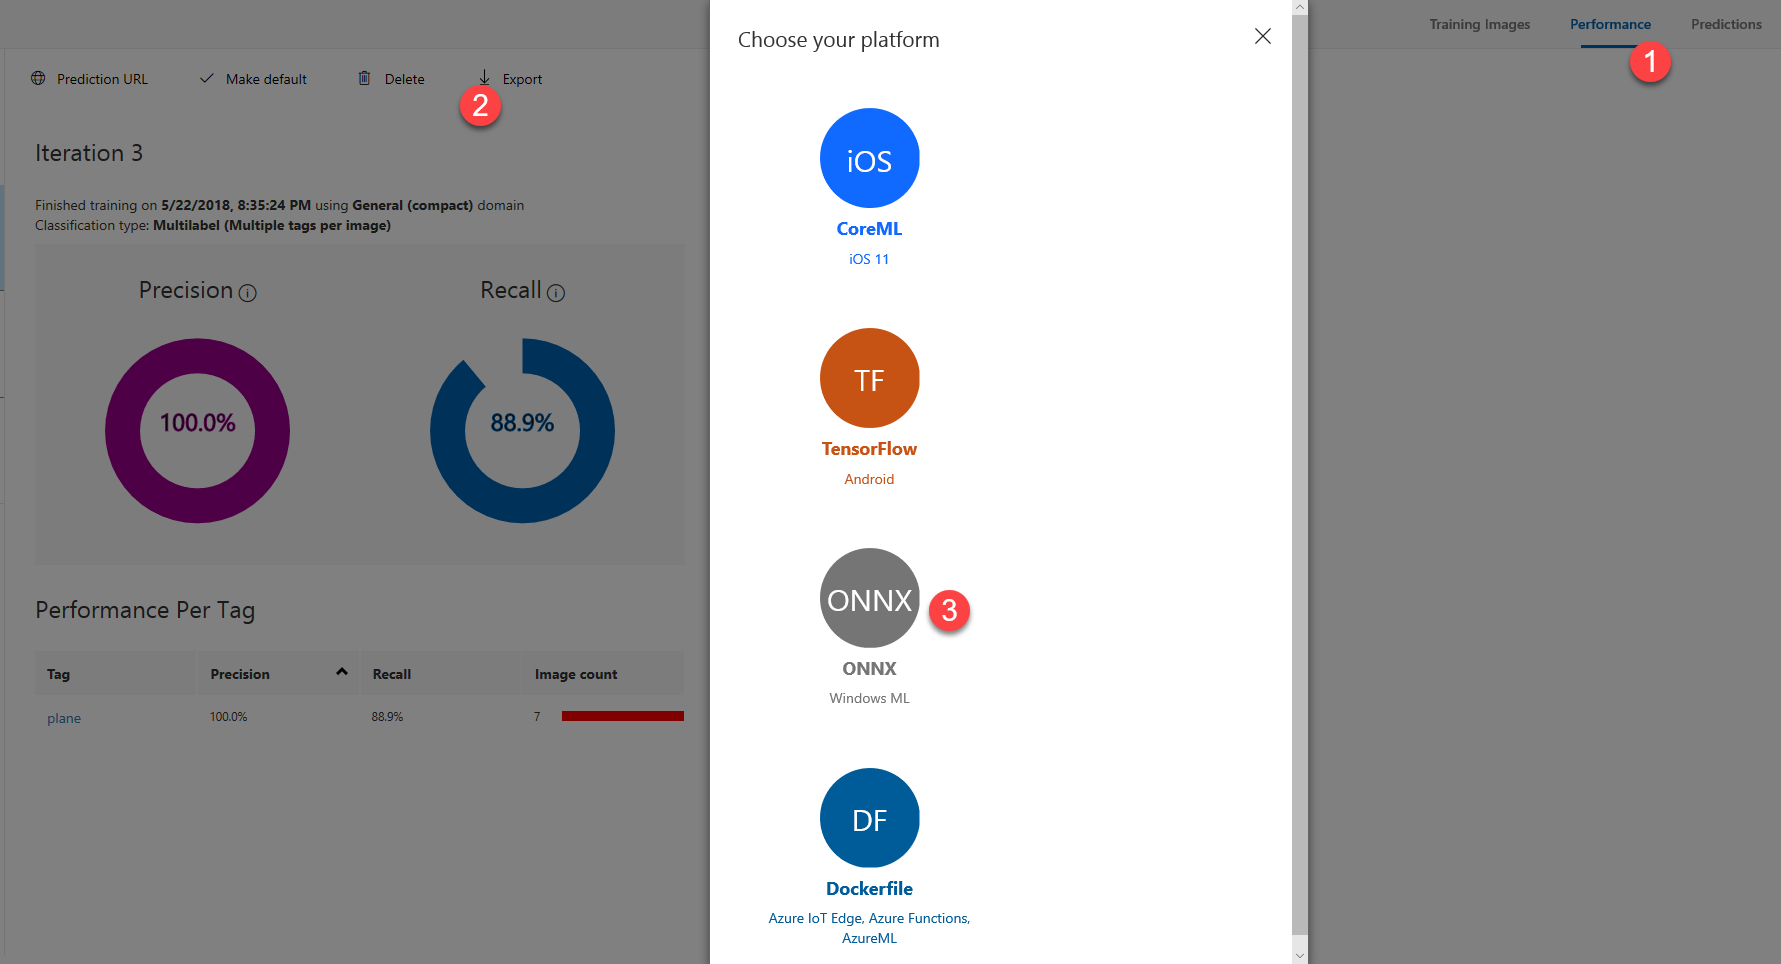
Choose ONNX. Compared to the last time we used it, this time we will have a dropdown to choose the ONNX version we want to use:

Choose ONNX1.2. As you can see, we will get a warning that this model will work only with a Windows 10 version higher than build 17738. If you're using the final version of Windows 1809 you will be fine, since it's identified by the build number 17763. Before starting to use the model, let's rename it with a more meaningful name, like Planes.onnx.
Import the model into Visual Studio
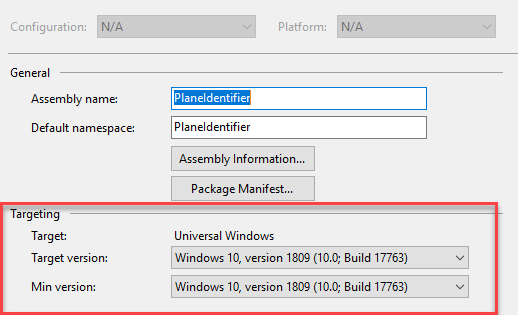
One of the best features of WinML is that Visual Studio offers built-in support for ONNX files. This means that, instead of manually creating all the bindings to map the inputs and the outputs of the machine learning model, Visual Studio will do everything for us, by generating a proxy class we can interact with. Let's start by upgrading our project, so that we can leverage the new APIs. Right click on it, choose Properties and set, as target and min version, Windows 10, version 1809 (10.0; Build 17763) .
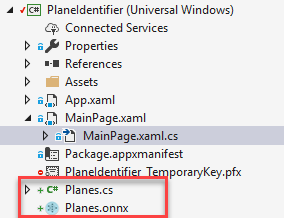
Now we can copy the downloaded ONNX file inside our Visual Studio project. After a few seconds, we will find a new class in the project with the same name of the model:
This is the class that Visual Studio has generated for my model:
 using System;
using System.Collections.Generic;
using System.Threading.Tasks;
using Windows.Media;
using Windows.Storage;
using Windows.Storage.Streams;
using Windows.AI.MachineLearning;
namespace PlaneIdentifier
{

    public sealed class PlanesInput
    {
        public ImageFeatureValue data; // BitmapPixelFormat: Bgra8, BitmapAlphaMode: Premultiplied, width: 227, height: 227
    }

    public sealed class PlanesOutput
    {
        public TensorString classLabel; // shape(-1,1)
        public IList<Dictionary<string,float>> loss;
    }

    public sealed class PlanesModel
    {
        private LearningModel model;
        private LearningModelSession session;
        private LearningModelBinding binding;
        public static async Task<PlanesModel> CreateFromStreamAsync(IRandomAccessStreamReference stream)
        {
            PlanesModel learningModel = new PlanesModel();
            learningModel.model = await LearningModel.LoadFromStreamAsync(stream);
            learningModel.session = new LearningModelSession(learningModel.model);
            learningModel.binding = new LearningModelBinding(learningModel.session);
            return learningModel;
        }
        public async Task<PlanesOutput> EvaluateAsync(PlanesInput input)
        {
            binding.Bind("data", input.data);
            var result = await session.EvaluateAsync(binding, "0");
            var output = new PlanesOutput();
            output.classLabel = result.Outputs["classLabel"] as TensorString;
            output.loss = result.Outputs["loss"] as IList<Dictionary<string,float>>;
            return output;
        }
    }
}
We can see a few important differences, compared to the model that was generated in the previous post:
- All the WinML APIs aren't in preview anymore, so that they have been moved to the Windows.AI.MachineLearning namespace
- The input (the photo) is handled with a different class. In the previous model, the input type was VideoFrame; now it's ImageFeatureValue.
- Also the output is a bit different. In the old model, the tags were stored inside a List collection; now instead the model is using a new class called TensorString. The results, instead, were stored inside a Dictionary<string, float> collection, while now they're included inside an IList<Dictionary<string, object> collection.
Where are these differences coming from? Some of them are due to the breaking changes in WinML. For example, the different way of handling the input image or the list of tags is a consequence of a change in the APIs. Some others, instead, are part of the new ONNX 1.2 definition.
A great way to understand these differences is to explore the ONNX model. There are many tools on the web which can help to visualize them. The one I prefer is called Netron, which is open source and available for all the operating systems.
When you open an ONNX file, the tool will visualize the whole neural network that composes the machine learning model. I won't dig deep into the details, because I don't know them 😃 Knowing how to build a neural network requires knowldege which goes beyond the normal development skills. However, thanks to the tool we can see an important information: which are the expected inputs and ouputs.
Let's start by opening the old ONNX model which was included in the original Visual Studio project. Click on the icon near the zooming icons to explore the generale properties of the model:
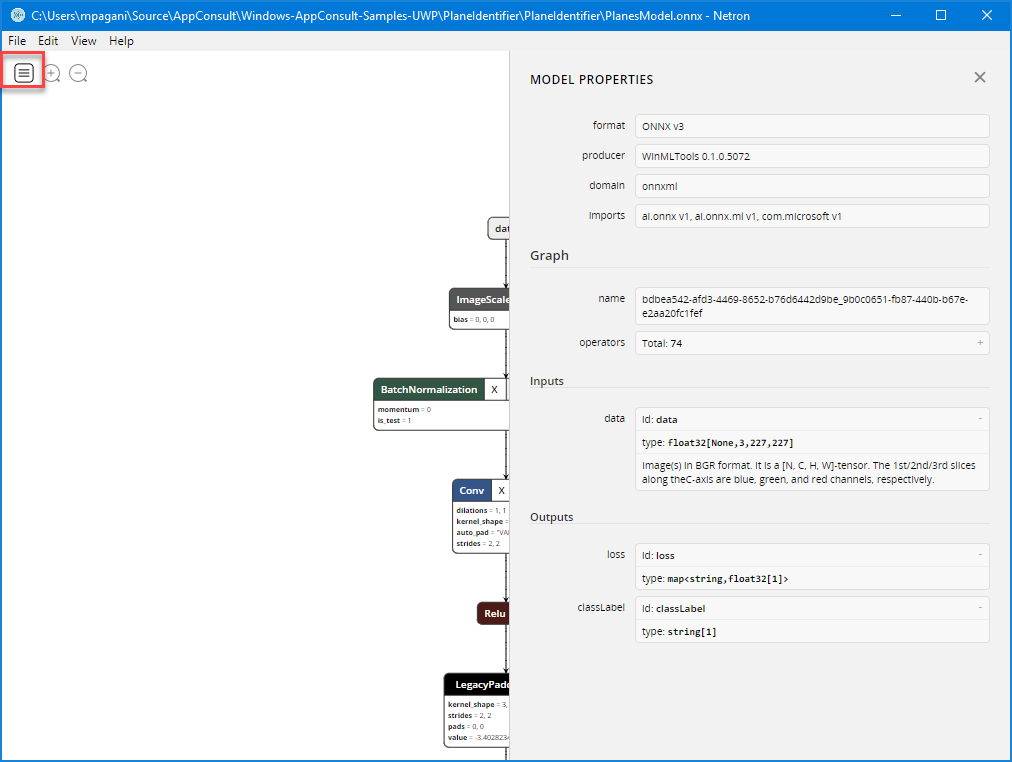
Let's focus on the output, which is the one where we're seeing a major difference. As you can see, the loss property, which is the one that contains the probability that our tag "plane" has been identified in the given image, is a map<string, float32[1]> type. As such, the Visual Studio proxy generator properly translated this as a Dictionary<string, float> collection.
Let's open now the new model based on ONNX 1.2:
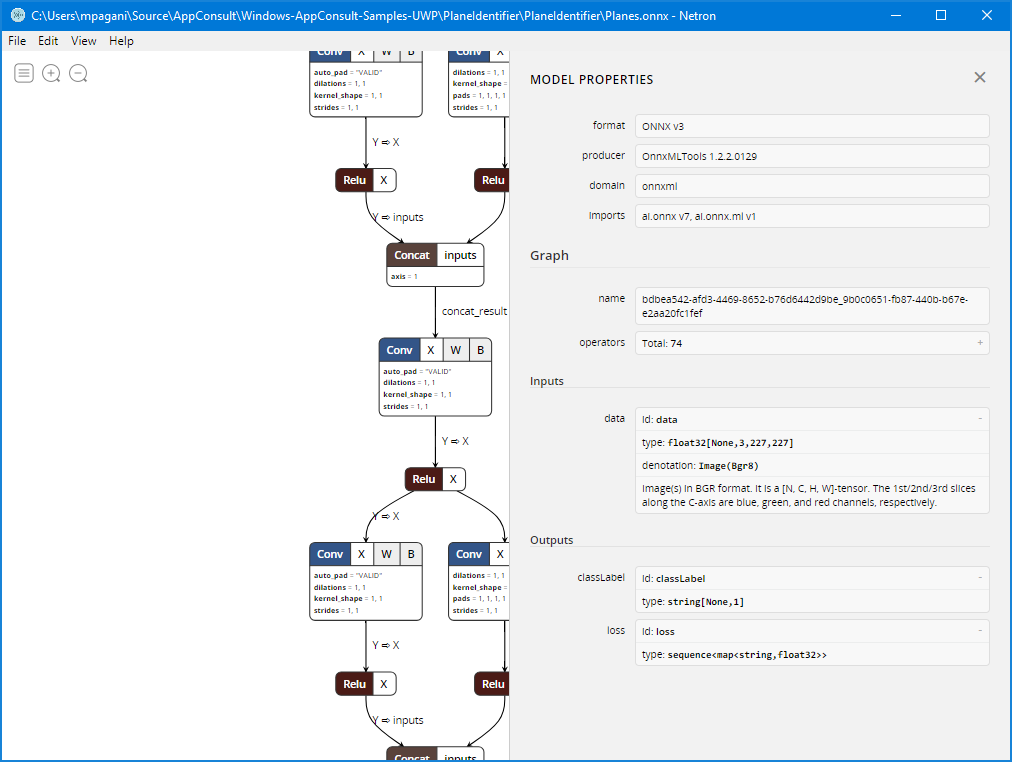
As you can see, the loss type has changed. Now it's sequence<map<string, float32>> and, as such, Visual Studio had to translate it with a more complex collection's type: IList<Dictionary<string, float>> .
Important! Right now the proxy generator included in Visual Studio has a bug which will lead your project to compile just fine, but to fail the recognition. The reason is that the sequence<map<string, float>> output of the ONNX model should be translated with IList<IDictionary<string, float>> , but Visual Studio will generate instead a property of type IList<Dictionary<string, float>> (notice the usage of IDictionary instead of Dictionary). Make sure to change both the PlanesOutput property and the cast of the result.Outputs["loss"] value to use the right collection's type; otherwise, when we're going to use the model, the cast will fail and the output will be a null property, which of course will cause the overall process to fail.
Changing the code
Let's see now how we must adjust the code of the previous project in order to support these changes. Let's start by deleting the old files (PlanesModel.onnx and PlanesModel.cs), so that they don't mix up with the new model.
At first, we will see an error in the OnNavigatedTo() method of the MainPage class. The proxy, in fact, doesn't expose anymore a method called CreatePlanesModel() to load the model file, but it has been replaced by a more generic CreateFromStreamAsync() .
 protected async override void OnNavigatedTo(NavigationEventArgs e)
{
    var modelFile = await StorageFile.GetFileFromApplicationUriAsync(new Uri("ms-appx:///Planes.onnx"));
    planeModel = await PlanesModel.CreateFromStreamAsync(modelFile);
}
Make sure also that the Uri passed to the GetFileFromApplicationUriAsync() method reflects the correct name of the ONNX file you have just imported.
The second error is in the name of the class generated to map the inputs and the outputs. They aren't anymore PlanesModelInput and PlanesModelOutput, but simply PlanesInput and PlanesOutput. We can find a reference to it in the first lines of the EvaluateVideoFrameAsync() method, which we need to change:
 private async Task EvaluateVideoFrameAsync(VideoFrame frame)
    {
        if (frame != null)
        {
            try
            {
                PlanesInput inputData = new PlanesInput();
                inputData.data = frame;
                //evaluate the model

            }
            catch (Exception ex)
            {
                Debug.WriteLine($"error: {ex.Message}");
                Status.Text = $"error: {ex.Message}";
            }
        }
    }
However, even after fixing this, you will immediately face a new error. Visual Studio will complain that you can't assign the input parameter of the method (the VideoFrame object) inside the data property of the input model.
If you take a look at the proxy class, this shouldn't be a surprise. If you remember, one of the differences between the old model and the new one is that the input image isn't handled with a VideoFrame object anymore, but with an ImageFeatureValue one.
Luckily, the ImageFeatureValue class exposes a convienient static method called CreateFromVideoFrame() , which is able to convert the VideoFrame object into the expected type:
 private async Task EvaluateVideoFrameAsync(VideoFrame frame)
{
    if (frame != null)
    {
        try
        {
            PlanesInput inputData = new PlanesInput();
            inputData.data = ImageFeatureValue.CreateFromVideoFrame(frame);

            //evaluate the model
        }
        catch (Exception ex)
        {
            Debug.WriteLine($"error: {ex.Message}");
            Status.Text = $"error: {ex.Message}";
        }
    }
}
Finally, we need to handle the output in a different way. Compared to the old code, in fact, now we're dealing with a more complex collection. Now the loss property is an IList<IDictionary<string, float>> .
Here is how the final code looks like:
 private async Task EvaluateVideoFrameAsync(VideoFrame frame)
{
    if (frame != null)
    {
        try
        {
            PlanesInput inputData = new PlanesInput();
            inputData.data = ImageFeatureValue.CreateFromVideoFrame(frame);
            var results = await planeModel.EvaluateAsync(inputData);
            var loss = results.loss.ToList();
            var labels = results.classLabel;

            float value = loss.FirstOrDefault()["plane"];

            var lossStr = (value * 100.0f).ToString("#0.00") + "%";
            bool isPlane = false;
            if (value > 0.75)
            {
                isPlane = true;
            }

            string message = $"Predictions: {lossStr} - Is it a plane? {isPlane}";
            Status.Text = message;
        }
        catch (Exception ex)
        {
            Debug.WriteLine($"error: {ex.Message}");
            Status.Text = $"error: {ex.Message}";
        }
    }
}
After calling the EvaluateAsync() method exposed by the model, passing as input the image chosen by the user with the file picker, we convert the results.loss property to a list, by calling the ToList() method.
This list, in our scenario, contains only one item, which is a Dictionary<string, float> . Its purpose is to store, for each tag we have generated in the Custom Vision portal, the probability that the object identified by that tag has been recognized in the image.
Our Custom Vision model is very simple and it understands only a single tag: plane. As such, we retrieve the item identified by the plane key from the dictionary and we get its value. Then we calculate a percentage out of it, so that for the user it's easier to understand how many chances there are that a plane is indeed present in the image.
For our demo, we're assuming that if the probability is higher than 75% the photo indeed contains a plane.
Testing the job
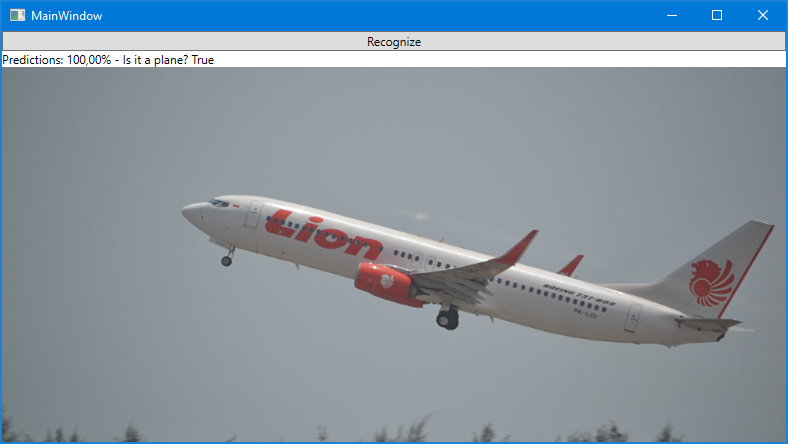
Now the Visual Studio project shouldn't include anymore errors. Let's compile and run it!

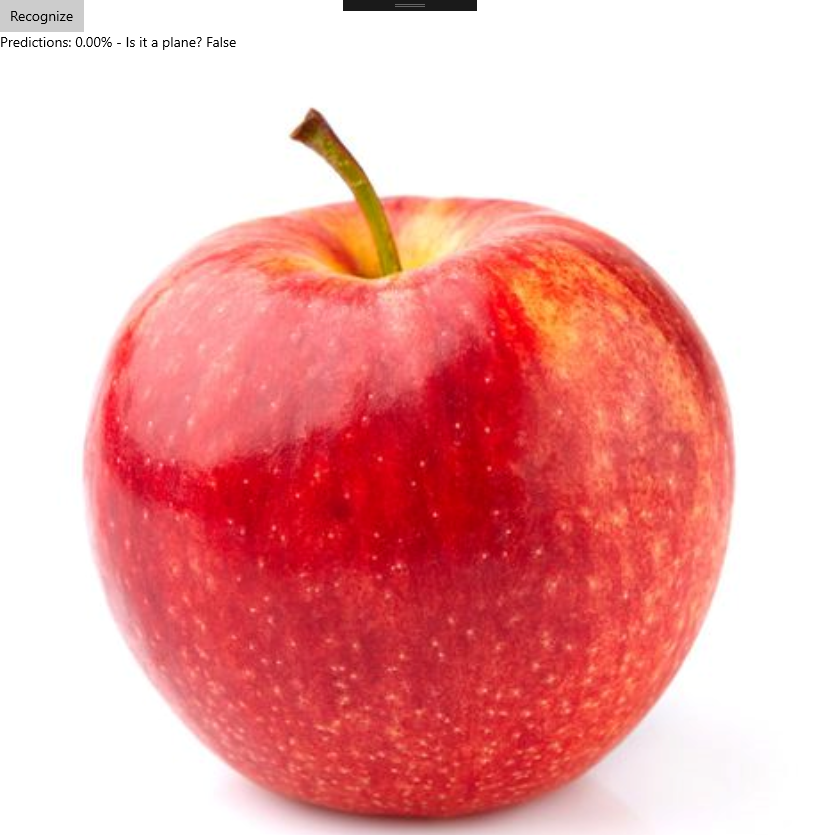
As you can see, the project is now working again as expected. In the first photo the model has correctly recognized a plan, while it couldn't find one in the second photo.
Update the Desktop Bridge version
The original sample includes also a WPF application packaged with a Windows Application Packaging Project, in order to demonstrate that the WinML APIs can be consumed also by a Win32 application packaged with the Desktop Bridge.
In order to update also this project to use the latest bits, here are the steps to follow:
- Right click on the WPF project, choose Add reference and make sure to add a reference to the Windows.md file that ships with the 17763 SDK. This way you will have access to all the APIs that have been added in the last version of Windows, including the final WinML ones. You can find this file in the path C:\Program Files (x86)\Windows Kits\10\UnionMetadata\10.0.17763.0. Make sure to change the filter of the picker from Component files to All files, otherwise the .md file won't be visible.
- Delete the old PlanesModel.onnx and PlanesModel.cs files
- Copy the Planes.onnx and Planes.cs files from the UWP project to the WPF one
- Open the Planes.cs proxy class and make sure that the type of the loss property is indeed IList<IDictionary<string, float>> . It may happen, in fact, that Visual Studio will try to restore the original wrong type.
- Now you will have to go through the code in the MainWindow.xamlcs file and make the same changes we have previously did in the MainPage.xaml.cs file of the UWP project, like switching PlanesModelInput to PlanesModel, using the ImageFeatureValue.CreateFromVideoFrame() method to set the input image, etc.
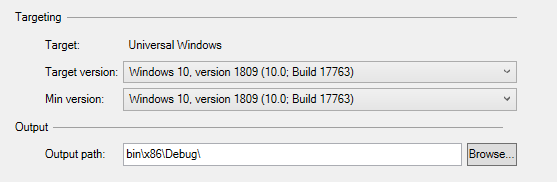
- In the end, right click on the Windows Application Packaging Project, choose Properties and make sure to set also here, as Target version and Min version, Windows 10 version 1809:
Now run the application packaged with the Desktop Bridge and test it. Everything should work as expected also in this case.
Wrapping up
In this post we have seen the improvements and the changes that ONNX 1.2 and Windows 10 1809 has brought to WinML, the framework included in the Universal Windows Platform to add artificial intelligence to our Windows applications even when we lack Internet connection.
Custom Vision, the training service provided by Azure, is the perfect companion for WinML, since it allows to generate your own machine learning models and to export them using ONNX, which is natively supported by WinML and Visual Studio. Thanks to the proxy generator, Windows is the easiest platform to include as part of the intelligent edge ecosystem, because it makes really easy to leverage a machine learning model even without being a data scientist.
You can find the updated sample project on GitHub.
Happy coding!