Deploy a Docker multi-container application on Azure Web Apps
In the last post of my series about Docker we have seen how, thanks to Docker Compose, it's easy to deploy an application composed by multiple components running in different containers.
Thanks to Docker Compose we can run or stop all the containers which compose our application at the same time with a single command; additionally, the tool takes care of creating a dedicated network bridge, so that we can easily put them in communication simply by using the assigned IP address or DNS name.
The biggest advantage of this approach (and, generally speaking, of Docker containers) is that we can take this architecture and deploy it on any machine which hosts the Docker service and be sure that it will always run as expected.
However, until the last post, we have always deployed our solutions based on containers on our local machine. It was great for testing and debugging purposes, but it isn't a realistic scenario. A real application would run on a real server, so that it can be accessed by any user.
And which better place to host our applications than the cloud? Azure is a perfect match for container-based solutions, since it can quickly scale based on the workload.
As we have seen so far, Docker is just a service that can run on any Windows or Linux machine. A simple approach to host our application would be to create a Linux VM on Azure, install Docker and invoke our Docker Compose command on it. However, this solution has some downsides. Since we have created the VM, we are responsible for it. We need to keep it patched, up-to-date with the latest security features, etc.
It would be much better if we could use a PaaS (Platform-As-A-Service) solution? Welcome Azure Web Apps!
Using Azure Web Apps with Docker
Azure Web Apps is an Azure service, which is part of the Azure App Service realm, that can host any kind of web application. It's a PaaS service, meaning that we can focus on the web application hosting, without bothering about the underneath hardware and configuration. We can choose the configuration of the machine (based on the workload), we can configure the application platform (for example, by choosing which version of .NET, PHP or Java we want to leverage), but we aren't responsible for maintaining the underline platform. We don't have to take care of keeping the OS or the frameworks up-to-date.
Since a while Azure App Service has added support for Linux machines, meaning that we can host web apps on a machine running Linux instead of Windows. With this feature we get also full Docker support, for a single container or for multiple containers.
This means that, using the same Docker images and compose file we have built to deploy our solution locally, we can deploy our application also on Azure and immediately get all the benefits offered by this powerful platform.
Let's start!
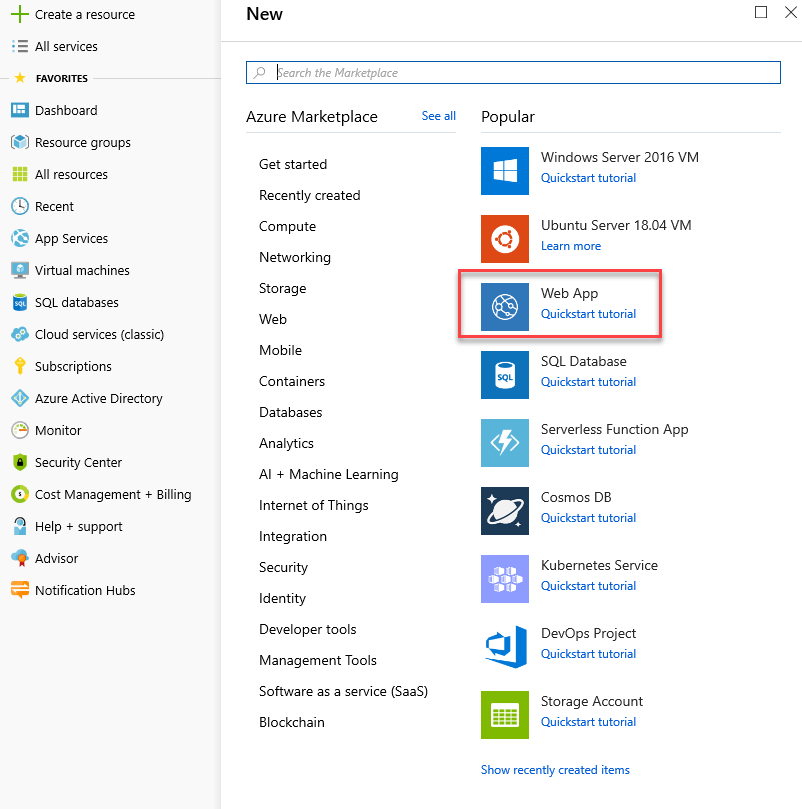
First go to the Azure portal and login with your account. Choose Create a resource and, from the list, choose Web App.
You will be asked to setup your web application:
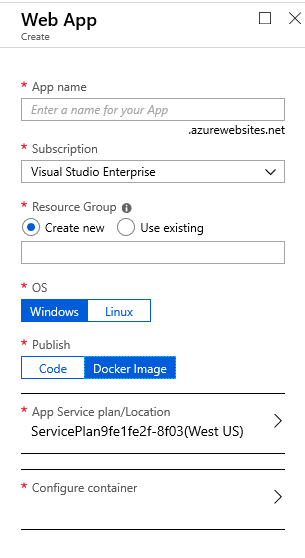
- App name is a unique identifier for the app. It will be also the prefix of the default domain to reach this app from Internet. For example, if you call it MyFirstDockerApp, you will be able to access to it using https://myfirstdockerapp.azurewebsites.net
- The Azure subscription, in case you have one or more.
- The resource group, which is a way to bundle together all the services required by the web app to work. I suggest to create a new dedicated one, so that at a later stage you can easily delete or move all the resources.
- The operating system. Choose Linux.
- The App Service plan / location. Use this option to choose the App Service plan you want to use. An App Service plan is a combination of location (in which Azure region you want to deploy the app) and the pricing tier (which reflects the hardware features of the hosting machine). At the top you will notice that the pricing tiers are split into three different categories: Dev / Test, Production and Isolated. Since we are in testing phase, feel free to choose one of the plans under the first option, which are free or really cheap.
We have left one option behind, because it's the critical one we need for our workload. Under Publish, you can choose Code or Docker Image. Once you choose the second option, you will see at the bottom a new field called Configure container. By clicking on it you will expand, at the right, a new panel where to specify the configuration of your containers:

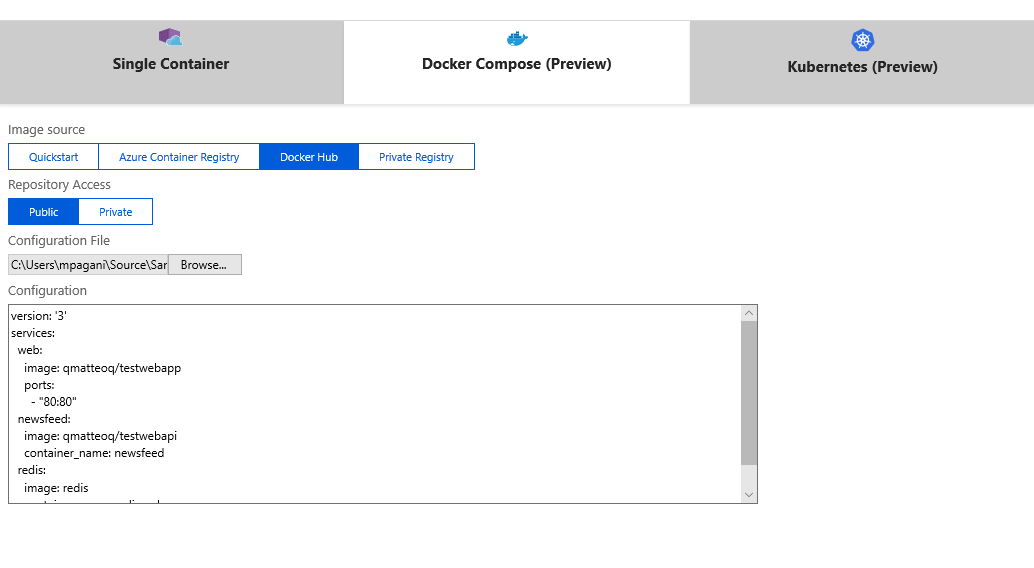
You have three options:
- Single container can be used to deploy a single application running in a single container
- Docker Compose can be used to deploy a solution based on multiple containers using the Docker Compose file format.
- Kubernetes achieves the same goal of the previous option, but using the Kubernetes file format to describe the containers. In case you never heard of it, Kubernetes is a very popular technology to orchestrate containers created by Google.
Regardless of the choice, you will be able to use different image sources:
- Quickstart allows to quickly deploy sample solutions to test the Azure App Service platform.
- Azure Container Registry is a platform provided by Azure to host your own images. Think of it like your own personal Docker Hub repository.
- Docker Hub is the official Docker repository we have learned to use in the previous posts. From here you can pull all the public images released by developers and companies from all around the globe.
- Private Registry is the option to choose in case you're hosting your images on your own private repository.
Our scenario is a multi-container solution based on images coming from Docker Hub. If you remember one of the previous posts, we have pushed the images we have built for our web application and our web API to Docker Hub.
Let's choose Docker Compose and then Docker Hub as Image source. We have published our images as public, so leave Public as Repository Access. In the Configuration File field press Browse and look for the docker-compose.yml file we have built in a previous post.
You will see, in the Configuration area, the content of the YML file.
Press Apply and you will be redirected to the Web App configuration page. This time the Configure container field should be reported as Complete. Press Create at the bottom of the section to start the creation of the web app.
The web application will be now deployed and, under the hood, Azure will pull the images we have specified in the Docker Compose file (qmatteoq\testwebapp, qmatteoq\testwebapi and redis) and will spin a container for each of them. Azure is smart enough to understand that the service called web is the only one for which we're exposing the 80 port. As such, this container will be the one exposed directly through the 80 port of the URL that has been assigned to the our App Service.
Everything is awesome... more or less
Let's give a try to our deployment. Open the browser and point it to the URL which was assigned your app service. You should see... this:
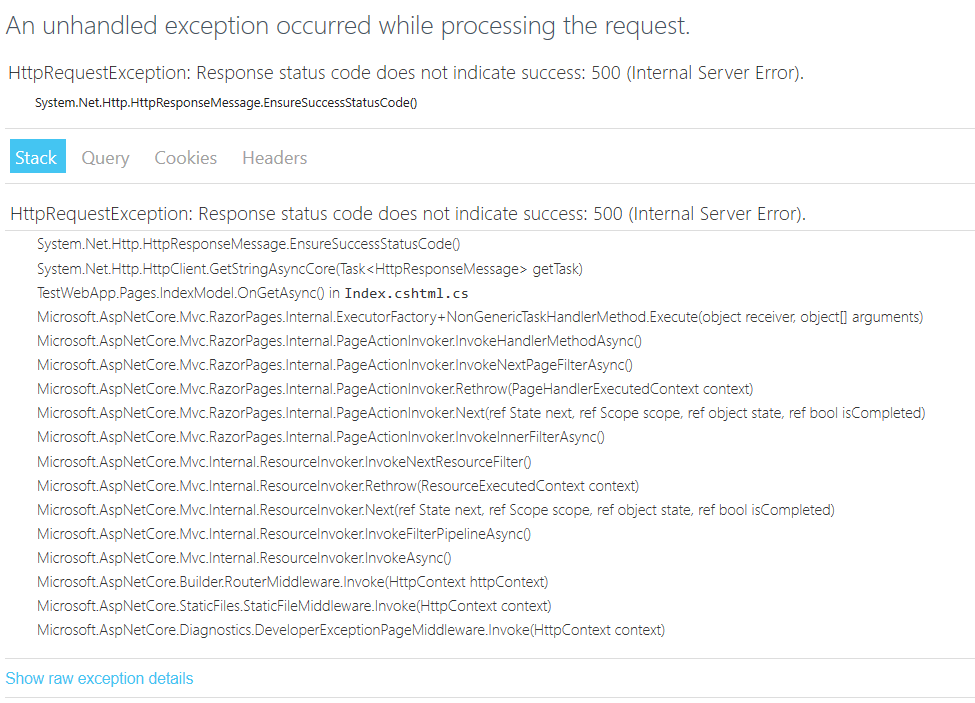
Well, this isn't a pleasant surprise. Something bad is happening. Specifically, based on the stack trace, it seems that our web application is failing to communicate with the Web API. The GetStringAsync() method of the HttpClient, which we're using to retrieve the list of blog posts from the Web API, is failing.
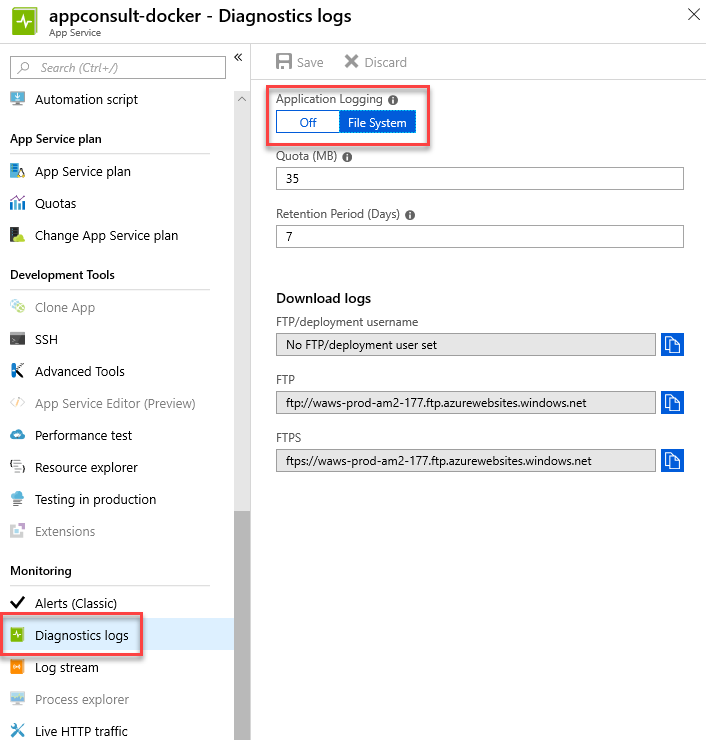
Is it possible to get more details? Sure, but first we need to enable some logging. Move to the Diagnostic logs section of your web app and turn it on by choosing File System.
Now try to reload again the website, in order to reproduce the error. Now we should have some logging in the file system of the web application. The easiest way to access them is to choose Advanced Tools from the Development tools section of the web app.
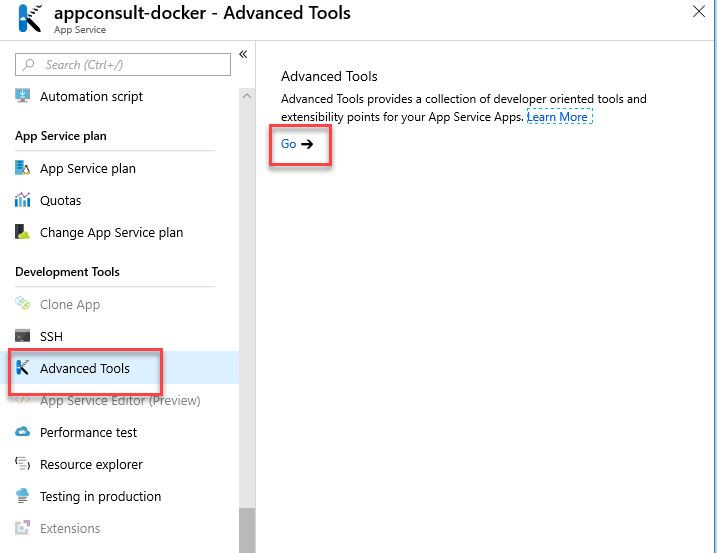
Press the Go button to open Kudu, which is a diagnostic web interface for your application. Typically, Kudu is available at the same URL of the main application, but with the prefix scm between the app name and the domain. For example, if your application is hosted at https://mydockerwebapp.azurewebsites.net, the Kudu interface will be available at https://mydockerwebapp.scm.azurewebsites.net.
As you can see in the web interface, one of the available REST API is called Current Docker logs:
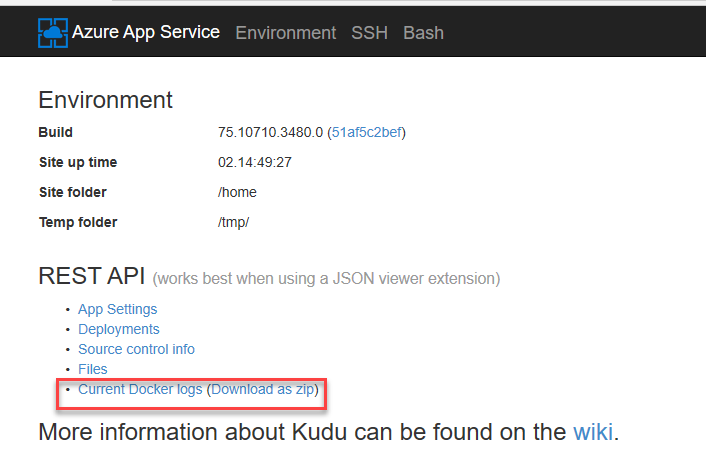
Click on the Download as zip button to download a compressed file, which will contain multiple log files: a generic one for the Docker service and a specific one for each container that has been created.
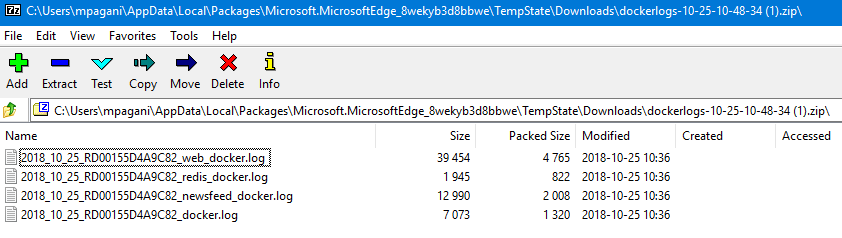
Let's start by opening the one related to the web application, which ends with the suffix web_docker.
This is the error we see:
 2018-10-25T10:54:59.901632419Z       An unhandled exception has occurred while executing the request.
2018-10-25T10:54:59.901706119Z System.Net.Http.HttpRequestException: Response status code does not indicate success: 500 (Internal Server Error).
2018-10-25T10:54:59.901714719Z    at System.Net.Http.HttpResponseMessage.EnsureSuccessStatusCode()
2018-10-25T10:54:59.901719519Z    at System.Net.Http.HttpClient.GetStringAsyncCore(Task`1 getTask)
2018-10-25T10:54:59.901774720Z    at TestWebApp.Pages.IndexModel.OnGetAsync() in /src/TestWebApp/Pages/Index.cshtml.cs:line 18
2018-10-25T10:54:59.901782320Z    at Microsoft.AspNetCore.Mvc.RazorPages.Internal.ExecutorFactory.NonGenericTaskHandlerMethod.Execute(Object receiver, Object[] arguments)
2018-10-25T10:54:59.901786720Z    at Microsoft.AspNetCore.Mvc.RazorPages.Internal.PageActionInvoker.InvokeHandlerMethodAsync()
2018-10-25T10:54:59.901859320Z    at Microsoft.AspNetCore.Mvc.RazorPages.Internal.PageActionInvoker.InvokeNextPageFilterAsync()
2018-10-25T10:54:59.901867120Z    at Microsoft.AspNetCore.Mvc.RazorPages.Internal.PageActionInvoker.Rethrow(PageHandlerExecutedContext context)
2018-10-25T10:54:59.901911520Z    at Microsoft.AspNetCore.Mvc.RazorPages.Internal.PageActionInvoker.Next(State& next, Scope& scope, Object& state, Boolean& isCompleted)
2018-10-25T10:54:59.901927920Z    at Microsoft.AspNetCore.Mvc.RazorPages.Internal.PageActionInvoker.InvokeInnerFilterAsync()
2018-10-25T10:54:59.901932220Z    at Microsoft.AspNetCore.Mvc.Internal.ResourceInvoker.InvokeNextResourceFilter()
2018-10-25T10:54:59.902024521Z    at Microsoft.AspNetCore.Mvc.Internal.ResourceInvoker.Rethrow(ResourceExecutedContext context)
2018-10-25T10:54:59.902032421Z    at Microsoft.AspNetCore.Mvc.Internal.ResourceInvoker.Next(State& next, Scope& scope, Object& state, Boolean& isCompleted)
2018-10-25T10:54:59.902095221Z    at Microsoft.AspNetCore.Mvc.Internal.ResourceInvoker.InvokeFilterPipelineAsync()
2018-10-25T10:54:59.902103021Z    at Microsoft.AspNetCore.Mvc.Internal.ResourceInvoker.InvokeAsync()
2018-10-25T10:54:59.902107221Z    at Microsoft.AspNetCore.Builder.RouterMiddleware.Invoke(HttpContext httpContext)
2018-10-25T10:54:59.902159422Z    at Microsoft.AspNetCore.StaticFiles.StaticFileMiddleware.Invoke(HttpContext context)
2018-10-25T10:54:59.902174122Z    at Microsoft.AspNetCore.Diagnostics.DeveloperExceptionPageMiddleware.Invoke(HttpContext context)
2018-10-25T10:54:59.930285062Z       Request finished in 85.9709ms 500 text/html; charset=utf-8
This information isn't really helpful because it's the same error we see on the stack trace of the web page. The Web API is failing to return the list of blog posts to the web application. So maybe something wrong is happening with the Web API itself. Let's take a look at the log with suffix newsfeed_docker.
 2018-10-25T10:54:59.881446518Z       An unhandled exception has occurred while executing the request.
2018-10-25T10:54:59.881562818Z StackExchange.Redis.RedisConnectionException: It was not possible to connect to the redis server(s). UnableToConnect on rediscache:6379/Interactive, Initializing, last: NONE, origin: BeginConnectAsync, outstanding: 0, last-read: 0s ago, last-write: 0s ago, unanswered-write: 783901s ago, keep-alive: 60s, state: Connecting, mgr: 10 of 10 available, last-heartbeat: never, global: 53s ago
2018-10-25T10:54:59.881571918Z    at StackExchange.Redis.ConnectionMultiplexer.ConnectImplAsync(Object configuration, TextWriter log) in C:\projects\stackexchange-redis\src\StackExchange.Redis\ConnectionMultiplexer.cs:line 820
2018-10-25T10:54:59.881632919Z    at TestWebApi.Controllers.NewsController.Get() in /app/Controllers/NewsController.cs:line 22
2018-10-25T10:54:59.881640719Z    at lambda_method(Closure , Object )
2018-10-25T10:54:59.881644719Z    at Microsoft.Extensions.Internal.ObjectMethodExecutorAwaitable.Awaiter.GetResult()
2018-10-25T10:54:59.881696719Z    at Microsoft.AspNetCore.Mvc.Internal.ActionMethodExecutor.AwaitableObjectResultExecutor.Execute(IActionResultTypeMapper mapper, ObjectMethodExecutor executor, Object controller, Object[] arguments)
2018-10-25T10:54:59.881704419Z    at System.Threading.Tasks.ValueTask`1.get_Result()
2018-10-25T10:54:59.881762619Z    at Microsoft.AspNetCore.Mvc.Internal.ControllerActionInvoker.InvokeActionMethodAsync()
2018-10-25T10:54:59.881781119Z    at Microsoft.AspNetCore.Mvc.Internal.ControllerActionInvoker.InvokeNextActionFilterAsync()
2018-10-25T10:54:59.881785419Z    at Microsoft.AspNetCore.Mvc.Internal.ControllerActionInvoker.Rethrow(ActionExecutedContext context)
2018-10-25T10:54:59.881846920Z    at Microsoft.AspNetCore.Mvc.Internal.ControllerActionInvoker.Next(State& next, Scope& scope, Object& state, Boolean& isCompleted)
2018-10-25T10:54:59.881854320Z    at Microsoft.AspNetCore.Mvc.Internal.ControllerActionInvoker.InvokeInnerFilterAsync()
2018-10-25T10:54:59.881937520Z    at Microsoft.AspNetCore.Mvc.Internal.ResourceInvoker.InvokeNextResourceFilter()
2018-10-25T10:54:59.881944820Z    at Microsoft.AspNetCore.Mvc.Internal.ResourceInvoker.Rethrow(ResourceExecutedContext context)
2018-10-25T10:54:59.881948520Z    at Microsoft.AspNetCore.Mvc.Internal.ResourceInvoker.Next(State& next, Scope& scope, Object& state, Boolean& isCompleted)
2018-10-25T10:54:59.882008221Z    at Microsoft.AspNetCore.Mvc.Internal.ResourceInvoker.InvokeFilterPipelineAsync()
2018-10-25T10:54:59.882015221Z    at Microsoft.AspNetCore.Mvc.Internal.ResourceInvoker.InvokeAsync()
2018-10-25T10:54:59.882018921Z    at Microsoft.AspNetCore.Builder.RouterMiddleware.Invoke(HttpContext httpContext)
2018-10-25T10:54:59.882073921Z    at Microsoft.AspNetCore.Diagnostics.DeveloperExceptionPageMiddleware.Invoke(HttpContext context)
2018-10-25T10:54:59.913042876Z       Request finished in 66.4934ms 500 text/html; charset=utf-8
Now we are getting a much more meaningful error! As you can see from the description, the problem seems to be the connection between the Web API and the Redis cache. The connection to the Redis cache to retrieve the list of cached posts is failing.
What's happening here? This problem took me a while to figure out because the same multi-container architecture was working just fine on my local machine. When you deploy a solution using Docker Compose, thanks to the dedicated bridge, all the containers are hosted on the same network, so they can easily comunicate with each other using their IP address or DNS name. As such, at first I had no idea why the Web API wasn't able to communicate with the Redis cache.
Thanks to my friend and Azure guru Carlos I've been able to understand what's happening. If you remember the post about creating our multi-container application, we have learned that we can simplify the communication between multiple containers by using their name. The same concept was applied during the deployment phase, when we have set the container_name property in the Docker Compose file.
This is the configuration we have specified for the Redis cache container:
 redis:
  image: redis
  container_name: rediscache
Since we have specified rediscache as name of the container, we have configured the Web API to connect to the Redis cache using this name. This is an excerpt of the code which we have previously wrote in the Web API controller:
 [Route("api/[controller]")]
[ApiController]
public class NewsController : ControllerBase
{
    // GET api/values
    [HttpGet]
    public async Task<ActionResult<IEnumerable<string>>> Get()
    {
        ConnectionMultiplexer connection = await ConnectionMultiplexer.ConnectAsync("rediscache");
        var db = connection.GetDatabase();

        //code to parse the XML
    }
}
The connection to the rediscache container, performed by the ConnectAsync() method of the ConnectionMultiplexer class, is failing. The reason is that Azure ignores the container_name property included in the Docker Compose file, but it sets the name of the container simply using the name of the service.
In our Docker Compose file the name we have configured for the service is simply redis, so we need to change the Web API code to use the new endpoint:
 [Route("api/[controller]")]
[ApiController]
public class NewsController : ControllerBase
{
    // GET api/values
    [HttpGet]
    public async Task<ActionResult<IEnumerable<string>>> Get()
    {
        ConnectionMultiplexer connection = await ConnectionMultiplexer.ConnectAsync("redis");
        var db = connection.GetDatabase();

        //code to parse the XML
    }
}
After having applied this fix, we need to create a new image and push it again to Docker Hub. At first, run the following command from the folder which contains the Web API:
docker build --rm -t qmatteoq/testwebapi:latest .
Then push it to Docker Hub using the following command:
docker push qmatteoq/testwebapi
Once it's done, go back to the Azure portal and, in the Web App, choose the Container settings section. This will bring up the same panel you have used during the creation of the web app to configure your Docker based solution. Press Browse and look again for the Docker Compose file, then press Save at the end of the page. This will trigger a new deploy of the solution. Azure will pull the updated images from Docker hub and it will spin up a new set of containers.
If you did everything well, now if you try to hit again the URL of your web app you should see the application up & running:
And if your refresh it, you should see the first item in the blog posts list changing, to demonstrate that the list of posts have been retrieved from the Redis cache and not re-downloaded from the original RSS.
What's next?
In this post we have learned how we can use Azure App Services to deploy our multi-container application on the cloud, so that it can be easily accessed also from other users, it can easily scale in case of heavy workloads, etc. Everything has been done using a PaaS service, meaning that we don't have to worry about maintaining the hardware, the virtual machine, the OS or the Docker service. We can just focus on our application.
In order to achieve this goal, however, in this post we have performed a lot of manual tasks. We had to manually push again our image once we have built it; we had to manually perform a new deploy of the Docker Compose file in order to let Azure pick the new version of the image we have published on Docker Hub; etc.
In the next post we'll see how we can automate this process thanks to Azure DevOps and Docker Hub.
Happy coding!