Deploying local application data in a Desktop Bridge app with Advanced Installer
One of the best practices when it comes to Windows development is to leverage the AppData folder (which lives under C:\Users\username\AppData) to store files which require read and write access and which are tightly coupled with the application. Think, for example, to logs, configuration files, local databases. These are kind of files that make sense only for your application, so there's no need to keep them also when the application is uninstalled.
This approach is the opposite to storing these files inside the installation folder which, instead, is considered a bad practice. The main reason is that AppData is a folder which lives under the user's space, so we are sure that our application will be able to read and write them even if the customer is a standard Windows user. We can't say the same for installation folders. Often applications are installed in folders like C:\Program Files which are system protected and, as such, they force the user to be an admin in order to use them.
When we package our application with the Desktop Bridge, by using the AppData folder we also help to keep the operating system clean and reliable. When an application is packaged, in fact, all the operations against the AppData folder are redirected to the local folder of the application (for example, C:\Users\mpagani\AppData\Local\Packages\ExpenseIt.ExpenseIt_w3kjh0qp85zv8\LocalCache). When the application is uninstalled, Windows automatically deletes this local folder, ensuring that there no leftovers on the system that could waste space or slow down the computer over time.
However, there's one potential disadvantage when you use the AppData folder and you work with a Desktop Bridge application. Sometimes applications needs to deploy, during the setup, a set of files inside the AppData folder, other than the executable and DLLs in the installation folder. It could be a configuration file with a set of default values; it can be a database already populated with a default set of data.
Unfortunately, the Windows 10 deployment model doesn't support this scenario. All the files included in the package are deployed inside a single folder which lives under C:\Program Files\WindowsApps.
The suggested guideline for developers is to include these files inside the package and to tweak the code of the packaged application. When the application is started for the first time, it takes care of copying these files from the package to the AppData folder, so that it can starts using them as usual. However, as we have already seen when we have talked about the Package Support Framework, this isn't always possible. If it's an old application, the source code might not be available anymore or built with a legacy technology, so it's hard to make changes.
Is there a way to solve this problem?
Advanced Installer to the rescue!
The last release of the tool by Caphyon, in fact, has added a smart new feature to deal with this scenario. Let's see how it works!
If you remember, we have already talked about Advanced Installer. It's a very popular authoring tool which has recently released, in partnership with Microsoft, a free version focused on packaging called Advanced Installer Express.
It's a powerful alternative to the Desktop App Converter and it supports many advanced features.
If you remember we have discussed one of them on this blog. The tool is able to generate a package which replaces the entry point of your application with a launcher, which takes care of performing additional tasks before launching the real application. The one we have seen in the previous post was about data migration. The launcher is able to automatically migrate the application's data in case the user installs the packaged version of an application on a machine which already has the traditional Win32 version.
The new Advanced Installer release (15.1) has added a new feature to this launcher which is able to solve exactly the problem I have outlined at the beginning of the post. The tool will migrate the local application data for us, without having to change the code. Let's see how to do it.
In most of the cases, you won't have to do anything special to leverage this feature. If you have previously built a MSI installer with Advanced Installer or you have used their converter to package an existing Win32 app, the tool will have detected that your installer deploys some files in the AppData folder. We can see this configuration in the Files and folders section of the tool.
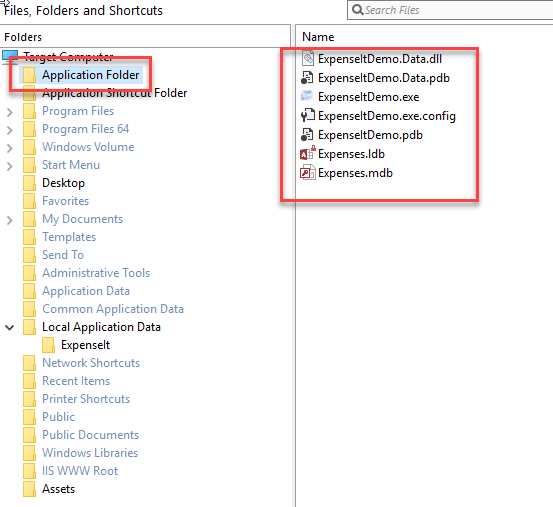
The first image shows the standard configuration leveraged by every setup. The Application folder contains the application's executable and DLLs, which are deployed in the installation folder.
However, we can notice that we have some content also inside the Local Application Data folder of the setup definition:
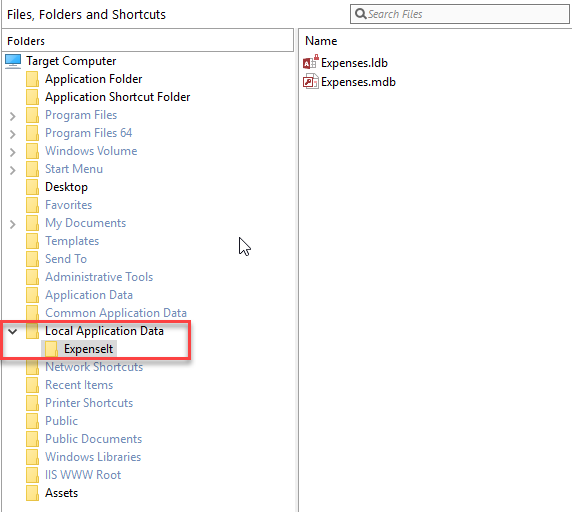
In my sample, I have an Access database which is deployed in the AppData folder of the user, so that the application can access to it with full permissions.
In the past, this configuration would have simply been ignored. The content of the Local Application Data folder would have been included inside the package (specifically, in the VFS folder, the one used to handle the Virtual File System), but the application wouldn't have been able to leverage it. We would have needed to write some code to copy the Access database in the local AppData folder at the first run.
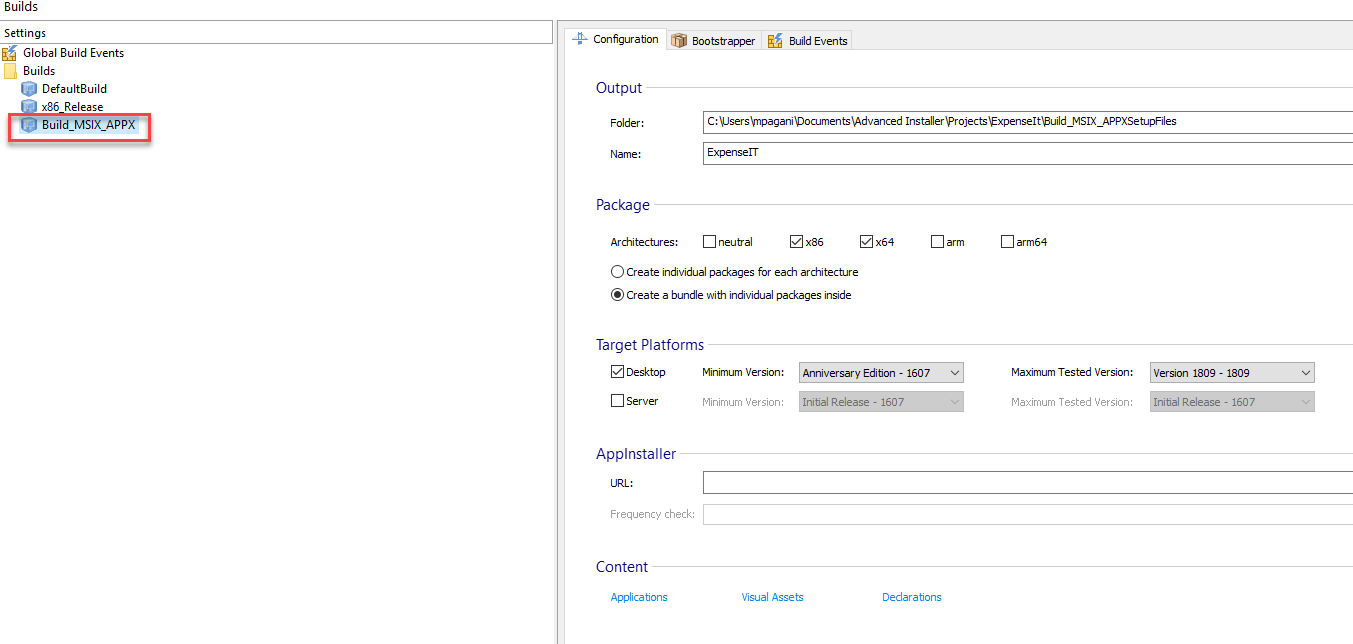
Now, instead, Advanced Installer handles this scenario for us. Just move to the Builds tab, make sure to select the MSIX / AppX configuration, right click on it and choose Build.
Open the folder where Advanced Installer has created the AppX file and install it, then launch the application at least once. Now open your local AppData folder and look for the local storage of the application (for example, C:\Users\mpagani\AppData\Local\Packages\ExpenseIt.ExpenseIt_w3kjh0qp85zv8\LocalCache). Surprise! The files which were part of the Local Application Folder section are now inside this folder, which replicates the structure of the real AppData one:

If we launch our application now, we'll notice that it will continue to work as expected. Every tentative of accessing to the files inside the AppData folder, in fact, will be automatically redirected to the local storage of the application, where the files have been copied.
What happened, under the hood, is the same thing we have observed in the previous post. If we unpack the package or we open it with a tool like 7-Zip, we can notice two things:
- The package contains an executable called AiStub.exe inside the AI_STUBS folder
- If we open the AppxManifest.xml file with a text editor, we can notice that the entry point of our application isn't anymore our main executable, but this new process added by the tool:
<Application EntryPoint="Windows.FullTrustApplication" Executable="AI_STUBS\AiStub.exe" Id="ExpenseIt">
The AiStub.exe process takes care of copying the application's data from the VFS folder inside the package to the local storage of the packaged version. Then it launches the main executable of the application. Everything is completely transparent for the user.
Neat, isn't it?
Additionally, since the last time I talked about Advanced Installer, the team has added some new interesting features. Let's briefly see them.
AppInstaller support
We have already talked about AppInstaller on this blog. It's a new feature added in Windows 10 1803 which allows to distribute your packaged application manually (on a website or using an internal share) and still offer an auto-update feature to your customers.
Now also Advanced Installer supports this and, in the AppX / MSIX build configuration, you can specify exactly like in Visual Studio where are you going to deploy the app and the frequency for update checks:

Bundle support
Bundling is a technique to create a special package which contain the base application, plus a set of sub packages tailored for different configurations (like images for different scaling factors, libraries for a specific CPU architecture, etc).
It's a way to optimize the deployment process of the package. The user will get the base application, plus only the sub packages which are relevant for the configuration of his machine. This way we can avoid, for example, wasting the user's bandwidth to download 4K assets when the user has a regular Full HD display.
Now you can create bundles also using Advanced Installer, thanks to another option in the build configuration:
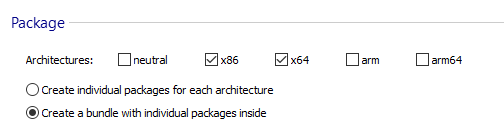
If you opt-in for the second option, instead of getting as output a package for each architecture, you will get a special package with extension .appxbundle, which contains all the sub packages for the various architectures.
Automatic generation of test certificates
Every package, in order to be installed on a machine, must be signed with a trusted certificate. When we package an application using Visual Studio, this is done automatically thanks to a temporary certificate generated with the UWP / Windows Application Packaging project. However, when we create a package manually or with another tool, like Advanced Installer, we need to manually sign it.
In many cases, we might not have a certificate ready to be used for signing, especially if we are in the testing phase. Advanced Installer makes easier to generate a test certificate that we can use to test our packages.
Just move to the Digital signatures section and, under Software Publisher Certificate, press Create. After a few seconds a test certificate will be installed on your machine (you will see an UAC prompt, since the operation requires admini privileges) and the dropdown will show it:

As last step, make sure to check the Enable signing option. Now it's enough to generate a new package using the appropriate configuration under Builds to apply this digital signature. Since the certificate has been added as trusted, you'll be able to immediately double click on the generate package and deploy it.
MSIX support
MSIX is the new generation of packaging technologies, which was announced at the Windows Developer Day earlier this year and, later, demoed and detailed at BUILD. You can learn more by watching these sessions from BUILD.
MSIX will be introduced with the next Windows 10 feature update (codename RS5), but you can already start playing with it by joining the Windows Insider Program. If you're running Advanced Installer on Windows 10 build 17704 or newer, you'll be able to use the AppX build configuration to generate a MSIX package.
Wrapping up
In this blog post we have learned how Advanced Installer can help us to solve a common scenario when our application uses the local AppData folder to store files. We might have some default data that needs to be deployed together with the application but, unfortunately, Windows is able to deploy the content of the package only inside a dedicated folder for packaged apps.
Advanced Installer helps to solve this scenario, by introducing in the package a launcher which takes care of copying the data for us and then launching the real application, without having to change our code.
Remember that you can download the free version of Advanced Installer from https://www.advancedinstaller.com/express-edition.html.
Happy packaging!