Solving common Desktop Bridge blockers with the Package Support Framework
Most of the times, packaging a Win32 application with the Desktop Bridge is a straightforward operation. However, sometimes, the outcome might be different than what we expect. We need to keep in mind, in fact, that an application must satisfy a set of requirements in order to work with the Desktop Bridge, like not running as elevated, not incorporating a kernel driver or a NT service, etc. As a reminder, you can find all the requirements in the documentation.
Some of these requirements aren't really a total blocker, but they may require some adjustement in the code of your application in order to make it compliant. We have already seen a couple of very common ones on this blog, which is the inability to write in the installation folder or to access to the current working directory.
However, in some scenarios, like with old enterprise apps, these issues can become a real blocker. In the field we can find many apps that are still widely used in companies which, however, have been developed a long time ago and there isn't anymore the opportunity to change the code. The company who created it might not exist anymore; or the source code could be too old to be updated. Do you mean you have to give up in these scenarios? No, thanks to the Package Support Framework!
It's an open source framework developed by Microsoft which allows to implement in an application one or more runtime fixes. Thanks to these fixes, you are able to change the faulty behavior of the app without having to change the code. How does it work?
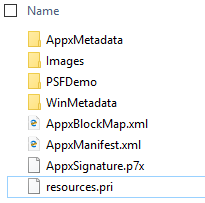
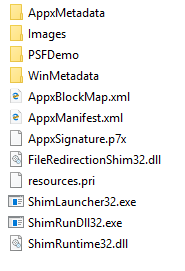
When you apply the Package Support Framework, your package looks a bit different than a standard one:

In addition to your Win32 application, the package includes also:
- A shim launcher
- One or more runtime fixes, which are represented by a DLL
- A configuration file, which tells to the shim launcher which is the main executable of your app, the runtime fixes to load, etc.
As a result, the entry point of an application which is leveraging the Package Support Framework isn't anymore the main executable of your app, but the shim launcher. It will take care of launching the app for you and applying the various runtime fixes you have declared in the configuration file.
Runtime fixes can be developed by you or you can leverage the ones already available on GitHub. Right now there are only a few, but since it's an open source project driven by the community the catalog will grow for sure in the coming months.
As you can see from the name, the Package Support Framework has been built with MSIX, the new generation of packaging tools, in mind. However, as we're going to see in the post, the framework is just a set of DLLs and executable we need to include in our existing package. As such, it doesn't have any specific dependency with the MSIX format. We can use already use it today with any Desktop Bridge app packaged using the AppX format.
Let's see how to use the Package Support Framework! In this post we'll focus on the standard approach to leverage when you already have a package and you want to apply one or more runtime fixes. In the next one, instead, we'll see how to do the same with Visual Studio, which requires some more steps but it enables also the debugging experience easier, especially if you're planning to build your own runtime fix.
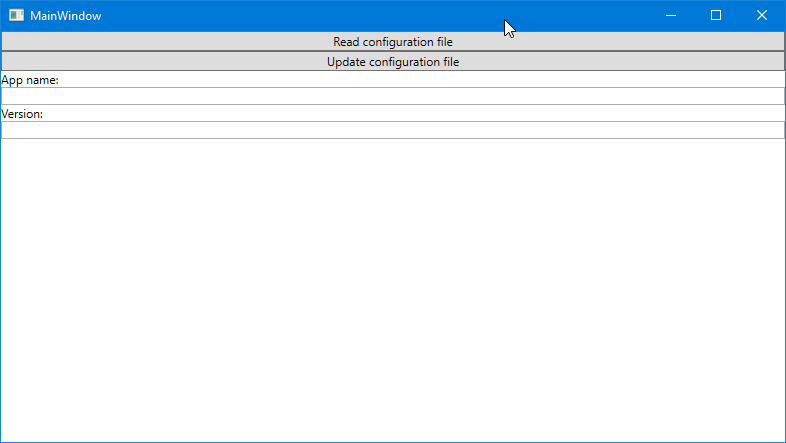
The demo application
For this post I've built a very simple WPF application which relies on the Current Working Directory, which is the installation folder. It tries, in fact, to read and update a configuration file from the location where the app has been deployed. This file is called app.json and the content is really simple:
 {
  "appname": "PSFDemo",
  "version":  "1.0.0"
}
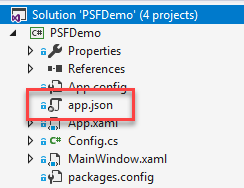
The file is included inside the Visual Studio project, which means that it's deployed together with the app in the output folder at compilation time:
The application uses the file system APIs to access to this file, read the content, deserialize it and display it in the user interface.
This is the code used for reading the file:
 private void OnReadFile(object sender, RoutedEventArgs e)
{
    string filePath = $"{Environment.CurrentDirectory}/app.json";
    string json = File.ReadAllText(filePath);
    Config config = JsonConvert.DeserializeObject<Config>(json);
    AppName.Text = config.AppName;
    Version.Text = config.Version;
}
As you can see, I'm using the Environment.CurrentDirectory property to get access to the installation folder of the application, where the app.json file is stored. Then, using the File class, I'm reading the content as a text and, using the popular library JSON.NET, I deserialize it into a Config object. It's a simple class I've built to map the structure of the config JSON file. In the end, I just display these two information in the user interface.
As you can notice from the screenshot, the application's name and version are displayed inside a TextBox control. The reason why I'm doing this is that the user can change these values and then, pressing the second button at the top, update the app.json file with these information. This is the code executed when you press the button:
 private void OnWriteFile(object sender, RoutedEventArgs e)
{
    Config config = new Config
    {
        AppName = AppName.Text,
        Version = Version.Text
    };

    string json = JsonConvert.SerializeObject(config);

    string filePath = $"{Environment.CurrentDirectory}/app.json";
    File.WriteAllText(filePath, json);
}
As you can notice, I'm doing the reverse of the reading operation. I create a new Config object with the data inserted by the user, I serialize it and then I save in the app.json file as a text.
Now let's launch the application. Press first the Read configuration file button and you should see the information stored in the defualt app.json file being displayed in the user interface. Then change them (for example, increase the version number to 1.0.1) and, this time, press the Update configuration file button. If you open the folder where you have deployed the application (for example, the bin/Debug one in case you're launching it directly from Visual Studio), you will notice that the app.json file has been updated and it should look like this:
 {
  "appname": "PSFDemo",
  "version":  "1.0.1"
}
However, due to the requirements listed when you are preparing to package an application with the Desktop Bridge, we can expects some troubles if we want to publish this application on the Microsoft Store. Let's add a Windows Application Packaging Project to our solution, add a reference to our WPF app and then deploy the packaged version (if it's the first you hear about this project type, you'll find all the information you need in the documentation).
First let's try to read the configuration file:
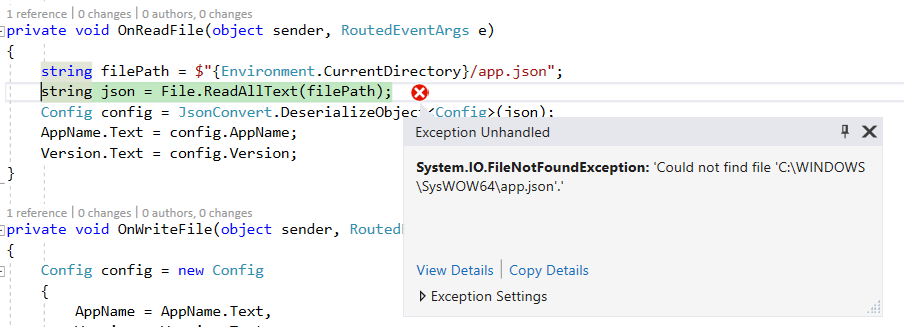
As expected, we're hitting a FileNotFoundException. When an application is running as packaged, the Current Working Directory doesn't point to the location where the package has been deployed, but to C:\Windows\SysWOW64 or C:\Windows\System32 based on the CPU architecture. As a consequence, we're trying to read the app.json file from a location where this file doesn't exist.
What about the writing operation?
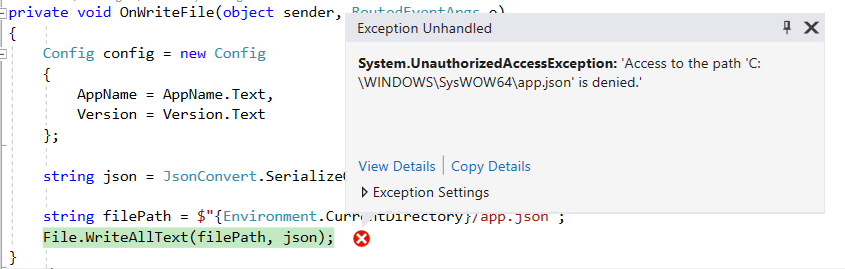
Here we have two problems:
- We're still using the Environment.CurrentDirectory API, which points again to the wrong location
- Even if we would be trying to access to the correct folder, we would get anyway an exception because the location where Windows deploys Store apps is system protected and, as such, we don't have write access.
The best approach to make our application compliant with the Desktop Bridge requirements would be to do some fine tuning to our code. However, as mentioned at the beginning of the post, we don't have always this chance. So let's see how to inject the Package Support Framework in our application.
Adding the Package Support Framework
As first step, we need the packaged version of our application. If we're using Visual Studio, we can generate it by right clicking on the Windows Application Packaging Project and by choosing Store -> Create app packages. Once we have it, we need to unpack it somewhere, in order to manipulate it. We can use the MakeAppX tool, which is included in the Windows 10 SDK. The easiest way to get access to the tool is to use the special Visual Studio version of the command prompt, which comes with all the environment variable already set in the proper way.
You can find this prompt in the Start menu, by searching for Developer Command Prompt for VS2017.
Open it and move to the folder where you have copied your AppX package, then run the following command:
makeappx unpack -p "<name of the package>.appx" -d "PackageFolder"
After a few seconds, you will find in the same location a folder called PackageFolder with the content of the package.
The Win32 binaries are stored inside inside a folder with the same name of the app (in my case, PSFDemo), while in the root you will find all the specific files required by a Windows 10 package, like the manifest or the resource index.
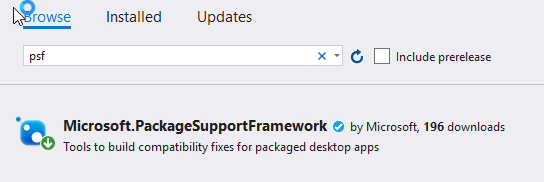
Let's download now the framework. It's published as a NuGet package, so you can use Visual Studio or the NuGet CLI to download it. I'll choose the first option, since it's easiest one. Just open your Visual Studio project (or any Visual Studio project, even an emtpy one, for what matters), right click on it and choose Manage NuGet packages. Now look for a package called Microsoft.PackageSupportFramework:
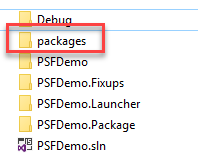
Installing it in your project won't have any effect. The real reason why we're doing this is that, this way, the various DLLs and executables we need to include in our package will be downloaded. If you're using the traditional packages.config approach, the package will be downloaded inside a folder called packages in the same folder which contains your Visual Studio project:
Otherwise, if you're using the new global package cache approach, you will find it in %userprofile%.nuget\packages\microsoft.packagesupportframework.
Regardless of the way you have downloaded the package, you will find all the files you need inside the bin folder:
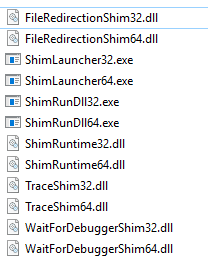
The folders contains the Shim Launcher, some companion DLLs and processes and a collection of some runtime fixes ready to be use. The minimum files you will need to incorporate in your package are ShimLauncher.exe, ShimRunDll.exe and ShimRuntime.dll. As you can see, they come in two flavors: 32 and 64 bit. Choose the ones you need based on the architecture of your Win32 application.
Then you can hook up any runtime fix you need, either included in the package or developed by you. In this case, since one of the problems our application is suffering is that it's trying to write some data inside the installation folder, we copy over also the FileRedirectionShim.dll file.
In my scenario my application is compiled for x86, so this is how the final version of my folder looks like:
Updating the manifest file
As we have mentioned before, the biggest change in your application when you use the Package Support Framework is that your entry point isn't any more your main executable, but the shim launcher which injects all the required infrastructure for you. As such, we need to tweak a bit the manifest file. Open the AppxManifest.xml file with a text editor and look for the following entry:
 <Application Id="PSFDemo"
Executable="PSFDemo/PSFDemo.exe"
EntryPoint="Windows.FullTrustApplication">
You need to change the Executable attribute so that it points to the shim launcher:
 <Application Id="PSFDemo"
Executable="ShimLauncher32.exe"
EntryPoint="Windows.FullTrustApplication">
Configuring the Package Support Framework
Now our package has been configured to launch the Shim Launcher instead of our application. However, we haven't instructed the launcher which is the application to run, which runtime fixes to use, etc.
In order to do this, we need to add a configuration file inside the package and place it in the root, in the same location where we have placed the Package Support Framework executable and libraries.
The file name must be config.json and it looks like this:
 {
  "applications": [
    {
      "id": "PSFDemo",
      "executable": "PSFDemo/PSFDemo.exe",
      "workingDirectory": "PSFDemo/"
    }
  ]
}
Please note: right now the Package Support Framework is able to handle properly the config.json file only if the encoding is set to UTF-8. If you use any other encoding, including UTF-8 with BOM, you will get an error at startup in parsing the config.json file. The team is aware of this limitation and they will likely include a fix in a future release.
The applications node is the core one and it's used to instruct the launcher which is the main process of our application. Specifically:
- id is the main identifier of the app. It must match the id attribute of the Application node inside the manifest.
- executable is the entry point of our Win32 application. Basically, it's the value that, previously, we were using as entry point inside the manifest.
- workingDirectory is the path, relative to the package, which contains our executable.
Thanks to the workingDirectory attribute we can solve our problem in reading the configuration file. In fact, the application is now able to access to the correct working directory.
Let's try this!
Repackaging the app
In order to test the application we need to repackage our application. Let's open again a Developer Command Prompt for VS2017 and move to the folder where you have previously unpacked the package.
Now run the following command:
makeappx pack -p "<name of the package>.appx" -d "PackageFolder"
As you can see, the command is the same we have used before. We have just switched the unpack statement to pack.
However, the package is still unusable at this point, because it must be signed with a valid certificate in order to be installed.
As such, you will need to place your PFX certificate in the same folder where you have created the package and run the following command:
signtool sign /a /v /fd sha256 /f "MyCertificate.pfx" "<name of the package>.appx"
If you don't have a certificated ready to be used, you can create a testing one following the guidance on the documentation.
After you have signed it, now you're ready to install it. Just double click on the package, choose Install and then launch it.
Now press the Read configuration file button and, this time, you'll see the information about the application being displayed inside the user interface. The Current Working Directory redirection is working and now the Environment.CurrentDirectory API is correctly pointing to the folder where the package has been deployed.
However, our work isn't done yet. If we press the Update configuration file button, in fact, the application will still crash. Thanks to the Package Support Framework, it will try now to write the file in the correct directory but, being system protected, the operation will fail.
Let's fix this!
Adding a runtime fix
So far we have just configured the Package Support Framework, but we haven't added any specific runtime fix. We are just leveraging the Current Working Directory redirection support built-in inside the framework.
We have already executed one piece of the puzzle. If you remember, when you have copied the Package Support Framework files inside the package, we have included also the FileRedirectionShim32.dll library, which contains the runtime fix we need.
However, it isn't enough. We need to configure it in the config.json file, so that the launcher knows to pick it up. This is how the final configuration looks like:
 {
  "applications": [
    {
      "id": "PSFDemo",
      "executable": "PSFDemo/PSFDemo.exe",
      "workingDirectory": "PSFDemo/"
    }
  ],
  "processes": [
    {
        "executable": "PSFDemo",
        "shims": [
            {
                "dll": "FileRedirectionShim.dll",
                "config": {
                    "redirectedPaths": {
                        "packageRelative": [
                            {
                                "base": "PSFDemo/",
                                "patterns": [
                                    ".*\\.json"
                                ]
                            }
                        ]
                    }
                }
            }
        ]
    }
  ]
}
The section where to configure the runtime fixes is called processes. Inside it we have a generic configuration with an expression to filter the processes we want to apply the fixes to. In this case, since our application is made by only one executable called PSFDemo.exe, we can just specify the base name in the executable parameter.
Then, inside the collection called shims, we can create one or more elements, one for every runtime fix we want to apply. In this case, we have created one for the file redictions. For each fix we must specify the library which implements it (the dll property) and a configuration (the config property).
The configuration doesn't have a fixed schema, but it's defined by the developer who has created the runtime fix. In this case, the file redirection fix requires to specify which are the paths we want to redirect. Each of them is represented by a packageRelative item, which requires:
- a base property, to specify which is the path of the application where our application will try to write some data
- a patterns property, which is a rule to determine which file system requests we want to redirect. In this case, we know that our application tries to update a JSON file inside the installation folder, so we use .*\.json as an expression.
Now let's repeat again the process to package and sign the application. Uninstall the previous version from the Start menu and install the new one.
Press first the Read configuration file button, in order to display the values from the config file. Now change one of them (for example, change the version number to 1.0.1) and press Update configuration file. Surprise! This time you won't get any exception. But where did our file go?
The file has been automatically created inside the local storage that is assigned to every Store application, which is saved inside the %localappdata%/Packages path. The full path will be something like %localappdata%\Packages\PSFDemo_8x64rcfmpem5g\LocalCache\Local\VFS\C$\Program Files\WindowsApps\PSFDemo_1.0.0.0_x86__8x64rcfmpem5g\PSFDemo
Inside the VFS folder the runtime fix has created a file called app.json and it has placed it inside the same path where the file should be created originally, which is the folder where Windows saves the Store applications (C:\Program Files\WindowsApps).
The nice bonus is that the local storage wins over the installation folder. As such, if you close the application, you open it again and you press the Read configuration file, you will see the updated value displayed in the user interface and not the original one. The reason is that the app.json file inside the VFS folder has a higher priority than the one which was deployed with the package.
Neat, isn't it?
Wrapping up
In this blog post we have seen how the Package Support Framework can help us to solve some problems we may face when we want to package an existing Win32 app which would require some code changes in order to be compatible, but we don't have access to the source code anymore. Thanks to the runtime fixes, we can apply changes to the app's behavior on the fly, without having to change the code.
Of course, if you own the code the best strategy is still to update it, since it will help the maintanibility in the long term. Additionally, thanks to the Desktop Bridge and the new upcoming features like XAML Island, you will be able to extend your application with Windows 10 features.
In this post we have seen a first approach, which requires to manually unpack and pack our package and to apply the required changes to its content. This approach is suggested when we don't own the source of the project, so we don't have a Visual Studio project to deal with. In the next post, instead, we're going to see how we can apply the Package Support Framework through Visual Studio, which will allow us also to debug the runtime fixes more easily.
In the meantime, you can find the sample project used for this app in our official GitHub repository.
Happy packaging!