Create a Windows Mixed Reality App from 0 - A simple example
We start from the empty project we just created (👨💻 The Unity project) and which we configured for Windows Mixed Reality. Let’s first save the current scene.
- Click on the File menu and then Save Scene as… 
- Choose “MainScene” for the name. The saved file goes in the Assets folder of the project like any other files that will be part of the project (3D objects, textures, scripts)

The camera
The first step is to move the camera to the origin (x=0, y=0, z=0). It acts for the player; its position and rotation will be the ones of the Mixed Reality headset.
- Click on the objet Main Camera in the Hierarchy window; this selects the objet and the Inspector windows display its properties
- In the Inspector window and the Transform group, change the valuer or x, y and z to have "0" for each coordinate of the position

- Secondly, change the Clear Flags from Skybox to Solid Color.
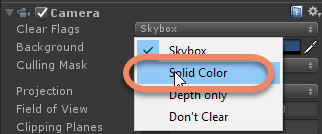
- Then, for the Background property, choose the color Black (#00000000) which is the transparency color.
The controllers
Now, we add a script for handling the main button of the controller (this is the trigger behind the controller; it is the button pressed by the the forefinger). We can attach this script to an existing object like the camera or create an empty GameObject which will act as a ‘container’. We use the second option for a better readability of the project.
- In the GameObject menu, click on Create Empty 
- In the Hierarchy window, click on the new object called "GameObject"
- Click a second time to modify the name (or press F2)

- Name the GameObject "InputManager"
- Still with the InputManager GameObject selected in the Hierarchy window, click on the Add Component in the Inspector window
![clip_image003[4]](https://msdntnarchive.blob.core.windows.net/media/2018/06/clip_image0034.jpg "clip_image003[4]")
- In the search zone, tape "Script" and click on New Script ![clip_image004[4]](https://msdntnarchive.blob.core.windows.net/media/2018/06/clip_image00441.png "clip_image004[4]")
- Give it the name "Tap" and click on Create and Add ![clip_image005[4]](https://msdntnarchive.blob.core.windows.net/media/2018/06/clip_image0054.png "clip_image005[4]")
- We have now a new script associated with the InputManager object. In order to modify it, double-click on it
![clip_image006[4]](https://msdntnarchive.blob.core.windows.net/media/2018/06/clip_image0064.png "clip_image006[4]")
Visual Studio is the default script editor for Unity. The script is opened is not empty. Here is its content;

The two comments are explicits. We see there that we are in the context of video games with code which will be executed only one time (Start) and for each single frame (Update); That is to say at the minimum 60 or 90 times by second if the PC allows it
We write some C# code to handle the main button of the controllers. We can use a class name GestureRecognizer. This class abstrats the HoloLens gesture recognition, the button pressed on Xbox or motion controllers. Here is how to use it:
- We use the namespace containing this class
using UnityEngine.XR.WSA.Input;
- We add a private member of type GestureRecognizer
private GestureRecognizer recognizer;
- In the Start() method, create an instance of the recognizer member
recognizer = new GestureRecognizer();
- We want to handle the Tap gesture (As we previously said, the class is high level enough to handle as well the HoloLens AirTap and the main bouton pressed of motion controllers). We use the SetRecognizableGestures() method
recognizer.SetRecognizableGestures(GestureSettings.Tap);
- To be notified when the Tap is done (or main controller’s button pressed), we subscribe to the Tapped event and we start the gestures’ capture or recognition
 recognizer.Tapped += GestureRecognizer_Tapped;

recognizer.StartCapturingGestures();
Some code
We can now create some material (virtual material )! On each button’ pressure (or AirTap), the GestureRecognizer_Tapped method is executed. Here is what we can do:
a. Create a simple GameObjet: a cube
b. Change its size to x=1, y=0.1, z=1. We have a brick which is 1m on 1m (x and z) with thickness of 10cm (y)
c. Change its position in order that the brick is in front of us (x=0), at 2m of height (y=2) and 4m of distance (z=4)
d. We indicate that the object is subject to the gravity force (and we let the Unity engine do the job)
 private void GestureRecognizer_Tapped(TappedEventArgs obj)
{
    var o = GameObject.CreatePrimitive(PrimitiveType.Cube); //a
    o.transform.localScale = new Vector3(1f, 0.1f, 1f); //b
    o.transform.position = new Vector3(0f, 2f, 4f); //c
    o.AddComponent<Rigidbody>(); //d
}
As you can see, when we press the controller’s button, we create a brick. Because we assigned a RigidBody, the bricks will fall in the empty space forever. Let’s add a plan on which the bricks would be able to fall. Go back to Unity:
- In the GameObject menu, click on 3D Object and then Cube ![clip_image008[4]](https://msdntnarchive.blob.core.windows.net/media/2018/06/clip_image00842.jpg "clip_image008[4]")
- In the Hierachy window, select the cube and press F2 to rename it; Call it "Floor"
![clip_image009[4]](https://msdntnarchive.blob.core.windows.net/media/2018/06/clip_image0094.png "clip_image009[4]")
- Change its position in order that it can be in front of us (x=0), at 4m of distance (z=4) and at the the level of the floor (y=-1.8) if we consider that we are tall by 1m80; Change its dimensions to go from a cube to a plan with a width and length of 3m (x=3, z=3). Modify its thickness to 10cm (y=0.1)
![clip_image010[4]](https://msdntnarchive.blob.core.windows.net/media/2018/06/clip_image0104.png "clip_image010[4]")
We have finished! To test, simply click on the the Unity PLAY button ![clip_image012[4]](https://msdntnarchive.blob.core.windows.net/media/2018/06/clip_image0124.jpg "clip_image012[4]") : You will see the rendering in the Game window of Unity and more interesting in the Windows Mixed Reality headset!
: You will see the rendering in the Game window of Unity and more interesting in the Windows Mixed Reality headset!
![clip_image014[4]](https://msdntnarchive.blob.core.windows.net/media/2018/06/clip_image0144.jpg "clip_image014[4]")
Here is the full script:
 using System;
using System.Collections;
using System.Collections.Generic;
using UnityEngine;
using UnityEngine.XR.WSA.Input;

public class Tap : MonoBehaviour
{

    private GestureRecognizer recognizer;

    // Use this for initialization
    void Start()
    {
        recognizer = new GestureRecognizer();
        recognizer.SetRecognizableGestures(GestureSettings.Tap);
        recognizer.Tapped += GestureRecognizer_Tapped;
        recognizer.StartCapturingGestures();
    }

    private void GestureRecognizer_Tapped(TappedEventArgs obj)
    {
        var o = GameObject.CreatePrimitive(PrimitiveType.Cube); //a
        o.transform.localScale = new Vector3(1f, 0.1f, 1f); //b
        o.transform.position = new Vector3(0f, 2f, 4f); //c
        o.AddComponent<Rigidbody>(); //d
    }

    // Update is called once per frame
    void Update()
    {

    }
}
As usual, the sample code is available on GitHub - https://github.com/Microsoft/Windows-AppConsult-Samples-MixedReality/tree/master/CreateMixedRealityAppFrom0/CreateObjects
Happy coding!
--