Ask Learn
Preview
Please sign in to use this experience.
Sign inThis browser is no longer supported.
Upgrade to Microsoft Edge to take advantage of the latest features, security updates, and technical support.
Note
Access to this page requires authorization. You can try signing in or changing directories.
Access to this page requires authorization. You can try changing directories.
If your goal is to reach the widest possible audience for your Windows application, the Microsoft Store is without any doubt your best choice. Other than being available to every Windows 10 user on the planet, it allows to forget about all the processes related to application development which aren’t actually “development”. I’m talking about important features like handling updates, selling the app, keeping track of the crashes that might happen, etc. The Store does everything for you and, thanks to Visual Studio and the AppX (in the near future, MSIX), you don’t even have to take care of authoring an installer procedure. Just create an app package for your application and upload it to the Dev Center during the submission process. Done!
However, the Microsoft Store might not always be the best solution. Think, for example, to a Line of Business (LOB) application which is distributed only internally inside a company. There are many caveats in using the Microsoft Store for such a scenario:
The best way to solve these problems but, at the same time, retaining all the advantages of using a Store infrastructure is the Microsoft Store for Business. It offers all the benefits of the public Store we have outlined before, but solves most of the problem that are typical of an enterprise entity:
However, not all the enterprises are ready to leverage the Store for Business or another deployment solution like System Center Configuration Manager or Intune. Sometimes they just want to deploy an application on an internal website or an internal share and let the employees download it from there.
Another scenario where the Store might not be handy is the testing phase. A great approach is to publish an application as hidden and share the link with your testers, but it might not always be the best solution since:
Wouldn’t be nice if we could retain some of the benefits of a Store infrastructure, like auto updates, also with a manual distribution model based on sideloading? Well, thanks to a new feature added in the upcoming release of Windows, we can!
If you have already worked with UWP or Desktop Bridge, you should be familiar with App Installer. It’s a new tool that comes with Windows 10, starting from the Anniversary Update, and that makes super easy handling the sideloading of app packages. If you remember, before Anniversary Update, the only way to sideload a package was to run a PowerShell script, which under the hood uses the Add-AppxPackage command. Starting from Anniversary Update, instead, you can just double click on an app package to get a simpler experience:
The upcoming RS4 update for Windows is going to expand further the deployment opportunities with App Installer, by introducing the option to install a package directly from a remote source, like a website. Additionally, Windows now supports .appinstaller files, which contain the definition of an app package that you want to install on your machine. This format is quite powerful since it allows you to specify:
Here is an example of an .appinstaller file, taken from the official documentation:
 <?xml version="1.0" encoding="utf-8"?>
<AppInstaller
    xmlns="https://schemas.microsoft.com/appx/appinstaller/2017"
    Version="1.0.0.0"
    Uri="https://mywebservice.azurewebsites.net/appset.appinstaller" >

    <MainBundle
        Name="Contoso.MainApp"
        Publisher="CN=Contoso"
        Version="2.23.12.43"
        Uri="https://mywebservice.azurewebsites.net/mainapp.appxbundle" />

    <OptionalPackages>
        <Bundle
            Name="Contoso.OptionalApp1"
            Publisher="CN=Contoso"
            Version="2.23.12.43"
            Uri="https://mywebservice.azurewebsites.net/OptionalApp1.appxbundle" />

        <Bundle
            Name="Contoso.OptionalApp2"
            Publisher="CN=Contoso"
            Version="2.23.12.43"
            Uri="https://mywebservice.azurewebsites.net/OptionalApp2.appxbundle" />

        <Package
            Name="Fabrikam.OptionalApp3"
            Publisher="CN=Fabrikam"
            Version="10.34.54.23"
            ProcessorArchitecture="x86"
            Uri="https://mywebservice.azurewebsites.net/OptionalApp3.appx" />

    </OptionalPackages>

    <Dependencies>
        <Package Name="Microsoft.VCLibs.140.00" Publisher="CN=Microsoft Corporation, O=Microsoft Corporation, L=Redmond, S=Washington, C=US" Version="14.0.24605.0" ProcessorArchitecture="x86" Uri="https://foobarbaz.com/fwkx86.appx" />
        <Package Name="Microsoft.VCLibs.140.00" Publisher="CN=Microsoft Corporation, O=Microsoft Corporation, L=Redmond, S=Washington, C=US" Version="14.0.24605.0" ProcessorArchitecture="x64" Uri="https://foobarbaz.com/fwkx64.appx" />
    </Dependencies>

</AppInstaller>
Thanks to this file, which can be made available through a website or a file share, you can deploy an application (Contoso.MainApp), its optional packages (Contoso.OptionalApp1, Contoso.OptionalApp2 and Contoso.OptionalApp3) and its dependencies (the Visual C++ runtime) without passing from the Store. The user will just have to click on a web link that points to the appinstaller and Windows will take care of everything. This is made possible by a new protocol which has been added to Windows 10 called ms-appinstaller. Here is how a web page that can trigger the remote installation of an app package looks like :
 <html>
    <body>
        <h1> MyApp Web Page </h1>
        <a href="ms-appinstaller:?source=https://mywebservice.azureedge.net/HubApp.appx"> Install app package </a>
        <a href="ms-appinstaller:?source=https://mywebservice.azureedge.net/HubAppBundle.appxbundle"> Install app bundle  </a>
        <a href="ms-appinstaller:?source=https://mywebservice.azureedge.net/HubAppSet.appinstaller"> Install related set </a>
    </body>
</html>
Each link is prefixed by the ms-appinstaller protocol and followed by the source parameter, which specifies the URL of an .appx, .appxbundle or .appinstaller file.
One of the most interesting new features of App Installer is that you can enable also auto updates. This way, you can make sure a sideloaded application will always be up-to-date to the most recent version even without using the Store. Just publish a new .appinstaller file and a new package with a higher version number in the same web location or file share and that’s it! In this post we’re going to see how, thanks to Visual Studio 2017 15.7 (which is currently in Preview) we can enable this scenario very easily.
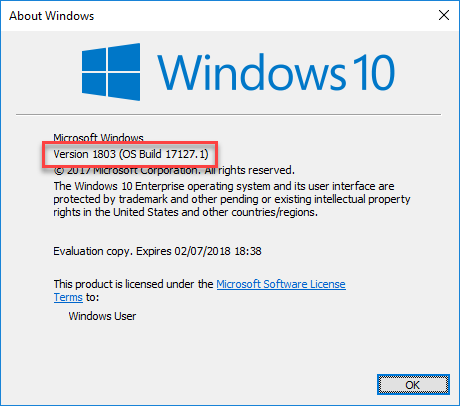
The feature we’re going to see is part of RS4 and the next Windows 10 SDK. As such, in order to test it, we’ll need to try it on a machine which is enrolled into the Windows Insider Program. We will need a Windows build with version number equal or higher to 17120 (you can check your build number by typing winver in the Start menu or in the search box):
The first step, if you don’t already have it, is to install the Preview branch of Visual Studio 2017, which can be downloaded from https://www.visualstudio.com/vs/preview/ and it works side by side just fine with the stable version. You’re going to need 15.7 Preview 2, which is the first version that has added support for this new feature. The second step is to download the Insider Preview SDK from https://www.microsoft.com/en-us/software-download/windowsinsiderpreviewSDK This feature, as already mentioned, is part of RS4 and, as such, in order to leverage it from a UWP or a Desktop Bridge application it must be compiled with the RS4 SDK.
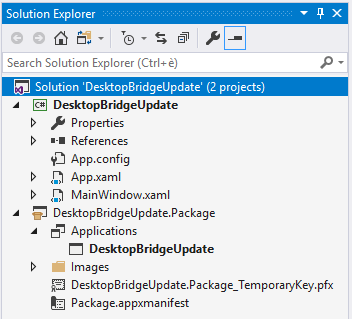
Now let’s open Visual Studio Preview and create a new project. For the purpose of this test we’re going to use a Win32 application packaged with the Desktop Bridge (since traditional desktop applications are very common in the enterprise world), but of course the same process will work also for a native UWP application. We won’t go through all the details, because I will basically repeat the same steps I’ve discussed in a previous blog post: I’m going to create a dummy WPF application and package it with the Desktop Bridge using the Windows Application Packaging Project. This is how my solution looks like:
There’s only one important thing to keep in mind. As usual, when you’ll add a Windows Application Packaging Project or a UWP project to your solution, you’ll be asked which version of the Windows 10 SDK you want to set as minimum and as target. As mentioned before, this feature we’re going to leverage is specific to RS4, so we need to set in both dropdowns the Insider Preview SDK we have just downloaded:
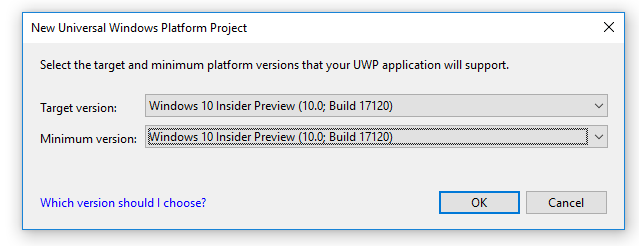
At the time of writing the latest version of the SDK is 17120; when RS4 will officially ship, just replace it with the final version of the SDK that will be released.
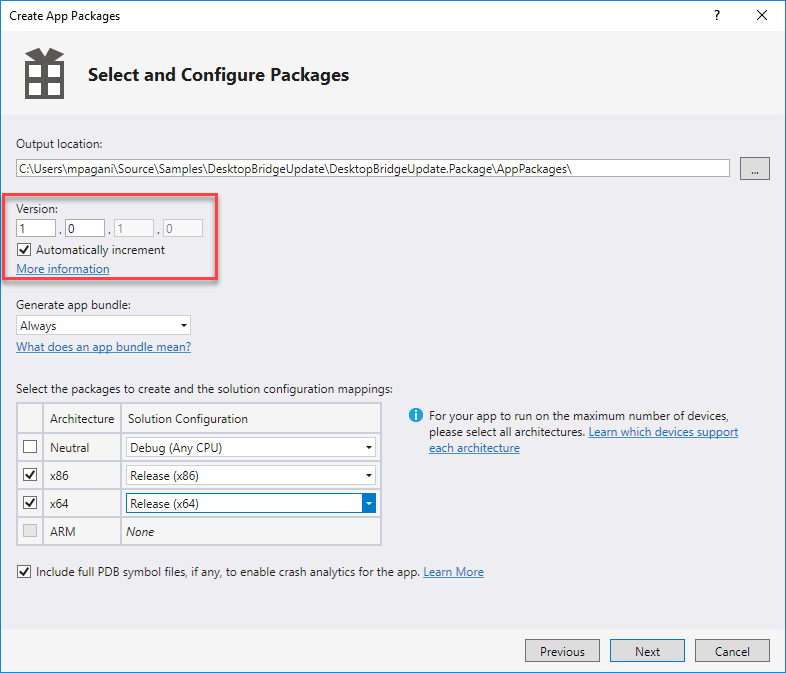
Now let’s package our application, as we have done multiple times: right click on the Windows Application Packaging Project, choose Store –> Create app packages. This time, the window that will appear will be slight different than the one we are used to see:
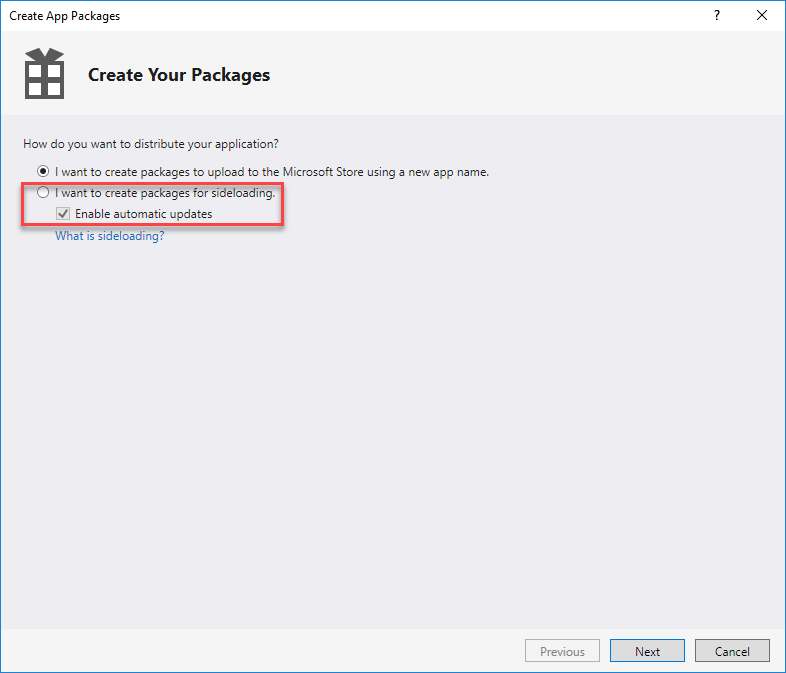
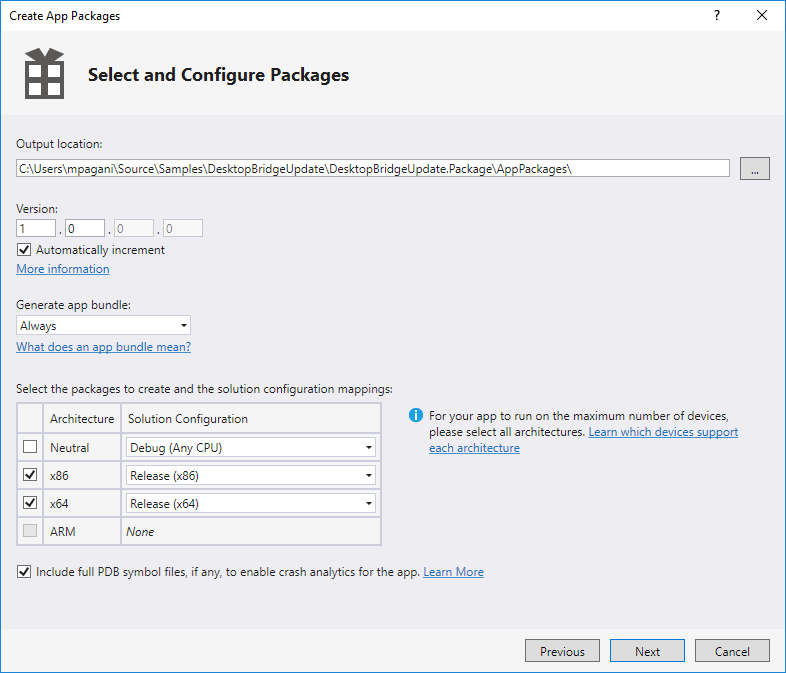
As you can see, when we choose the option I want to create packages for sideloading we have a new checkbox called Enable automatic updates. Make sure it’s enabled and let’s press Next. The next step will be familiar: it’s the traditional one where we setup the package we want to create, by configuring the bundle and the supported platforms.
Let’s press Next again and, this time, we’ll see something new:
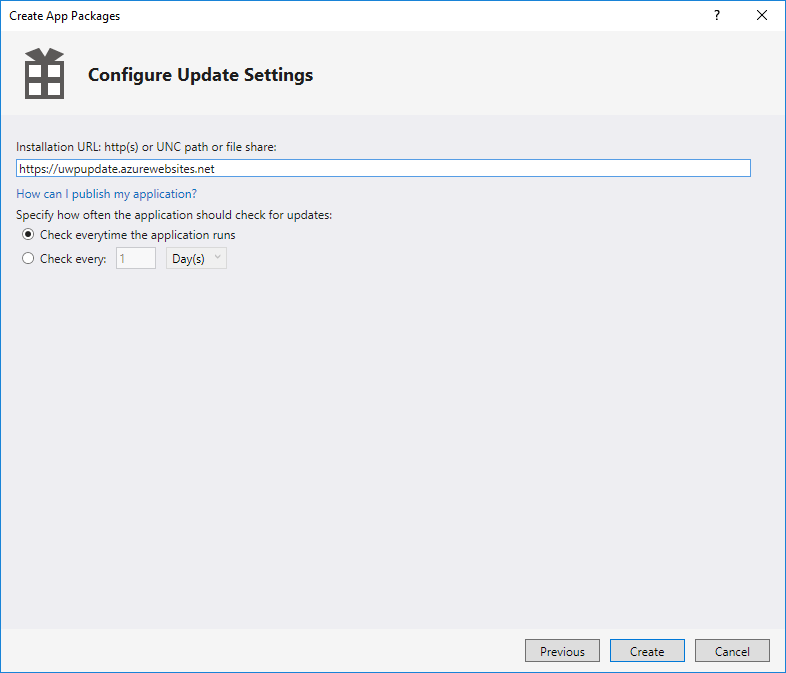
This is where we can setup our automatic update feature. We will have to provide:
Now press Create. Visual Studio, as usual, will start the compilation process and it will prepare the package for sideloading. The difference is that, this time, other than the usual test certificate and .appxbundle file, we will find also an .appinstaller file and a HTML page in the deployment folder:

Let’s open the .appinstaller file with a text editor like Notepad or Visual Studio Code:
 <?xml version="1.0" encoding="utf-8"?>
<AppInstaller Uri="https://uwpupdate.azurewebsites.net/DesktopBridgeUpdate.Package.appinstaller" Version="1.0.0.0" xmlns="https://schemas.microsoft.com/appx/appinstaller/2017/2">
  <MainBundle Name="c6c08364-cbe5-4267-ae81-ce9be33ff652" Version="1.0.0.0" Publisher="CN=mpagani" Uri="https://uwpupdate.azurewebsites.net/DesktopBridgeUpdate.Package_1.0.0.0_Test/DesktopBridgeUpdate.Package_1.0.0.0_x86_x64.appxbundle" />
  <UpdateSettings>
    <OnLaunch HoursBetweenUpdateChecks="0" />
  </UpdateSettings>
</AppInstaller>
The XML is the same one we’ve seen at the beginning of this post. In this case, it’s much simpler because we don’t have optional packages or dependencies, but just the main bundle. However, there’s a new option we didn’t see before: the <UpdateSettings> section, which has a node called <OnLaunch> with an attribute HoursBetweenUpdateChecks that specifies the update check frequency. In this case it’s set to 0 because, during the wizard, I’ve chosen to check for updates everytime the application runs.
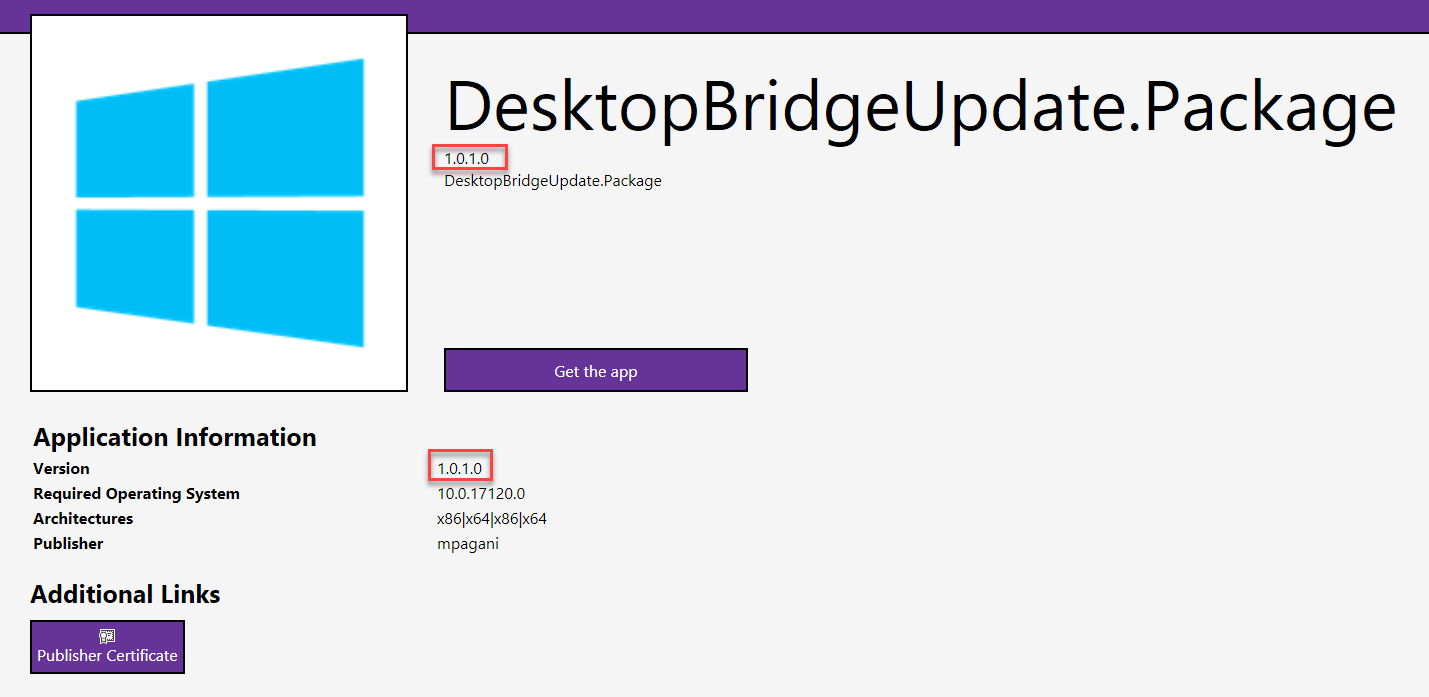
Now you just have to deploy on your website or file share (it must be the same one you have specified during the wizard) the whole content of the folder, including the .appinstaller file, the HTML page and the subfolder with the package and the certificate. After you’ve done it, you’ll be able to hit with your browser the index.html page of the folder and see a page like the following one:
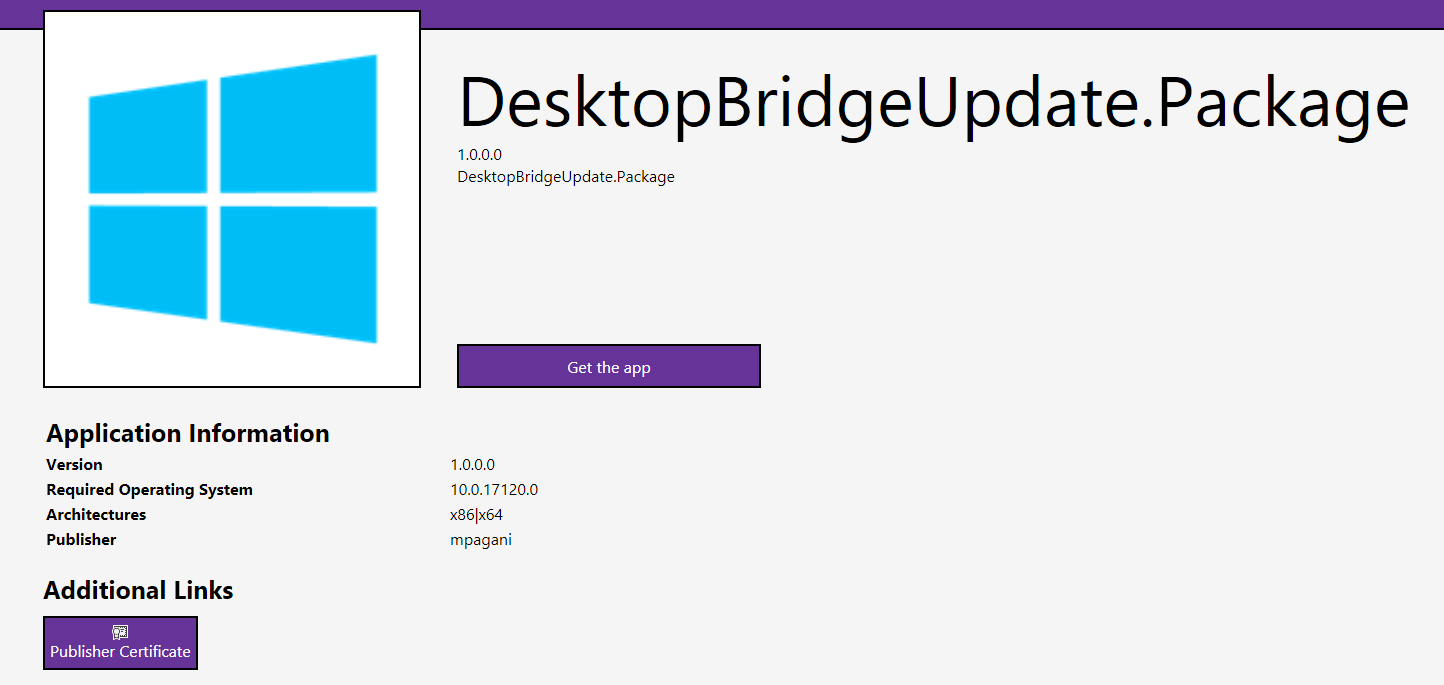
The button Publisher Certificate at the bottom will allow you to download and install the certificate which has been used to sign the package. In an enterprise scenario probably it won’t be needed (it’s likely that the package will be signed with a certificate already trusted by all the computers in the company) but, for example, it could be very helpful if you decide to leverage this approach to allow external users to test your application before submitting it to the Store.
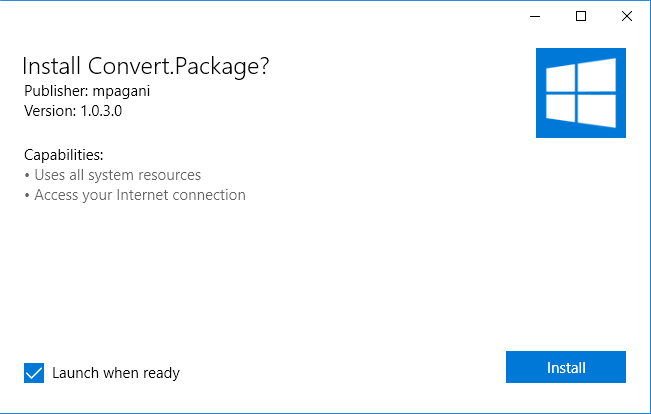
However, the core App Installer experience is delivered through the Get the app button. Click on it and Windows will automatically start for you the sideloading experience, like if you have double clicked on a local app package:

Install and launch the application and… no surprises here  Your packaged WPF application will just start:
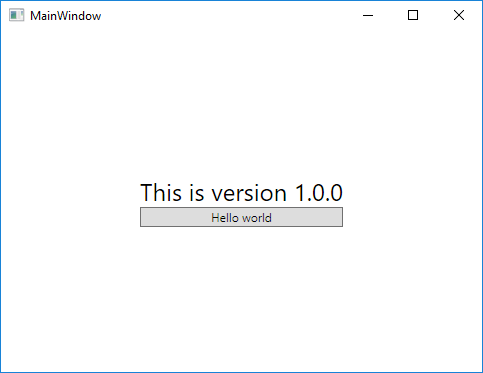
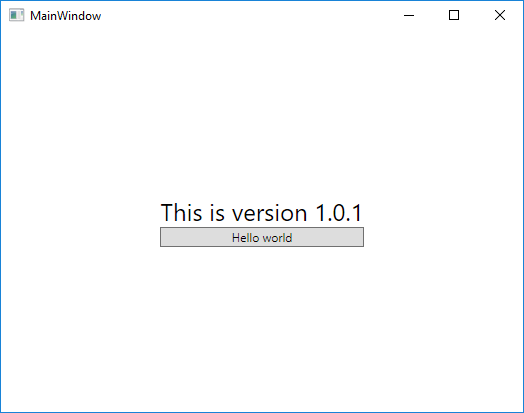
Now let’s do something interesting. Let’s return to Visual Studio and change something in the WPF application. For example, I’ve changed the label in the main window with the text This is version 1.0.1. Then right click again on the Windows Application Packaging Project and start the creation of a new package for sideloading. Keep everything as it is (the wizard will remember all the options you’ve previously set, including the URL for the auto update feature), just make sure to increase the version number of the package (or to use the Automatically increment option):
Complete the wizard and, in the AppPackages folder of your project, you will find an updated.appinstaller file, an updated HTML page plus a new folder which contains the new app package:
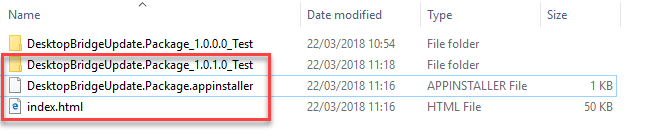
Make sure to copy all of them in the same web location or file share where you have deployed the previous version and remember to overwrite the existing HTML page and .appinstaller file. You can verify you did everything correctly just by opening again the index.html file in the location. You should see an updated version number in the page:
Now open the application again and then close it. Wait for a few seconds and then open again the application you have previously deployed from the Start menu:
Surprise! The application has automatically updated itself in the background, without asking any intervention from our side. We could have noticed that something was happening only if we would have tried to open the application during the update process. In this case, Windows would have warned us with a similar message:
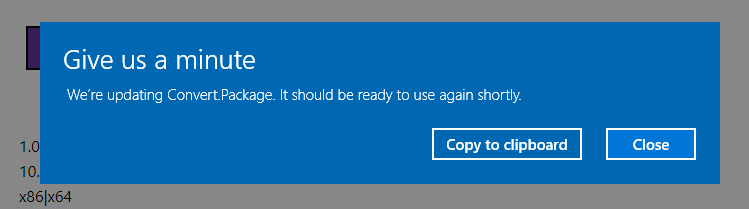
What happened? When we have launched the application after having deployed the new package on the website, Windows has identified that there was a new update to download. However, to not disrupt the user's workflow, it just queued the operation. Then, as soon as the application has been closed (which means that the user doesn't need it anymore for the moment), Windows has applied the update silently.
In this post we have seen how, thanks to the new features that have been added to App Installer in RS4, we are able to manage automatic updates for a UWP or a Desktop Bridge simply by deploying a couple of files in a web location or in a file share. No setup authoring, no setting up a web service, nothing. Just copying and pasting some files. This feature could be extremely helpful in enterprise or testing scenarios, where you don’t have the chance to go through a Store infrastructure or an environment managed with tools like System Center Configuration Manager or Intune.
The web page you have seen in the post is just a “dummy page” created by Visual Studio to make it easier to enable the deployment of app packages from a website. Of course, you’re free to change it as you prefer. The key part is the URL used to trigger the installation of the app from remote, which leverages the ms-appinstaller protocol:
<a class='app-dl-app app-dl-button' href='ms-appinstaller:?source=https://uwpupdate.azurewebsites.net/DesktopBridgeUpdate.Package.appinstaller'>Get the app</a>
Happy packaging!
Please sign in to use this experience.
Sign in