Preparing a Desktop Bridge application for the Store submission
If you follow this blog regularly, you’ll know that currently the submissions of Desktop Bridge apps on the Store requires an extra vetting other than the standard certification process. Desktop Bridge applications, in fact, make use of a special capability called runFullTrust, which is restricted. If you try to submit an application that declares it in the manifest, you’ll get an error during the package upload step. In order to get access to this capability developers must fill the official nomination form. Once the request has been validated, a person from Microsoft will contact you and will guide you through all the steps to request the unlock of your Dev Center account.
However, once it has been granted, many developers are still stuck because they get other errors during the upload or the certification process which aren’t connected to the application itself, but to the package that hasn’t been prepared in the right way. Let’s see the most common issues and how to solve them.
Assigning the correct identity
The manifest file of a Store application includes an entry called <Identity> , which contains a set of information that, combined together, define the family name of the package. The most important information, that generate the true identity, are the Name and the Publisher. Usually the configuration of the identity, for a full UWP application, is completely transparent, thanks to Visual Studio. When you’re ready to publish a UWP application on the Store, in fact, you can simply right click on the project, choose Store –> Create app packages and a wizard will guide you through the creation of the packages that you will have to upload in the Dev Center. During the process, you’ll be asked to sign in with your Microsoft Account and to associate a name to the application (either a new one or an already reserved one). Visual Studio, under the hood, will set the right identity in the manifest, by getting the information directly from your Dev Center’s account.
This experience is also available to Desktop Bridge applications thanks to the Javascript’s project approach or to the new Desktop Bridge Packaging Project, now available in the Preview branch of Visual Studio. However, it isn’t applicable to every scenario at the moment. The project, in fact, must be supported by Visual Studio, which means desktop applications built with WPF, Windows Forms or C++. As such, many developers still use the Desktop App Converter to perform the conversion of the classic desktop installer, either because it’s built with a non-Microsoft technology or because they need to capture additional changes (like the installation of a dependency, registry keys, etc.).
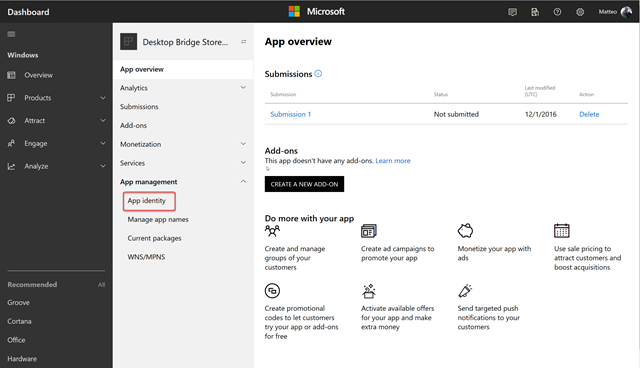
The easiest way to set the identity using the Desktop App Converter is to leverage two of the parameters that can be appended to the tool. But first we need to retrieve the right Name and Publisher from the Dev Center. Go to https://dev.windows.com, login with your Microsoft Account and access to the dashboard. If you haven’t done it yet, reserve a new name for your application by clicking on the Create a new app button. You won’t need to start the submission process now, it’s enough to reserve the name, which must be unique across the Store. Otherwise, if you have already reserved a name, simply look for it in the list of your apps on the Dev Center and click on it. Regardless of the path you have followed, you’ll end up to the detail page of the application. On the left menu, you will find the option App management –> App identity, highlighted in the image below.
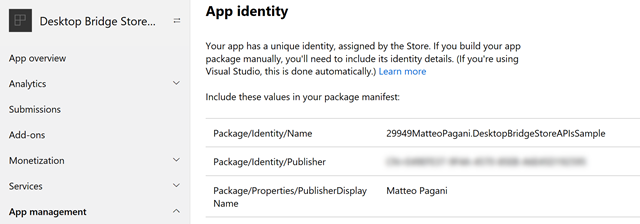
Click on it and you will be redirected to a page with all the info we’re looking for.
Take note of two values Package/Identity/Name and Package/Identity/Publisher. We’re going to pass them to the Desktop App Converter, using the –PackageName and –Publisher parameters, like in the following example:
DesktopAppConverter -Installer "setup.msi" -Destination "C:\ConvertedApp" -PackageName "29949MatteoPagani.DesktopBridgeStoreAPIsSample" -AppId "DesktopBridgeSample" -Publisher "CN=ABCDEFGH-1234-ABCD-1234-ABCD1234ABCD" -Version "1.0.0.0." -MakeAppx -Sign -Verbose
The –Name parameter must be set with the same value of the field Package/Identity/Name, while the –Publisher one with the value of the field Package/Identity/Publisher. Please note the usage of the –AppId parameter. Typically it’s an optional one but, in this scenario, it becomes required because, otherwise, the Desktop App Converter will try to set the Id attribute of the Application entry in the manifest with the same value assigned to the –PackageName parameter. The problem is that, as you can see in the previous image, most of the times the identity name assigned by the Dev Center starts with some numbers, which is a pattern not allowed by the manifest schema. Thanks to the –AppId parameter, you can avoid this issue by assigning a different value.
Thanks to this command, the output of the Desktop App Converter will be a package with the identity expected by the Dev Center and, as such, you won’t get any error when you will try to upload it during the submission.
However, this approach isn’t applicable all the times. In fact, you may already have converted your application using some test values and already started to apply changes, like changing assets, declaring extensions in the manifest, etc. Running the Desktop App Converter again would mean starting from scratch. Let’s remember, in fact, that the usage of the tool should be a one-time process, unless you need to capture changes in the dependencies or the registry keys handled by the traditional installer. Every time you need to release an update, you just need to replace the existing file in the PackageFiles folder generated by the Desktop App Converter and recreate the package. In these scenarios, you need to manually edit the manifest, by copying and pasting in the right XML attributes the values taken from the Dev Center.
As first step, open the AppxManifest.xml file with a text editor (I use Visual Studio Code, but you’re free to use the editor you like most) and identify the <Identity> tag. You will need to copy:
- The value of the Dev Center field Package/Identity/Name in the Name attribute.
- The value of the Dev Center field Package/Identity/Publisher in the Publisher attribute.
Here is how a correct <Identity> tag should look like:
<Identity Name="29949MatteoPagani.DesktopBridgeStoreAPIsSample" Publisher="CN=ABCDEFGH-1234-ABCD-1234-ABCD1234ABCD" ProcessorArchitecture="x86" Version="1.0.0.0" />
After you have changed the identity you’ll need to recreate the resources files, used to handle the various Windows 10 scaling factors. By default, in fact, these resources are signed with a digital certificate that is generated based on the identity declared in the manifest. As such, if you change the identity at a later stage, you may stumble across errors during the package creation. To fix this issue, just follow the guidance provided in the following blog post.
Now you’re ready to generate the package that must be submitted on the Store. We’re going to leverage the makeappx tool, which is included in the Windows 10 SDK. If you don’t have it, you can get it bundled with Visual Studio 2015 or 2017 (just make sure to choose the Universal Windows Platform development tools during the setup) or separately by downloading the following installer.
The easiest way to access to the tool is by using the special Visual Studio command prompt, which you can find in the Start menu. The name is Developer Command Prompt for followed by the Visual Studio version. It’s a regular command prompt, but with all the Windows 10 SDK path variables already configured, so that you can access to the built-in command line tools from every location. Now, using the cd command, move to the folder where you have stored the PackageFiles folder generated by the Desktop App Converter and run the following command:
makeappx pack -d "PackageFiles" -p "<name_of_the_package>.appx" -l
At the end of the process you’ll get an AppX file, which is the one you must upload during the submission process on the Dev Center. If you have already worked with the package generation process using command line tools, you’ll remember that before manually installing it on your machine you needed to use also the signtool application, in order to sign the package with a trusted certificate. In the Store submission scenario this operation isn’t needed. The package, in fact, will be automatically signed with the Store certificate during the submission process, so it’s not required to manually sign it.
Setting the right application name and publisher name
Another common mistake is when the display name and the publisher display name set in the manifest don’t match the ones defined in the Dev Center. Specifically:
- The display name must match the one you have reserved for the application
- The publisher display name must match the one you have chosen when you have opened your account
Also these two values can be retrieved from the App Identity page of the Dev Center we’ve seen before. The display name is displayed at the top of the left menu, while the publisher display name can be retrieved from the Package/Properties/PublisherDisplayName field in the page. Also in this case, there are two options to set these values.
If you’re using the Desktop App Converter, you can leverage the -PackageDisplayName and –PackagePublisherDisplayName parameters, like in the following example:
DesktopAppConverter -Installer "setup.msi" -Destination "C:\ConvertedApp" -PackageName "29949MatteoPagani.DesktopBridgeStoreAPIsSample" -AppId "DesktopBridgeSample" -Publisher "CN=ABCDEFGH-1234-ABCD-1234-ABCD1234ABCD" -Version "1.0.0.0" -PackageDisplayName "Desktop Bridge Sample" -PackagePublisherDisplayName "Matteo Pagani" -MakeAppx -Sign -Verbose
If, instead, you’re leveraging the manual packaging you will need to edit the DisplayName and PublisherDisplayName values inside the Properties section of the manifest, like in the following sample:
 <Properties>
  <DisplayName>Desktop Bridge Sample</DisplayName>
  <PublisherDisplayName>Matteo Pagani</PublisherDisplayName>
  <Logo>Assets\SampleAppx.150x150.png</Logo>
</Properties>
Matching the Store name with the name displayed in the Start menu
This issue is also very common and, unlike the others, can delay your plans of getting the app on the Store. The previous two mistakes, in fact, can be identified immediately: the Dev Center will return an error as soon as you try to upload the AppX during the submission process. This mistake, instead, doesn’t generate an error during the upload, but it will cause a certification failure.
In the manifest there’s an Application entry, which includes a child item called VisualElements that describes the look & feel of the package when it’s installed in Windows, like the assets, the name, etc. One of these attribute is called DisplayName and it’s the default name displayed in the Start menu, when the tile is pinned to the Start screen, etc. To improve the user experience and avoid confusion, this attribute must match the name you have reserved on the Dev Center. The goal is to avoid that the user installs your application from the Store and then he can’t find it in the Start menu because the two names are different.
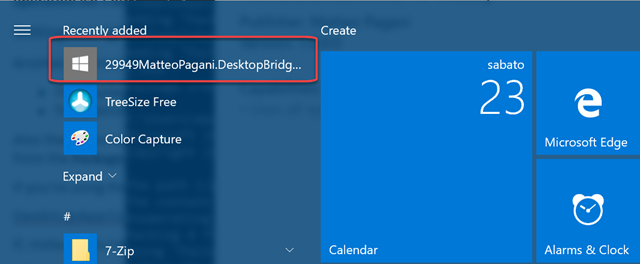
Also in this case, you can set this value directly during the Desktop App Converter’s conversion process by using the parameter –AppDisplayName. Even if technically it’s optional, if you have followed the guidance so far, however, it becomes required. The reasons is that, if you don’t specify it, the Desktop App Converter will use the same value set in the –PackageName parameter, which could lead to a bad result, as you can see in the following image:
Here is a sample command that make use of the –AppDisplayName parameter:
DesktopAppConverter -Installer "setup.msi" -Destination "C:\ConvertedApp" -PackageName "29949MatteoPagani.DesktopBridgeStoreAPIsSample" -AppId "DesktopBridgeSample" -Publisher "CN=ABCDEFGH-1234-ABCD-1234-ABCD1234ABCD" -Version "1.0.0.0" -PackageDisplayName "Desktop Bridge Sample" -PackagePublisherDisplayName "Matteo Pagani" -AppDisplayName "Desktop Bridge Sample" -MakeAppx -Sign -Verbose
If, instead, you want to proceed with the manual packaging, you need to edit the DisplayName attribute of the VisualElement entry with the same name you have reserved on the Dev Center, like in the following sample:
 <Applications>
  <Application Id="HelloCentennial" Executable="HelloCentennial.exe" EntryPoint="Windows.FullTrustApplication">
    <uap:VisualElements DisplayName="Desktop Bridge Sample" Description="HelloCentennial" BackgroundColor="#777777"
  Square150x150Logo="Assets\SampleAppx.150x150.png" Square44x44Logo="Assets\SampleAppx.44x44.png" />
   </Application>
</Applications>
Wrapping up
In this blog post we’ve seen some of the most common errors that developers make when they are ready to submit their Desktop Bridge application on the Store. Once you have received the ok from the Microsoft contact you’re working with to bring your desktop application on the Store, make sure to prepare the package in the right way!
Happy packaging!


