Chaining multiple installers with the Desktop App Converter
One of the key requirements of an app package deployed from the Store is that it must be self-contained: the application must run without asking to the user to manually install a set of libraries, a framework or a runtime. If this requirement is easy to satisfy with a regular UWP application, since they fully rely on the Universal Windows Platform that ships with Windows 10, it isn’t necessarily the case when it comes to desktop applications packaged with the Desktop Bridge. These applications, in fact, can be developed using also non-Microsoft technologies, like Java or Electron, or rely on a specific version of a library (like a specific version of DirectX or of the Visual Studio C++ runtime), which aren’t built-in in the operating system.
To solve this problem, usually traditional desktop installers include in the setup process of the application also the installer of the dependency or they trigger a remote download and a separate installation process. However, a Desktop Bridge application can’t use this approach: all the dependencies and required files should be included in the package and installed when the user downloads the app from the Store. The application can’t trigger, when it starts, the execution of a separate installer.
However, in many cases, these frameworks or libraries can’t simply be included as standalone inside the package, because the application looks for them in system folders like Windows, System32, Program Files, etc. To solve this scenario, the Desktop Bridge supports the concept of Virtual File System. Inside a package you can create a folder called VFS, which contains multiple folders that maps the various system folders, by following the naming schema described in the documentation at https://docs.microsoft.com/en-us/windows/uwp/porting/desktop-to-uwp-behind-the-scenes#file-system
| System location | Redirected location under [Package/VFS] | Valid on architectures |
| FOLDERID_SystemX86 | SystemX86 | x86, amd64 |
| FOLDERID_System | SystemX64 | amd64 |
| FOLDERID_ProgramFilesX86 | ProgramFilesX86 | x86, amd6 |
| FOLDERID_ProgramFilesX64 | ProgramFilesX64 | amd64 |
| FOLDERID_ProgramFilesCommonX86 | ProgramFilesCommonX86 | x86, amd64 |
| FOLDERID_ProgramFilesCommonX64 | ProgramFilesCommonX64 | amd64 |
| FOLDERID_Windows | Windows | x86, amd64 |
| FOLDERID_ProgramData | Common AppData | x86, amd64 |
| FOLDERID_System\catroot | AppVSystem32Catroot | x86, amd64 |
| FOLDERID_System\catroot2 | AppVSystem32Catroot2 | x86, amd64 |
| FOLDERID_System\drivers\etc | AppVSystem32DriversEtc | x86, amd64 |
| FOLDERID_System\driverstore | AppVSystem32Driverstore | x86, amd64 |
| FOLDERID_System\logfiles | AppVSystem32Logfiles | x86, amd64 |
| FOLDERID_System\spool | AppVSystem32Spool | x86, amd64 |
Whenever the user will launch your application, Windows will look for the dependencies in the VFS folder first. This approach helps also to solve the problem known as “DLL Hell”, which is very frequent in the desktop world. The term refers to the fact that you may have installed on your computer multiple applications that depends by the same framework or set of libraries. Since they are installed system-wide, all the applications will use the same one. However, this can cause issues if you have, for example, Application A which requires Framework X 1.0, while Application B requires Framework X 2.0. The more recent version can contain, in fact, breaking changes that could lead to Application A to stop working properly or to have issues we aren’t aware of, because we have never tested our application against it.
Thanks to the Virtual File System, each application will leverage its own specific version of the framework or the libraries. This way, if we install an application that requires a more recent version, it won’t break the already installed ones, since they will continue to leverage the libraries embedded in the package and not the system-wide version.
The easiest way to create the proper VFS structure required by the application is to use the Desktop App Converter. As you’ll probably know, this tool runs the traditional desktop installer of your application inside a container, it detects all the changes performed by the setup process (file system, registry keys, etc.) and exports the result into a Universal Windows Package. One of the changes detected by the tool are exactly dependencies: in these cases, the correct VFS infrastructure is automatically recreated inside the package, allowing the application to leverage it in the right way so that it doesn’t require a system-wide version installed on the user’s computer.
However, not all the desktop installers support this feature: there are many scenarios where the user is asked to manually install a dependency before starting the application. For these scenario, there’s an easy solution: chain multiple installers using a single batch file and then use it as a starting point of the Desktop App Converter.
Let’s see a real example!
Creating the batch file
As a sample for this scenario, I’m going to simulate that my application has a dependency from the Visual C++ runtime, specifically from version 10.0. Why using such an old version? If you are a regular reader of this blog, you’ll probably know that Visual C++ libraries are distributed by Microsoft also as Store packages. As such, as we have learned in another post, if your application has a dependency from them, you can simply declare it in the manifest file, like in the following sample:
 <Dependencies>
  <TargetDeviceFamily Name="Windows.Desktop" MinVersion="10.0.14393.0" MaxVersionTested="10.0.15063.0" />
  <PackageDependency Name="Microsoft.VCLibs.110.00.UWPDesktop" MinVersion="11.0.24217.0" Publisher="CN=Microsoft Corporation, O=Microsoft Corporation, L=Redmond, S=Washington, C=US" />
  <PackageDependency Name="Microsoft.VCLibs.140.00.UWPDesktop" MinVersion="14.0.24217.0" Publisher="CN=Microsoft Corporation, O=Microsoft Corporation, L=Redmond, S=Washington, C=US" />
</Dependencies>
This way, when the user installs the application from the Store, if he doesn’t have the Visual C++ libraries on his machine, Windows will take care of automatically downloading them too. However, the Store offers three versions of the library: 11.0, 12.0 and 14.0. As you can see, 10.0 isn’t supported and, as such, we need to use another approach to include it. This approach is exactly using the VFS folder. However, in a real scenario I faced working with a customer, we didn’t have an installer as a starting point, so the first tentative we did was to manually recreate the VFS folder and copy the dependencies from my Windows installation. However, it wasn’t an easy task: we haven’t been able to find a comprehensive list of all the DLLs copied by the Visual C++ runtime installer and the exact location where they are placed. As such, we were stuck in getting an error every the application was launched.
Thanks to a suggestion from Adam Braden from the Dev Platform team, we’ve been able to find a workaround that allowed us to move on and get the packaged application up & running: chain installers. The Desktop App Converter, in fact, doesn’t support just regular installers like a MSI file, but you can pass as –Installer parameter also a batch file. The tool will simply execute all the commands inside the file and then will export the changes. As such, I’ve first downloaded a simple free application (7-zip), in order to have a real setup process that could be executed inside the container, and then I’ve created a batch file that takes care of installing first the application and then VC++ runtime. Here is how the batch files look like:
 msiexec /i "7z1701-x64.msi" /quiet /qn /norestart
vcredist_x86.exe /q /norestart
As you can see, it’s simply a plain text file (which you’ll need to save with the .bat extension) that invokes the two installations, one after the other. The only difference compared to when we use the Desktop App Converter directly on a MSI installer is that, in this case, we have to manually specify the parameters which are required to perform a silent installation ( /quiet /qn /norestart). Since the DAC will receive, as input, a batch file and not a MSI one, it won’t be able to apply automatically these parameters.
Now that you have created the batch file, you simply need to run the Desktop App Converter as usual. The only difference is that the –Installer parameter will point to the batch file and not to a traditional setup, like in the following sample:
DesktopAppConverter -Installer "C:\Users\mpagani\Desktop\VCRedist\setup.bat" -Destination "C:\VCRedist-AppX" -PackageName "VCRedist" -Publisher "CN=mpagani" -Version "1.0.0.0" -Verbose
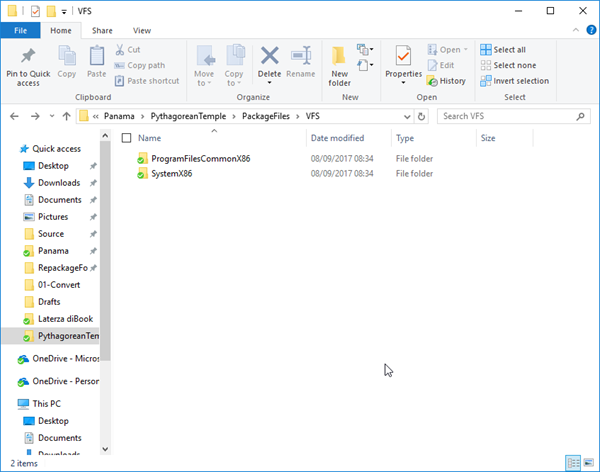
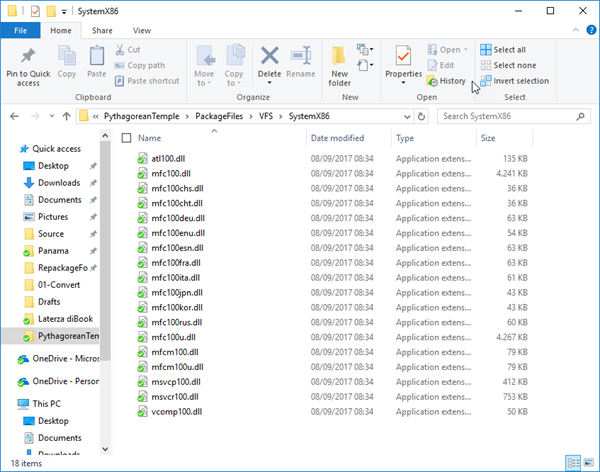
The DAC will run as usual: the only difference will happen under the hood. After spinning up the container, in fact, the tool will execute the batch file inside it, which will trigger the two installations, one after the other. Only when both of them are completed, the container will be stopped and the tool will export all the changes that have been applied, which will be a merge of the 7-Zip and the VC++ runtime installations. If you open the VFS folder stored inside the PackageFiles folder, which is created in the path that you have set in the –Destination parameter, you will see that our batch worked: the root of the package will contain the 7-zip application’s files, but also a VFS entry with two subfolders that map the system folders where the VC++ runtime has been installed (in this case, ProgramFilesCommonX86 which maps the system folder C:\Program Files (x86) and SystemX86, which maps the system folder C:\Windows\System32).
 |
 |
Thanks to this approach, I’ve been able to understand that, under the hood, the VC++ runtime installs more DLLs in the system than the ones I was trying to manually copy at the beginning of the process. After converting the batch file, it was easy to solve the problem: I just copied the whole content of the VFS folder inside the package of the developer I was working with and the application, this time, started to work as expected.
Wrapping up
In this post I used a “fake” setup combined with the dependency I needed (the VC++ 10 runtime) because I had a different scenario, but of course this approach works fine also when you have an installer you need to convert, but it has some dependencies which are expected to be manually downloaded from the user and, as such, they aren’t included as part of the setup process. Just create a batch that installs the dependency first and then the real application and pass it as –Installer parameter of the Desktop App Converter: if everything works as expected, you will end up with a completely self-contained version of the application. Remember, in these scenarios, to always make sure to:
- Read the license of the framework / library / runtime to understand if you are allowed to perform this kind of repackaging and distribution.
- Keep the framework / library / runtime up-to-date, especially when vendors release security updates, which are critical to keep the application safe. This is a general rule that applies to every application that uses a 3rd party component. Every time a new update is released, you should incorporate it in the VFS folder of the package and test your application, to make sure that everything continues to work as expected. Then, submit the new package with the updated framework on the Dev Center or distribute it using an enterprise tool, so that every user of your application will automatically get it.
Happy conversion!