Supporting “launch at startup” in a desktop app converted with the Desktop Bridge
One of the common requirements that many traditional desktop apps have is to support the “launch at startup” option: when the user logs in into his Windows PC, the application is automatically started, without requiring him to manually open it. It’s a way to speed up the workflow of the user and it’s leveraged especially by communications apps (like Skype, Slack, Telegram, Microsoft Teams, etc.), so that the user can be immediately connected with his friends and colleagues right after booting up his computer.
Is it possible to support this requirement also in a converted desktop app with the Desktop Bridge? Sure, thanks to one of the many special extensions that are available specifically for converted apps.
Enabling the feature
For this post, we’re going to take as a starting point the usual sample app I’ve used in every other blog post (HelloCentennial) and expand it to add this feature. You can grab, as usual, the original version of the project from my GitHub repository: https://github.com/qmatteoq/DesktopBridge/tree/master/1.%20Desktop%20App%20Converter/HelloCentennial
In this case, to achieve our goal, we’re going to leverage the classic manual approach based on the Desktop Bridge Debugging Project for Visual Studio 2017. As such, our starting point will be the same you can find in this folder of my repository: https://github.com/qmatteoq/DesktopBridge/tree/master/3.%20Convert
- A Windows Forms app, with the traditional desktop app
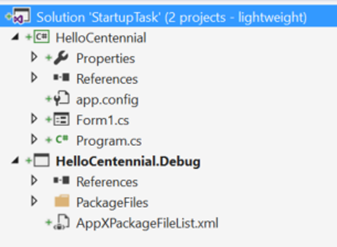
- A Desktop Bridge Debugging Project, with a PackageFiles folder that contains the manifest, the assets and the Win32 executables of the HelloCentennial desktop app (which are kept in sync thanks to the configuration described in the AppXPackageFileList.xml file).
Here is how the solution looks like:
As for every other extension, the starting point is always the manifest file. To add support to the “launch at startup” option, we need to leverage a feature called Startup Task, which must be added to the AppxManifest.xml file included in the PackageFiles folder of the Desktop Bridge Debugging Project. Here is how the extension definition looks like:
 <Extensions>
  <desktop:Extension Category="windows.startupTask" Executable="HelloCentennial.exe" EntryPoint="Windows.FullTrustApplication">
    <desktop:StartupTask TaskId="HelloCentennialTask" Enabled="true" DisplayName="Hello Centennial Startup Task" />
  </desktop:Extension>
</Extensions>
The extension is part of a specific set reserved for desktop apps so, in the Package entry of the manifest, you need to add the desktop namespace, as in the following sample:
 <?xml version="1.0" encoding="utf-8"?>
<Package xmlns="https://schemas.microsoft.com/appx/manifest/foundation/windows10"
         xmlns:uap="https://schemas.microsoft.com/appx/manifest/uap/windows10"
         xmlns:desktop="https://schemas.microsoft.com/appx/manifest/desktop/windows10"
         xmlns:mp="https://schemas.microsoft.com/appx/2014/phone/manifest"
         xmlns:rescap="https://schemas.microsoft.com/appx/manifest/foundation/windows10/restrictedcapabilities"
         IgnorableNamespaces="uap rescap mp desktop">

    <!-- content of the manifest -->

</Package>
The <desktop:Extension> element has two fixed attributes:
- Category, which must be windows.startupTask.
- EntryPoint, which must be Windows.FullTrustApplication
The custom attribute is Excecutable, which is a reference to the process that you want to launch at startup. In this case, it’s the same process of the main app (HelloCentennial.exe), but it isn’t a fixed requirement: it can be a different executable stored inside the same app package or you can even have multiple entries, in case you have multiple processes you need to run at startup.
Inside the <desktop:Extension> entry you need to define the real task, thanks to the <desktop:StartupTask> element. Here you can configure a set of important attributes:
- TaskId is the unique identifier of the task. It’s very important and we will see later why: we’ll need it in case we want to handle the task from the code of our desktop app.
- Enabled is a boolean value: we can set it to true if we want the startup feature to be automatically enabled when the app is launched for the first time or to false if, instead, we want to use an opt-in approach by the user.
- DisplayName is a simple string with the name of the task, that can act as a description of its purpose.
This is how the full AppxManifest.xml file of our converted app looks like:
 <?xml version="1.0" encoding="utf-8"?>
<Package xmlns="https://schemas.microsoft.com/appx/manifest/foundation/windows10"
         xmlns:uap="https://schemas.microsoft.com/appx/manifest/uap/windows10"
         xmlns:desktop="https://schemas.microsoft.com/appx/manifest/desktop/windows10"
         xmlns:mp="https://schemas.microsoft.com/appx/2014/phone/manifest"
         xmlns:rescap="https://schemas.microsoft.com/appx/manifest/foundation/windows10/restrictedcapabilities"
         IgnorableNamespaces="uap rescap mp desktop">
  <Identity Name="HelloCentennial" Version="1.0.0.0" Publisher="CN=mpagani" ProcessorArchitecture="x86" />
  <Properties>
    <DisplayName>Hello Centennial</DisplayName>
    <PublisherDisplayName>Matteo Pagani</PublisherDisplayName>
    <Logo>Assets\storelogo.png</Logo>
  </Properties>
  <Dependencies>
    <TargetDeviceFamily Name="Windows.Desktop" MinVersion="10.0.14393.0" MaxVersionTested="10.0.14393.0" />
  </Dependencies>
  <Resources>
    <Resource Language="en-us" />
  </Resources>
  <Applications>
    <Application Id="HelloCentennial" Executable="HelloCentennial.exe" EntryPoint="Windows.FullTrustApplication">
      <uap:VisualElements DisplayName="Hello Centennial" Description="Hello Centennial" BackgroundColor="transparent" Square150x150Logo="Assets\Square150x150Logo.png" Square44x44Logo="Assets\Square44x44Logo.png">
        <uap:DefaultTile Square310x310Logo="Assets\LargeTile.png" Wide310x150Logo="Assets\WideTile.png" Square71x71Logo="Assets\SmallTile.png">
        </uap:DefaultTile>
      </uap:VisualElements>
      <Extensions>
        <desktop:Extension Category="windows.startupTask" Executable="HelloCentennial.exe" EntryPoint="Windows.FullTrustApplication">
          <desktop:StartupTask TaskId="HelloCentennialTask" Enabled="true" DisplayName="Hello Centennial Startup Task" />
        </desktop:Extension>
      </Extensions>
    </Application>
  </Applications>
  <Capabilities>
    <Capability Name="internetClient" />
    <rescap:Capability Name="runFullTrust" />
  </Capabilities>
</Package>
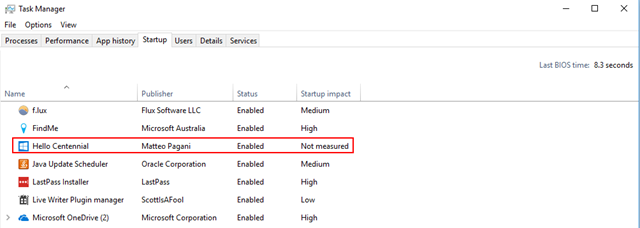
This is enough to enable the feature: launch the converted version of the app by setting, as startup project in is Visual Studio, the Desktop Bridge Debugging one and press F5. If you did everything correctly, your app will be now automatically enabled for startup: you can easily check it by right clicking on the taskbar in Windows, choosing Task Manager and move to the Startup tab. You should find your converted app in the list of apps that are allowed to run at startup:
There’s one important information to highlight: in order for the startup task to be properly registered, the app needs to be launched at least one time. It isn’t enough to side load the AppX or install the app from the Store to schedule the startup task.
Controlling the startup task from code
Having only the opportunity to define a startup task without giving the chance to the user or to the developer to control it wouldn’t be really useful: typically, all the traditional desktop apps that support this feature offer also a setting so that the user can control it and enable / disable the auto startup. We can achieve this goal thanks to a specific set of APIs which are part of the Universal Windows Platform. As such, if we want to include this feature in our converted app, we need to move to the Enhance phase: you can refer to one of the previous posts on this blog to learn how you can integrate UWP APIs inside a traditional desktop application.
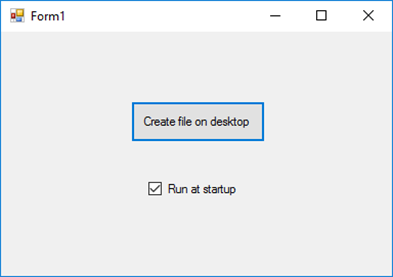
Once you have added a reference to the required libraries (either by manually adding a reference to the Windows.md and System.Runtime.WindowsRuntime files or by using the UWPDesktop NuGet package), you can access to the StartupTask class, which belongs to the Windows.ApplicationModel namespace. Let’s assume that we have modified the user interface of the basic HelloCentennial app to add a CheckBox control that reflects the status of the startup task: when it’s checked, the task is enabled and the application is launched at startup; when it’s unchecked, the task is disabled. This is the look and feel of the updated user interface:
As first step, I’ve subscribed to the Load event of the form, so that I can check the status of the task when the app starts and keep the user interface consistent:
 private async void Form1_Load(object sender, EventArgs e)
{
    var startupTask = await Windows.ApplicationModel.StartupTask.GetAsync("HelloCentennialTask");
    switch (startupTask.State)
    {
        case Windows.ApplicationModel.StartupTaskState.Disabled:
            chkBoxStartup.Checked = false;
            break;
        case Windows.ApplicationModel.StartupTaskState.DisabledByUser:
            chkBoxStartup.Checked = false;
            break;
        case Windows.ApplicationModel.StartupTaskState.Enabled:
            chkBoxStartup.Checked = true;
            break;
    }
}
Looking at the code, you’ll now understand the importance of the TaskId attribute of the <desktop:StartupTask> element in the manifest file: to get a reference in code to the startup task, we need to call the GetAsync() method of the StartupTask class passing, as parameter, the identifier we have declared in the manifest. Then we can use the State enumerator to understand which is the current status:
- Disabled and DisabledByUser are similar in terms of the final result: the task is disabled and the app isn’t launched at startup. The difference is that, in case it has been disabled by the user thanks to the option which is available in the Task Manager in the Startup section, only the user can reactivate it. The application can’t programmatically activate it again. However, from a UI point of view, in both cases we unselect the checkbox.
- Enabled means, instead, that the app is automatically launched at startup and, in this case, we mark the checkbox.
By using the same APIs, we can now allow the user to control the startup behavior: once we have a reference to the startup task object, in fact, we have access to some APIs to enable or disable it. The following sample shows the code that handles the Click event of the CheckBox control, which is invoked every time the user clicks on it:
 private async void chkBoxStartup_Click(object sender, EventArgs e)
{
    var startupTask = await Windows.ApplicationModel.StartupTask.GetAsync("HelloCentennialTask");
    if (startupTask.State == Windows.ApplicationModel.StartupTaskState.Enabled)
    {
        startupTask.Disable();
        chkBoxStartup.Checked = false;
        MessageBox.Show("The task has been disabled");
    }
    else
    {
        var state = await startupTask.RequestEnableAsync();
        switch (state)
        {
            case Windows.ApplicationModel.StartupTaskState.DisabledByUser:
                MessageBox.Show("The task has been disabled by the user");
                chkBoxStartup.Checked = false;
                break;
            case Windows.ApplicationModel.StartupTaskState.Enabled:
                MessageBox.Show("The task has been enabled");
                chkBoxStartup.Checked = true;
                break;
        }
    }
}
We get a reference to the startup task we have declared in the manifest identified by the HelloCentennialTask name. Then, by using again the State property, we check if the task is already enabled or not:
- If it’s enabled, it means that the user has clicked on the checkbox to disable it: we call the Disable() method on the object and we uncheck the CheckBox control.
- If it’s disabled, it means that the user has clicked on the checkbox to enable it: we call the RequestEnableAsync() method this time. This method returns a value of the StartupTaskState enumerator with the new status of the task, which can be useful to understand if the operation has completed with success or not. Remember, in fact, that if the task has been disabled by the user using the Task manager, the operation will fail and the returned state will be DisabledByUser. Based on the response, we also check or uncheck the Checkbox control.
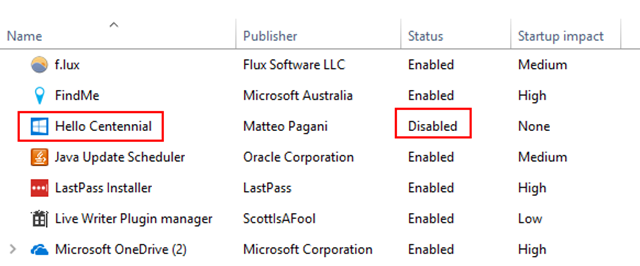
That’s all. If you now try to launch again the application, the checkbox will be selected: we have queried the status of the task, we have found out that it’s enabled and we have checked it. If you click on it to uncheck it, you’ll invoke the chkBoxStartup_Click event handler, which will call the Disable() method. Again, you can see the outcome by right clicking on the Windows taskbar and opening the Task Manager: this time, in the Startup section, you should see that the status of the task connected to the Hello Centennial app will be Disabled.
Let’s do another experiment. Enable the task again by clicking on the checkbox, then close the application. Now, in the Startup section of the Task Manager, right click on the Hello Centennial task and choose Disable. Now reopen the app: this time, the checkbox will be unchecked, since during the form load the StartupTask API will detect that the task status is DisabledByUser. Now click on the checkbox: this time you’ll get a message saying that the task has been disabled by the user and the checkbox will stay unchecked. This is expected: the task has been disabled by the user directly in Windows, so the app can’t enable it again on its own. It must be the user to return to the Task Manager, go to the Startup section, right click on the Hello Centennial startup task and choose Enable. Now the application will be able to control it again and you’ll be able to use the checkbox to enable or disable it.
Wrapping up
In this post we’ve learned how to enable a “launch at startup” experience also in a converted desktop app with the Desktop Bridge. As usual, you can find the sample used in this blog post on my GitHub repository at https://github.com/qmatteoq/DesktopBridge/tree/master/Extras/StartupTask
Happy coding!


