Desktop Bridge – Enhancing a desktop application with the UWP APIs
Update: this post has been updated on 11/21/2016 to reflect the official name of Visual Studio 15 announced at Connect() 2016, which is Visual Studio 2107
In the first post of the series we’ve learned how the Desktop Bridge is a series of tools created to bridge the gap between the existing Win32 world and the new UWP world, with the goal of combining the best of both of them.
So far, we’ve learned two different approaches to convert a Win32 app into a UWP app:
- Starting from an installer, which gets converted and packaged by a tool called Desktop App Converter.
- Starting from an executable or a Visual Studio project, which can be converted either manually or by leveraging an extension for the preview of the next Visual Studio version (codename VS15).
In this new post we’ll continue exploring the second scenario but, this time, we’re going to expand the existing Win32 application to start leveraging some new UWP features.
A Win32 developer may wonder why he should do such a thing: due to the higher security restrictions, in some cases a UWP app has to deal with some limitations compared to a Win32 app, so why a developer should be interested into integrating these kind of APIs?
As I’ve already stated in the previous articles, the digital world has gone through a deep change in the last years and now users are acquainted with new and different ways of interacting with computers and devices: speech, pen, notifications, touch screens, etc. These are all scenarios which are greatly supported by the Universal Windows Platform and that can be implemented in a much easier and powerful way compared to what you can do now with a traditional Win32 app.
Think, for example, about notifications: a Win32 app has always been able to notify an event to the user through a popup or a message in the system tray. But these approaches don’t fully integrate with the Windows ecosystem. A toast notification generated by a UWP application, instead, has a UI consistent with the rest of the operating system; it gets stored in the Action Center, so the user can always retrieve it even if he missed it; it can be actionable, so the user can perform tasks without evening opening the app. And what if you want to receive a notification when the app isn’t running? In this case, you would need to create a Windows Service or keep the app always opened, even if minimized, instead of relying on more efficient architectures like push notifications.
Another great example is monetization: if you’re a developer, you’ll know how hard it’s to sell and monetize a desktop application: you need to create a website, promote it, establish a payment account, etc. The Universal Windows Platform includes a set of APIs to integrate directly with the Store and easily enable scenarios like in-app purchases, advertising or trial modes.
As you can see, there are tons of scenarios where integrating UWP APIs into a Win32 app makes a lot of sense. So, let’s do it! In this article we’ll start from the same Windows Forms application we’ve created in the previous post, but we’ll add a new feature: every time the text file is created on the desktop, we’re going to show a toast notification to the user to confirm that the operation has been completed with success.
Including a reference to the Universal Windows Platform
As we’ve just mentioned, the starting point will be the same Windows Forms app used in the previous article, which you can download from GitHub: https://github.com/qmatteoq/DesktopBridge/tree/master/3.%20Convert
Just remember that, to create this sample app, we’re using the approach provided by Visual Studio 2017 to launch the Windows Forms app inside the UWP container: as such, the solution can be opened only by Visual Studio 2017 RC with the proper extension installed. If you’re going to open it with Visual Studio 2015, you’ll be able to see just the Windows Forms app. This approach has been described in the previous post.
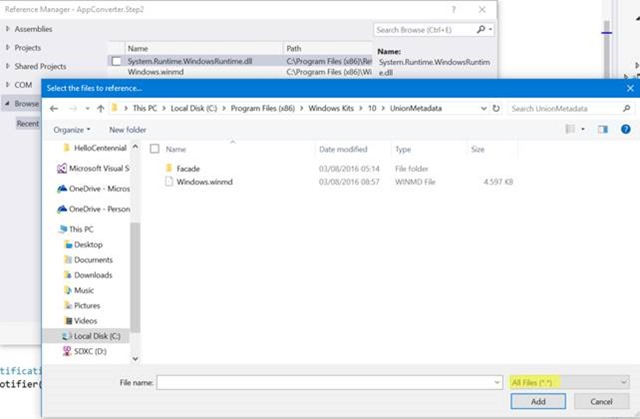
However, for the moment we’ll focus on the Windows Forms app, since it’s where we need to start integrating the UWP APIs. The first thing we need is to make the Universal Windows Platform visible to the Windows Forms app: by default, it runs on the .NET Framework, so it doesn’t have access to the UWP APIs. We need to add a reference to the metadata file that contains the definition of all the supported APIs: it’s called Windows.md and we can find it in the following path on our computer C:\Program Files (x86)\Windows Kits\10\UnionMetadata.
Consequently, the first step is to right click on the Windows Forms project in Solution Explorer, choose Add reference, press Browse and look for this file.
Just remember, as highlighted in the above image, to change the dropdown filter from Component files to All files. By default, in fact, the reference dialog for a Win32 app allows only to include standard .NET components, like DLLs or executables, while a WinMD file is something that belongs to the Windows Runtime ecosystem.
Once you’ve done this operation, you’ll now be able to use a subset of the UWP APIs when the app is packaged and launched as a UWP app. You can find a detailed list of the supported APIs in the following page: https://msdn.microsoft.com/en-us/windows/uwp/porting/desktop-to-uwp-supported-api
Now that we have access to the Universal Windows Platform, we can start writing the code that is able to generate a toast notification, which should be familiar to you if you have some previous experience with UWP development:
 public void ShowNotification()
{
    string xml = @"<toast>
                    <visual>
                        <binding template='ToastGeneric'>
                            <text>Desktop Bridge</text>
                            <text>The file has been created</text>
                        </binding>
                    </visual>
                </toast>";

    Windows.Data.Xml.Dom.XmlDocument doc = new Windows.Data.Xml.Dom.XmlDocument();
    doc.LoadXml(xml);

    ToastNotification toast = new ToastNotification(doc);
    ToastNotificationManager.CreateToastNotifier().Show(toast);
}
Toast notifications are represented by a XML payload, which defines the structure and the content of the toast notification. In this sample, we’re using a very simple template which has just a title (the first text entry) and a message (the second text entry).
After defining the string with the XML payload, we can actually start to use some real UWP APIs: first, we need to convert the string into a XmlDocument object, which is part of the Universal Windows Platform (you can notice, in fact, that it belongs to the namespace Windows.Data.Xml.Dom, which isn’t part of the .NET Framework).
The second step is to create a ToastNotification object (again, a UWP class that belongs to the Windows.UI.Notifications namespace) and to pass, as parameter, the XmlDocument we have just created. In the end, we use the ToastNotificationManager class to create a notifier object to show the notification by calling the Show() method.
Now we’re going to change a bit the code connected to the button to generate the text file, by calling this new method right after the file creation:
 private void OnCreateFile(object sender, EventArgs e)
{
    string userPath = Environment.GetFolderPath(Environment.SpecialFolder.DesktopDirectory);
    string fileName = $"{userPath}\\centennial.txt";
    File.WriteAllText(fileName, "This file has been created by a Centennial app");
    ShowNotification();
}
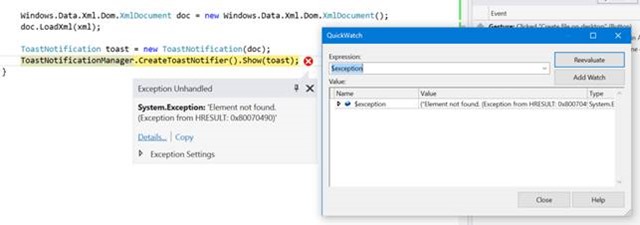
That’s all: as you can see, from a code point of view, the operation is very simple. One important thing to highlight is that accessing to the Universal Windows Platform from a Win32 app is achievable only through the Desktop Bridge. You can easily see this requirement by directly launching the Windows Forms app as a native Win32 one: as soon as you click the button, the file will be created, but you’ll get an exception on the ShowNotification() method, like in the following image:
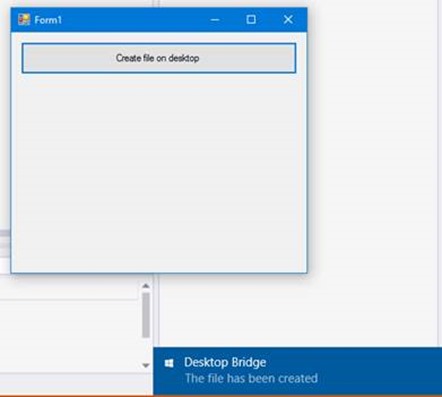
If, instead, you follow one of the two approaches described in the previous post to package the Win32 app into a UWP container (the manual one with the makeapp.exe tool or the automatic one based on the Desktop to UWP Packaging Project available in Visual Studio 2017), you will properly see the toast notification appearing on your screen:
Keeping a foot in both camps
The previous code has a defect: it’s cool to start leveraging some UWP APIs without having to rewrite the app but, at the same time, we may not be ready yet to go Windows 10 only. So far, Windows 10 is the fastest growing operating system both in the consumer and enterprise world, but you may still have some customers which are relying on previous versions of the OS, like Windows 7 or 8.x. In this scenario, we would need to maintain two separate branches of our Windows Forms app: one that just writes the file on the desktop and another one that, additionally, sends the toast notification.
We have just seen, in fact, that if we launch our Windows Forms app outside the UWP container, we get an exception when we try to show the notification. This is the same experience that a Windows 7 or 8.x user would get: a crash as soon as we try to send the notification, since Windows versions prior to Windows 10 don’t have the Universal Windows Platform.
However, thanks to conditional compilation, we can avoid to keep two separate branches: we can make sure that the UWP code is compiled and executed only when the app is running as an AppX package, while keeping the regular flow when it’s running as a regular Windows Forms app.
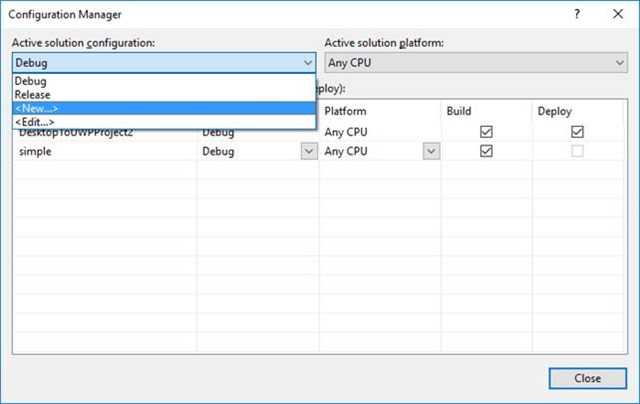
Let’s see how to do it. First, we need to create a new build configuration, that we’re going to use only when we build the app through the Desktop to UWP deployment project.
In Visual Studio go to Build -> Configuration Manager, click on the dropdown labeled Active solution configurations and choose New:
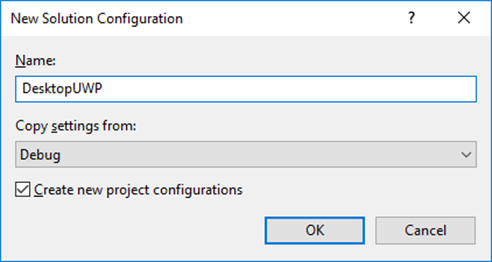
Give a meaningful name to the new configuration (like DesktopUWP) and choose to copy the settings from the Debug configuration in the dropdown menu.
Now right click on the Windows Forms project and choose Properties. In the Build section, make sure to select the new DesktopUWP configuration from the Configuration dropdown menu and add, in the general section, a new conditional compilation symbol (to make things simpler, we’re going to reuse the same name of the configuration, which is DesktopUWP):
We can now change a little bit our code, by adding a conditional compilation attribute to our method that shows the notification:
 [Conditional("DesktopUWP")]
public void ShowNotification()
{
    string xml = @"<toast>
            <visual>
                <binding template='ToastGeneric'>
                    <text>Desktop Bridge</text>
                    <text>The file has been created</text>
                </binding>
            </visual>
        </toast>";

    Windows.Data.Xml.Dom.XmlDocument doc = new Windows.Data.Xml.Dom.XmlDocument();
    doc.LoadXml(xml);

    ToastNotification toast = new ToastNotification(doc);
    ToastNotificationManager.CreateToastNotifier().Show(toast);
}
Thanks to this attribute, this method will be compiled (and executed) only if we are building the application using the DesktopUWP configuration. If we are compiling our project with any other configuration, it will be like if the method doesn’t even exist: it won’t even be included inside the executable generated by Visual Studio.
From now on:
- Every time you need to create the executable to be launched on a Windows 7 or Windows 8.1 machine, use the Debug or Release configuration.
- Every time you need to package the app using the Desktop Bridge, use the DesktopUWP configuration.
There’s one last step to do: when we created the DesktopUWP configuration, Visual Studio has also created a new subfolder into the bin folder where to deploy the build output. As such, in the bin folder of the Windows Forms project, we won’t have any more just the Debug and Release folders, but also a new one called DesktopUWP:
The executable stored in this new folder is the one that will use the UWP APIs, so it’s the one that we need to copy in the PackageLayout folder, so that it can be included in the AppX package that we will generate. As such, here is how we need to change the AppXPackageFileList.xml file of the Desktop to UWP deployment project:
 <?xml version="1.0" encoding="utf-8"?>
<Project ToolsVersion="14.0" xmlns="https://schemas.microsoft.com/developer/msbuild/2003">
  <PropertyGroup>
    <MyProjectOutputPath>$(PackageLayout)\..\..\AppConverter.Step2\bin</MyProjectOutputPath>
  </PropertyGroup>
  <ItemGroup>
    <LayoutFile Include="$(MyProjectOutputPath)\DesktopUWP\AppConverter.Step2.exe">
      <PackagePath>$(PackageLayout)\AppConverter.Step2.exe</PackagePath>
    </LayoutFile>
  </ItemGroup>
</Project>
As you can see, we changed the subfolder Debug with DesktopUWP.
You can easily test this code by placing a breakpoint in the OnCreateFile() event handler:
- If you set as startup project the Windows Forms one and you launch it, you’ll notice that the file will be created but the ShowNotification() method will be completely ignored.
- If you set as startup project the Desktop to UWP deployment project and you launch it, this time the ShowNotification() method will be invoked and the toast notification will be displayed.
Goal achieved! Now you can have the same exact application running just fine both on Windows 10 (and leveraging, at the same time, some new UWP features) and on Windows 8.x, 7 or even earlier.
Using asynchronous methods
If you have some previous experience with the Windows Runtime or the Universal Windows Platform, you’ll know that it’s built with great performances in mind: consequently, every operation that could take more than 50 ms to be completed is implemented using the async / await pattern. This way, it’s easier for the developer to keep the UI of his application always responsive, no matter how long it can take for the operation to be completed.
However, if you try to use one of the asynchronous UWP APIs in a Win32 app out of the box, Visual Studio won’t be able to compile the project. Let’s see a real example by adding a new Windows 10 feature to our application: speech. We want our application to be able to synthetize a voice and to save it into an audio file. Again, this is another scenario where the Universal Windows Platform can be really helpful, since it provides a set of simple yet powerful APIs to integrate natural user interactions in the app.
Let’s add another button to the Windows Forms app using the designer and handle the Click event with the following method:
 private async void OnGenerateAudio(object sender, EventArgs e)
{
    SpeechSynthesizer speech = new SpeechSynthesizer();
    var result = await speech.SynthesizeTextToStreamAsync("Hello cenntennial");

    string userPath = Environment.GetFolderPath(Environment.SpecialFolder.DesktopDirectory);
    string fileName = $"{userPath}\\speech.wav";

    using (FileStream stream = File.Create(fileName))
    {
        await result.AsStreamForRead().CopyToAsync(stream);
        await stream.FlushAsync();
    }
}
As you can see, thanks to the UWP APIs, achieving our task is just a couple of lines of code: we use the SpeechSynthesizer class (which belongs to the UWP Windows.Media.SpeechSynthesis namespace) and the SynthesizeTextToStreamAsync() method, which takes as input the text we want to synthesize and converts it into an audio stream.
The rest of the code is purely based on the standard .NET Framework: we create a file on the user’s desktop (called speech.wav), we open it for writing and we copy inside it the audio stream we’ve previously obtained.
As you can see, the method has been configured to use the async / await pattern: in the method’s signature we’ve added the async keywordand we prefixed the invocation of the SynthesizeTextToStreamAsync() method with the await keyword. However, you’ll notice immediately that Visual Studio will show you an error, complaining about the lack of an implementation of the GetAwaiter() method:
To solve this problem, we need to add another reference to our Windows Forms project, which isn’t added by default since it’s part of the .NET Core framework. The name of the library is System.Runtime.WindowsRuntime.dll and we can find it in the following path: C:\Program Files (x86)\Reference Assemblies\Microsoft\Framework\.NETCore\v4.5.1
After adding this reference to the project, you’ll notice that the error will disappear and you’ll be able to compile the Windows Forms application just fine. If you want to test this new feature, again, remember that you’ll have to follow the steps described in the previous article: you’ll have to manually create an AppX package or launch the deployment and debugging using a Desktop to UWP Packaging Project created with Visual Studio 2017. If you have done everything correctly, you will find on your desktop an audio file called speech.wav with a synthetized voice pronouncing the sentence “Hello centennial”.
Wrapping up
In this article we’ve seen how we can start moving our Win32 application forward by integrating to integrate APIs which belong to the Universal Windows Platform.
You can download the full sample code used in this article from the usual GitHub repository: https://github.com/qmatteoq/DesktopBridge/tree/master/4.%20Enhance
In the next post we’ll do another step forward and we’ll see another way to detect if the app is running inside the UWP container or not and, consequently, furtherly optimizing the application for Windows 10 and keeping, at the same time, a single code base.
